并发编程系列: 线程基础
改不完的 Bug,写不完的矫情。公众号 杨正友 现在专注音视频和 APM ,涵盖各个知识领域;
只做全网最Geek的公众号,欢迎您的关注!
线程的合理使用对于Android开发来说,确实非常重要,一年前我也零零散散写了两篇Android讯息邮差-线程和线程切换 和锁机制的文章,现在回过头复习,稍微有点浅显,所以准备将这些碎片化的知识点系统整理一下,希望看完整个系列文章的你以后可以自信的告诉我: 多线程,我不怕,放马过来吧。面试官这些八股文咱都是手把手实践过的,还为难我就说不过去了吧~
- 开启线程的5种方式?
- 线程和进程的区别?为什么要有线程,而不是仅仅用进程?
- run()和start()方法区别
- 如何控制某个方法允许并发访问线程的个数?
- 在Java中wait和seelp方法的不同;
- 谈谈wait/notify关键字的理解
- 什么导致线程阻塞?
- 线程如何关闭?
- 讲一下java中的同步的方法
- 数据一致性如何保证?
- 如何保证线程安全和同步?
- 两个进程同时要求写或者读,能不能实现?如何防止进程的同步?
- 线程间操作List
- Java中对象的生命周期
- 谈谈对Synchronized关键字,类锁,方法锁,重入锁的理解
- static synchronized 方法的多线程访问和作用
- 同一个类里面两个synchronized方法,两个线程同时访问的问题
- synchronized 和volatile 关键字的区别
- synchronized与Lock的区别
- volatile 、synchronized和ReentrantLock的用法,区别原理和内部实现
- lock原理
- 死锁的四个必要条件?怎么避免死锁?
- 对象锁和类锁的区别
- 什么是线程池,如何使用?
- Java的并发、多线程、线程模型
- 多线程有什么要注意的问题?
- 谈谈你对多线程同步机制的理解?
- 如何保证多线程读写文件的安全?
- 多线程断点续传原理和实现
本系列计划出三个系列,系列一线程池已经出了,还没来的及关注我的账号的小伙伴赶紧前去复习一下吧。
一. 线程的创建方式
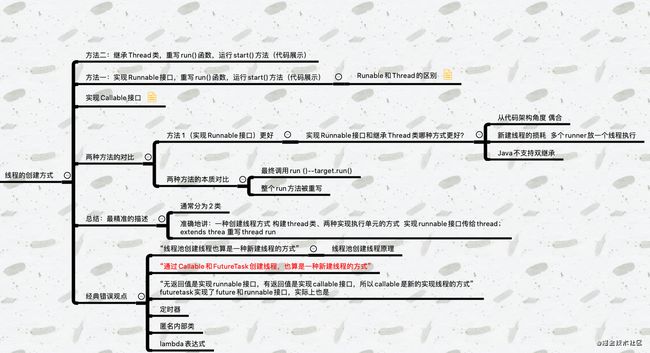
Oracle 官方提供了线程创建的两种方式,分别为
1.1 线程的创建方式类型
方法一: 继承Thread类
/**
 * 使用 Thread 类来定义工作
 */
public class ThreadDemo implements TestDemo {

    @Override
    public void runTest() {


        Thread thread = new Thread() {

            @Override
            public void run() {

                System.out.println("Thread started!");
            }
        };
        thread.start();

    }
}
打印结果
Thread started!
方法二: 实现Runnable接口
/**
  * 使用 Runnable 类来定义工作
  */
 public class RunnableDemo implements TestDemo {

     @Override
     public void runTest() {

         Runnable runnable = new Runnable() {

             @Override
             public void run() {

                 System.out.println("Thread with Runnable started!");
             }
         };

         Thread thread = new Thread(runnable);
         thread.start();
     }
 }
打印结果
Thread with Runnable started!
使用实现Runnable接口。目前理解的好处有两个:
- 可以突破单继承的局限
- 可以实现代码的重用,多个Thread公用Runable。
1.2 线程的创建方式的区别
那么线程池创建的两种方式有什么区别呢?
从代码架构角度偶合来说,实现Runnable接口其实更优于继承Thread类,因为
-
因为Java不支持双继承,实现Runnable接口是将多个runner放一个线程执行,而新建线程的损耗会更大
-
其实看源码也知道: 这两个方式 Runnable接口调用run ()的target.run(),但是继承Thread类整个 run()方法都被重写了
关于线程的经典错误观点
我们再看看民间那额外的三种线程创建的经典说法吧~
错误一:❌ 经典错误观点 “线程池创建线程也算是一种新建线程的方式”
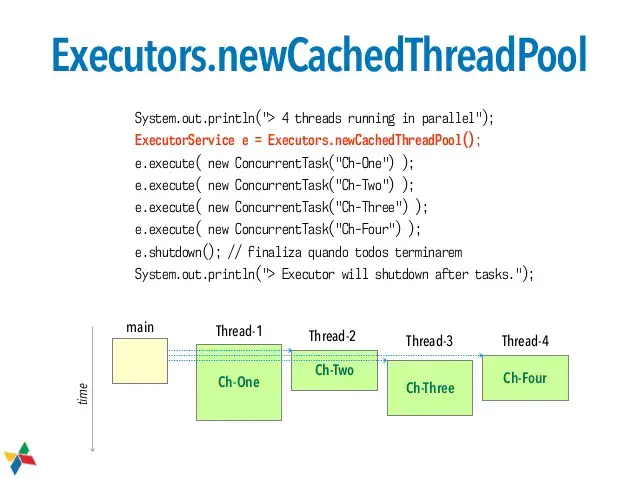
对线程池不太了解的同学建议看一下我之前写的简易版文件下载,这里还是简单的和大家聊一下可缓存线程池:
可缓存线程池
- 常用线程池
public class ExecutorDemo implements TestDemo {

    @Override
    public void runTest() {

        Runnable runnable =   new Runnable() {

            @Override
            public void run() {

                System.out.println("Thread with Runnable started!");
            }
        };

        final ExecutorService executor = Executors.newCachedThreadPool();
        executor.execute(runnable);
        executor.execute(runnable);
        executor.execute(runnable);
    }
}
打印日志如下:
Thread with Runnable started!
System.out: Thread with Runnable started!
- 短时批量处理
 ExecutorService executor = Executors.newFixedThreadPool(20);

        for   (Bitmap bitmap : bitmaps) {

            executor.execute(bitmapProcessor(bitmap));
        }
        executor.shutdown();
其实线程池管理的还是线程,看我之前写的线程池系列大概有简单分析了一些线程池的源码,所以不能理解为线程池创建线程也算是一种新建线程的方式
错误二❌: 通过Callable和FutureTask创建线程,也算是一种新建线程的方式
public class CallableDemo implements TestDemo {

    @Override
    public void runTest() {

        final Callable<String> callable = new Callable<String>() {

            @Override
            public String call() throws Exception {


                try {

                    Thread.sleep(1500);
                } catch (InterruptedException e) {

                    e.printStackTrace();
                }
                return "Done!";
            }
        };

        final ExecutorService executor = Executors.newCachedThreadPool();
        final Future<String> future = executor.submit(callable);

        try {

            final String result = future.get();
            System.out.println("result: " + result);
        } catch (Exception e) {

            e.printStackTrace();
        }
    }
}
打印日志如下:
result: Done!
那么问题来了,Callable(Future) 和 Runnable 相比有什么不一样呢?
Callable VS Runnable:
- Callable 可以有返回值
- Callable 可以抛出异常
因为多了返回值,所以在运行时需要接受Callable的返回结果,就得使用Future接口的实现类来获取结果。常见的Future实现类有FutureTask。紧接着我们看看: ThreadFactory
错误三❌: 通过ThreadFactory创建线程,也算是一种新建线程的方式
public class ThreadFactoryDemo implements TestDemo {

      @Override
      public void runTest() {

          ThreadFactory factory = new ThreadFactory() {

              @Override
              public Thread newThread(Runnable r) {

                  AtomicInteger count = new AtomicInteger(0);
                  return new Thread(r, "Thread-" + count.incrementAndGet());
              }
          };


          Runnable r = new Runnable() {

              @Override
              public void run() {

                  System.out.println(Thread.currentThread().getName() + " started!");
              }
          };

          final Thread thread = factory.newThread(r);
          thread.start();
          final Thread thread1 = factory.newThread(r);
          thread1.start();
      }
  }
打印日志如下:
Thread-1 started!
Thread-1 started!
错误四❌: 匿名内部类
错误五❌: 定时器
错误六❌: lambada表达式
二. 启动线程的正确和错误的方法
2.1 start()
start 它的作用是启动一个新线程。
通过start()方法来启动的新线程,处于就绪(可运行)状态,并没有运行,一旦得到cpu时间片,
就开始执行相应线程的run()方法,这里方法run()称为线程体,它包含了要执行的这个线程的内容,run方法运行结束,此线程随即终止。
start()不能被重复调用。用start方法来启动线程,真正实现了多线程运行,即无需等待某个线程的run方法体代码执行完毕就直接继续执行下面的代码。
这里无需等待run方法执行完毕,即可继续执行下面的代码,即进行了线程切换
2.2 run()
run()就和普通的成员方法一样,可以被重复调用。
如果直接调用run方法,并不会启动新线程!
程序中依然只有主线程这一个线程,其程序执行路径还是只有一条,还是要顺序执行,还是要等待run方法体执行完毕后才可继续执行下面的代码,这样就没有达到多线程的目的。
  static void pong(){

        System.out.print("pong");
    }
    public static void main(String[] args) {

        Thread t=new Thread(){

            public void run(){

                pong();
            }
        };
        t.run();
        System.out.print("ping");
    }
代码执行结果
pongping
简单总结一下:
- start() 需要获取cpu资源 上下文,才可以启动一个新线程,run()不能
- start()不能被重复调用,否则会出现 illegalThreadStateException run()可以
- start()中的run代码可以不执行完就继续执行下面的代码,即进行了线程切换。直接调用run方法必须等待其代码全部执行完才能继续执行下面的代码。
- start() 实现了多线程,run()没有实现多线程。
- start() 调用顺序不一定代表执行程序 需要调度器去配置
三. 如何正确停止线程?
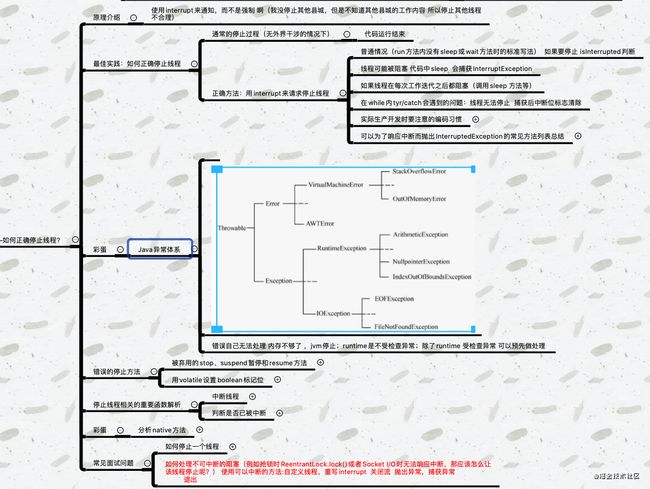
涉及到线程的交互问题,很多同学可能很快想到stop()方法,其实点进源码发现: 其实 stop() 已经早被官方废弃掉了的过时方法,那么为什么官方要废弃它呢?
原理介绍
stop 是强制停止线程的意思,如果使用stop强制停止,其他线程正在工作,但是不知道当前线程并不知道其他线程的工作内容,而线程操作存在原子性问题,这样很容易出现数据紊乱,所以停止其他线程是很不合理,建议使用interrupt来通知
我们看一段:
public class SynchronizedObject {

    private String name = "a";
    private String password = "aa";

    public synchronized void printString(String name, String password){

        try {

            this.name = name;
            Thread.sleep(100000);
            this.password = password;
        } catch (InterruptedException e) {

            e.printStackTrace();
        }
    }

    public String getName() {

        return name;
    }

    public void setName(String name) {

        this.name = name;
    }

    public String getPassword() {

        return password;
    }

    public void setPassword(String password) {

        this.password = password;
    }
}

public class MyThread extends Thread {

    private SynchronizedObject synchronizedObject;
    public MyThread(SynchronizedObject synchronizedObject){

        this.synchronizedObject = synchronizedObject;
    }

    public void run(){

        synchronizedObject.printString("b", "bb");
    }
}

public class Run {

    public static void main(String args[]) throws InterruptedException {

        SynchronizedObject synchronizedObject = new SynchronizedObject();
        Thread thread = new MyThread(synchronizedObject);
        thread.start();
        Thread.sleep(500);
        thread.stop();
        System.out.println(synchronizedObject.getName() + "  " + synchronizedObject.getPassword());
    }
}
打印一下日志:
b
aa
咦,看到了没有调用stop() 计算的结果不是 (b, bb),而是一直小于(b,aa)呢?
stop() 强制结束了线程,这样就可能会造成不可预知错误
通常线程在无外界干涉的情况下,代码执行结束后,会自动停止线程,那么我们该如何认为的停止我们的线程执行呢?
普通情况
- 如果Thread的run方法内有 sleep(线程在每次工作迭代之后都阻塞) 或wait方法时的标准写法,如果线程发生阻塞,那么相对应的代码中sleep就会捕获InterruptException,这个在IDEA编译器在编译期是帮我们处理了的
- 没有的话,如果要停止,我们需要加一个中断位isInterrupted作为判断依据。
- 在while内tyr/catch会遇到的问题:线程无法停止,捕获后中断位标志清除
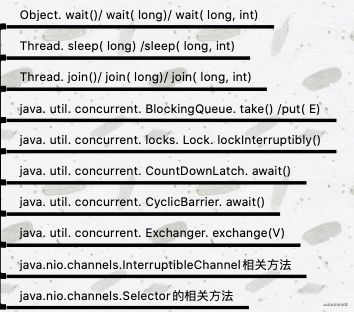
为了响应中断而抛出InterruptedException的方法,我这边简单的给大家总结一下常见的方法列表:
那么实际开发中,我们怎样去处理这种线程中断的问题呢?
-
- 优先选择:传递中断 在方法签名中全抛出异常 使用者必须捕获异常 ;
- 1.1 否则方法自己捕获了异常就会导致日志被刷新 ,无法响应中断,方法自己把中断信息吞掉,Thread的run方法只能捕获,不能抛InterruptedException
-
- 不想或无法传递:恢复中断
- 2.1 在catch语句中调用Thread.currentThread()。Interrupt(来恢复中断 就可以根据isInterrupt判断)
-
- 不要吞掉(屏蔽)中断
我们稍微改造一下:
 public class MyThread extends Thread {

    public void run(){

        super.run();
        for(int i=0; i<500000; i++){

            if(this.interrupted()) {

                System.out.println("线程已经终止, for循环不再执行");
                break;
            }
            System.out.println("i="+(i+1));
        }
    }
}

public class Run {

    public static void main(String args[]){

        Thread thread = new MyThread();
        thread.start();
        try {

            Thread.sleep(2000);
            thread.interrupt();
        } catch (InterruptedException e) {

            e.printStackTrace();
        }
    }
}
打印一下日志:
20000
20000
这样结果就对了吧,这里使用的是异常法来处理线程终止问题,当然我们也可以这么做:
public class MyThread extends Thread {

    public void run(){

        while (true){

            if(this.isInterrupted()){

                System.out.println("线程被停止了!");
                return;
            }
            System.out.println("Time: " + System.currentTimeMillis());
        }
    }
}

public class Run {

    public static void main(String args[]) throws InterruptedException {

        Thread thread = new MyThread();
        thread.start();
        Thread.sleep(2000);
        thread.interrupt();
    }
}
将方法interrupt()与return结合使用也能实现停止线程的效果,不过整体而言,异常法是要优于这种方式实现线程的停止的,因为在catch块中还可以将异常向上抛,使线程停止事件得以传播。
线程终止总结
正确✔️的方法:
Thread.interrupt()代表的是温和式结束,不终结,不强制
- interrupted() 和 isInterrupted(): 检查(和重置)中断状态
- InterruptedException:如果线程在等待时中断,或在中断状态等待,直接结束等待过程,因为等待过程什么也不会做
- 而 interrupt() 的目的是为了让线程做完,收尾工作尽快终结,所以要跳出等待工作
错误❌的方法:
- 使用
stop的后果: 会使线程运行到一半,突然停滞没法保证一个基本单位的操作 ;- 会释放所有的
monitor
- 会释放所有的
suspend暂停和resume的后果: 带着锁去休息会导死锁- 用
volatile设置boolean标记位- 如果作为一个标志位 修改它的状态 是可以的
- 但是,在生产者消费者模型里面,由于生产者生产速度很快,导致线程阻塞的时候,线程也不会停下来
- 如果作为一个标志位 修改它的状态 是可以的
所以还是得再 while(canceled){ storage.put(num)) ,做Interrupt标记中断处理
关于Interrupt,还有一个误区: Interrupt 一定能中断线程吗?
给大家分享一个案例:
boolean islnterrupted()
islnterrupted 代表的是: 返回当前线程是否被中断 并且清空状态,操作的是任意对象,如果是其他线程肯定不管用了
还有一个问题就是:
如何处理不可中断的阻塞(例如抢锁时ReentrantLock.lock()或者Socket I/O时无法响应中断,那应该怎么让该线程停止呢?
使用可以中断的方法:自定义线程,重写interrupt,关闭流,抛出异常,捕获异常退出
interrupt方法原理
那么中断线程的原理是怎么样的呢? 它底层调用的是 native interrupt0(),将设置interrupted状态为true,然后_SleepEvent就是对应Thread.sleep方法,其次((JavaThread*)thread)->parker()就是对应LockSupport.park方法,最后_ParkEvent就是对应synchronized同步块及Object.wait方法
说了这么多,如果面试官问你这一个问题,你该如何回答,面试官才会给你加鸡腿呢?我们可以从三个方面回答:
-
- 原理:用interrupt来请求、好处
-
- 想停止线程,要请求方、被停止方、子方法被调用方相互配合
-
- 最后再说错误的方法:stop/suspend已废弃,volatile的boolean无法处理长时间阻塞的情况
四. 线程的6个状态
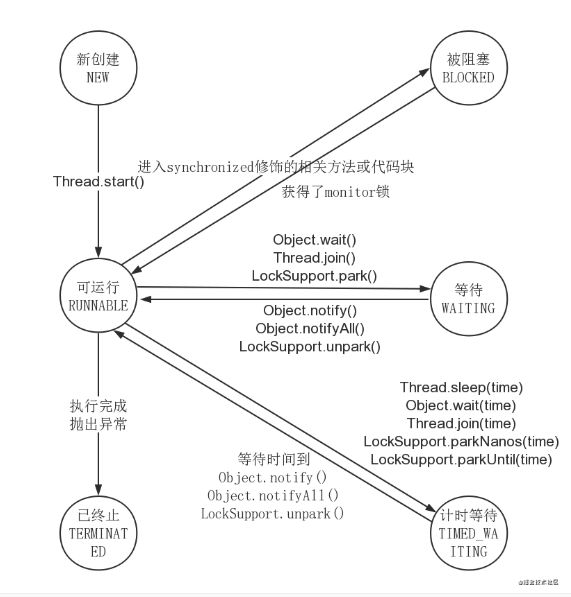
一图解天下,下面我们来看一下线程的六种状态,看完这张图就能很好的解释线程有哪几种状态?生命周期是什么啦
-
- New: 已创建但还尚未启动的新线程
-
- Runnable: 可运行
一般习惯而言,把Blocked(被阻塞)、Waiting(等待)、Timed_waiting(计时等待)都称为阻塞状态
 3. Blocked: 被阻塞
 4. Waiting: 等待
 5. Timed waiting: 限期等待
-
- Terminated: 终止
五. Thread和Object类中和和线程相关的重要方法
Thread和Object类常用方法,这边给大家整理了一个表格
那么他们一般是怎么使用的呢?我们先看一下 wait()、notify()、notifyAll() 这几个通用方法
5.1 wait()、notify()、notifyAll()
wait()、notify()、notifyAll() 看起来很类似,其实它们生效阶段还是不一样的,像wait,在有锁的情况下,会进入阻塞阶段,无锁的话,遇到中断,会释放锁
那么问题来了,wait什么时候才会被唤醒,这里小编把唤醒四种情况整理给小伙伴了
- 5.1.1 另一个线程调用这个对象的notify()方法且刚好被唤醒的是本线程;
- 5.1.2 另一个线程调用这个对象的notifyAll()方法;
- 5.1.3 过了wait(long timeout)规定的超时时间,如果传入0就是永久等待;
- 5.1.4 线程自身调用了interrupt()
如果满足上述条件之一即可。
而notify()notifyAll()不一样了,它两只应该被拥有该对象的monitor的线程调用,一旦线程被唤醒,线程便会从对象的“等待线程集合”中被移除,
所以可以重新参与到线程调度当中,要等刚才执行notify()notifyAll()的线程退出被synchronized保护的代码并释放monitor
notify和notifyAll 不同点在于: all 唤醒所有的线程 notify:唤醒一个 ,其他的线程可能一直处于等待状态
说了不同点,说点wait/notify/notifyAll共同的特点、性质:
-
- 用必须先拥有monitor
-
- 只能唤醒其中一个
-
- 属于Object类
-
- 类似功能的Condition
-
- 同时持有多个锁的情况,只会持有当前对象的那一把锁
因为原理设计 c 层代码,就不重点说明了,只是简单知道里面有一个入口集合和等待集合
这三个方法,实际开发中运用最广泛的场景还是生产-消费者模型比较多,运用这些API,让生产者和消费者两个组织更好的结合和配合,使他们能够相互平衡。如线程池里面的阻塞队列blockingQueue,实现过程可以简单的说明如下:
- 使用自己定义的 队列,里面用list,add,get方法加锁
- 生产者生产的产品已经满了的时候wait ;
- 当消费者发现对店里面的数据为空的时候wait
package cn.think.in.java.thread;
public class ProducerConsumer {

    public static void main(String[] args) {

        Info info = new Info();
        Producer producer = new Producer(info);
        Consumer consumer = new Consumer(info);

        new Thread(producer).start();
        new Thread(consumer).start();
    }
}
class Consumer implements Runnable{

    private Info info;
    public Consumer(Info info) {

        this.info = info;
    }
    @Override
    public void run() {

        for (int i = 0; i < 10; i++) {

            info.consumer();
        }
    }
}
class Producer implements Runnable{

    private Info info;
    public Producer(Info info) {

        this.info = info;
    }
    @Override
    public void run() {

        for (int i = 0; i < 10; i++) {

            info.producer("小"+i, i);
        }
    }
}
class Info{

    private String name;
    private int age;
    private boolean isProducer = true;
    public synchronized void producer(String name, int age){

        while (!isProducer){

        // 不是生产者,需要等待
            try {

                wait();
            } catch (InterruptedException e) {

                System.out.println("producer wait interrupted");
            }
        }
        setAge(age);
        setName(name);
        System.out.println("productor create one Info");
        isProducer = false;
        notify(); // 唤醒等待的线程
    }
    public synchronized void consumer(){

        while (isProducer){

            try {

                wait();
            } catch (InterruptedException e) {

                System.out.println("consumer wait interrupted");
            }
        }
        System.out.println("consumer get "+getName()+",age is "+getAge());
        isProducer = true;
        notify();
    }
    public int getAge() {

        return age;
    }
    public void setAge(int age) {

        this.age = age;
    }
    public String getName() {

        return name;
    }
    public void setName(String name) {

        this.name = name;
    }
}
你以为看来这些你就掌握了它们吗?太天真了,看看BAT大厂一般是怎么出面试题的吧~
面试题一: 为什么wait() 需要在同步代码块内使用,而 sleep() 不需要?
如果不放在同步代码块里面 其他线程可能先执行notify ,那wait的线程可能永远不会被唤醒 sleep属于线程的,和其他线程关系不大
面试题二: 为什么线程通信的方法wait(), notify()和notifyAll()被定义在Object类里?而sleep定义在Thread类里?
属于锁,对象的头里面有几位保存锁状态 ,一个线程可能会持有多个对象的锁,这样更加灵活
面试题三: wait方法是属于Object对象的,那调用Thread.wait会怎么样?
是可以作为锁对象的 但是现场退出的时候会notify 会影响我们的流程
面试题四: 如何选择用notify还是nofityAll?
面试题五: notifyAll之后所有的线程都会再次抢夺锁,如果某线程抢夺失败怎么办?
进入等待状态 提到其他的线程释放锁的时候去竞争
面试题六: 用suspend()和resume()来阻塞线程可以吗?为什么?
suspend() 和resume() 已经不推荐使用,功能类似于wait和notify,但是不释放锁,并且容易引起死锁 .
面试题七: 用程序实现两个线程交替打印 0~100 的奇偶数?效率最高那种
有朋友可能认为开两个线程,奇数线程打印奇数,偶数线程打印偶数,然后用synchronized,但是这样竞争可能比较大,效率不会太高
public class WaitNotifyPrintOddEvenSyn {


    private static int count;

    private static final Object lock = new Object();

    /**
     * 新建2个线程,第一个只处理偶数,第二个只处理奇数(用位运算);用synchronized来通信
     */
    public static void main(String[] args) {

        new Thread(() -> {

            while (count < 100) {

                synchronized (lock) {

                    if ((count & 1) == 0) {

                        System.out.println(Thread.currentThread().getName() + ":" + count++);
                    }
                }
            }
        }, "偶线程").start();

        new Thread(() -> {

            while (count < 100) {

                synchronized (lock) {

                    if ((count & 1) == 1) {

                        System.out.println(Thread.currentThread().getName() + ":" + count++);
                    }
                }
            }
        }, "奇线程").start();
    }
}
更好的方法是用wait/notify,一个runnable里执行 : ++ ,notify ,wait,
public class WaitNotifyPrintOddEveWait {


    private static int count = 0;

    private static final Object lock = new Object();

    public static void main(String[] args) {

        new Thread(new TurningRunner(), "偶线程").start();
        new Thread(new TurningRunner(), "奇线程").start();
    }

    /**
     * 1. 拿到锁,立刻打印
     * 2. 打印完,唤醒其他线程,自己就休眠
     */
    static class TurningRunner implements Runnable {


        @Override
        public void run() {

            while (count < 100) {

                synchronized (lock) {

                    //拿到锁就打印
                    System.out.println(Thread.currentThread().getName() + ":" + count++);
                    lock.notify();
                    if (count < 100) {

                        try {

                            //如果任务还没结束,就让出当前的锁,并休眠
                            lock.wait();
                        } catch (InterruptedException e) {

                            e.printStackTrace();
                        }
                    }
                }
            }
        }
    }
}
6.2 join()方法
因为新的线程加入了我们,所以我们要等他执行完再出发,join()方法就是让另一个线程插在自己前面, 要注意的到底是谁在等待谁。
普通用法是: 如果子线程加入到主线程 那么所有子线程执行完成之后主线程才会继续执行
class JoinThread implements Runnable
{

    // 重写run方法
    public void run()
    {

        for(int i = 0; i< 30;i++)
        {

            System.out.println(Thread.currentThread().getName()+"..."+i);
        }
    }
}

//main方法如下
public static void main(String[] args) throws InterruptedException {

        JoinThread object = new JoinThread();
        Thread t1 = new Thread(object);
        Thread t2 = new Thread(object);
        t1.start();
        t1.join();
        t2.start();
        /**
         * 主线程执行到这里,放弃执行资格,此时活着的线程只有t1和t2,
         *
         *  那么此时t1和t2交替执行,当t1执行完,主线程才能继续执行,
         *  也就是说,主线程重新获取执行资格跟t2是否执行完没有半毛钱关系
         *
         * */
        //t1.join();
        for(int j = 0;j < 50;j++)
        {

            System.out.println(Thread.currentThread().getName()+"..."+j);
        }
 }
遇到中断: 在此线程中使用主线程Interrupt, 会在main 的join里捕获异常
那么在join期间,线程到底是什么状态?
join方法会让线程陷入无限期的等待状态
join() 的原理是怎样的呢?
从native层 来说,它默认为在没有notify,thread执行完后会在 C++ 层调用notify_all
5.3 yield()方法
yield()方法不会释放自己的锁,不会陷阻塞,下次cpu调度可以快速调用,它只是暂时让出自己的时间给同优先级的线程,它存在的目的在于JVM不保证释放cpu,和不同的是sleep:调度器认为自己阻塞了线程,而yield()随时都有可能被调度
5.4 获取当前执行线程的引用:Thread.currentThread()方法
5.5 sleep()方法
当我只想让线程在预期的时间执行,其他时候不要占用CPU资源,我们可以考虑使用sleep()方法,和wait()不同的是:它不释放锁的,包括synchronized和lock,当然,sleep()有一个比较重要的特质就是: 响应中断,当抛出InterruptedException,会清除中断标记,我们其实也可以用TimeUnit.Second来处理。
一句话总结:
sleep方法可以让线程进入Waiting状态,并且不占用CPU资源,但是不释放锁,直到规定时间后再执行,休眠期间如果被中断,会抛出异常并清除中断状态。
那么wait/notify和sleep有什么异同呢?
相同点是都能实现线程阻塞和响应中断,不同点在于以下五个维度
- 同步方法中
- 释放锁
- 指定时间
- 所属类
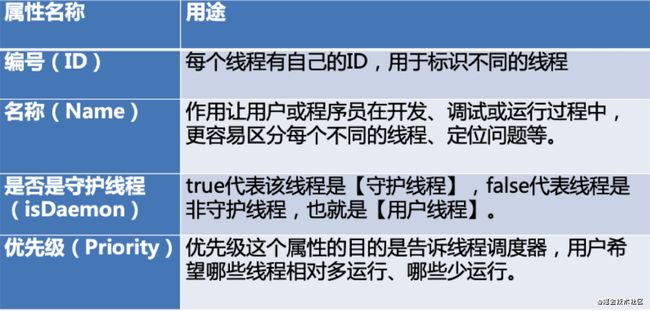
六. 线程各属性
6.1 线程Id
jvm运行起来之后,我们自己的线程,这个线程早就不是0了,那么系统会帮我们自己创建其他的线程,这个线程,如: nextThreadId ++number 主线程是1
6.2 线程名字
默认名称是 thread— 0 (自增的) ,那么怎样修改线程的名字 : 其实一旦线程启动了之后 native名字没有办法修改,这个大家要记住它
6.3 守护线程
守护线程的作用在于 给用户线程提供服务,它默认继承自父线程,是通过jvm启动的,不影响JVM退出,当退出了会去看有没有用户线程,直到JVM离开,守护线程还在,因为这一个特性,在Android里面常常用于进程保活处理,一般不会设置为守护线程,因为可能会发生异常退出情况
这里面需要注意的是:
- setDaemon方法的使用必须在start方法之前。不然会抛出异常的。
- 在守护线程中创建的线程都是守护线程。
- 不是所有的应用都可以分配给守护线程来执行。比如:读写操作或计算逻辑。
6.4 线程优先级
线程按照优先级有十个,默认是5,因为不同操作系统不一样,优先级会被操作系统改变,所以程序设计不应依赖于优先级
七. 线程挂起、恢复
线程的挂起、恢复,使用的是suspend和resume,我们来看一下这段代码
public class SuspendAndResume implements Runnable {

    // valatile修饰的关键字,表示线程A在使用的同时可能被线程B修改
    private volatile int firstVal;
    private volatile int secondVal;
    // 判断两者是否相等
    public boolean valueEquals(){

        return (firstVal == secondVal);
    }
    @Override
    public void run() {

        try {

            firstVal = 0;
            secondVal = 0;
            workMethod();
        } catch (InterruptedException e) {

            System.out.println("thread was interrupted....");
        }
    }
    private void workMethod() throws InterruptedException {

        int val = 1;
        while (true){

            stepOne(val); // 设置值后会休眠300毫秒
            stepTwo(val);
            val++;
            Thread.sleep(200);
        }
    }
    private void stepOne(int val) throws InterruptedException {

        firstVal = val;
        Thread.sleep(300);
    }
    private void stepTwo(int val){

        secondVal = val;
    }
    public static void main(String[] args) {

        SuspendAndResume demo = new SuspendAndResume();
        Thread thread = new Thread(demo);
        thread.start();
        // 主线程睡眠1秒,保证其他线程都启动
        try {

            Thread.sleep(1000);
        } catch (InterruptedException e) {

        }
        for (int i = 0; i < 10; i++) {

            thread.suspend(); // 线程挂起
            System.out.println("equals result: "+demo.valueEquals());
            thread.resume(); // 线程恢复
            try {

                // 线程随机休眠0-2秒
                Thread.sleep((long) (Math.random()*2000));
            } catch (InterruptedException e) {

            }
        }
        System.exit(0);
    }
}
打印的结果有true和false。说明了在多线程的环境下是不安全的。
打印false的原因有2种情况:
- 当stepOne方法执行完成后,stepTwo方法执行前。线程被挂起了,然后去判断返回false。
- 在没有suspend和resume方法的情况下,刚刚执行完stepOne方法后,线程就被main线程抢夺CPU,然后去执行判断导致返回false。
因为返回结果和预期的不一样,所以被弃用。
可以考虑采用设置标志位的方法,让线程在安全的位置挂起。
比“繁忙等待”技术更优的是:java内置的“通知-等待”技术。
八. 线程的未捕获异常UncaughtException应该如何处理?
为什么需要UncaughtExceptionHandler?
- 主线程可以轻松发现异常,子线程却不行 在子线程 抛出了异常 会被主线程覆盖
- 子线程异常无法用传统方法捕获子线程抛出异常,主线程try catch没用 只能捕获当前线程的异常
- 不能直接捕获的后果、提高健壮性
解决方案
- 方案一(不推荐):手动在每个run方法里进行try catch
- 方案二(推荐):利用UncaughtExceptionHandler
- UncaughtExceptionHandler接口
- 一个待实现方法 void uncaughtException(Thread t, Throwable e)
- 异常处理器的调用策略
- 递归调用父类的处理器
- 使用默认的全局处理器
- 如果都不存在,就输出异常栈
- 自己继承并实现UncaughtExceptionHandler
- 给程序统一设置
- 给每个线程单独设置
- 给线程池设置UncaughtExceptionHandler
- 实现
- imp接口
- 设置自己的处理器
- UncaughtExceptionHandler接口
面试题
1. 如何全局处理异常?为什么要全局处理?不处理行不行?
UncaughtExceptionHandler
2. run方法是否可以抛出异常?如果抛出异常,线程的状态会怎么样?
没有声明throw
3. 线程中如何处理某个未处理异常?
4. 说一下Java的异常体系
九. 线程间的交互
15.1 wait/notify/notifyAll线程通信
noftify通知
线程A在wait之前线程B就notify,导致线程A处于等待唤醒状态。
我们不能确保这种现象不发生,我们只能保证在这个现象发生了线程不会处于“等待唤醒”的状态,导致应用出错。
解决方法就是设置标志位,当线程要wait前,判断当前是否可以去wait。
这也是之前提到的通知-等待技术。
package cn.think.in.java.thread;
public class MissedNotify extends Object {

	private Object proceedLock;

	public MissedNotify() {

		print("in MissedNotify()");
		proceedLock = new Object();
	}

	public void waitToProceed() throws InterruptedException {

		print("in waitToProceed() - entered");

		synchronized ( proceedLock ) {

			print("in waitToProceed() - about to wait()");
			proceedLock.wait();
			print("in waitToProceed() - back from wait()");
		}

		print("in waitToProceed() - leaving");
	}

	public void proceed() {

		print("in proceed() - entered");

		synchronized ( proceedLock ) {

			print("in proceed() - about to notifyAll()");
			proceedLock.notifyAll();
			print("in proceed() - back from notifyAll()");
		}

		print("in proceed() - leaving");
	}

	private static void print(String msg) {

		String name = Thread.currentThread().getName();
		System.out.println(name + ": " + msg);
	}

	public static void main(String[] args) {

		final MissedNotify mn = new MissedNotify();

		Runnable runA = new Runnable() {

				public void run() {

					try {

						//休眠1000ms,大于runB中的500ms,
						//是为了后调用waitToProceed,从而先notifyAll,后wait,
						//从而造成通知的遗漏
						Thread.sleep(1000);
						mn.waitToProceed();
					} catch ( InterruptedException x ) {

						x.printStackTrace();
					}
				}
			};

		Thread threadA = new Thread(runA, "threadA");
		threadA.start();

		Runnable runB = new Runnable() {

				public void run() {

					try {

						//休眠500ms,小于runA中的1000ms,
						//是为了先调用proceed,从而先notifyAll,后wait,
						//从而造成通知的遗漏
						Thread.sleep(500);
						mn.proceed();
					} catch ( InterruptedException x ) {

						x.printStackTrace();
					}
				}
			};

		Thread threadB = new Thread(runB, "threadB");
		threadB.start();

		try {

			Thread.sleep(10000);
		} catch ( InterruptedException x ) {
     }

		//试图打断wait阻塞
		print("about to invoke interrupt() on threadA");
		threadA.interrupt();
	}
}
notifyAll通知
两个程序不同。这个引起问题的原因是wait外面的if判断出现问题了。
修改的方式就是将if换为while,这也是在等待-通知技术中对wait的常用处理方式。最好也要配上一个标志位,用于判断是否符合条件。
另外:wait被唤醒后,会接着上次停的地方继续运行。
package cn.think.in.java.thread;
import java.util.*;

public class EarlyNotify extends Object {

	private List list;

	public EarlyNotify() {

		list = Collections.synchronizedList(new LinkedList());
	}

	public String removeItem() throws InterruptedException {

		print("in removeItem() - entering");

		synchronized ( list ) {

			if ( list.isEmpty() ) {
       //这里用if语句会发生危险
				print("in removeItem() - about to wait()");
				list.wait();
				print("in removeItem() - done with wait()");
			}

			//删除元素
			String item = (String) list.remove(0);

			print("in removeItem() - leaving");
			return item;
		}
	}

	public void addItem(String item) {

		print("in addItem() - entering");
		synchronized ( list ) {

			//添加元素
			list.add(item);
			print("in addItem() - just added: '" + item + "'");

			//添加后,通知所有线程
			list.notifyAll();
			print("in addItem() - just notified");
		}
		print("in addItem() - leaving");
	}

	private static void print(String msg) {

		String name = Thread.currentThread().getName();
		System.out.println(name + ": " + msg);
	}

	public static void main(String[] args) {

		final EarlyNotify en = new EarlyNotify();

		Runnable runA = new Runnable() {

				public void run() {

					try {

						String item = en.removeItem();
						print("in run() - returned: '" +
								item + "'");
					} catch ( InterruptedException ix ) {

						print("interrupted!");
					} catch ( Exception x ) {

						print("threw an Exception!!!\n" + x);
					}
				}
			};

		Runnable runB = new Runnable() {

				public void run() {

					en.addItem("Hello!");
				}
			};

		try {

			//启动第一个删除元素的线程
			Thread threadA1 = new Thread(runA, "threadA1");
			threadA1.start();

			Thread.sleep(500);

			//启动第二个删除元素的线程
			Thread threadA2 = new Thread(runA, "threadA2");
			threadA2.start();

			Thread.sleep(500);
			//启动增加元素的线程
			Thread threadB = new Thread(runB, "threadB");
			threadB.start();

			Thread.sleep(10000); // wait 10 seconds

			threadA1.interrupt();
			threadA2.interrupt();
		} catch ( InterruptedException x ) {
     }
	}
}
15.2 join通信
- wait方法为什么必须在synchronized代码块中?
- wait方法等待的是synchronized锁的对象。
15.3 Condition通信
import java.util.concurrent.*;
import java.util.concurrent.locks.*;

class Info{
     	// 定义信息类
	private String name = "name";//定义name属性,为了与下面set的name属性区别开
	private String content = "content" ;// 定义content属性,为了与下面set的content属性区别开
	private boolean flag = true ;	// 设置标志位,初始时先生产
	private Lock lock = new ReentrantLock();
	private Condition condition = lock.newCondition(); //产生一个Condition对象
	public  void set(String name,String content){

		lock.lock();
		try{

			while(!flag){

				condition.await() ;
			}
			this.setName(name) ;	// 设置名称
			Thread.sleep(300) ;
			this.setContent(content) ;	// 设置内容
			flag  = false ;	// 改变标志位,表示可以取走
			condition.signal();
		}catch(InterruptedException e){

			e.printStackTrace() ;
		}finally{

			lock.unlock();
		}
	}

	public void get(){

		lock.lock();
		try{

			while(flag){

				condition.await() ;
			}
			Thread.sleep(300) ;
			System.out.println(this.getName() +
				" --> " + this.getContent()) ;
			flag  = true ;	// 改变标志位,表示可以生产
			condition.signal();
		}catch(InterruptedException e){

			e.printStackTrace() ;
		}finally{

			lock.unlock();
		}
	}

	public void setName(String name){

		this.name = name ;
	}
	public void setContent(String content){

		this.content = content ;
	}
	public String getName(){

		return this.name ;
	}
	public String getContent(){

		return this.content ;
	}
}
class Producer implements Runnable{
     	// 通过Runnable实现多线程
	private Info info = null ;		// 保存Info引用
	public Producer(Info info){

		this.info = info ;
	}
	public void run(){

		boolean flag = true ;	// 定义标记位
		for(int i=0;i<10;i++){

			if(flag){

				this.info.set("姓名--1","内容--1") ;	// 设置名称
				flag = false ;
			}else{

				this.info.set("姓名--2","内容--2") ;	// 设置名称
				flag = true ;
			}
		}
	}
}
class Consumer implements Runnable{

	private Info info = null ;
	public Consumer(Info info){

		this.info = info ;
	}
	public void run(){

		for(int i=0;i<10;i++){

			this.info.get() ;
		}
	}
}
public class ThreadCaseDemo{

	public static void main(String args[]){

		Info info = new Info();	// 实例化Info对象
		Producer pro = new Producer(info) ;	// 生产者
		Consumer con = new Consumer(info) ;	// 消费者
		new Thread(pro).start() ;
		//启动了生产者线程后,再启动消费者线程
		try{

			Thread.sleep(500) ;
		}catch(InterruptedException e){

			e.printStackTrace() ;
		}

		new Thread(con).start() ;
	}
}
八. 线程和进程区别
- 进程有自己的独立区域,进程之间的数据不共享
- 一个进程可以有多个线程
- 一个软件可能包括多个进程
- 一个运行中的线程可能包括线程
-
CPU 线程和操作系统线程
-
CPU 线程
-
多核cpu各个核各自独立运行,因此每一个核每一个线程
-
「四核⼋线程」: CPU 硬件方面级别对CPU进行了一次多核线程的支持(本质上依然是每个核一个线程)
-
操作系统线程: 操作系统利用时间分片的方式,把CPU还分给多条运行逻辑,即为操作系统线程
-
单核CPU也可以运行多线程操作系统
-
-
-
九. 线程工具类的封装
public class ThreadUtils {

    public ThreadUtils() {

    }

// 判断当前线程是否在主线程
    public static void checkIsOnMainThread() {

        if (Thread.currentThread() != Looper.getMainLooper().getThread()) {

            throw new IllegalStateException("Not on main thread!");
        }
    }

// 执行不中断的线程
    public static void executeUninterruptibly(ThreadUtils.BlockingOperation operation) {

        boolean wasInterrupted = false;

        while(true) {

            try {

                operation.run();
                break;
            } catch (InterruptedException var3) {

                wasInterrupted = true;
            }
        }

        if (wasInterrupted) {

            Thread.currentThread().interrupt();
        }

    }
// 执行间隔时间内不中断的线程
    public static boolean joinUninterruptibly(Thread thread, long timeoutMs) {

        long startTimeMs = SystemClock.elapsedRealtime();
        long timeRemainingMs = timeoutMs;
        boolean wasInterrupted = false;

        while(timeRemainingMs > 0L) {

            try {

                thread.join(timeRemainingMs);
                break;
            } catch (InterruptedException var11) {

                wasInterrupted = true;
                long elapsedTimeMs = SystemClock.elapsedRealtime() - startTimeMs;
                timeRemainingMs = timeoutMs - elapsedTimeMs;
            }
        }

        if (wasInterrupted) {

            Thread.currentThread().interrupt();
        }

        return !thread.isAlive();
    }

    public static void joinUninterruptibly(final Thread thread) {

        executeUninterruptibly(new ThreadUtils.BlockingOperation() {

            public void run() throws InterruptedException {

                thread.join();
            }
        });
    }

    public static void awaitUninterruptibly(final CountDownLatch latch) {

        executeUninterruptibly(new ThreadUtils.BlockingOperation() {

            public void run() throws InterruptedException {

                latch.await();
            }
        });
    }

    public static boolean awaitUninterruptibly(CountDownLatch barrier, long timeoutMs) {

        long startTimeMs = SystemClock.elapsedRealtime();
        long timeRemainingMs = timeoutMs;
        boolean wasInterrupted = false;
        boolean result = false;

        while(true) {

            try {

                result = barrier.await(timeRemainingMs, TimeUnit.MILLISECONDS);
                break;
            } catch (InterruptedException var12) {

                wasInterrupted = true;
                long elapsedTimeMs = SystemClock.elapsedRealtime() - startTimeMs;
                timeRemainingMs = timeoutMs - elapsedTimeMs;
                if (timeRemainingMs <= 0L) {

                    break;
                }
            }
        }

        if (wasInterrupted) {

            Thread.currentThread().interrupt();
        }

        return result;
    }

    public static void waitUninterruptibly(final Object object) {

        executeUninterruptibly(new ThreadUtils.BlockingOperation() {

            public void run() throws InterruptedException {

                object.wait();
            }
        });
    }

    public static <V> V invokeAtFrontUninterruptibly(Handler handler, final Callable<V> callable) {

        if (handler.getLooper().getThread() == Thread.currentThread()) {

            try {

                return callable.call();
            } catch (Exception var6) {

                throw new RuntimeException(var6);
            }
        } else {

            class Result {

                public V value;

                Result() {

                }
            }

            final Result result = new Result();

            class CaughtException {

                Exception e;

                CaughtException() {

                }
            }

            final CaughtException caughtException = new CaughtException();
            final CountDownLatch barrier = new CountDownLatch(1);
            handler.post(new Runnable() {

                public void run() {

                    try {

                        result.value = callable.call();
                    } catch (Exception var2) {

                        caughtException.e = var2;
                    }

                    barrier.countDown();
                }
            });
            awaitUninterruptibly(barrier);
            if (caughtException.e != null) {

                RuntimeException runtimeException = new RuntimeException(caughtException.e);
                runtimeException.setStackTrace(concatStackTraces(caughtException.e.getStackTrace(), runtimeException.getStackTrace()));
                throw runtimeException;
            } else {

                return result.value;
            }
        }
    }

    public static void invokeAtFrontUninterruptibly(Handler handler, final Runnable runner) {

        invokeAtFrontUninterruptibly(handler, new Callable<Void>() {

            public Void call() {

                runner.run();
                return null;
            }
        });
    }

    public static StackTraceElement[] concatStackTraces(StackTraceElement[] inner, StackTraceElement[] outer) {

        StackTraceElement[] combined = new StackTraceElement[inner.length + outer.length];
        System.arraycopy(inner, 0, combined, 0, inner.length);
        System.arraycopy(outer, 0, combined, inner.length, outer.length);
        return combined;
    }

    public interface BlockingOperation {

        void run() throws InterruptedException;
    }

    public static class ThreadChecker {

        private Thread thread = Thread.currentThread();

        public ThreadChecker() {

        }

        public void checkIsOnValidThread() {

            if (this.thread == null) {

                this.thread = Thread.currentThread();
            }

            if (Thread.currentThread() != this.thread) {

                throw new IllegalStateException("Wrong thread");
            }
        }

        public void detachThread() {

            this.thread = null;
        }
    }
}
总结
本文从线程的创建方式,如何启动和停止线程;线程的6种状态;Thread和Object类中;和线程相关的重要方法;线程各属性;线程挂起、恢复;线程的未捕获异常UncaughtException应该如何处理;以及线程和进程区别
全方位学习了Android程序员需要掌握的Java线程基础,当然也有死锁,以及内存操作问题没有涉及,这个放到系列三线程安全细聊, Java线程,在各种开源库都有实现,在做基础架构开发必定要精深的技术,学习至完全掌握非常必要。好了,今天的留言就到这里,欢迎留言讨论~

