CMake的使用和pcre2
文章目录
-
-
- 使用CMake对pcre进行编译
- 如何在工程中使用
- 测试代码
- 错误记录
- 附
- 小记
- 补:对jpeg开源库进行编译
-
使用CMake对pcre进行编译
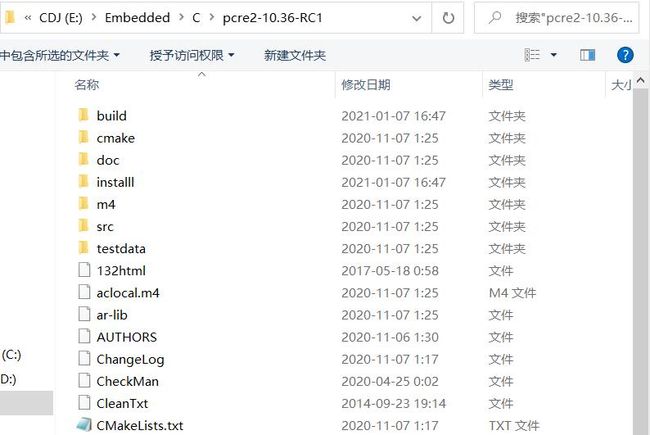
在学习python中的正则表达式后,百度了一下看有没有C语言实现的正则表达式工具,还真有,就是Perl-compatibal regular expression(即perl兼容的正则表达式,而且一般Linux发行版中的grep、awk等都是基于这个实现的)。然后把源码下载下来解压,目录如下(其中build和installl是我自己创建的,下面的文件夹是我使用cmake后的文件夹,所有有些改变):
我先前就一直很疑惑从github上下载的源码怎么编译,我能想到的无非是makefile加编译器。但是具体的配置还是有点不会,其实还是有点不管自己动手的感觉。今天我就按着感觉,把这源码编译成功了,原来过程也不是很复杂。
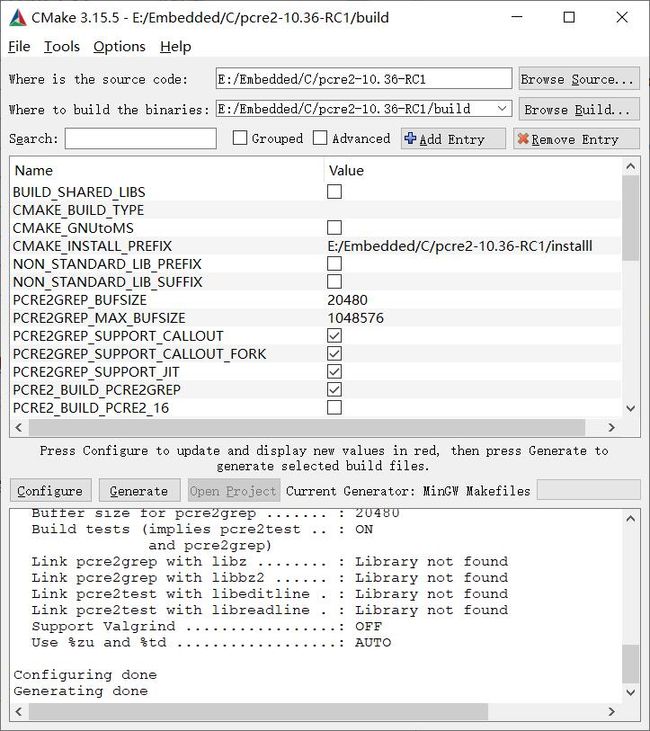
我看到文件夹中有CMakeLists.txt就知道这必定是需要CMake了,我电脑上又刚安装了这个软件。于是打开CMake,画面如下:
使用步骤:
-
选择源码所在目录,我刚开始选择了
pcre2-10.36-RC1目录下的src了,然后config时报错误。其实源码目录就是pcre2-10.36-RC1,因为这个目录下有个CMakeLists.txt文件; -
选择
build的目录(这个目录用于保存CMake生成的Makefile,以及后面使用make进行编译的中间文件),这个目录是我自己新建的; -
点击
Configure,配置完后,上图中的中间那个窗口可以进行一些其它的配置,比如编译完后install到哪里去(由于源码目录下有了install文件,所以我新建了installl); -
配置好后点击
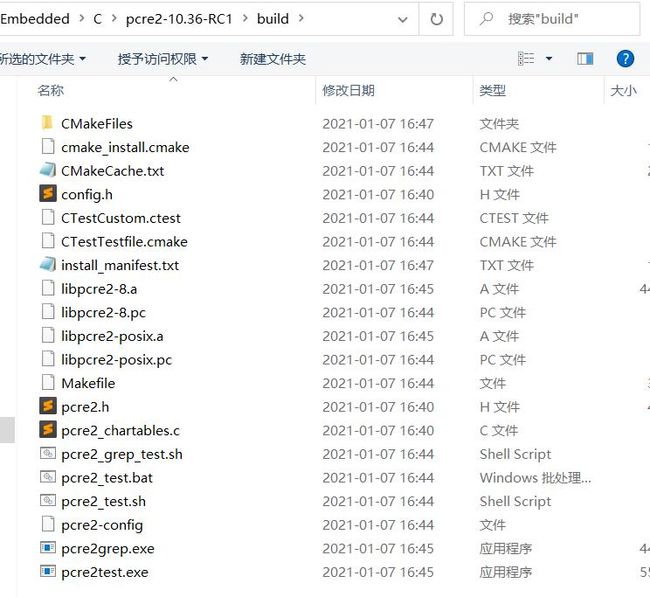
Generate,这一步产生Makefile,并保存到build目录下,build目录如下,可以看到有Makefile这个文件了。 -
使用
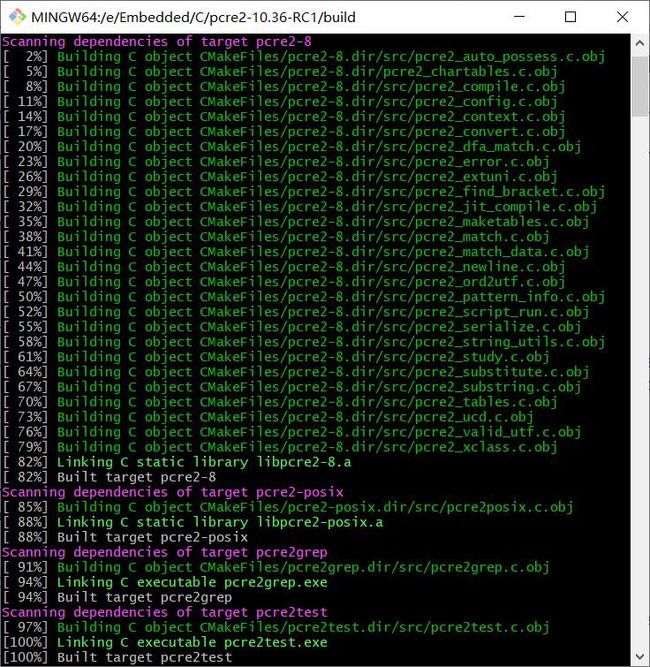
make进行编译,我使用了git bash进行编译,因为在这个环境中可以使用make命令,编译完成后就可以看到build目录下有一些其它文件,比如上图中的可执行文件; -
再使用
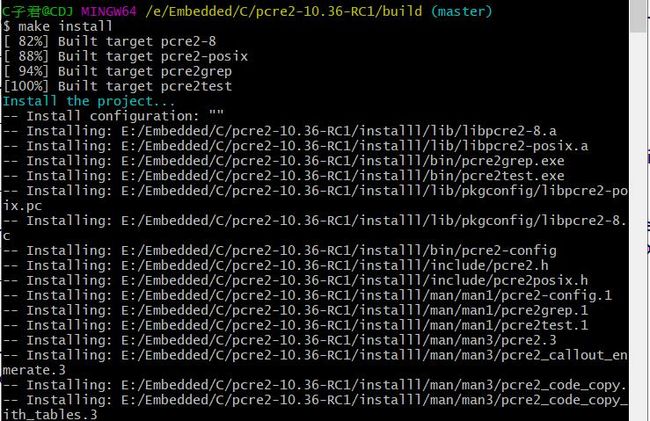
make install进行安装; -
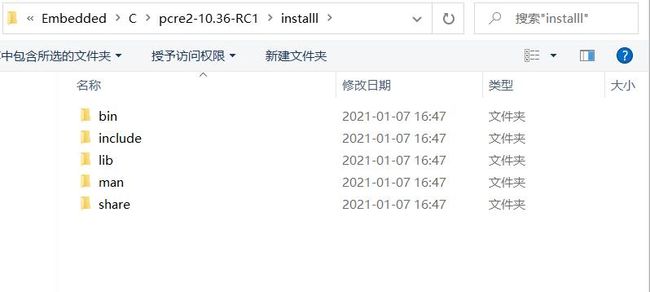
使用时,将include中的头文件和lib中的库文件拷贝到工程文件夹中即可,man中是一些手册,share中是一些html的文件,也算是帮助信息。
当然还有其它的编译方法:比如使用.config直接进行配置编译,主要三步:.config进行配置、make、make install。
如何在工程中使用
编译后在installl文件夹中有两个文件夹很重要:一个是include,另一个是lib。
在include中包含两个头文件:pcre2.h和pcre2posix.h,pcre2posix.h其实是为了方便移植的(符合POSIX接口),它就是对pcre2.h中的一些函数用宏定义取了一个别名,如下:
/* The structure representing a compiled regular expression. It is also used
for passing the pattern end pointer when REG_PEND is set. */

typedef struct {

  void *re_pcre2_code;
  void *re_match_data;
  const char *re_endp;
  size_t re_nsub;
  size_t re_erroffset;
  int re_cflags;
} regex_t;

/* The structure in which a captured offset is returned. */

typedef int regoff_t;

typedef struct {

  regoff_t rm_so;
  regoff_t rm_eo;
} regmatch_t;

......

PCRE2POSIX_EXP_DECL int pcre2_regcomp(regex_t *, const char *, int);
PCRE2POSIX_EXP_DECL int pcre2_regexec(const regex_t *, const char *, size_t,
                     regmatch_t *, int);
PCRE2POSIX_EXP_DECL size_t pcre2_regerror(int, const regex_t *, char *, size_t);
PCRE2POSIX_EXP_DECL void pcre2_regfree(regex_t *);

// 就是一个宏定义
#define regcomp  pcre2_regcomp
#define regexec  pcre2_regexec
#define regerror pcre2_regerror
#define regfree  pcre2_regfree

/* Debian had a patch that used different names. These are now here to save
them having to maintain their own patch, but are not documented by PCRE2. */

#define PCRE2regcomp  pcre2_regcomp
#define PCRE2regexec  pcre2_regexec
#define PCRE2regerror pcre2_regerror
#define PCRE2regfree  pcre2_regfree
另外就是lib中的库文件(真正的实现),包含libpcre2-8.a和libpcre2-posix.a,分别对应面的pcre2.h和pcre2posix.h。
如何使用呢?先看gcc的一些参数
| 参数 | 说明 | 比如 |
|---|---|---|
| -I | 添加头文件搜索路径 | -I /usr/include |
| -L | 添加库文件路径 | -L /usr/lib |
| -l(小写的l) | 指定要链接的库 | -lm,-lpthread |
注意:
- 路径的写法,Windows和Linux下不一样;
- 比如我有自己的一个库,名字是libmyfun.a,链接时只需
-lmyfun。
*
*lib
***libmyfunc.a
***libpthread.a
***libpcre2-8.a
*include
***pcre2.h
***pcre2posix.h
***myapi.h

gcc mymain.c -I /home/include -L /home/lib -lmyfunc
**为了方便:**将include和lib文件夹下的文件拷贝到MinGW对应的文件夹中取(我将libpcre2-8.a重命名为了libpcre2.a)。
测试代码
这个源自我最开始写的python代码:
 # author:		CofCai
 # datatime:	2021-01-07 15:40:49
 # file description:
 #  该文件是用于字符串处理的正则表达式的一些简单记录。
 # 参考:
 # 		python的RE教程:https://docs.python.org/zh-cn/3/library/re.html#regular-expression-syntax
 # 		https://www.cnblogs.com/z-qinfeng/p/11999963.html
 # 		经典实例(推荐):https://www.jb51.net/article/31235.htm
 # 		20个正则表达式:https://www.jb51.net/article/82835.htm
 #

import re

# 提取格式正确的电话
digit_number = ['15730807595', '131 2829 8283', '192-2482-8921',
				'157308075959', '238829', '127x8231x892e']
# 开头是1,第二位必须是3、5、9,第三位限制为数字,第四位可以为空格、-、还可以没有
# 后面紧跟着4个数字,然后又是空格、-、或者没有,最后又是4个数字,并且到此结束
# 如果pattern最后一个改为*,则'157308075959这个也会被匹配'
pattern_dig_num = re.compile(r'1[359]\d[- ]?\d{4}[- ]?\d{4}$')
print('pattern_dig_num: ', pattern_dig_num)

for i in digit_number:
	result = re.match(pattern_dig_num, i)
	# result = re.findall(pattern_dig_num, i)
	print(result)

print("anthor")
test_string = 'cdj-Hello,wold-cdj'
pattern_test_str = re.compile(r'^cdj(.*)cdj$')
result = re.match(pattern_test_str, test_string)
print(result.groups(0)
使用pcre实现如下:
#define PCRE2_STATIC
#define PCRE2_CODE_UNIT_WIDTH 8
#include 输出:
$ ./a.exe
match 1: 15730807595
match 2: 131 2829 8283
match 3: 192-2482-8921
错误记录
错误一:
E:/Embedded/C/pcre2-10.36-RC1/installl/include/pcre2.h:969:2: error: #error PCRE2_CODE_UNIT_WIDTH must be defined before including pcre2.h.

说明要在pcre2.h前定义PCRE2_CODE_UNIT_WIDTH,这个表示一个字符的宽度,比如ASCII就是8,utf就是32。
解决方法:
#define PCRE2_CODE_UNIT_WIDTH 8
#include
#include
错误二:
$ g++ sk.cpp -I /e/Embedded/C/pcre2-10.36-RC1/installl/include -L /e/Embedded/C/pcre2-10.36-RC1/installl/lib -lpcre2-8 -lpcre2-posix
C:\temp\ccwgopjN.o:sk.cpp:(.text+0xdb): undefined reference to `_imp__pcre2_compile_8'
C:\temp\ccwgopjN.o:sk.cpp:(.text+0x144): undefined reference to `_imp__pcre2_match_data_create_from_pattern_8'
C:\temp\ccwgopjN.o:sk.cpp:(.text+0x1d7): undefined reference to `_imp__pcre2_match_8'
C:\temp\ccwgopjN.o:sk.cpp:(.text+0x1f6): undefined reference to `_imp__pcre2_get_ovector_pointer_8'
D:/CDJ/CodeBlocks/CodeBlocks/MinGW/bin/../lib/gcc/mingw32/5.1.0/../../../../mingw32/bin/ld.exe: C:\temp\ccwgopjN.o: bad reloc address 0x30 in section `.rdata'
D:/CDJ/CodeBlocks/CodeBlocks/MinGW/bin/../lib/gcc/mingw32/5.1.0/../../../../mingw32/bin/ld.exe: final link failed: Invalid operation
collect2.exe: error: ld returned 1 exit status


$ gcc sk.c -lpcre2 -lpcre2-posix
D:/CDJ/CodeBlocks/CodeBlocks/MinGW/bin/../lib/gcc/mingw32/5.1.0/../../../libpcre2-posix.a(pcre2posix.c.obj):pcre2posix.c:(.text+0x12f): undefined reference to `pcre2_match_data_free_8'
D:/CDJ/CodeBlocks/CodeBlocks/MinGW/bin/../lib/gcc/mingw32/5.1.0/../../../libpcre2-posix.a(pcre2posix.c.obj):pcre2posix.c:(.text+0x13c): undefined reference to `pcre2_code_free_8'
D:/CDJ/CodeBlocks/CodeBlocks/MinGW/bin/../lib/gcc/mingw32/5.1.0/../../../libpcre2-posix.a(pcre2posix.c.obj):pcre2posix.c:(.text+0x243): undefined reference to `pcre2_compile_8'
D:/CDJ/CodeBlocks/CodeBlocks/MinGW/bin/../lib/gcc/mingw32/5.1.0/../../../libpcre2-posix.a(pcre2posix.c.obj):pcre2posix.c:(.text+0x2e7): undefined reference to `pcre2_pattern_info_8'
D:/CDJ/CodeBlocks/CodeBlocks/MinGW/bin/../lib/gcc/mingw32/5.1.0/../../../libpcre2-posix.a(pcre2posix.c.obj):pcre2posix.c:(.text+0x308): undefined reference to `pcre2_match_data_create_8'
D:/CDJ/CodeBlocks/CodeBlocks/MinGW/bin/../lib/gcc/mingw32/5.1.0/../../../libpcre2-posix.a(pcre2posix.c.obj):pcre2posix.c:(.text+0x331): undefined reference to `pcre2_code_free_8'
D:/CDJ/CodeBlocks/CodeBlocks/MinGW/bin/../lib/gcc/mingw32/5.1.0/../../../libpcre2-posix.a(pcre2posix.c.obj):pcre2posix.c:(.text+0x434): undefined reference to `pcre2_match_8'
D:/CDJ/CodeBlocks/CodeBlocks/MinGW/bin/../lib/gcc/mingw32/5.1.0/../../../libpcre2-posix.a(pcre2posix.c.obj):pcre2posix.c:(.text+0x44c): undefined reference to `pcre2_get_ovector_pointer_8'
D:/CDJ/CodeBlocks/CodeBlocks/MinGW/bin/../lib/gcc/mingw32/5.1.0/../../../../mingw32/bin/ld.exe: D:/CDJ/CodeBlocks/CodeBlocks/MinGW/bin/../lib/gcc/mingw32/5.1.0/../../../libpcre2-posix.a(pcre2posix.c.obj): bad reloc address 0x1c0 in section `.rdata'
D:/CDJ/CodeBlocks/CodeBlocks/MinGW/bin/../lib/gcc/mingw32/5.1.0/../../../../mingw32/bin/ld.exe: final link failed: Invalid operation
collect2.exe: error: ld returned 1 exit status
这种错误一般是没有实现对应的函数,但是在此处(pcre2)肯定不是,然后粘贴*undefined reference to _imp__pcre2_compile_8'*这句话去百度,得到一些不相关的答案。**然后,前一段时间不是买了虫部落的搜索高手嘛!**我就思考了一下,就只搜索**_imp__pcre2_compile_8**,没有到真解决这个问题了,[解决方法](https://blog.csdn.net/proware/article/details/105895945):定义一个宏:#define PCRE2_STATIC`
附
可以参考pcre附带的例子:pcredemo.c
小记
今天早上吸取了昨天的教训,昨天早上去西校门去早了,到那时才8点10不到,在寒风中等了20几分钟。于时,今天就晚去了一会,结果教练在四公里堵车,于是又在寒风中多等了一会。
补:对jpeg开源库进行编译
configure配置文件的参考
由于此开源包中没有CMakeLists.txt,说明不能用CMake进行编译。但是要注意,用CMake的目的就是生成Makefile文件,jpeg中本来就有Makefile,所以CMake也就没有必要了。
在Linux中进行编译的一般步骤为:
- ./configure [OPTIONS] [VAR=VALUE];
- make
- make install
最重要的一步就是第一步的配置,可以使用过./configure --help查看具体帮助信息,jpeg的configure帮助信息如下:
`configure' configures libjpeg 9.4.0 to adapt to many kinds of systems.
# 用法
Usage: ./configure [OPTION]... [VAR=VALUE]...
# 为了指定环境变量,请使用:变量名=变量值
To assign environment variables (e.g., CC, CFLAGS...), specify them as
VAR=VALUE.  See below for descriptions of some of the useful variables.

Defaults for the options are specified in brackets.
# 配置选项
Configuration:
  -h, --help              display this help and exit
      --help=short        display options specific to this package
      --help=recursive    display the short help of all the included packages
  -V, --version           display version information and exit
  -q, --quiet, --silent   do not print `checking ...' messages
      --cache-file=FILE   cache test results in FILE [disabled]
  -C, --config-cache      alias for `--cache-file=config.cache'
  -n, --no-create         do not create output files
      --srcdir=DIR        find the sources in DIR [configure dir or `..']
# 安装目录的设置
Installation directories:
# 与体系结构无关的安装目录
  --prefix=PREFIX         install architecture-independent files in PREFIX
                          [/usr/local]
# 与体系结构有关的安装目录
  --exec-prefix=EPREFIX   install architecture-dependent files in EPREFIX
                          [PREFIX]
# make install默认安装在/usr/local/bin和/usr/local/lib中,你也可以指定用--prefix
By default, `make install' will install all the files in
`/usr/local/bin', `/usr/local/lib' etc.  You can specify
an installation prefix other than `/usr/local' using `--prefix',
for instance `--prefix=$HOME'.
# 为了更好的控制,可使用以下选项
For better control, use the options below.

Fine tuning of the installation directories:
  --bindir=DIR            user executables [EPREFIX/bin]
  --sbindir=DIR           system admin executables [EPREFIX/sbin]
  --libexecdir=DIR        program executables [EPREFIX/libexec]
  --sysconfdir=DIR        read-only single-machine data [PREFIX/etc]
  --sharedstatedir=DIR    modifiable architecture-independent data [PREFIX/com]
  --localstatedir=DIR     modifiable single-machine data [PREFIX/var]
  --libdir=DIR            object code libraries [EPREFIX/lib]
  --includedir=DIR        C header files [PREFIX/include]
  --oldincludedir=DIR     C header files for non-gcc [/usr/include]
  --datarootdir=DIR       read-only arch.-independent data root [PREFIX/share]
  --datadir=DIR           read-only architecture-independent data [DATAROOTDIR]
  --infodir=DIR           info documentation [DATAROOTDIR/info]
  --localedir=DIR         locale-dependent data [DATAROOTDIR/locale]
  --mandir=DIR            man documentation [DATAROOTDIR/man]
  --docdir=DIR            documentation root [DATAROOTDIR/doc/libjpeg]
  --htmldir=DIR           html documentation [DOCDIR]
  --dvidir=DIR            dvi documentation [DOCDIR]
  --pdfdir=DIR            pdf documentation [DOCDIR]
  --psdir=DIR             ps documentation [DOCDIR]

Program names:
  --program-prefix=PREFIX            prepend PREFIX to installed program names
  --program-suffix=SUFFIX            append SUFFIX to installed program names
  --program-transform-name=PROGRAM   run sed PROGRAM on installed program names
# 系统类型
System types:
  --build=BUILD     configure for building on BUILD [guessed]
  --host=HOST       cross-compile to build programs to run on HOST [BUILD]
  --target=TARGET   configure for building compilers for TARGET [HOST]
# 可选的特性
Optional Features:
  --disable-option-checking  ignore unrecognized --enable/--with options
  --disable-FEATURE       do not include FEATURE (same as --enable-FEATURE=no)
  --enable-FEATURE[=ARG]  include FEATURE [ARG=yes]
  --enable-silent-rules   less verbose build output (undo: "make V=1")
  --disable-silent-rules  verbose build output (undo: "make V=0")
  --enable-maintainer-mode
                          enable make rules and dependencies not useful (and
                          sometimes confusing) to the casual installer
  --enable-dependency-tracking
                          do not reject slow dependency extractors
  --disable-dependency-tracking
                          speeds up one-time build
  --enable-ld-version-script
                          enable linker version script (default is enabled
                          when possible)
  --enable-shared[=PKGS]  build shared libraries [default=yes]
  --enable-static[=PKGS]  build static libraries [default=yes]
  --enable-fast-install[=PKGS]
                          optimize for fast installation [default=yes]
  --disable-libtool-lock  avoid locking (might break parallel builds)
  --enable-maxmem=N     enable use of temp files, set max mem usage to N MB

Optional Packages:
  --with-PACKAGE[=ARG]    use PACKAGE [ARG=yes]
  --without-PACKAGE       do not use PACKAGE (same as --with-PACKAGE=no)
  --with-pic[=PKGS]       try to use only PIC/non-PIC objects [default=use
                          both]
  --with-aix-soname=aix|svr4|both
                          shared library versioning (aka "SONAME") variant to
                          provide on AIX, [default=aix].
  --with-gnu-ld           assume the C compiler uses GNU ld [default=no]
  --with-sysroot[=DIR]    Search for dependent libraries within DIR (or the
                          compiler's sysroot if not specified).

Some influential environment variables:
# 使用的编译器
  CC          C compiler command
  CFLAGS      C compiler flags
  # 链接的标志,比如指定自定义库文件的搜索路径
  LDFLAGS     linker flags, e.g. -L<lib dir> if you have libraries in a
              nonstandard directory <lib dir>
  # 编译时需要连接的库,如-lm、-lpthread
  LIBS        libraries to pass to the linker, e.g. -l<library>
  # 比如指定头文件的路径
  CPPFLAGS    (Objective) C/C++ preprocessor flags, e.g. -I<include dir> if
              you have headers in a nonstandard directory <include dir>
  CPP         C preprocessor
  LT_SYS_LIBRARY_PATH
              User-defined run-time library search path.

Use these variables to override the choices made by `configure' or to help
it to find libraries and programs with nonstandard names/locations.

Report bugs to the package provider.
上面比较重要的配置是:
--prefix;CC=gcc;LIBS=-lm, -lpthread;CPPFLAGS=-I /home/include
