MFS 分布式文件系统的高可用
MFS 分布式文件系统的高可用
-
- MFS 高可用
MFS 高可用
mfs 的高可用至少需要两台 mater 主机;此处将之前的 server8 更改为master 和 server5 共同来实验高可用;server8 停掉之前的 chunkserver 服务,安装 master 和 cli;cgi 是图形化工具在 server5 上安装就可以;
[root@server8 mfs]# systemctl stop moosefs-chunkserver
[root@server8 3.0.115]# yum install moosefs-master-3.0.115-1.rhsystemd.x86_64.rpm \
 moosefs-cli-3.0.115-1.rhsystemd.x86_64.rpm -y
- 同步数据
首先保证这两个 master 上的数据要保持同步;此处用到的 iscsi;
在 server7 上 可以添加一块硬盘,但此处由于内存有限,实验受限,此处将之前的硬盘还原来做下面的实验;
[root@server7 mfs]# systemctl stop moosefs-chunkserver
[root@server7 mfs]# umount /mnt/chunk2/
[root@server7 mfs]# chown mfs.mfs /mnt/chunk2/		##将其独立出来,和存储就没有关系
[root@server7 mfs]# systemctl start  moosefs-chunkserver
此时在访问网页时可以看到其server7 占用的是根的资源;
删除分区信息,然后让 server7 做 iscsi 的输出端;
[root@server7 ~]# fdisk /dev/vdb		##删除分区
Welcome to fdisk (util-linux 2.23.2).

Changes will remain in memory only, until you decide to write them.
Be careful before using the write command.

Command (m for help): p

Disk /dev/vdb: 10.7 GB, 10737418240 bytes, 20971520 sectors
Units = sectors of 1 * 512 = 512 bytes
Sector size (logical/physical): 512 bytes / 512 bytes
I/O size (minimum/optimal): 512 bytes / 512 bytes
Disk label type: dos
Disk identifier: 0xbcab5d42

   Device Boot      Start         End      Blocks   Id  System
/dev/vdb1            2048    20971519    10484736   83  Linux

Command (m for help): d
Selected partition 1
Partition 1 is deleted

Command (m for help): p

Disk /dev/vdb: 10.7 GB, 10737418240 bytes, 20971520 sectors
Units = sectors of 1 * 512 = 512 bytes
Sector size (logical/physical): 512 bytes / 512 bytes
I/O size (minimum/optimal): 512 bytes / 512 bytes
Disk label type: dos
Disk identifier: 0xbcab5d42

   Device Boot      Start         End      Blocks   Id  System

Command (m for help): w
The partition table has been altered!

Calling ioctl() to re-read partition table.
Syncing disks.
注:清除分区信息表之后,因为没有分区表不能进行挂载;
当之前只有一个分区时,此时解决恢复的方法是直接新建一个分区,重新挂载便可看到之前的信息。
虽然删除了分区信息表,但是只要没有格式化,硬盘信息还是会在的。
- iscsi 存储建立块
[root@server7 mfs]# dd if=/dev/zero of=/dev/vdb bs=512 count=1
	##清除分区信息表
[root@server7 mfs]# yum install targetcli.noarch  -y
[root@server7 mfs]# systemctl start target.service
[root@server7 ~]# targetcli		##创建 iscsi 的块
Warning: Could not load preferences file /root/.targetcli/prefs.bin.
targetcli shell version 2.1.fb46
Copyright 2011-2013 by Datera, Inc and others.
For help on commands, type 'help'.

/> ls
o- / ............................................................................................... [...]
  o- backstores .................................................................................... [...]
  | o- block ........................................................................ [Storage Objects: 0]
  | o- fileio ....................................................................... [Storage Objects: 0]
  | o- pscsi ........................................................................ [Storage Objects: 0]
  | o- ramdisk ...................................................................... [Storage Objects: 0]
  o- iscsi .................................................................................. [Targets: 0]
  o- loopback ............................................................................... [Targets: 0]
/> cd backstores/
/backstores> cd block
/backstores/block> create my_disk /dev/vdb
Created block storage object my_disk using /dev/vdb.
/backstores/block> cd /
/> cd iscsi
/iscsi> create iqn.2021-04.org.westos:storage1
Created target iqn.2021-04.org.westos:storage1.
Created TPG 1.
Global pref auto_add_default_portal=true
Created default portal listening on all IPs (0.0.0.0), port 3260.
/iscsi> cd iqn.2021-04.org.westos:storage1/
/iscsi/iqn.20...stos:storage1> cd tpg1/
/iscsi/iqn.20...storage1/tpg1> cd acls
/iscsi/iqn.20...ge1/tpg1/acls> ls
o- acls ........................................................................................ [ACLs: 0]
/iscsi/iqn.20...ge1/tpg1/acls> create iqn.2021-04.org.westos:client
Created Node ACL for iqn.2021-04.org.westos:client
/iscsi/iqn.20...ge1/tpg1/acls> ls
o- acls ........................................................................................ [ACLs: 1]
  o- iqn.2021-04.org.westos:client ...................................................... [Mapped LUNs: 0]
/iscsi/iqn.20...ge1/tpg1/acls> cd ..
/iscsi/iqn.20...storage1/tpg1> cd ..
/iscsi/iqn.20...stos:storage1> ls
o- iqn.2021-04.org.westos:storage1 ............................................................. [TPGs: 1]
  o- tpg1 ......................................................................... [no-gen-acls, no-auth]
    o- acls .................................................................................... [ACLs: 1]
    | o- iqn.2021-04.org.westos:client .................................................. [Mapped LUNs: 0]
    o- luns .................................................................................... [LUNs: 0]
    o- portals .............................................................................. [Portals: 1]
      o- 0.0.0.0:3260 ............................................................................... [OK]
/iscsi/iqn.20...stos:storage1> cd tpg1/luns
/iscsi/iqn.20...ge1/tpg1/luns> create /backstores/block/my_disk
Created LUN 0.
Created LUN 0->0 mapping in node ACL iqn.2021-04.org.westos:client
/iscsi/iqn.20...ge1/tpg1/luns> ls
o- luns ........................................................................................ [LUNs: 1]
  o- lun0 .................................................. [block/my_disk (/dev/vdb) (default_tg_pt_gp)]
/iscsi/iqn.20...ge1/tpg1/luns> cd ..
/iscsi/iqn.20...storage1/tpg1> cd ..
/iscsi/iqn.20...stos:storage1> ls
o- iqn.2021-04.org.westos:storage1 ............................................................. [TPGs: 1]
  o- tpg1 ......................................................................... [no-gen-acls, no-auth]
    o- acls .................................................................................... [ACLs: 1]
    | o- iqn.2021-04.org.westos:client .................................................. [Mapped LUNs: 1]
    |   o- mapped_lun0 ......................................................... [lun0 block/my_disk (rw)]
    o- luns .................................................................................... [LUNs: 1]
    | o- lun0 .............................................. [block/my_disk (/dev/vdb) (default_tg_pt_gp)]
    o- portals .............................................................................. [Portals: 1]
      o- 0.0.0.0:3260 ............................................................................... [OK]
/iscsi/iqn.20...stos:storage1> exit
Global pref auto_save_on_exit=true
Configuration saved to /etc/target/saveconfig.json
在 master 主机 server5 和 server8 上安装 iscsi 的安装包,并编辑配置文件;
[root@server5 mfs]# yum install iscsi-* -y
[root@server5 mfs]# vim /etc/iscsi/initiatorname.iscsi
[root@server5 mfs]# cat /etc/iscsi/initiatorname.iscsi
InitiatorName=iqn.2021-04.org.westos:client
[root@server5 ~]# iscsiadm -m discovery -t st -p 172.25.25.7 		##指定端口
172.25.25.7:3260,1 iqn.2021-04.org.westos:storage1
[root@server5 ~]# iscsiadm -m node -l 		##登陆
Logging in to [iface: default, target: iqn.2021-04.org.westos:storage1, portal: 172.25.25.7,3260] (multiple)
Login to [iface: default, target: iqn.2021-04.org.westos:storage1, portal: 172.25.25.7,3260] successful.
[root@server5 ~]# fdisk -l ##登陆完成之后,此时便可查看到输出端的信息

Disk /dev/vda: 21.5 GB, 21474836480 bytes, 41943040 sectors
Units = sectors of 1 * 512 = 512 bytes
Sector size (logical/physical): 512 bytes / 512 bytes
I/O size (minimum/optimal): 512 bytes / 512 bytes
Disk label type: dos
Disk identifier: 0x000c6f4d

   Device Boot      Start         End      Blocks   Id  System
/dev/vda1   *        2048     2099199     1048576   83  Linux
/dev/vda2         2099200    41943039    19921920   8e  Linux LVM

Disk /dev/mapper/rhel-root: 18.2 GB, 18249416704 bytes, 35643392 sectors
Units = sectors of 1 * 512 = 512 bytes
Sector size (logical/physical): 512 bytes / 512 bytes
I/O size (minimum/optimal): 512 bytes / 512 bytes


Disk /dev/mapper/rhel-swap: 2147 MB, 2147483648 bytes, 4194304 sectors
Units = sectors of 1 * 512 = 512 bytes
Sector size (logical/physical): 512 bytes / 512 bytes
I/O size (minimum/optimal): 512 bytes / 512 bytes


Disk /dev/sda: 10.7 GB, 10737418240 bytes, 20971520 sectors		##此为输出端的信息
Units = sectors of 1 * 512 = 512 bytes
Sector size (logical/physical): 512 bytes / 512 bytes
I/O size (minimum/optimal): 512 bytes / 512 bytes
在另外一台 master 主机 server8 中和 server5 主机中设置基一致;最终登陆 iscsi 之后可以看到其上的存储;
[root@server8 3.0.115]# yum install iscsi-* -y
[root@server8 3.0.115]# vim /etc/iscsi/initiatorname.iscsi
[root@server8 3.0.115]# cat /etc/iscsi/initiatorname.iscsi
InitiatorName=iqn.2021-04.org.westos:client
[root@server8 3.0.115]# iscsiadm -m discovery -t st -p 172.25.25.7
172.25.25.7:3260,1 iqn.2021-04.org.westos:storage1
[root@server8 3.0.115]# iscsiadm -m node -l
Logging in to [iface: default, target: iqn.2021-04.org.westos:storage1,  portal: 172.25.25.7,3260] (multiple)
Login to [iface: default, target: iqn.2021-04.org.westos:storage1, portal: 172.25.25.7,3260] successful.
[root@server8 3.0.115]# fdisk -l ##查看分区信息
iscsi 是比较安全的,客户端的信息在服务端是不能被看到的;
在 master 主机 server5 中做如下的设置:
[root@server5 ~]# fdisk /dev/sda
##server5 上新建分区
Welcome to fdisk (util-linux 2.23.2).

Changes will remain in memory only, until you decide to write them.
Be careful before using the write command.

Device does not contain a recognized partition table
Building a new DOS disklabel with disk identifier 0x6688ac10.

Command (m for help): p

Disk /dev/sda: 10.7 GB, 10737418240 bytes, 20971520 sectors
Units = sectors of 1 * 512 = 512 bytes
Sector size (logical/physical): 512 bytes / 512 bytes
I/O size (minimum/optimal): 512 bytes / 512 bytes
Disk label type: dos
Disk identifier: 0x6688ac10

   Device Boot      Start         End      Blocks   Id  System

Command (m for help): n
Partition type:
   p   primary (0 primary, 0 extended, 4 free)
   e   extended
Select (default p):
Using default response p
Partition number (1-4, default 1):
First sector (2048-20971519, default 2048):
Using default value 2048
Last sector, +sectors or +size{
     K,M,G} (2048-20971519, default 20971519):
Using default value 20971519
Partition 1 of type Linux and of size 10 GiB is set

Command (m for help): p

Disk /dev/sda: 10.7 GB, 10737418240 bytes, 20971520 sectors
Units = sectors of 1 * 512 = 512 bytes
Sector size (logical/physical): 512 bytes / 512 bytes
I/O size (minimum/optimal): 512 bytes / 512 bytes
Disk label type: dos
Disk identifier: 0x6688ac10

   Device Boot      Start         End      Blocks   Id  System
/dev/sda1            2048    20971519    10484736   83  Linux

Command (m for help): w
The partition table has been altered!

Calling ioctl() to re-read partition table.
Syncing disks.
由于是热备共存储的,此时在 server8 上也能观察到效果;
[root@server8 ~]# fdisk -l		##server8 可以看到分区信息

Disk /dev/vda: 21.5 GB, 21474836480 bytes, 41943040 sectors
Units = sectors of 1 * 512 = 512 bytes
Sector size (logical/physical): 512 bytes / 512 bytes
I/O size (minimum/optimal): 512 bytes / 512 bytes
Disk label type: dos
Disk identifier: 0x000c6f4d

   Device Boot      Start         End      Blocks   Id  System
/dev/vda1   *        2048     2099199     1048576   83  Linux
/dev/vda2         2099200    41943039    19921920   8e  Linux LVM

Disk /dev/mapper/rhel-root: 18.2 GB, 18249416704 bytes, 35643392 sectors
Units = sectors of 1 * 512 = 512 bytes
Sector size (logical/physical): 512 bytes / 512 bytes
I/O size (minimum/optimal): 512 bytes / 512 bytes


Disk /dev/mapper/rhel-swap: 2147 MB, 2147483648 bytes, 4194304 sectors
Units = sectors of 1 * 512 = 512 bytes
Sector size (logical/physical): 512 bytes / 512 bytes
I/O size (minimum/optimal): 512 bytes / 512 bytes


Disk /dev/sda: 10.7 GB, 10737418240 bytes, 20971520 sectors
Units = sectors of 1 * 512 = 512 bytes
Sector size (logical/physical): 512 bytes / 512 bytes
I/O size (minimum/optimal): 512 bytes / 512 bytes
Disk label type: dos
Disk identifier: 0xf4771c4e

   Device Boot      Start         End      Blocks   Id  System
/dev/sda1            2048    20971519    10484736   83  Linux

[root@server8 ~]#  ll /dev/sda1
##此时虽然会看到分区信息表中的信息,但是实际并不存在
ls: cannot access /dev/sda1: No such file or directory
[root@server4 ~]# partprobe			##刷新内核分区表
[root@server4 ~]# ll /dev/sda1		##此时才会看到新的分区信息
brw-rw---- 1 root disk 8, 1 Apr 18 16:18 /dev/sda1
此时在 server5 上来做,在 server8 上来观察实验效果;
格式化分区,挂载设备;往存储中存入数据,卸载挂载,在 server8 中来观察效果;
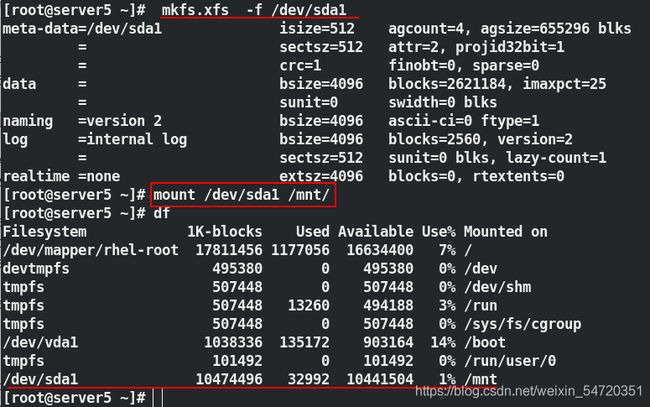
[root@server5 ~]# mkfs.xfs  -f /dev/sda1
	##由于之前存储上有信息,此时格式化需要加参数 -f
[root@server5 ~]# mount /dev/sda1 /mnt/
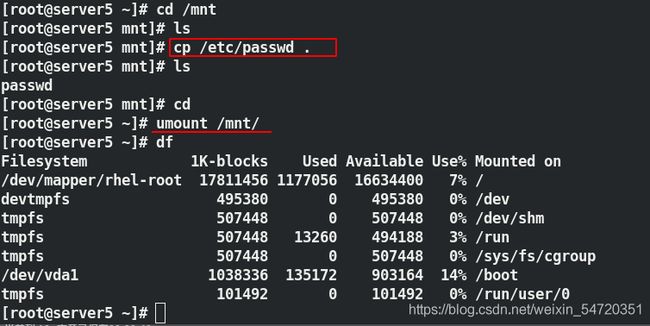
[root@server5 ~]# cd /mnt
[root@server5 mnt]# ls
[root@server5 mnt]# cp /etc/passwd .
[root@server5 mnt]# ls
passwd
[root@server5 mnt]# cd
[root@server5 ~]# umount /mnt/
注: xfs 是本地本件系统,不能同时挂载到两个节点上。当 server5 没有卸载时, server8 上即使挂载上也不能观察到内容。
- 数据迁移
[root@server8 ~]# umount /mnt/
[root@server5 ~]# systemctl stop moosefs-master
##停止和开启时 /var/lib/mfs/ 中文件的内容不一致,此处应该先停止然后在复制
[root@server5 ~]# mount /dev/sda1 /mnt/
[root@server5 ~]# cd /mnt/
[root@server5 mnt]# ls
passwd
[root@server5 mnt]# rm -fr *
[root@server5 mnt]# ls
[root@server5 mnt]# cd /var/lib/mfs/
[root@server5 mfs]# ls
[root@server5 mfs]# cp -p * /mnt/
[root@server5 mfs]# cd /mnt
[root@server5 mnt]# ls
changelog.2.mfs  changelog.5.mfs  changelog.8.mfs  metadata.crc		metadata.crc       metadata.mfs.back.1  stats.mfs
changelog.3.mfs  changelog.7.mfs  changelog.9.mfs  metadata.mfs.back  metadata.mfs.empty
[root@server5 mnt]# cd
[root@server5 ~]# ls -ld /mnt/
drwxr-xr-x 2 root root 259 Apr 28 22:19 /mnt/
[root@server5 ~]# chown mfs.mfs /mnt/
##修改文件的所有人和所有组,其实修改的是挂上去的设备的所有人和所有组
[root@server5 ~]# umount /mnt/
[root@server5 ~]# mount /dev/sda1 /var/lib/mfs/
[root@server5 mfs]# systemctl start moosefs-master
##策划一下看是否能正常启动
[root@server5 mfs]# systemctl stop moosefs-master
[root@server5 mfs]# cd
[root@server5 ~]# umount /var/lib/mfs/
在 server8 中来测试:
[root@server8 ~]# netstat -antlp		##确定没有启动
[root@server8 ~]# mount /dev/sda1  /var/lib/mfs/
[root@server8 ~]# systemctl start moosefs-master
[root@server8 ~]# netstat -antlp		##查看是否正常启动
[root@server8 ~]# systemctl stop moosefs-master.service
[root@server8 ~]# umount /var/lib/mfs/
此时虽然可以挂载,但是客户端的信息并不能被识别,接下来就应该做高可用,自动切换;
可以参考官方文档 Pacemaker
(1)两个主 master 之间做免密认证
[root@server5 ~]#  ssh-keygen		##生成密钥
Generating public/private rsa key pair.
Enter file in which to save the key (/root/.ssh/id_rsa):
Enter passphrase (empty for no passphrase):
Enter same passphrase again:
Your identification has been saved in /root/.ssh/id_rsa.
Your public key has been saved in /root/.ssh/id_rsa.pub.
The key fingerprint is:
SHA256:r/hiMC0Dnl3h1YRfJMKgK7EDLVdS8Gkav85yHwNsJxU root@server5
The key's randomart image is:
+---[RSA 2048]----+
|  ooo Eo.+o..    |
| . + o..+....    |
|o = =..o . .     |
| +.O oo   .      |
| .=+Bo. S        |
|  o+*=.  .       |
|    .=o   .      |
|  .o. o+ .       |
|   oooooo        |
+----[SHA256]-----+
[root@server5 ~]# ssh-copy-id server8	##发送公钥
/usr/bin/ssh-copy-id: INFO: Source of key(s) to be installed: "/root/.ssh/id_rsa.pub"
The authenticity of host 'server8 (172.25.25.8)' can't be established.
ECDSA key fingerprint is SHA256:cbCu+XhxnOmdcBA5Yw4Zcd2CgLZrbma+AQzLIGvU3hc.
ECDSA key fingerprint is MD5:7a:1b:f7:c6:9c:25:f9:c3:d7:22:d7:fa:e3:ff:61:5e.
Are you sure you want to continue connecting (yes/no)? yes
/usr/bin/ssh-copy-id: INFO: attempting to log in with the new key(s), to filter out any that are already installed
/usr/bin/ssh-copy-id: INFO: 1 key(s) remain to be installed -- if you are prompted now it is to install the new keys
root@server8's password:

Number of key(s) added: 1

Now try logging into the machine, with:   "ssh 'server8'"
and check to make sure that only the key(s) you wanted were added.
(2) 安装套件
yum install -y pacemaker pcs psmisc policycoreutils-python 第一次安装可能会缺失一些对应的包;此时需要重新配置软件仓库;
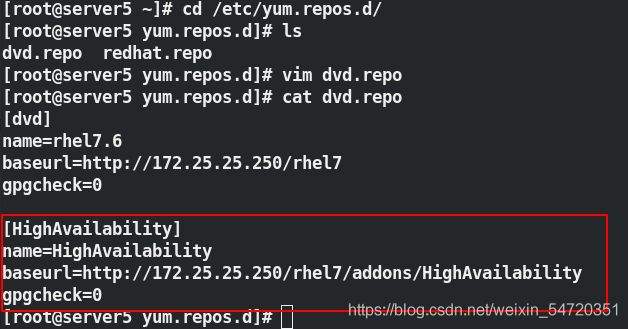
配置好软件仓库之后,再次安装高可用套件便不会在有问题。
由于之前做了免密认证,此时在台主机上为两台主机一起操作,保证一致。
[root@server5 yum.repos.d]# scp dvd.repo server8:/etc/yum.repos.d/
## 将软件仓库复制到server8 master 主机上
[root@server5 yum.repos.d]# ssh server8 yum install -y pacemaker pcs psmisc policycoreutils-python
在 server8 主机上安装高可用套件
注:在客户端先卸载 mfs 不然会很卡umount /mnt/mfs;
在安传完成之后,此时便可以启动来为两个节点之间做设置;
[root@server5 yum.repos.d]# systemctl enable --now pcsd.service
##设定开机自启
[root@server5 yum.repos.d]# ssh server8 systemctl enable --now pcsd.service
[root@server5 yum.repos.d]# echo westos | passwd --stdin hacluster
	##设定密码
[root@server5 yum.repos.d]# ssh server8 echo westos | passwd --stdin hacluster
[root@server5 yum.repos.d]# grep hacluster /etc/shadow
	##查看密码是否设定成功
hacluster:$6$76tIwIH1$KYYyS9mNmhY1jaQUNSvuiyguusuLyAO3ZEWF76NQdOSfrnwI1YfKDVUbqhaq8rYblBNKcgzT0ZusyOHHAuuf81:18746::::::
[root@server5 ~]# pcs cluster auth server5 server8
	##认证 server5 和 server8 打算做集群的主机,认证的用户是  hacluster
Username: hacluster
Password:
server5: Authorized
server8: Authorized
[root@server5 ~]#  pcs cluster setup --name mycluster server5 server8
##添加节点到集群
启动集群
[root@server5 ~]# pcs cluster start --all	##启动所有的节点
server5: Starting Cluster (corosync)...
server8: Starting Cluster (corosync)...
server5: Starting Cluster (pacemaker)...
server8: Starting Cluster (pacemaker)...
此时查看集群的状态时,发现会有警告信息,但是两个节点已经 online ;
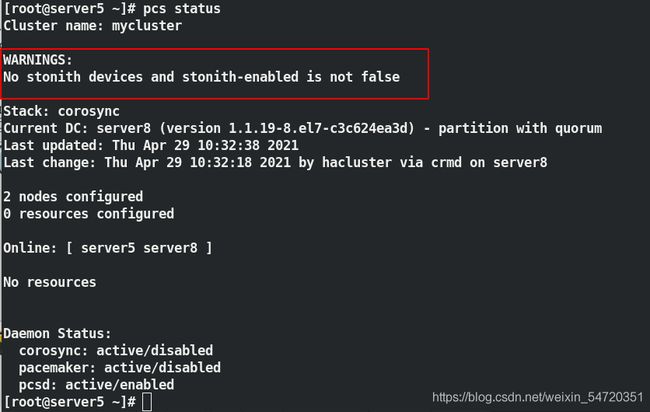
当查看状态有问题时,可以用以下方法来查看日志信息:
journalctl | grep -i error 或者 crm_verify -LV 来查看错误信息;
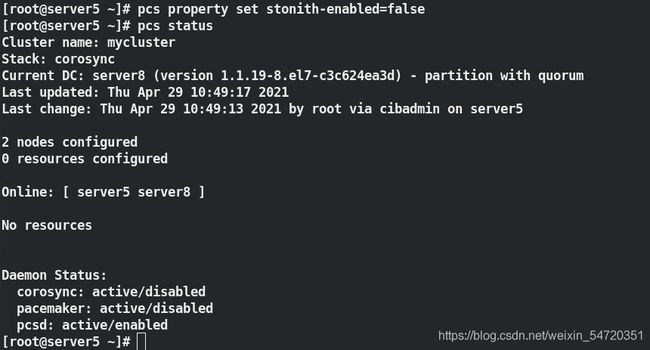
执行 pcs property set stonith-enabled=false之后,此时可以看到两个节点都 online ,没有警告信息;
[root@server5 ~]# pcs resource standards
[root@server5 ~]# pcs resource providers
[root@server5 ~]# pcs resource agents ocf:heartbeat
[root@server5 ~]# pcs resource decsribe ocf:heartbeat:IPaddr2
	##查看设定vip 相关的具体信息
[root@server5 ~]# pcs resource create vip ocf:heartbeat:IPaddr2 ip=172.25.25.100 cidr_netmask=32 op monitor interval=30s
	##创建 vip 为172.25.225.100 ,每隔30s 监控一次
[root@server5 ~]# pcs status		##查看状态
[root@server5 ~]# ip addr			##查看 IP 是否已经到位
[root@server5 ~]# pcs node standby
	##模拟节点下线,看其是否会自动切换
[root@server5 ~]# pcs status		##再次查看状态
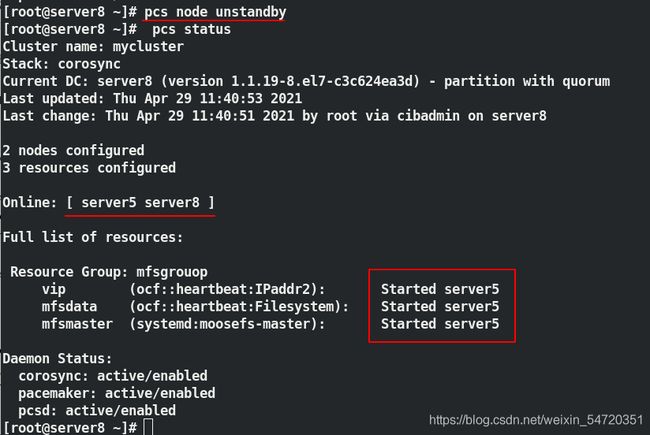
[root@server5 ~]# pcs node unstandby	##节点上线
[root@server5 ~]# pcs status		##再次查看状态
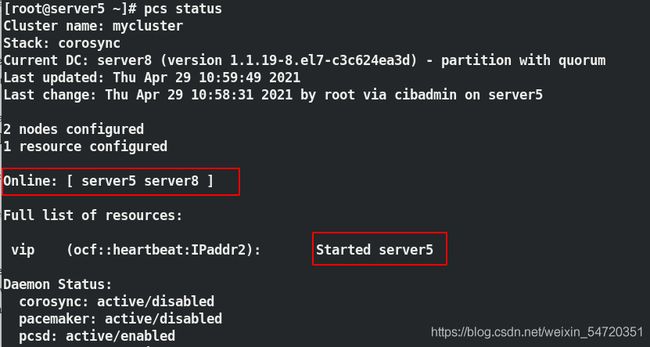
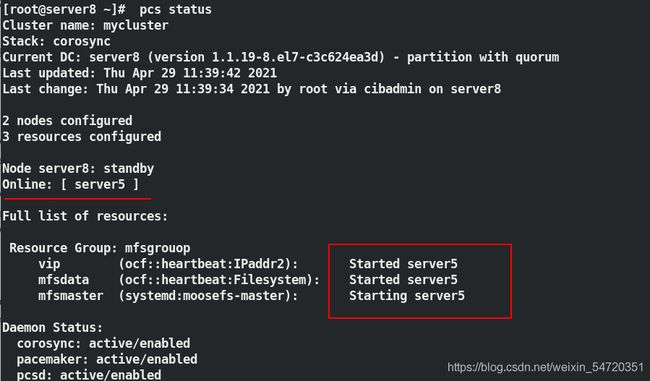
当 vip 设定好之后,此时查看 vip 的设定时如图所示,此时 vip 是在 server5 上;

此时让 server5 下线,看 vip 是否会自动切换;如图当 server5 下线时,此时会自动切换到 server8 上;
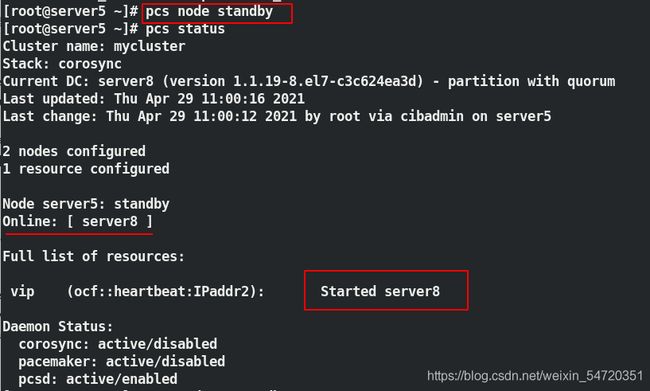
当 server5 再次上线时,此时并不会资源发生争抢,不会切换;
[root@server5 ~]# pcs cluster enable --all
server5: Cluster Enabled
server8: Cluster Enabled
[root@server5 ~]# ssh server8 pcs cluster enable --all
server5: Cluster Enabled
server8: Cluster Enabled
此时 vip 已经设定完成,接下来就应该加入服务和存储;
[root@server5 ~]# pcs resource describe ocf:heartbeat:Filesystem
##查看帮助
[root@server5 ~]# pcs resource create mfsdata ocf:heartbeat:Filesystem device=/dev/sda1 directory=/var/lib/mfs fstype=xfs op monitor interval=60s
##设定存储,此时存储和vip 不在一起;
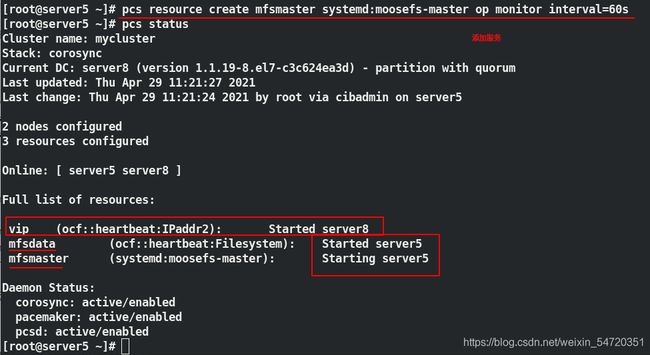
[root@server5 ~]# pcs resource create mfsmaster systemd:moosefs-master op monitor interval=60s
##添加服务,此时三个可能不在一起
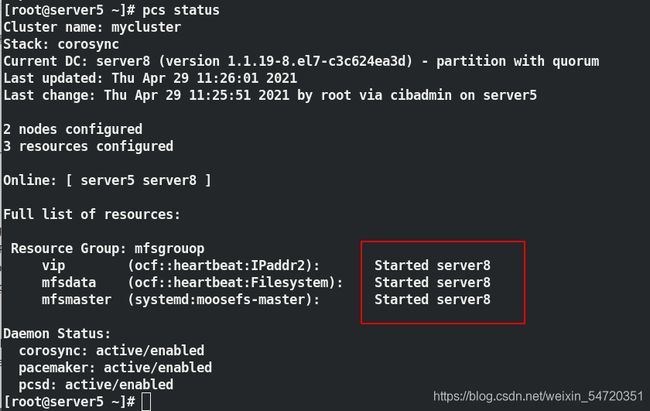
添加完服务和存储之后,此时可能和 vip 并不在一起,所以需要建立一个组来约束,组的作用起到资源约束和启动顺序的约束;
[root@server5 ~]# pcs resource group add mfsgrouop vip mfsdata mfsmaster
 ##先挂存储后起服务;
此时再次查看身份时,稍等一会便会设定成功;
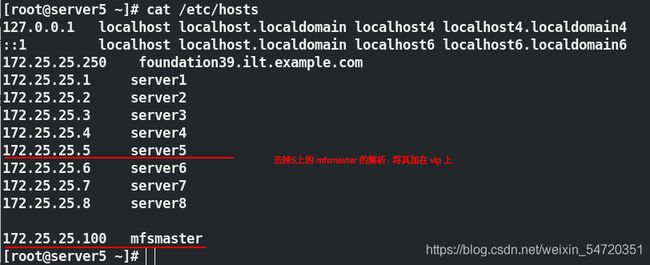
此时在一个结点上便可以进行整体迁移,在做迁移前要先写入解析,在所有结点都要写入;
[root@server5 ~]# cat /etc/hosts
127.0.0.1   localhost localhost.localdomain localhost4 localhost4.localdomain4
::1         localhost localhost.localdomain localhost6 localhost6.localdomain6
172.25.25.250	 foundation39.ilt.example.com
172.25.25.1	server1
172.25.25.2	server2
172.25.25.3	server3
172.25.25.4	server4
172.25.25.5 server5
172.25.25.6	server6
172.25.25.7	server7
172.25.25.8	server8

172.25.25.100	mfsmaster

[root@server6 ~]# vim /etc/hosts
[root@server6 ~]# systemctl restart moosefs-chunkserver

[root@server7 ~]# vim /etc/hosts
[root@server7 ~]# systemctl restart moosefs-chunkserver

[root@server8 ~]# vim /etc/hosts

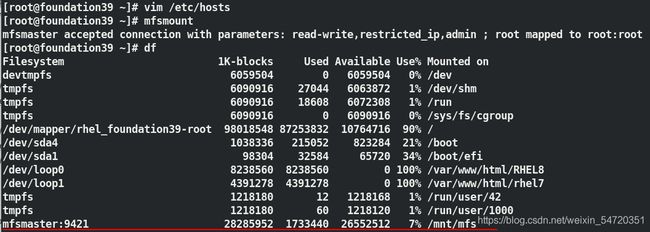
[root@foundation39 ~]# vim /etc/hosts
[root@foundation39 ~]# mfsmount
mfsmaster accepted connection with parameters: read-write,restricted_ip,admin ; root mapped to root:root
故障切换
做完解析之后,此时便可以做故障切换来模拟数据迁移;
[root@server8 ~]# pcs node standby ##停掉 server8 上结点
[root@server8 ~]#  pcs status ##此时查看时会自动切换到在线的 server5
server8 再次上线:
当 5 内核突然崩了时,5 和 8 之间的心跳就断了;
模拟内核突然崩溃的现象:
[root@server5 ~]# echo c > /proc/sysrq-trigger
##server5 内核崩了

[root@server8 ~]# pcs status
Cluster name: mycluster
Stack: corosync
Current DC: server8 (version 1.1.19-8.el7-c3c624ea3d) - partition with quorum
Last updated: Thu Apr 29 12:07:55 2021
Last change: Thu Apr 29 11:40:51 2021 by root via cibadmin on server8

2 nodes configured
3 resources configured

Online: [ server8 ]
OFFLINE: [ server5 ]

Full list of resources:

 Resource Group: mfsgrouop
     vip	(ocf::heartbeat:IPaddr2):	Started server8
     mfsdata	(ocf::heartbeat:Filesystem):	Started server8
     mfsmaster	(systemd:moosefs-master):	Stopped

Failed Actions:
* mfsmaster_start_0 on server8 'not running' (7): call=30, status=complete, exitreason='',
    last-rc-change='Thu Apr 29 12:07:49 2021', queued=0ms, exec=2111ms


Daemon Status:
  corosync: active/enabled
  pacemaker: active/enabled
  pcsd: active/enabled
	##此时检测到 8 上服务起不来
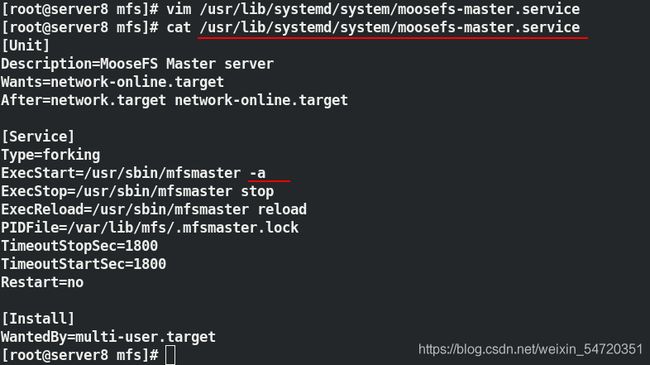
由于没有正常嗯关闭,文件丢失,服务启动不了,可用 mfsmaster -a 来恢复数据;
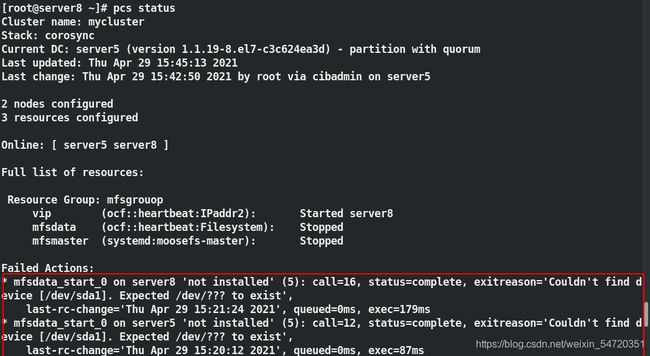
恢复之后,虽然服务起来了,但是是手动起来的集群并不能识别;也就是说当起不来的时候需要修改启动脚本
修改脚本
[root@server8 mfs]# vim /usr/lib/systemd/system/moosefs-master.service
当修改脚本之后,修改 server5 的内核问题之后,此时当 server5 起来之后,会自动切换到 server5 上;在 server5 上也编辑启动脚本
[root@server5 ~]# vim /usr/lib/systemd/system/moosefs-master.service
[root@server5 ~]# systemctl daemon-reload
此时再次模拟 5 上内核崩溃;
[root@server8 ~]# pcs status
Cluster name: mycluster
Stack: corosync
Current DC: server8 (version 1.1.19-8.el7-c3c624ea3d) - partition with quorum
Last updated: Thu Apr 29 12:20:11 2021
Last change: Thu Apr 29 11:40:51 2021 by root via cibadmin on server8

2 nodes configured
3 resources configured

Online: [ server8 ]
OFFLINE: [ server5 ]

Full list of resources:

 Resource Group: mfsgrouop
     vip	(ocf::heartbeat:IPaddr2):	Started server8
     mfsdata	(ocf::heartbeat:Filesystem):	Started server8
     mfsmaster	(systemd:moosefs-master):	Stopped

Failed Actions:
* mfsmaster_start_0 on server8 'not running' (7): call=30, status=complete, exitreason='',
    last-rc-change='Thu Apr 29 12:07:49 2021', queued=0ms, exec=2111ms


Daemon Status:
  corosync: active/enabled
  pacemaker: active/enabled
  pcsd: active/enabled
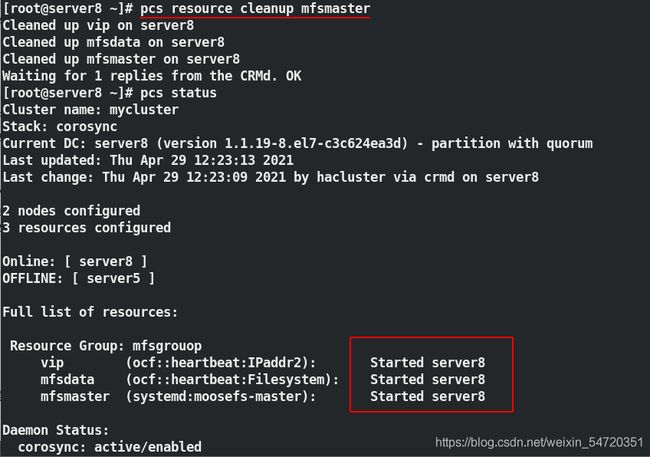
此时 server8 还是起不来,因为他尝试启动过,但是没有起来,不会重复启动,需要刷新资源;
server8 虽然接管,但是 server8 此时是单点;
现在两个 master 属于双机热位集群,共同使用一个存储;
在生产环境中可能会因为压力过大或者网络等原因出现假死状态,网络的问题可以用添加网线的办法来避免,但是其他问题导致 master 假死时,心跳丢失,此时会将数据传递到另外一个 master 所在的主机上,但是假死主机再次启动时,此时共享存储发生争抢;此时就需要一个fence设备,当其出现假死时,就给其断电(没有正常 reboot);断电之后在给其供电,由于设置了开机自启,当其再次开启会自动加入到集群中;
由于没有外部的电源交换机,此处借助虚拟机来模拟实验,搭建虚拟机 fence
虚拟机fence
在客户端(真实主机中)安装:
[root@foundation39 ~]# yum install fence-virtd-libvirt.x86_64 fence-virtd.x86_64 fence-virtd-multicast.x86_64 -y
安装完成之后输入 fence_virtd -c 来设定 fence 设备的信息;
[root@foundation39 ~]# fence_virtd -c
Module search path [/usr/lib64/fence-virt]:

Available backends:
    libvirt 0.3
Available listeners:
    multicast 1.2

Listener modules are responsible for accepting requests
from fencing clients.

Listener module [multicast]:

The multicast listener module is designed for use environments
where the guests and hosts may communicate over a network using
multicast.

The multicast address is the address that a client will use to
send fencing requests to fence_virtd.

Multicast IP Address [225.0.0.12]:

Using ipv4 as family.

Multicast IP Port [1229]:

Setting a preferred interface causes fence_virtd to listen only
on that interface.  Normally, it listens on all interfaces.
In environments where the virtual machines are using the host
machine as a gateway, this *must* be set (typically to virbr0).
Set to 'none' for no interface.

Interface [virbr0]: br0

The key file is the shared key information which is used to
authenticate fencing requests.  The contents of this file must
be distributed to each physical host and virtual machine within
a cluster.

Key File [/etc/cluster/fence_xvm.key]:

Backend modules are responsible for routing requests to
the appropriate hypervisor or management layer.

Backend module [libvirt]:

The libvirt backend module is designed for single desktops or
servers.  Do not use in environments where virtual machines
may be migrated between hosts.

Libvirt URI [qemu:///system]:

Configuration complete.

=== Begin Configuration ===
backends {

	libvirt {

		uri = "qemu:///system";
	}

}

listeners {

	multicast {

		port = "1229";
		family = "ipv4";
		interface = "br0";
		address = "225.0.0.12";
		key_file = "/etc/cluster/fence_xvm.key";
	}

}

fence_virtd {

	module_path = "/usr/lib64/fence-virt";
	backend = "libvirt";
	listener = "multicast";
}

=== End Configuration ===
Replace /etc/fence_virt.conf with the above [y/N]? y
设定完成之后需要建立设定时的目录和生成密钥;
[root@foundation39 ~]# cd /etc/cluster/
-bash: cd: /etc/cluster/: No such file or directory
[root@foundation39 ~]# mkdir /etc/cluster		##建立目录
[root@foundation39 ~]# cd /etc/cluster/
[root@foundation39 cluster]# dd if=/dev/urandom of=/etc/cluster/fence_xvm.key bs=128 count=1
 ##生成密钥文件
1+0 records in
1+0 records out
128 bytes copied, 7.4463e-05 s, 1.7 MB/s
[root@foundation39 cluster]# ll
total 4
-rw-r--r--. 1 root root 128 Apr 29 16:17 fence_xvm.key
[root@foundation39 cluster]# netstat -anulp | grep :1229
[root@foundation39 cluster]# systemctl start fence_virtd	##开启服务
[root@foundation39 cluster]# netstat -anulp | grep :1229
udp        0      0 0.0.0.0:1229            0.0.0.0:*                           7375/fence_virtd
在真实主机中开启 fence 服务之后,在 master 主机中安装客户端;
[root@server5 ~]# yum install fence-virt.x86_64 -y		##安装客户端
[root@server5 ~]# ssh server8 yum install fence-virt.x86_64 -y
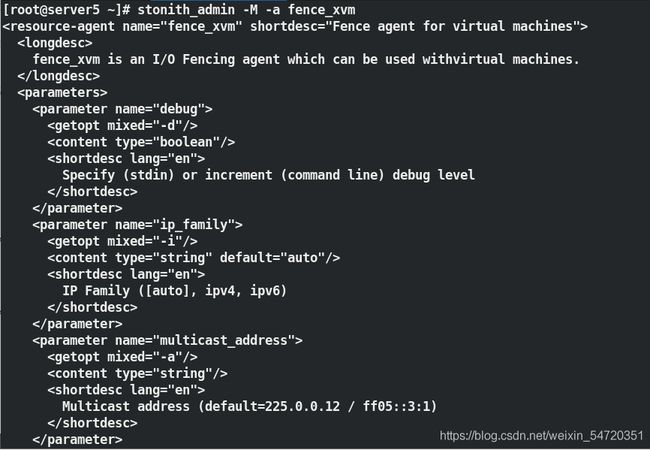
查看其元数据,查看其工作时做了那些动作:输入命令 stonith_admin -M -a fence_xvm
在两个 master 端也要新建目录,将之前生成的密钥复制过来;
[root@server5 ~]# mkdir /etc/cluster
[root@server5 ~]# ssh server8 mkdir /etc/cluster
[root@server5 ~]# ls  /etc/cluster/
fence_xvm.key
[root@server5 ~]# ssh server8 ls  /etc/cluster/
fence_xvm.key
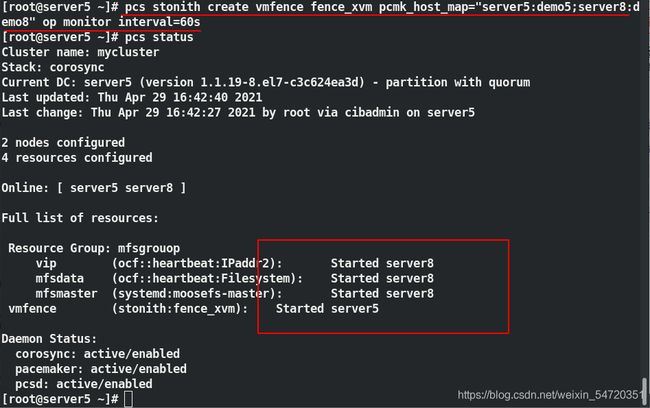
由于虚拟机的主机名和真实主机中看到的名称不一致,卒要做映射;
[root@server5 ~]# pcs stonith create vmfence fence_xvm pcmk_host_map="server5:demo5;server8:demo8" op monitor interval=60s
[root@server5 ~]# pcs status
设定完成之后,此时虽然 fence 已经加进去了,但是并没有生效;输入命令 pcs property set stonith-enabled=true 来让其生效;
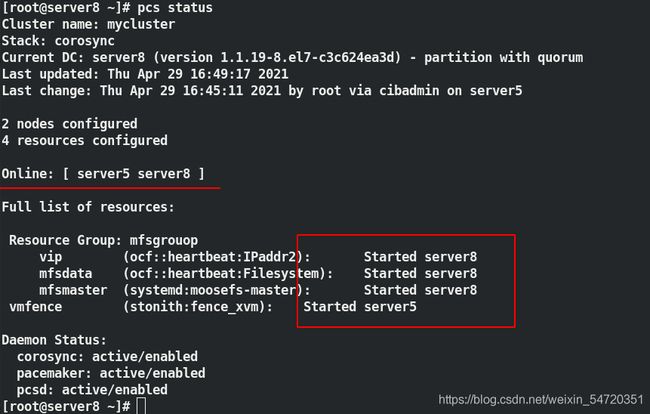
此时再次模拟内核故障,现在 vip 在 server8 上,让 server8 内核发生故障来观察;
[root@server8 ~]# echo c > /proc/sysrq-trigger
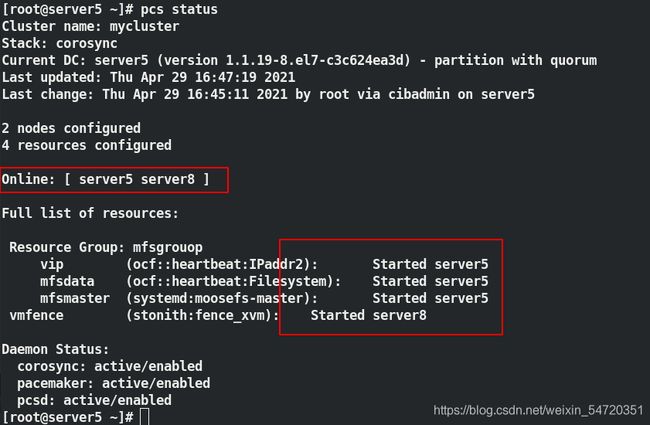
当 server8 故障时,会自动切换到在线的主机中, server8 等待开启之后会自动加入集群,并不会争夺资源;
模拟网卡硬件故障,此时 vip 在 server5 上,让 server5 的网卡发生故障,来观察效果;
[root@server5 ~]# ip link set down eth0
当 server5 故障时,会自动切换到在线的主机中, server5 等待开启之后会自动加入集群,并不会争夺资源;
注:
在做的过程中如果出现以下问题,只需输入 pcs resource cleanup mfsmaster 来刷新一下资源即可;。

