上一篇文章介绍了maskView的原理和基本使用
接下来介绍下maskView的进阶使用
一.利用maskView使用多种图片做渐变切换动画
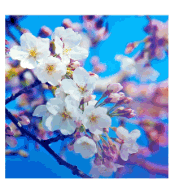
1.素材

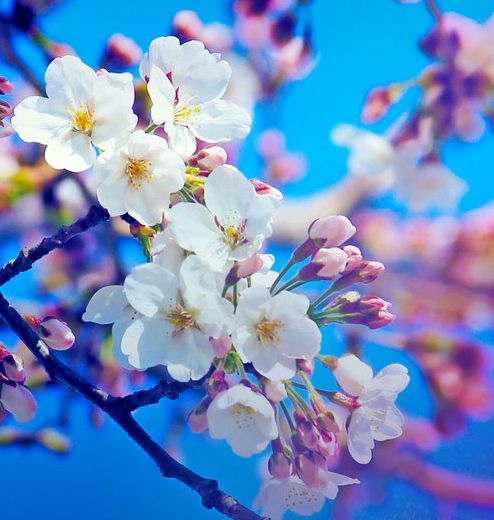


    // 上述素材按照顺序分别是‘base’,'background',''mask','mask1';
    self.view.backgroundColor = [UIColor whiteColor];
    UIImageView *baseGround = [[UIImageView alloc] initWithFrame:CGRectMake(0, 0, 200, 200)];
    baseGround.image        = [UIImage imageNamed:@"base"];
    baseGround.center       = self.view.center;
    [self.view addSubview: baseGround];


    UIImageView *upGround = [[UIImageView alloc] initWithFrame:baseGround.frame];
    upGround.image        = [UIImage imageNamed:@"background"];
    [self.view addSubview:upGround];


    UIView *mask      = [[UIView alloc] initWithFrame:upGround.bounds];
    upGround.maskView = mask;

    UIImageView *picOne = [[UIImageView alloc] initWithFrame:CGRectMake(0, 0, 100, 400)];
    picOne.image        = [UIImage imageNamed:@"mask1"];
    [mask addSubview:picOne];

    UIImageView *picTwo = [[UIImageView alloc] initWithFrame:CGRectMake(100, -200, 100, 400)];
    picTwo.image        = [UIImage imageNamed:@"mask"];
    [mask addSubview:picTwo];

    [UIView animateWithDuration:5.f delay:5.f options:0 animations:^{
        picOne.y -= 400;
        picTwo.y += 400;
    } completion:^(BOOL finished) {

    }];
- Code原理解析:
mask默认色为透明(clearColor),如果picOne和picTwo不存在时,由于mask是透明,切mask又是upGround的maskView,则upGround也会透明,即效果图只会看到baseGround。在此例中一开始mask有picOne和picTwo两个子View,且picOne和picTwo显示在mask上的部分不是透明部分,所以一开始效果图只会看到backGround.
- 图片渐变动画实现原理:
随着picOne和picTwo的上下部分移动,最终的效果是picOne和picTwo显示在mask上的都是透明部分,当显示在mask上的控件透明时,则mask也会透明,那么backGround也会透明,最终的效果图就是逐渐看不到backGround,然后显示baseGround.
运行效果图
二.maskView配合CAGradientLayer使用
iPhone滑动解锁效果
先来个Demo来解释下CAGradientLayer吧,先了解下CAGradientLayer是个啥玩意,
- (void)viewDidLoad {
    [super viewDidLoad];
    self.view.backgroundColor = [UIColor grayColor];
    // 渐变Layer
    CAGradientLayer *gradientLayer = [CAGradientLayer layer];
    [self.view.layer addSublayer:gradientLayer];
    gradientLayer.frame = CGRectMake(0, 200, self.view.width, 64);
    gradientLayer.colors = @[
                             (__bridge id)[UIColor blackColor].CGColor,
                              (__bridge id)[UIColor whiteColor].CGColor,
                              (__bridge id)[UIColor blackColor].CGColor,                             ];
    gradientLayer.locations = @[@0.25,@0.5,@0.75];
 }
运行效果图:
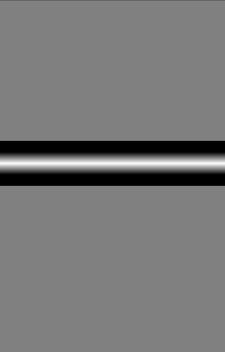
CAGradientLayer可用来处理颜色渐变,它的渐变色也可以做隐式动画
此例用frame设置了layer的位置,也可以用position属性设置layer的位置
colors 属性是设置CAGradientLayer的渐变颜色(此Demo是从黑-->白-->黑)。
locations 属性是相对于 colors 设置的,此Demo中locations值的含义是 按颜色渐变方向划分 ,从(0 -> 0.25)部分是黑色,从(0.25 -> 0.5)部分是黑到白的渐变过程,以此类推0.75的含义。
注意
1.CAGradientLayer 默认的渐变方向是从上到下,即垂直方向。
2.colors 是个NSArray类型,只能存对象,所以需要将CGColor转换一下,此属性可设置多个值(1个,2个,3个等...,都行),此Demo的滑动解锁效果只需要 两种 颜色的渐变,所以设置了三个值,实际值可根据需求设置。
3.设置好 colors 要设置好与之相对应的 locations 值
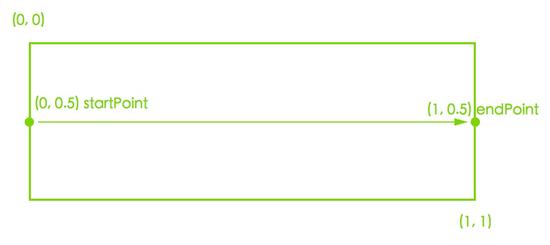
4.如果要改变 CAGradientLayer 的渐变方向,则要显式的给 startPoint和 endPoint 两个属性赋值。
如果要改为水平方向,则需要改成
             gradientLayer.startPoint = CGPointMake(0, 0.5);
             gradientLayer.endPoint = CGPointMake(1, 0.5)
修改之后的效果图:
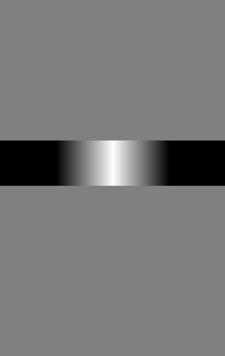
startPoint,endPoint原理解析
既然 CAGradientLayer 可以绘制出渐变颜色的效果,那自然有颜色渐变的方向,所以这两个属性的作用就是设置颜色渐变的起始点和结束点,这两个属性共同决定了颜色渐变的方向:
接下来来个CAGradientLayer的动效Demo(只需要在上面的代码添加几句即可)
- (void)viewDidLoad {
    [super viewDidLoad];
    self.view.backgroundColor = [UIColor grayColor];
    // 渐变Layer
    CAGradientLayer *gradientLayer = [CAGradientLayer layer];
    [self.view.layer addSublayer:gradientLayer];
    gradientLayer.frame = CGRectMake(0, 200, self.view.width, 64);
   gradientLayer.colors = @[
                             (__bridge id)[UIColor blackColor].CGColor,
                              (__bridge id)[UIColor whiteColor].CGColor,
                              (__bridge id)[UIColor blackColor].CGColor,                             ];
    gradientLayer.locations = @[@0.25,@0.5,@0.75];

    // 添加部分
    CABasicAnimation *basicAnimation = [CABasicAnimation animationWithKeyPath:@"locations"];
    basicAnimation.fromValue = @[@0, @0, @0.25];
    basicAnimation.toValue = @[@0.75, @1, @1];
    basicAnimation.duration = 2.5;
    basicAnimation.repeatCount = HUGE;
    [gradientLayer addAnimation:basicAnimation forKey:nil];

 }
解析:
- 将keyPath赋值为“locations”是让CAGradientLayer的locations属性做动画,因为locations对应着颜色,那么颜色也会跟着动,最终的显示效果就是:

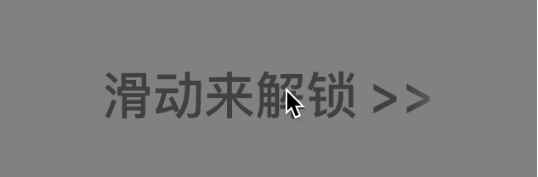
疑问:但是如何将颜色渐变的动画作用在UILabel的文字上呢 ?
1.其实非常简单,就是让UILabel上的文字称为CAGradientLayer的遮罩即可。
再来修改下代码
- (void)viewDidLoad {
    [super viewDidLoad];
    self.view.backgroundColor = [UIColor grayColor];
    // 渐变Layer
    CAGradientLayer *gradientLayer = [CAGradientLayer layer];
    [self.view.layer addSublayer:gradientLayer];
    gradientLayer.frame = CGRectMake(0, 200, self.view.width, 64);
    gradientLayer.colors = @[
                             (__bridge id)[UIColor blackColor].CGColor,
                              (__bridge id)[UIColor whiteColor].CGColor,
                              (__bridge id)[UIColor blackColor].CGColor,                             ];
    gradientLayer.locations = @[@0.25,@0.5,@0.75];

    // 添加部分
    CABasicAnimation *basicAnimation = [CABasicAnimation animationWithKeyPath:@"locations"];
    basicAnimation.fromValue = @[@0, @0, @0.25];
    basicAnimation.toValue = @[@0.75, @1, @1];
    basicAnimation.duration = 2.5;
    basicAnimation.repeatCount = HUGE;
    [gradientLayer addAnimation:basicAnimation forKey:nil];

    // 第二次添加部分
    UILabel *unlock = [[UILabel alloc] initWithFrame:gradientLayer.bounds];
    // 必需要强引用保存unlock,此句也可以用[self.view addSubview:unlock]来替代;
    self.unlock = unlock;
    unlock.alpha = 0.5;
    unlock.text = @"滑动来解锁 >>";
    unlock.textAlignment = NSTextAlignmentCenter;
    unlock.font = [UIFont boldSystemFontOfSize:30];
    gradientLayer.mask = unlock.layer;
 }
代码解析:
1.self.unlock = unlock; 用强引用保存label (@property (nonatomic, strong)UILabel *unlock;) ,防止 label dealloc,如果label被销毁,则label没有了delegate。
为什么要强引用 unlock 标签 ?
当一个控件(UIiew,UIlabel,UIbutton)创建时,系统会自动创建一个与之相对应的layer,layer怎么显示,实际是与之对应的控件相关的,layer与之对应的控件是delegate关系,即layer.delegate=当前控件,在系统创建layer之后,layer的delegate会执行 - (void)drawLayer:(CALayer *)layer inContext:(CGContextRef)context 方法绘制图层来显示给用户看,当控件销毁了,则不会执行此方法了,那么layer上什么也没有,又因为控件创建的默认色为clearColor(如果设置了backgroundColor为不透明,则layer也会不透明),那么layer也会全透明(UIImageView比较特殊,除外)。在此例中如果不强引用保存unlock,执行完viewDidload方法后unlock就会销毁,如果unlock销毁了,那么unlock相对的layer就是全透明,那么gradientLayer也会全透明,即不强引用unlock的最终显示效果是 屏幕上什么都看不见。
最终滑动解锁效果图:
关于CAGradientLayer的属性详细解析可参考CAGradientLayer的一些属性解析
三.maskView配合CAShapeLayer使用
这个Demo没啥可讲的,自己看下源码,先上效果图,再上代码。
#import "UIImage+DDF.h"
#define   DEGREES(degrees)  ((M_PI * (degrees))/ 180.f)

@interface ViewControllerSix ()
@property (nonatomic, strong) UIView        *showView;
@property (nonatomic, strong) CAShapeLayer  *maskLayer;
@end

@implementation ViewControllerSix

- (void)handlePan:(UIPanGestureRecognizer *)recognizer
{
    // 拖拽
    CGPoint translation = [recognizer translationInView:self.view];
    recognizer.view.center = CGPointMake(recognizer.view.center.x + translation.x,
                                         recognizer.view.center.y + translation.y);
    [recognizer setTranslation:CGPointMake(0, 0) inView:self.view];

    // 关闭CoreAnimation的隐式动画,如果开启隐式动画,会出现卡顿现象。
    [CATransaction setDisableActions:YES];
    _maskLayer.position = recognizer.view.center;
}

- (void)viewDidLoad
{
    [super viewDidLoad];

    UIImageView *imageView = [[UIImageView alloc] initWithFrame:self.view.bounds];
    imageView.image = [UIImage imageNamed:@"Slice"];
    [self.view addSubview:imageView];


    _maskLayer = [CAShapeLayer layer];

    // 利用贝塞尔曲线创建一个圆
    UIBezierPath *path = [UIBezierPath bezierPathWithArcCenter:CGPointMake(0, 0)
                                                        radius:100
                                                    startAngle:DEGREES(0)
                                                      endAngle:DEGREES(360)
                                                     clockwise:YES];
    // 获取path
    _maskLayer.path     = path.CGPath;
    _maskLayer.position = CGPointMake(_showView.bounds.size.width/2.f,
                                      _showView.bounds.size.height/2.f);

    _maskLayer.fillColor = [UIColor whiteColor].CGColor;
    _maskLayer.position = self.view.center;

    UIView *blurView = [[UIView alloc] initWithFrame:self.view.bounds];
    blurView.backgroundColor = [UIColor blackColor];
    [self.view addSubview:blurView];
    // 只显示圆形部分
    blurView.layer.mask = _maskLayer;
    blurView.layer.contents = (__bridge id)([[UIImage imageNamed:@"Slice"] imgWithBlur].CGImage);

    /*
     透明的View,用于maskView中的ShapeLayer的参考View(用于拖拽)
     */
    _showView = [[UIView alloc] initWithFrame:CGRectMake(0, 0, 200, 200)];
    _showView.backgroundColor = [UIColor clearColor];
    _showView.center = self.view.center;
    [self.view addSubview:_showView];

    UIPanGestureRecognizer *recognizer = [[UIPanGestureRecognizer alloc] initWithTarget:self action:@selector(handlePan:)];
    [_showView addGestureRecognizer:recognizer];
}

@end
上述所有Demo源码地址MaskViewDemo