Spring Boot 在企业级开发中的常用技术介绍。
全部章节传送门:
Spring Boot学习笔记(一):Spring Boot 入门基础
Spring Boot学习笔记(二):Spring Boot 运行原理
Spring Boot学习笔记(三):Spring Boot Web开发
Spring Boot学习笔记(四):Spring Boot 数据访问
Spring Boot学习笔记(五):Spring Boot 企业级开发
Spring Boot学习笔记(六):Spring Boot 应用监控
安全控制 Spring Security
Spring Security 是专门针对基于 Spring 的项目的安全框架,充分利用了依赖注入和 AOP 来实现安全的功能。
安全框架有2个重要的概念,即认证(Authentication)和授权(Authorization)。认证即认证用户可以访问当前系统;授权即确定用户在当前系统下所拥有的功能权限。
准备环境
在数据库中创建3张表,分别是用户表、角色表和用户角色关联表,并在表中插入几条数据。
create table t_sys_user(
    id int primary key auto_increment,
    username varchar(10),
    password varchar(20)
) ENGINE=InnoDB DEFAULT CHARSET=utf8;

insert into t_sys_user(id, username, password) values(1, 'wyk','wyk');
insert into t_sys_user(id, username, password) values(2, 'gjj','gjj');

create table t_sys_role(
    id int primary key auto_increment,
    name varchar(15)
) ENGINE=InnoDB DEFAULT CHARSET=utf8;

insert into t_sys_role(id, name) values(1, 'ROLE_ADMIN');
insert into t_sys_role(id, name) values(2, 'ROLE_USER');

create table sys_user_roles(
    sys_user_id int,
    roles_id int,
    foreign key(sys_user_id) references t_sys_user(id),
    foreign key(roles_id) references t_sys_role(id)
) ENGINE=InnoDB DEFAULT CHARSET=utf8;

insert into sys_user_roles(sys_user_id, roles_id) values(1, 1);
insert into sys_user_roles(sys_user_id, roles_id) values(2, 2);
新建 Spring Boot 项目
新建Spring Boot 的 Web项目,添加相关依赖。
    4.0.0

        org.springframework.boot
        spring-boot-starter-parent
        2.1.3.RELEASE


    com.wyk
    securitydemo
    0.0.1-SNAPSHOT
    demo
    Demo project for Spring Boot Security


        1.8


            org.springframework.boot
            spring-boot-starter-data-jpa


            org.springframework.boot
            spring-boot-starter-jdbc


            org.springframework.boot
            spring-boot-starter-thymeleaf


            org.springframework.boot
            spring-boot-starter-web


            org.springframework.boot
            spring-boot-starter-security


         org.thymeleaf.extras
            thymeleaf-extras-springsecurity5


            mysql
            mysql-connector-java
            runtime


            org.springframework.boot
            spring-boot-starter-test
            test


                org.springframework.boot
                spring-boot-maven-plugin
在 application.properties 中添加相关配置。
# 数据库相关
spring.datasource.url=jdbc:mysql://127.0.0.1:3306/springstudy?serverTimezone=GMT%2B8
spring.datasource.username=spring
spring.datasource.password=spring
spring.datasource.dirverClassName=com.mysql.jdbc.Driver
# 根据实体类自动维护数据库表结构的功能
spring.jpa.hibernate.ddl-auto=none
# 设置hibernate操作的时候在控制台显示真实的SQL语句
spring.jpa.show-sql=true
# 安全日志级别
logging.level.org.springframework.security=INFO
# 关掉thymeleaf缓存
spring.thymeleaf.cache=false
创建用户和角色
根据数据表定义用户和角色类。
用户:
package com.wyk.securitydemo.domain;

import org.springframework.security.core.GrantedAuthority;
import org.springframework.security.core.authority.SimpleGrantedAuthority;
import org.springframework.security.core.userdetails.UserDetails;

import javax.persistence.*;
import java.util.ArrayList;
import java.util.Collection;
import java.util.List;

@Entity
@Table(name="t_sys_user")
public class SysUser implements UserDetails {

    private static final long serialVersionUID = 1L;
    @Id
    @GeneratedValue
    private Long id;
    private String username;
    private String password;

    //用户和角色的映射关系
    @ManyToMany(cascade = {CascadeType.REFRESH}, fetch=FetchType.EAGER)
    @JoinTable(name="sys_user_roles", joinColumns = {@JoinColumn(name="sys_user_id", referencedColumnName = "id")},
            inverseJoinColumns={@JoinColumn(name="roles_id", referencedColumnName = "id")})
    private List roles;

    //重写,将用户角色作为权限
    @Override
    public Collection getAuthorities() {
        List auths = new ArrayList();
        List roles = this.getRoles();
        for(SysRole role : roles) {
            auths.add(new SimpleGrantedAuthority(role.getName()));
        }
        return auths;
    }

    @Override
    public boolean isAccountNonExpired() {
        return true;
    }

    @Override
    public boolean isAccountNonLocked() {
        return true;
    }

    @Override
    public boolean isCredentialsNonExpired() {
        return true;
    }

    public boolean isEnabled() {
        return true;
    }

    public Long getId() {
        return id;
    }

    public void setId(Long id) {
        this.id = id;
    }

    @Override
    public String getUsername() {
        return username;
    }

    public void setUsername(String username) {
        this.username = username;
    }

    @Override
    public String getPassword() {
        return password;
    }

    public void setPassword(String password) {
        this.password = password;
    }

    public List getRoles() {
        return roles;
    }

    public void setRoles(List roles) {
        this.roles = roles;
    }
}
角色:
package com.wyk.securitydemo.domain;

import javax.persistence.Entity;
import javax.persistence.GeneratedValue;
import javax.persistence.Id;
import javax.persistence.Table;

@Entity
@Table(name="t_sys_role")
public class SysRole {
    @Id
    @GeneratedValue
    private Long id;
    private String name;

    public Long getId() {
        return id;
    }

    public void setId(Long id) {
        this.id = id;
    }

    public String getName() {
        return name;
    }

    public void setName(String name) {
        this.name = name;
    }
}
另外添加一个用来展示数据的类:
package com.wyk.securitydemo.domain;

public class Msg {
    private String title;
    private String content;
    private String extraInfo;

    public Msg(String title, String content, String extraInfo) {
        this.title = title;
        this.content = content;
        this.extraInfo = extraInfo;
    }

    public String getTitle() {
        return title;
    }

    public void setTitle(String title) {
        this.title = title;
    }

    public String getContent() {
        return content;
    }

    public void setContent(String content) {
        this.content = content;
    }

    public String getExtraInfo() {
        return extraInfo;
    }

    public void setExtraInfo(String extraInfo) {
        this.extraInfo = extraInfo;
    }
}
数据访问
本项目的数据访问很简单。
package com.wyk.securitydemo.dao;

import com.wyk.securitydemo.domain.SysUser;
import org.springframework.data.jpa.repository.JpaRepository;

public interface SysUserRepository extends JpaRepository {
    //根据用户名查询用户
    SysUser findByUsername(String username);
}
自定义 UserDetailService
UserDetailsService接口用于返回用户相关数据。它有loadUserByUsername()方法,根据username查询用户实体,可以实现该接口覆盖该方法,实现自定义获取用户过程。该接口实现类被DaoAuthenticationProvider 类使用,用于认证过程中载入用户信息。
package com.wyk.securitydemo.security;

import com.wyk.securitydemo.dao.SysUserRepository;
import com.wyk.securitydemo.domain.SysUser;
import org.springframework.beans.factory.annotation.Autowired;
import org.springframework.security.core.userdetails.UserDetails;
import org.springframework.security.core.userdetails.UserDetailsService;
import org.springframework.security.core.userdetails.UsernameNotFoundException;

public class CustomUserService implements UserDetailsService {
    @Autowired
    SysUserRepository userRepository;

    @Override
    public UserDetails loadUserByUsername(String s) {
        SysUser user = userRepository.findByUsername(s);
        if(user == null) {
            throw new UsernameNotFoundException("用户名不存在");
        }

        return user;
    }
}
配置
Spring MVC 配置:
package com.wyk.securitydemo.config;


import org.springframework.context.annotation.Configuration;
import org.springframework.web.servlet.config.annotation.ResourceHandlerRegistry;
import org.springframework.web.servlet.config.annotation.ViewControllerRegistry;
import org.springframework.web.servlet.config.annotation.WebMvcConfigurationSupport;

@Configuration
public class WebMvcConfig extends WebMvcConfigurationSupport {

    /**
     * 注册访问login转向login.html
     * @param registry
     */
    @Override
    public void addViewControllers(ViewControllerRegistry registry) {
        registry.addViewController("/login").setViewName("login");
    }

    /**
     * 注册静态资源根目录是在static目录
     * 估计是收spring security影响,不加此方法无法正确找到静态资源
     * @param registry
     */
    @Override
    protected void addResourceHandlers(ResourceHandlerRegistry registry) {
        // TODO Auto-generated method stub
        registry.addResourceHandler("/**").addResourceLocations("classpath:/static/");
        super.addResourceHandlers(registry);
    }
}
Spring Security 配置:
package com.wyk.securitydemo.config;

import com.wyk.securitydemo.security.CustomPasswordEncoder;
import com.wyk.securitydemo.security.CustomUserService;
import org.springframework.context.annotation.Bean;
import org.springframework.context.annotation.Configuration;
import org.springframework.security.config.annotation.authentication.builders.AuthenticationManagerBuilder;
import org.springframework.security.config.annotation.web.builders.HttpSecurity;
import org.springframework.security.config.annotation.web.builders.WebSecurity;
import org.springframework.security.config.annotation.web.configuration.EnableWebSecurity;
import org.springframework.security.config.annotation.web.configuration.WebSecurityConfigurerAdapter;
import org.springframework.security.core.userdetails.UserDetailsService;
import org.springframework.security.crypto.password.PasswordEncoder;

@EnableWebSecurity
@Configuration
public class WebSecurityConfig extends WebSecurityConfigurerAdapter {
    @Bean
    UserDetailsService customUserService() {
        return new CustomUserService();
    }

    //通过@Bean注入指定的PasswordEncoder
    @Bean
    public PasswordEncoder passwordEncoder(){
        return new CustomPasswordEncoder();
    }

    @Override
    protected void configure(AuthenticationManagerBuilder auth) throws Exception {
        //添加自定义user detail service 认证
        auth.userDetailsService(customUserService());
    }

    @Override
    protected void configure(HttpSecurity httpSecurity) throws Exception {
        httpSecurity.authorizeRequests()
                .anyRequest().authenticated() // 所有请求需要认证后访问
                .and()
                .formLogin()
                    .loginPage("/login")
                    .failureUrl("/login?error")
                    .permitAll() // 定制登录行为,登录页面可任意访问
                .and()
                .logout().permitAll(); // 定义注销行为,注销页面可任意访问
    }

    @Override
    public void configure(WebSecurity webSecurity) throws Exception {
        //忽略静态资源
        webSecurity.ignoring().antMatchers("/css/**","/js/**");
    }

}
其中使用的加密算法是明文加密,即不加密,如下所示。
package com.wyk.securitydemo.security;

import org.springframework.security.crypto.password.PasswordEncoder;

public class CustomPasswordEncoder implements PasswordEncoder {

    @Override
    public String encode(CharSequence charSequence) {
        return charSequence.toString();
    }

    @Override
    public boolean matches(CharSequence charSequence, String s) {
        return s.equals(charSequence.toString());
    }
}
前端页面
添加 bootstrap 静态资源,创建登陆页面:
登录页面
已成功注销
有错误,请重试
使用帐号密码登录
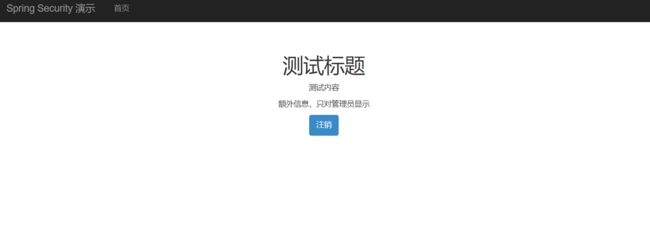
首页,需要注意,虽然maven引入的是thymeleaf-extras-springsecurity5,但是这里的命名空间要使用thymeleaf-extras-springsecurity4。
无更多信息显示
测试程序
运行程序,进入登陆界面。

使用普通用户登录。

注销后在使用管理员登录。
批处理 Spring Batch
批处理是一种处理模式,它涉及一系列自动复杂作业的执行而无需用户交互。批处理过程处理批量数据并运行很长时间。一些企业应用程序需要处理大量数据来执行操作,如
- 基于时间的事件,如周期性计算。
- 在大型数据集上重复处理的定期应用程序。
- 处理和验证交易方式中可用数据的应用程序。
Spring Batch 是一个轻量级框架,用于开发在企业应用程序中使用的批处理应用程序。
Spring Batch 结构
Spring Batch 框架架构如下所示。

每个作业Job(需要执行的任务)有1个或者多个作业步Step;每个Step对应一个ItemReader(读取数据的接口)、ItemProcessor(处理数据的接口)、ItemWriter(输出数据的接口); 通过JobLauncher(启动接口)可以启动Job,启动Job时需要从JobRepository(注册的容器)获取存在的JobExecution; 当前运行的Job及Step的结果及状态会保存在JobRepository中。
准备环境
以将一个csv文件中的数据使用JDBC批处理方式插入数据库为例进行讲解。
在MySQL中创建一个数据表。
create table t_person_info (
    id int not null primary key,
    name varchar(20),
    age int,
    nation varchar(20),
    address varchar(20)
) ENGINE=InnoDB DEFAULT CHARSET=utf8;

alter table t_person_info modify id int auto_increment;
新建 Spring Boot 项目
创建 Spring Boot 项目并添加依赖。
    4.0.0

        org.springframework.boot
        spring-boot-starter-parent
        2.1.3.RELEASE


    com.wyk
    batchdemo
    0.0.1-SNAPSHOT
    batchdemo
    Demo project for Spring Boot Batch


        1.8


            org.springframework.boot
            spring-boot-starter-batch


                    org.hsqldb
                    hsqldb


            org.springframework.boot
            spring-boot-starter-data-jpa


            org.springframework.boot
            spring-boot-starter-jdbc


            org.springframework.boot
            spring-boot-starter-web


            org.hibernate
            hibernate-validator


            mysql
            mysql-connector-java
            runtime


            org.springframework.boot
            spring-boot-starter-test
            test


            org.springframework.batch
            spring-batch-test
            test


                org.springframework.boot
                spring-boot-maven-plugin
在 application.properties 中添加配置。由于Spring Batch默认会创建数据表,这里要允许创建。
# 数据库相关
spring.datasource.url=jdbc:mysql://127.0.0.1:3306/springstudy?serverTimezone=GMT%2B8
spring.datasource.username=spring
spring.datasource.password=spring
spring.datasource.dirverClassName=com.mysql.jdbc.Driver
# 允许覆盖注册
spring.main.allow-bean-definition-overriding=true
# 在数据库里面创建默认的数据表
spring.batch.initialize-schema=ALWAYS
# 显示sql
spring.jpa.show-sql=true
在类路径 src/main/resources 下添加 people.csv 。
王某某,21,汉族,合肥
张某某,33,汉族,北京
李某某,22,藏族,拉萨
赵某某,13,壮族,上海
添加领域模型类
根据数据表添加领域模型类。
package com.wyk.batchdemo.domain;

import javax.validation.constraints.Size;

public class Person {

    @Size(max=4, min=2)
    private String name;
    private int age;
    private String nation;
    private String address;

    public String getName() {
        return name;
    }

    public void setName(String name) {
        this.name = name;
    }

    public int getAge() {
        return age;
    }

    public void setAge(int age) {
        this.age = age;
    }

    public String getNation() {
        return nation;
    }

    public void setNation(String nation) {
        this.nation = nation;
    }

    public String getAddress() {
        return address;
    }

    public void setAddress(String address) {
        this.address = address;
    }
}
添加数据处理和校验
数据处理类:
package com.wyk.batchdemo.batch;

import com.wyk.batchdemo.domain.Person;
import org.springframework.batch.item.validator.ValidatingItemProcessor;
import org.springframework.batch.item.validator.ValidationException;

//数据处理
public class CsvItemProcessor extends ValidatingItemProcessor {
    @Override
    public Person process(Person item) throws ValidationException {
        //调用自定义校验器
        super.process(item);
        //校验数据
        if(item.getNation().equals("汉族")) {
            item.setNation("01");
        } else {
            item.setNation("02");
        }

        return item;
    }
}
数据校验类:
package com.wyk.batchdemo.batch;

import org.springframework.batch.item.validator.ValidationException;
import org.springframework.batch.item.validator.Validator;
import org.springframework.beans.factory.InitializingBean;


import javax.validation.ConstraintViolation;
import javax.validation.Validation;
import javax.validation.ValidatorFactory;
import java.util.Set;

public class CsvBeanValidator implements Validator, InitializingBean {
    private javax.validation.Validator validator;

    @Override
    public void validate(T t) throws ValidationException {
        Set> constraintViolations = validator.validate(t);//校验数据

        if(constraintViolations.size() > 0) {
            StringBuilder message = new StringBuilder();
            for(ConstraintViolation constraintViolation : constraintViolations) {
                message.append(constraintViolation.getMessage() + "\n");
            }
            throw new ValidationException(message.toString());
        }
    }

    @Override
    public void afterPropertiesSet() throws Exception {
        //校验器初始化
        ValidatorFactory validatorFactory = Validation.buildDefaultValidatorFactory();
        validator = validatorFactory.usingContext().getValidator();
    }
}
Job 监听
package com.wyk.batchdemo.batch;

import org.springframework.batch.core.JobExecution;
import org.springframework.batch.core.JobExecutionListener;

public class CsvJobListener implements JobExecutionListener {
    long startTime;
    long endTime;

    @Override
    public void beforeJob(JobExecution jobExecution) {
        startTime = System.currentTimeMillis();
        System.out.print("任务开始处理");
    }

    @Override
    public void afterJob(JobExecution jobExecution) {
        endTime = System.currentTimeMillis();
        System.out.print("任务处理结束");
        System.out.println("耗时:" + (endTime - startTime) + "ms");
    }
}
添加配置
package com.wyk.batchdemo.batch;

import com.wyk.batchdemo.domain.Person;
import org.springframework.batch.core.Job;
import org.springframework.batch.core.Step;
import org.springframework.batch.core.configuration.annotation.EnableBatchProcessing;
import org.springframework.batch.core.configuration.annotation.JobBuilderFactory;
import org.springframework.batch.core.configuration.annotation.StepBuilderFactory;
import org.springframework.batch.core.launch.support.RunIdIncrementer;
import org.springframework.batch.core.launch.support.SimpleJobLauncher;
import org.springframework.batch.core.repository.JobRepository;
import org.springframework.batch.core.repository.support.JobRepositoryFactoryBean;
import org.springframework.batch.item.ItemProcessor;
import org.springframework.batch.item.ItemReader;
import org.springframework.batch.item.ItemWriter;
import org.springframework.batch.item.database.BeanPropertyItemSqlParameterSourceProvider;
import org.springframework.batch.item.database.JdbcBatchItemWriter;
import org.springframework.batch.item.file.FlatFileItemReader;
import org.springframework.batch.item.file.mapping.BeanWrapperFieldSetMapper;
import org.springframework.batch.item.file.mapping.DefaultLineMapper;
import org.springframework.batch.item.file.transform.DelimitedLineTokenizer;
import org.springframework.batch.item.validator.Validator;
import org.springframework.context.annotation.Bean;
import org.springframework.context.annotation.Configuration;
import org.springframework.core.io.ClassPathResource;
import org.springframework.transaction.PlatformTransactionManager;

import javax.sql.DataSource;

@Configuration
@EnableBatchProcessing
public class CsvBatchConfig {

    @Bean
    public ItemReader reader() throws Exception {
        FlatFileItemReader reader = new FlatFileItemReader();
        reader.setResource(new ClassPathResource("people.csv"));// 设置文件路径
        reader.setLineMapper(new DefaultLineMapper() { // csv文件和领域模型进行映射
            {
                setLineTokenizer(new DelimitedLineTokenizer() {
                    {
                        setNames(new String[]{"name", "age", "nation", "address"});
                    }
                });
                setFieldSetMapper(new BeanWrapperFieldSetMapper() {
                    {
                        setTargetType(Person.class);
                    }
                });
            }
        });
        return reader;
    }

    @Bean
    public ItemProcessor processor() {
        CsvItemProcessor processor = new CsvItemProcessor();
        processor.setValidator(csvBeanValidator()); //指定校验器
        return processor;
    }

    @Bean
    public ItemWriter writer(DataSource dataSource) {
        JdbcBatchItemWriter writer = new JdbcBatchItemWriter();
        writer.setItemSqlParameterSourceProvider(new BeanPropertyItemSqlParameterSourceProvider());
        String sql = "insert into t_person_info " + "(name,age,nation,address) "
                + "values(:name, :age, :nation, :address)";
        writer.setSql(sql); // 设置需要批处理的SQL
        writer.setDataSource(dataSource);
        return writer;
    }

    @Bean
    public JobRepository jobRepository(DataSource dataSource,
                                       PlatformTransactionManager transactionManager)
            throws Exception{
        JobRepositoryFactoryBean jobRepositoryFactoryBean = new JobRepositoryFactoryBean();
        jobRepositoryFactoryBean.setDataSource(dataSource);
        jobRepositoryFactoryBean.setTransactionManager(transactionManager);
        jobRepositoryFactoryBean.setDatabaseType("mysql");
        return jobRepositoryFactoryBean.getObject();
    }

    @Bean
    public SimpleJobLauncher jobLauncher(DataSource dataSource,
                                         PlatformTransactionManager transactionManager)
        throws Exception {
        SimpleJobLauncher jobLauncher = new SimpleJobLauncher();
        jobLauncher.setJobRepository(jobRepository(dataSource, transactionManager));
        return jobLauncher;
    }

    @Bean
    public Job importJob(JobBuilderFactory jobs, Step s1) {
        return jobs.get("importJob")
                .incrementer(new RunIdIncrementer())
                .flow(s1)
                .end()
                .listener(csvJobListener())
                .build();
    }

    @Bean
    public Step step1(StepBuilderFactory stepBuilderFactory, ItemReader reader,
                      ItemWriter writer, ItemProcessor processor) {
        return stepBuilderFactory
                .get("step1")
                .chunk(65000) //批处理数据条数
                .reader(reader)
                .processor(processor)
                .writer(writer)
                .build();

    }

    @Bean
    public CsvJobListener csvJobListener() {
        return new CsvJobListener();
    }

    @Bean
    public Validator csvBeanValidator() {
        return new CsvBeanValidator();
    }
}
添加玩配置后已经可以运行程序,执行批量,但如果我们想手动触发任务,还要添加一些设置。
手动触发任务
修改 CsvBatchConfig 类中的 reader 方法。
@Bean
@StepScope
public FlatFileItemReader reader(@Value("#{jobParameter['input.file.name']}") String pathToFile)
    throws Exception {
    FlatFileItemReader reader = new FlatFileItemReader();
    reader.setResource(new ClassPathResource("people.csv"));// 设置文件路径
    reader.setLineMapper(new DefaultLineMapper() { // csv文件和领域模型进行映射
        {
            setLineTokenizer(new DelimitedLineTokenizer() {
                {
                    setNames(new String[]{"name", "age", "nation", "address"});
                }
            });
            setFieldSetMapper(new BeanWrapperFieldSetMapper() {
                {
                    setTargetType(Person.class);
                }
            });
        }
    });
    return reader;
}
然后添加控制器。
package com.wyk.batchdemo.controller;

import org.springframework.batch.core.Job;
import org.springframework.batch.core.JobParameters;
import org.springframework.batch.core.JobParametersBuilder;
import org.springframework.batch.core.launch.JobLauncher;
import org.springframework.beans.factory.annotation.Autowired;
import org.springframework.web.bind.annotation.RequestMapping;
import org.springframework.web.bind.annotation.RestController;

@RestController
public class DemoController {
    @Autowired
    JobLauncher jobLauncher;
    @Autowired
    Job importJob;
    public JobParameters jobParameters;

    @RequestMapping("/imp")
    public String imp(String fileName) throws Exception{
        String path = fileName + ".csv";
        jobParameters = new JobParametersBuilder()
                .addLong("time", System.currentTimeMillis())
                .addString("input.file.name", path)
                .toJobParameters();
        jobLauncher.run(importJob, jobParameters);
        return "ok";
    }
}
运行程序,打开 http://localhost:8080/imp?fileName=people ,即可成功运行批量。
异步消息
异步消息主要用于系统间的通讯。所谓异步消息即消息发送者无需等待消息接收者的处理及返回,甚至无需关心消息是否发送成功。
其中,消息代理(message broker)用来接管发送后的消息。异步消息的2种形式的目的地(destination):队列(queue)用于点对点的通讯,主题(topic)用于发布/订阅式的消息通讯。
企业级消息代理
JMS(Java Message Service)即Java消息服务,而ActiveMQ是一个JMS消息代理的实现。
ActiveMQ 安装
在 Docker 之中安装 ActiveMQ, 首先打开 Docker,执行命令。
docker search activemq
然后安装其中的 ActiveMQ 镜像。
docker pull webcenter/activemq
运行 ActiveMQ 。
docker run -d --name myactivemq -p 61617:61616 -p 8162:8161 webcenter/activemq:latest
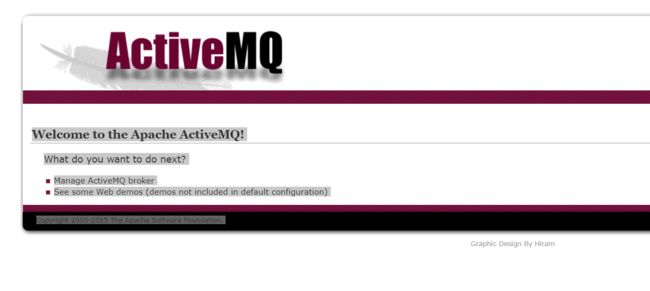
访问 http://localhost:8161 ,可以查看 ActiveMQ 的管理界面。
使用 ActiveMQ
新建 Spring Boot 项目,并添加 ActiveMQ 的依赖。
    org.springframework.boot
    spring-boot-starter-activemq
在 applicaton.properties 中配置 ActiveMQ 消息代理的地址。
spring.activemq.broker-url=tcp://localhost:61616
定义消息,实现 MessageCreator 接口,并重写 createMessage 方法。
public class Msg implements MessageCreator {
    @Override
    public Message createMessage(Session session) throws JMSException {
        return session.createTextMessage("这是一个测试消息");
    }
}
在运行类中定义消息发送以及目的地,需要实现CommandLineRunner接口。
@SpringBootApplication
public class ActivemqdemoApplication implements CommandLineRunner { // CommandLineRunner接口用于程序启动后执行的代码

    @Autowired
    JmsTemplate jmsTemplate;

    public static void main(String[] args) {
        SpringApplication.run(ActivemqdemoApplication.class, args);
    }

    public void run(String... args) throws Exception {
        //向mt-destination目的地发送Msg的消息
        jmsTemplate.send("my-destination", new Msg());
    }
}
定义消息监听的类,通过 @JmsListener 注解监听消息。
@Component
public class Receiver {

    @JmsListener(destination = "my-destination")
    public void receiveMessage(String message) {
        System.out.println("接收到: <" + message + ">");
    }
}
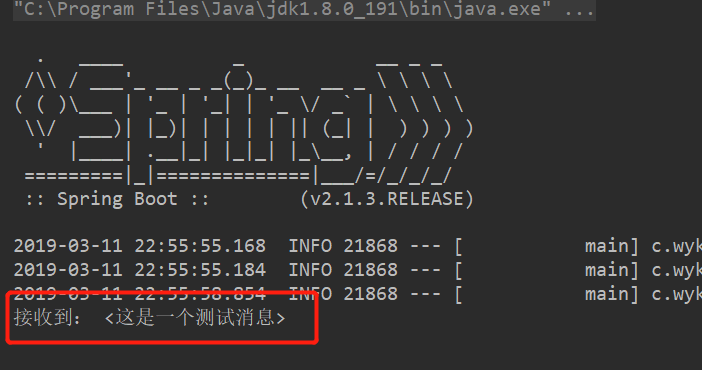
运行程序,会自动向目的地发送消息,控制台会监听到消息。
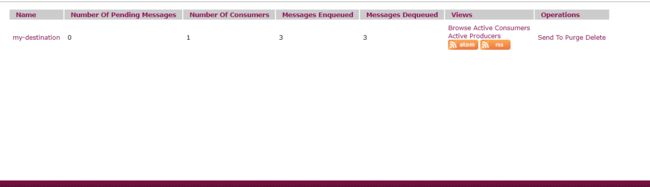
在 ActiveMQ 的管理端也可以查看目的地的相关信息。