基于cubemx和hal库编写的触摸键盘(lvgl组件)
基于cubemx和hal库编写的触摸键盘(lvgl组件)
文章目录
- 前言
- 一、点亮lcd
- 二、触摸屏底层
-
- 1.初始化
- 2.读入数据
- 三、移植lvgl
-
- 添加源码
- 修改源码
- 添加键盘组件
- 启动lvgl
前言
近年国赛对于人机交互的要求逐渐上升,普通的矩阵按键,串口输入未免过于普通且不灵活,所以我基于R61529液晶驱动芯片和FT6236触摸屏芯片并移植了lvgl(轻度综合图形界面库)制作了一个触摸键盘
一、点亮lcd
首先在cube配置FSMC

STM32的 FSMC外设可以用于控制扩展的外部存储器,而 MCU 对液晶屏的操作实际上就是把显示数据写入到显存中,与控制存储器非常类似,且 8080接口的通讯时序完全可以使用 FSMC外设产生,因而非常适合使用 FSMC控制液晶屏。控制 LCD 时使用的是与 NORFLASH一样的模式 B。
Address setup time in HCLK clock cycles
Data setup time in HCLK clock cycles
这俩成员设置地址和数据建立时间,它表示多少个 HCLK周期数,按我的配置,HCLK的时钟频率为168MHz,即一个 HCLK周期为 1/168微秒。这里我查了手册地址和数据建立时间最短为10ns,所以填2最合适。
接下来修改lcd.c中地址线的定义,因为我硬件上LCD的DC(寄存器/数据选择)脚接在FSMC_A16地址线,所以cube配置LCD Register Select时候选择A16,要使 FSMC_A16 地址线为高电平,实质是输出地址信号的第 16位为 1 即可,要使 FSMC_A16 地址线为低电平,实质是输出地址信号的第 16位为 0 即可,但是,以上方法计算的地址还不完全正确,STM32 内部访问地址时使用的是内部 HADDR 总线,它是需要转换到外部存储器的内部 AHB 地址线,它是字节地址(8 位), 而存储器访问不都是按字节访问,因此接到存储器的地址线依存储器的数据宽度有所不同,在本工程中使用的是 16位的数据访问方式,所以HADDR 与 FSMC_A的地址线连接关系会左移一位。

二、触摸屏底层
1.初始化
代码如下:
u8 FT6236_Init(void)
{

	u8 temp[2];

	HAL_Delay (500);

	temp[0]=0;
	FT6236_WR_Reg(FT_DEVIDE_MODE,temp,1);	//进入正常操作模式
	FT6236_WR_Reg(FT_ID_G_MODE,temp,1);		//查询模式
	temp[0]=22;								//触摸有效值,22,越小越灵敏
	FT6236_WR_Reg(FT_ID_G_THGROUP,temp,1);	//设置触摸有效值
	temp[0]=12;								//激活周期,不能小于12,最大14
	FT6236_WR_Reg(FT_ID_G_PERIODACTIVE,temp,1);
	//读取版本号,参考值:0x3003
	FT6236_RD_Reg(FT_ID_G_LIB_VERSION,temp,2);
//	if(temp[0]==0X30&&temp[1]==0X03)//版本:0X3003
//	{

		printf("CTP ID:%x\r\n",((u16)temp[0]<<8)+temp[1]);
		return 0;
//	}
}
2.读入数据
代码如下(示例):
//扫描触摸屏(采用查询方式)
//mode:0,正常扫描.
//返回值:当前触屏状态.
//0,触屏无触摸;1,触屏有触摸
u8 FT6236_Scan(u8 mode)
{

	u8 buf[4];
	u8 i=0;
	u8 res=0;
	u8 temp;
	static u8 t=0;//控制查询间隔,从而降低CPU占用率
	t++;
//	if((t%10)==0||t<10)//空闲时,每进入10次CTP_Scan函数才检测1次,从而节省CPU使用率
//	{

		FT6236_RD_Reg(FT_REG_NUM_FINGER,&mode,1);//读取触摸点的状态
		if((mode&0XF)&&((mode&0XF)<6))
		{

			temp=0XFF<<(mode&0XF);//将点的个数转换为1的位数,匹配tp_dev.sta定义
			tp_dev.sta=(~temp)|TP_PRES_DOWN|TP_CATH_PRES;
			for(i=0;i<5;i++)
			{

				if(tp_dev.sta&(1<<i))	//触摸有效?
				{

					  FT6236_RD_Reg(FT6236_TPX_TBL[i],buf,4);	//读取XY坐标值
						tp_dev.x[i]=319-(((u16)(buf[0]&0X0F)<<8)+buf[1]);
						tp_dev.y[i]=479-(((u16)(buf[2]&0X0F)<<8)+buf[3]);
					 if((buf[0]&0XF0)!=0X80)tp_dev.x[i]=tp_dev.y[i]=0;//必须是contact事件,才认为有效
				}
			}
			res=1;
			if(tp_dev.x[0]==0 && tp_dev.y[0]==0)mode=0;	//读到的数据都是0,则忽略此次数据
			t=0;		//触发一次,则会最少连续监测10次,从而提高命中率
//		}
	}
	if((mode&0X1F)==0)//无触摸点按下
	{

		if(tp_dev.sta&TP_PRES_DOWN)	//之前是被按下的
		{

			tp_dev.sta&=~(1<<7);	//标记按键松开
		}else						//之前就没有被按下
		{

			tp_dev.x[0]=0xffff;
			tp_dev.y[0]=0xffff;
			tp_dev.sta&=0XE0;	//清除点有效标记
		}
	}
	if(t>240)t=10;//重新从10开始计数
	return res;
}
要移植到lvgl所以注释了节省CPU使用率的代码,因为lvgl本身不会一直读取触摸屏状态。
三、移植lvgl
参考https://blog.csdn.net/qq_26106317/article/details/109666444?spm=1001.2014.3001.5501
添加源码
首先去LVGL的github页 下载源码。
把其中 lv_conf_template.h 文件名改为 lv_conf.h 并移动到上级目录。lvgl/examples/里的 porting文件夹里面带template的文件重命名把template去掉
接着添加文件到工程

GUI_core :源码,所有源码都在项目根目录的src文件夹里,自行添加即可。(比较多,不列出来)
GUI_drv :port文件,对接API的地方,在 lvgl/examples/porting/中
GUI_app:用户文件,放你自己的东西,我放了lvgl头文件和配置文件,方便编辑。
修改源码
在port文件中把“#if 0”改为“#if 1”
lv_conf.h中定义屏幕大小

startup_stm32f407xx.s中调大栈大小

接下来在lv_port_disp_templ.c中修改显示接口函数
lv_port_disp_init函数里面有三种缓冲方式,注释掉其中两个,越下面的缓冲空间越大
disp_init中添加lcd初始化
/**********************
 *   STATIC FUNCTIONS
 **********************/

/* Initialize your display and the required peripherals. */
static void disp_init(void)
{

    /*You code here*/
		Lcd_Init();
}
disp_flush中添加画点代码
/* Flush the content of the internal buffer the specific area on the display
 * You can use DMA or any hardware acceleration to do this operation in the background but
 * 'lv_disp_flush_ready()' has to be called when finished. */
static void disp_flush(lv_disp_drv_t * disp_drv, const lv_area_t * area, lv_color_t * color_p)
{

    /*The most simple case (but also the slowest) to put all pixels to the screen one-by-one*/

    int32_t x;
    int32_t y;
	BlockWrite ( area->x1, area->x2, area->y1, area->y2 );
    for(y = area->y1; y <= area->y2; y++) {

        for(x = area->x1; x <= area->x2; x++)
					Lcd_ColorBox(x,y,1,1,color_p->full );
            /* Put a pixel to the display. For example: */
            /* put_px(x, y, *color_p)*/
            color_p++;
        }
    }


    /* IMPORTANT!!!
     * Inform the graphics library that you are ready with the flushing*/
    lv_disp_flush_ready(disp_drv);
}
接下来在lv_port_indev_templ.c修改触摸屏接口函数
/**********************
 *   STATIC FUNCTIONS
 **********************/

/*------------------
 * Touchpad
 * -----------------*/

/*Initialize your touchpad*/
static void touchpad_init(void)
{

    /*Your code comes here*/
	tp_dev.init();
}

/* Will be called by the library to read the touchpad */
static bool touchpad_read(lv_indev_drv_t * indev_drv, lv_indev_data_t * data)
{

    static lv_coord_t last_x = 0;
    static lv_coord_t last_y = 0;

    /*Save the pressed coordinates and the state*/
    if(touchpad_is_pressed()) {

        touchpad_get_xy(&last_x, &last_y);
        data->state = LV_INDEV_STATE_PR;
    } else {

        data->state = LV_INDEV_STATE_REL;
    }

    /*Set the last pressed coordinates*/
    data->point.x = last_x;
    data->point.y = last_y;

    /*Return `false` because we are not buffering and no more data to read*/
    return false;
}

/*Return true is the touchpad is pressed*/
static bool touchpad_is_pressed(void)
{

    /*Your code comes here*/
		if (tp_dev.scan(0)==1) return true;
    return false;
}

/*Get the x and y coordinates if the touchpad is pressed*/
static void touchpad_get_xy(lv_coord_t * x, lv_coord_t * y)
{

    /*Your code comes here*/

    (*x) = tp_dev.x[0];
    (*y) = tp_dev.y[0];
}
添加键盘组件
到官网CV一波
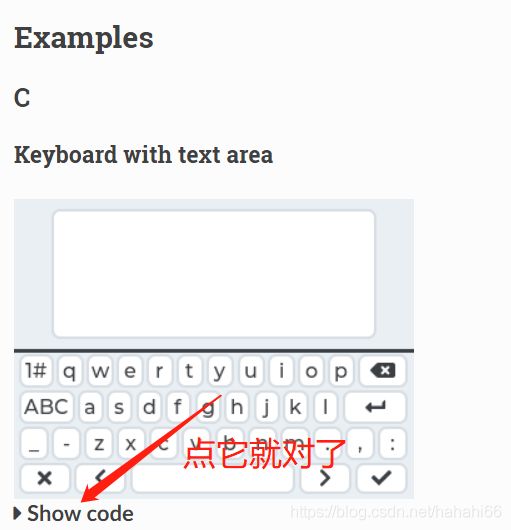
新建一个app.c文件放复制来的代码,记得包含"lv_port_disp.h"
启动lvgl
main函数while循环前添加初始化代码
	lv_init(); //lvgl 系统初始化
	lv_port_disp_init();
	lv_port_indev_init();
	lv_ex_keyboard_1();
给系统一个“心跳”:可以在while循环里面延时tick毫秒后执行也可以在定时器中断函数里面执行这两行代码
		lv_tick_inc (tick);
		lv_task_handler ();
其中的tick单位是毫秒,用来控制屏幕刷新读取触摸坐标的间隔
好像就是这些了,第一篇博客,多多指教。
附上源码链接