【网络仿真】ns-3安装与简介
此篇为学习笔记,课程地址——>
1
2
1 引言
The ns-3 simulator is a discrete-event network simulator targeted primarily for research and educational use.
ns-3模拟器: ns-3是一 款用于学术研究和教育用途的开放源代码验高散 事件模拟器,始于2006年。
我们将通过几个简单的模拟示例来窥探ns- 3的关键慨念和特征。
提示: ns 3是全新设计和实现的网络横拟器,它与ns-2不兼容!
1.1 关于ns-3
开发环境推荐:
- OS: Linux or macOS,不推荐Windows OS (可在Windows 下使用vmware workstation或
virtualbox虚拟化软件安装Linux) - Language: C++、Python
- Command Line Terminal:虽然有动画、数据分析与可视化工具可用。绝大工作还是在终端命令行中完成。
1.2 for ns-2 users
ns-3允许在模拟最中执行现实世界中的代码。借助DCE (Direct Code Execution) 可以将整个Linux网络栈封装仅一个ns-3节点中。
1.3 为ns-3做贡献
ns-3网络模拟器提供了一个开放、可扩展的网络模拟平台,主要用于网络研究和教育目的。
简单来说:ns-3提供了很多模型(models),用于模拟分组数据网络如何工作和执行;提供了一个网络模拟引擎。
为什么要使用ns-3:
- Include to perform studies that are more difficult or not possible to perform with real systems
- to study system behavlor in a highly controlled
- reproducible environment, and to learn about how networks work
大多数的ns-3模型用于建模Internet协议和网络是如何工作的。ns-3不局限于Internet系统。也有一些用户用于建模非Internet系统
现有的网络模拟/仿真工具:
- OPNET
- OMNET++
- ns-2
2 资源
2.1 Web
- Ofliclal Webste: https://www.nsnam.org
- Officlal Documents Webpage: http://www.nsnam.org/documentation
https://www.nsnam.org/documentation/development-tree/ - Official Wiki: https://www.nsnam.org/wiki
- Source Code: https://gitlab.com/nsnam
2.2 git
2018年12月ns-3的源码管理工具从Mer curial迁移到了Git。
2.3 waf
ns-3源码构建系统采用waf (https://waf.io/book/) .
waf是基于Python语言的源码构建系统,与make的功能相同(make太过复杂)。
不用去深究waf的实现细节,会用即可!(用来编译运行脚本)
2.4开发环境
ns-3采用的编程语言: C++、Python
- C++ Tutorial: http://www.cplusplus.com/doc/tutorial/
- Python: http://python.org
Linux中使用Gnu toolchain: - GNUC++编译器: gcc(g++)
- GNU binutils
- GNU gdb
- ns-3没有使用GNU的构建系统,而使用waf构建系统
macOS Toolchain: - Xcode
2.5 套接字编程
参考链接:
- https://www.elsevier.com/books/tcp-ip-sockets-in-c/donahoo/978-0-12-374540-8
- http://cs.baylor.edu/~donahoo/practical/CSockets/
- https://www.elsevier.com/books/multicast-sockets/makofske/978-1-55860-846-7
3 ns核心概念
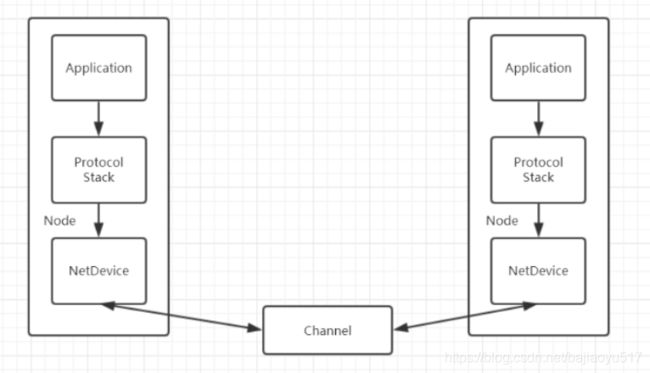
 node类:表示主机、路由器
application类:表示网络应用程序,e.g. 客户端应用程序
channel类:表示信道
net device类:表示node上的网络通信设备及驱动程序,负责将node连接到channel。e.g. CsmaNetDevice, PointToPointNetDevice, WifiNetDevice
topology helper:把net device连接到node和channel上,并配置它们,e.g. 分配ip地址
3.1 节点 Node
- ns3将基本的计算设备抽象为node(具体表现为node类)
- node类提供了许多方法模拟计算设备在计算机网络中的行为
- node的概念对应于host, end system…
- 把node看作一台计算机(裸机),需要向计算机内添加软硬件功能部分:应用程序、协议栈、计算机外设等。
Class_Node_API
Class_NodeContainer_API
Class_NodeList_API
3.2 应用程序 Application
应用程序是运行在node内部的用户软件。
ns3中有许多application类的子类:
- UdbEchoClientApplication
- UdbEchoServerApplication
Class_Application_API
Class_ApplicationContainer_API
3.3 信道 Channel
信道是数据的传输通道,有线、无线…
the basic communication subnetwork abstraction is called the channel and is represented in C++ by the class Channel
- 现实世界:网卡、双绞线
- 虚拟世界 :node、channel
Channel类提供相应的方法来管理通信子网对象,将节点连接到通信子网中。
- a channel specialization may model something as simple as a wire.可以模拟网线。
- the specialized channel can also model things as complicated as a large Ethernet switch.可以模拟以太网交换机。
- or three-dimensional space full of obstructions in the case of wireless networks.模拟无线网络中充满障碍的三维空间。
常见的channel:
- CsmaChannel: 可以模拟实现scma(carrier sense multiple access)的通信子网
- PointToPointChannel
- WifiChannel
Class_Channel_API
3.4 网络设备 Net Device
(node与channel连接必须有net device,例如网卡)
ns-3中的网络设备抽象包括两部分:
- software driver: 设备驱动程序
- simulated hardware: 仿真硬件
net device 被安装在node中,使当前node能够和其他node构建网络(借助channel)
Class_NetDevice_API
Class_NetDeviceContainer_API
3.5 拓扑辅助类 Topology Helpers
核心:简化网络拓扑配置,将那些机械的重复配置作用Helper实现。
Helpers示例(在官方文档的类索引中搜索Helper):
- PointToPointHelper
- InternetStackHelper
- Ipv4AddressHelper
- UdpEchoServerHelper
- UdpEchoClientHelper
4 ns3安装
官方安装指南
视频安装指南
python版本问题
其他ns3安装教程
(tips: 如果后续要安装ns3-gym,建议此处安装n3-3.29版本)
5 第一个模拟脚本
github例子分析文档
在ns-3中启动vscode:(ctrl+alt+t)
#命令行输入命令
cd /home/jnbai/桌面/ns3/ns-allinone-3.33/ns-3.33
code --user-data-dir=/root/.vscode-root/ . #root用户
code . #普通用户

#在命令行中运行:(ns-3.33目录下)
sudo ./waf --run first
在vscode中运行:.cc文件要放在ns-3.33->scratch文件夹下,且用命令行已经运行过一次。
因此,以后实验编写的脚本(.cc文件)要放在ns-3.33/scratch下面。
第一个模拟脚本(在ns-3.33->examples->tutorial->first.cc中)
/* -*- Mode:C++; c-file-style:"gnu"; indent-tabs-mode:nil; -*- */
/*
 * This program is free software; you can redistribute it and/or modify
 * it under the terms of the GNU General Public License version 2 as
 * published by the Free Software Foundation;
 *
 * This program is distributed in the hope that it will be useful,
 * but WITHOUT ANY WARRANTY; without even the implied warranty of
 * MERCHANTABILITY or FITNESS FOR A PARTICULAR PURPOSE.  See the
 * GNU General Public License for more details.
 *
 * You should have received a copy of the GNU General Public License
 * along with this program; if not, write to the Free Software
 * Foundation, Inc., 59 Temple Place, Suite 330, Boston, MA  02111-1307  USA
 */

//all header file is at build/ns3
#include "ns3/core-module.h"
#include "ns3/network-module.h"
#include "ns3/internet-module.h"
#include "ns3/point-to-point-module.h"
#include "ns3/applications-module.h"
#include "ns3/netanim-module.h"

// Default Network Topology
//
//       10.1.1.0
// n0 -------------- n1
//    point-to-point
//

//if is not at namespace ns3, add xx::
//e.g. Time::NS, std::cout, std::min()
using namespace ns3;


NS_LOG_COMPONENT_DEFINE ("FirstScriptExample");

int
main (int argc, char *argv[])
{

  //you can put into parameter at commandline
  //e.g. sudo ./waf --run "hello-simulator --numbers=5"
  CommandLine cmd;
  cmd.Parse (argc, argv);

  //this is to control time resolution unit (NS is millisecond)& how many log outputed
  Time::SetResolution (Time::NS);
  LogComponentEnable ("UdpEchoClientApplication", LOG_LEVEL_INFO);
  LogComponentEnable ("UdpEchoServerApplication", LOG_LEVEL_INFO);

  //------------------------------------
  //below is to build network topology

  //create two empty nodes by nodecontainer, and putint it.
  //you can get those nodes by nodes.Get (0) and nodes.Get (1)
  NodeContainer nodes;
  nodes.Create (2);

  PointToPointHelper pointToPoint;
  pointToPoint.SetDeviceAttribute ("DataRate", StringValue ("5Mbps"));
  pointToPoint.SetChannelAttribute ("Delay", StringValue ("2ms"));

  //this is use PointToPointHelper, install devices onto two nodes
  NetDeviceContainer devices;
  devices = pointToPoint.Install (nodes);

  //this is to install internet protocal into the nodes
  InternetStackHelper stack;
  stack.Install (nodes);

  //this is to set ip address: start from 10.1.1.0, subnet mask
  Ipv4AddressHelper address;
  address.SetBase ("10.1.1.0", "255.255.255.0");

  //this is assign ip address to every devices
  Ipv4InterfaceContainer interfaces = address.Assign (devices);

  //finished setting bottom layer
  //------------------------------
  //start setting upper layer

  //set server's port=9
  UdpEchoServerHelper echoServer (9);

  //ApplicationContainer is to log every node's application
  //this is to install application, echoServer, into the node 1 ; set star time and end time
  ApplicationContainer serverApps = echoServer.Install (nodes.Get (1));
  serverApps.Start (Seconds (1.0));
  serverApps.Stop (Seconds (10.0));

  //interfaces.GetAddress (1)=ip address of server node; 9=port of server node
  UdpEchoClientHelper echoClient (interfaces.GetAddress (1), 9);
  echoClient.SetAttribute ("MaxPackets", UintegerValue (1));
  echoClient.SetAttribute ("Interval", TimeValue (Seconds (1.0)));
  echoClient.SetAttribute ("PacketSize", UintegerValue (1024));

  ApplicationContainer clientApps = echoClient.Install (nodes.Get (0));
  clientApps.Start (Seconds (2.0));
  clientApps.Stop (Seconds (10.0));

  //this is set for visualization (NetAnim)
  AnimationInterface anim("first.xml");
  anim.SetConstantPosition(nodes.Get(0), 1.0, 2.0);
  anim.SetConstantPosition(nodes.Get(1), 2.0, 3.0);

  Simulator::Run ();
  Simulator::Destroy ();
  return 0;
}
