步骤:
- 第一步:抓包查看登陆接口
- 第二步:分析js文件,提取加密请求参数的js脚本
- 第三步:分析js文件,构造需要加密的字符串
- 第四步:编写代码模拟请求登陆
第一步:抓包查看post登陆接口
登陆接口
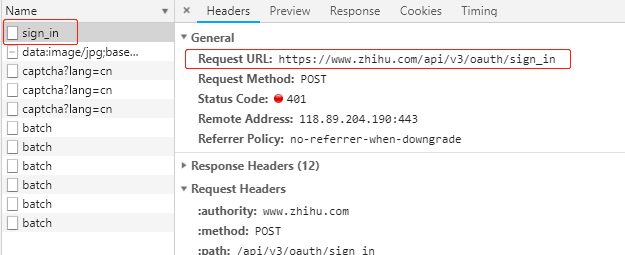
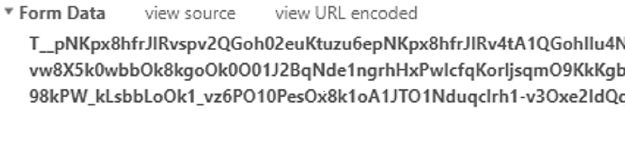
参数(可以看到post的数据是经过加密的)
第二步:分析js文件,提取加密请求参数的js脚本
通过全局搜索sign_in字段,找到对应post请求
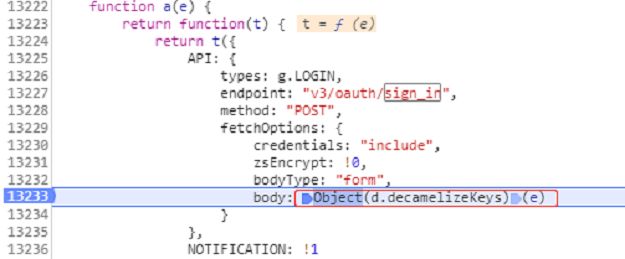
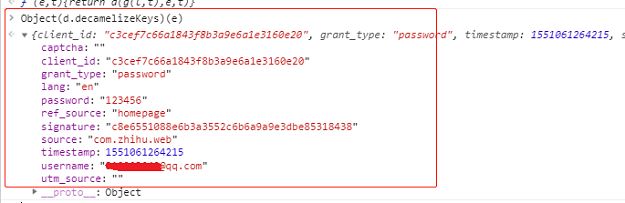
我们看到feachOpiton中的zsEncrypt参数为ture,zsEncrypt为ture应该是代表body需要加密,断点后通过控制台执行Object(d.decamelizeKeys)(e),可以获取到body参数
通过搜索zsEncrypt字段,可以找到请求时对body进行加密的函数

断点后发现o.default 为实际的加密函数,a为需要加密的字符串
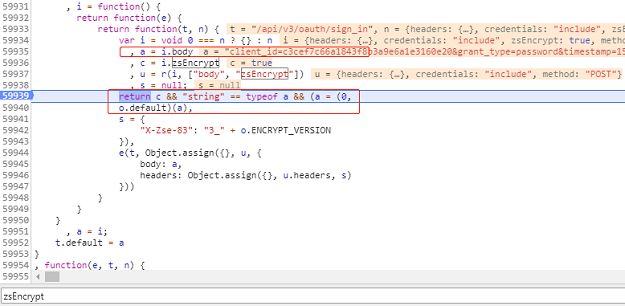
控制台调用o.default(a)可以获取到加密后字符

进入o.defaul函数,o.defaul实际为加密模块中对外暴露的Q加密函数
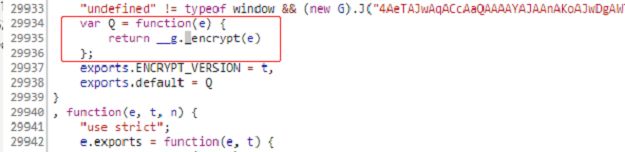
接下来需要提取加密模块,然后使用python执行提取出来的js脚本
将Q函数所在的函数复制到本地zhihu.js文件,将最外层函数删掉,只保存里面的代码

同时将export模块相关的代码删掉

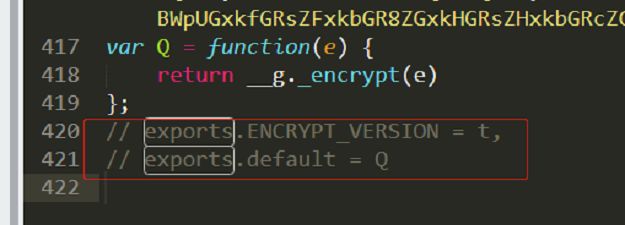
在zhihu.js最后调用Q函数加密需要加密的a字符串

创建zhihu.html文件,引入zhihu.js文件
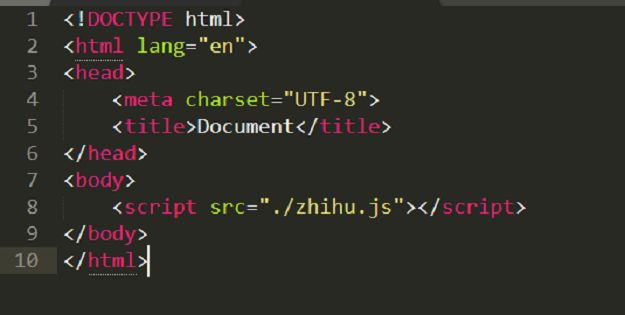
使用浏览器打开文件,控制台console中可以看到加密过的字符串

此时我们已经提取出了加密所需要的js文件,可以通过浏览器执行,但时通过python执行会发现无法执行,原因是浏览器环境和python执行js的node环境不同,使用vscode断点试调后发现node环境先缺少window对象、navigator对象(过程比较繁琐,有兴趣的可以自己去试调研究下),并且window对象下需要有encodeURIComponent函数,navigator对象下需要有userAgent属性。同时也需要用到atob函数,通过全局搜索atob可以找到zap.js文件中的atob函数,atob函数实际上是将base64编码的字符串转换二进制编码的字符串。缺少的这些我们可以自己定义出来,添加到zhihu.js文件开头。


此时提取出来的zhihu.js文件已经可以正常运行了

我们自己定义一个encrypt函数供python调用,这样就完成了加密js的提取

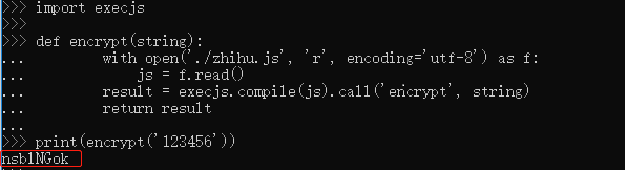
使用python调用执行js脚本
import execjs

def encrypt(string):
    with open('./zhihu.js', 'r', encoding='utf-8') as f:
        js = f.read()
    result = execjs.compile(js).call('encrypt', string)
    return result

print(encrypt('123456'))
第三步:分析js文件,构造需要加密的字符串
需要加密的字符串:
client_id=c3cef7c66a1843f8b3a9e6a1e3160e20&
grant_type=password&
timestamp=1551062570616&
source=com.zhihu.web&
signature=e3ab73425750a4dbcf9ab357f6030fc281ceeb22&
[email protected]&
password=123456&
captcha=&
lang=en&
ref_source=homepage&
utm_source=
这些参数中会变的参数的总共有四个,分别是timestamp,signature,username,password,这些需要我们自己传入,capthca参数是有验证码的时候需要传,我还没遇到过需要输入验证码的,这里我们不作考虑。真正需要我们构造的只有signature参数,下面介绍如何构造
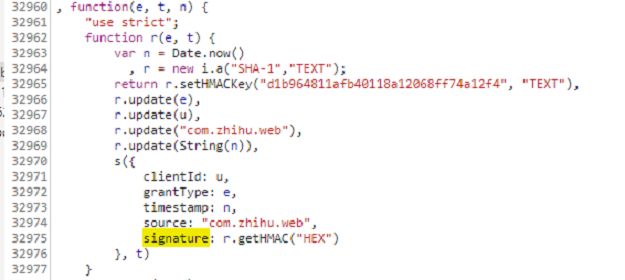
全局搜索signature,在main.app.xxx.js 中可以找到singnature的构造方法,是通过hmac加密
clientId,grantType,source,timestamp四个参数获得的
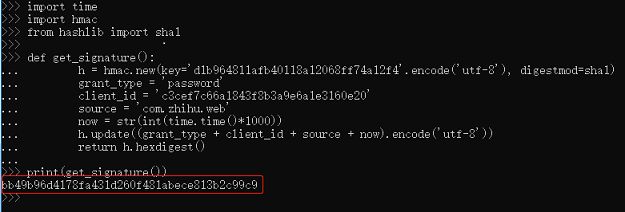
使用python模拟加密的js,代码如下
import time
import hmac
from hashlib import sha1

def get_signature():
    h = hmac.new(key='d1b964811afb40118a12068ff74a12f4'.encode('utf-8'), digestmod=sha1)
    grant_type = 'password'
    client_id = 'c3cef7c66a1843f8b3a9e6a1e3160e20'
    source = 'com.zhihu.web'
    now = str(int(time.time()*1000))
    h.update((grant_type + client_id + source + now).encode('utf-8'))
    return h.hexdigest()
print(get_signature())
第四步:编写代码模拟请求登陆
我们的准备工作已经完成了,下面开始编写代码模拟请求
- 第一步:请求请求login_url,udid_url,captcha_url加载所需要的cookie
- 第二步:构造需要加密的字符串
- 第三步:加密字符串
- 第四步:使用加密后的字符串请求post登陆接口
完整代码如下:
import requests
import re
import execjs
import time
import hmac
from hashlib import sha1

class Zhihu(object):

    def __init__(self, username, password):

        self.username = username
        self.password = password
        self.session = requests.session()
        # 此处请求头只需要这三个
        self.headers = {
            'content-type': 'application/x-www-form-urlencoded',
            'user-agent': 'Mozilla/5.0 (Windows NT 10.0; Win64; x64) AppleWebKit/537.36 (KHTML, like Gecko) Chrome/72.0.3626.109 Safari/537.36',
            'x-zse-83': '3_1.1'
        }

    def login(self):

        # 请求login_url,udid_url,captcha_url加载所需要的cookie
        login_url = 'https://www.zhihu.com/signup?next=/'
        resp = self.session.get(login_url, headers=self.headers)
        print("请求{},响应状态码:{}".format(login_url,resp.status_code))
        # print(self.session.cookies.get_dict())
        # self.save_file('login',resp.text)

        udid_url = 'https://www.zhihu.com/udid'
        resp = self.session.post(udid_url, headers=self.headers)
        print("请求{},响应状态码:{}".format(udid_url,resp.status_code))
        # print(self.session.cookies.get_dict())

        captcha_url = 'https://www.zhihu.com/api/v3/oauth/captcha?lang=en'
        resp = self.session.get(captcha_url, headers=self.headers)
        print("请求{},响应状态码:{}".format(captcha_url,resp.status_code))
        # print(self.session.cookies.get_dict())
        # print(resp.text)
        # self.save_file('captcha',resp.text)

        # 校验是否需要验证吗,需要则直接退出,还没遇到过需要验证码的
        if re.search('true',resp.text):
            print('需要验证码')
            exit()

        # 获取signature参数
        self.time_str = str(int(time.time()*1000))
        signature = self.get_signature()
        # print(signature)

        # 拼接需要加密的字符串
        string = "client_id=c3cef7c66a1843f8b3a9e6a1e3160e20&grant_type=password×tamp={}&source=com.zhihu.web&signature={}&username={}&password={}&captcha=&lang=en&ref_source=homepage&utm_source=".format(self.time_str,signature,self.username,self.password)
        # print(string)
        # 加密字符串
        encrypt_string = self.encrypt(string)
        # print(encrypt_string)

        # post请求登陆接口
        post_url = "https://www.zhihu.com/api/v3/oauth/sign_in"
        resp = self.session.post(post_url, data=encrypt_string, headers=self.headers)
        print("请求{},响应状态码:{}".format(post_url,resp.status_code))
        # print(self.session.cookies.get_dict())
        # print(resp.text)
        # self.save_file('post',resp.text)

        # 校验是否登陆成功
        if re.search('user_id',resp.text):
            print('登陆成功')
        else:
            print("登陆失败")
            exit()

    def test(self):

        # 请求个人信息接口查看个人信息
        me_url = 'https://www.zhihu.com/api/v4/me'
        data = {
            'include': 'ad_type;available_message_types,default_notifications_count,follow_notifications_count,vote_thank_notifications_count,messages_count;draft_count;following_question_count;account_status,is_bind_phone,is_force_renamed,email,renamed_fullname;ad_type'
        }
        resp = self.session.get(me_url, data=data, headers=self.headers)
        print("请求{},响应状态码:{}".format(me_url,resp.status_code))
        print(resp.text)
        # self.save_file('me',resp.text)

    def encrypt(self, string):

        with open('./zhihu.js', 'r', encoding='utf-8') as f:
            js = f.read()
        result = execjs.compile(js).call('encrypt', string)
        return result

    def get_signature(self):

        h = hmac.new(key='d1b964811afb40118a12068ff74a12f4'.encode('utf-8'), digestmod=sha1)
        grant_type = 'password'
        client_id = 'c3cef7c66a1843f8b3a9e6a1e3160e20'
        source = 'com.zhihu.web'
        now = self.time_str
        h.update((grant_type + client_id + source + now).encode('utf-8'))
        return h.hexdigest()

    def save_file(self, name, html):

        with open('{}.html'.format(name),'w',encoding='utf-8') as f:
            f.write(html)


if __name__ == "__main__":

    account = Zhihu('账号','密码')
    account.login()
    account.test()
登陆成功

代码
链接:https://pan.baidu.com/s/1aqzzkacgQM0n2ewV6r7csg
提取码:inv2
参考文章
https://zhuanlan.zhihu.com/p/34073256
https://mp.weixin.qq.com/s/XplpQ6QUophvgfyMszk0Hg