webpack打包原理_带你看懂 HMR 热更新原理
现在的我们基本上都是使用 webpack 模式开发,修改了代码之后,页面会直接进行改变,但是很少有人想过,为什么页面不刷新就会直接改变了?
初识 HMR 的时候,觉得神奇的同时,脑海中一直有一些疑问:
- 一般来说, webpack 会将不同的模块打包成不同 bundle 或 chunk 文件, 但是在使用 webpack 进行 dev 模式开发的时候,我并没有在我的 dist 目录中找到 webpack 打包好的文件,它们去哪了呢?
- 在查看 webpack-dev-server 的 package.json 文件中,我发现了 webpack-dev-middleware 这个依赖,这个 webpack-dev-middleware 又有什么作用呢?
- 在研究 HMR 的过程中,通过 Chrome 的开发者工具,我知道浏览器是通过 websocket 和 webpack-dev-server 进行通信的,但是我在 websocket 中并没有发现任何代码块。那么新的代码块是怎么跑到浏览器的呢?这个 websocket 又有什么作用?为什么不通过 websocket 进行新旧代码块的替换?
- 浏览器如何进行替换最新代码?替换过程中如今处理依赖关系?替换失败了会怎样?
带着这些疑惑,我去探究了一下 HMR 。
HMR 原理图解
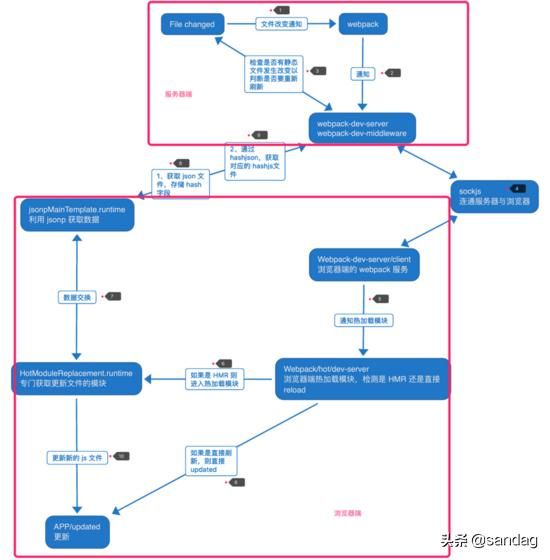
没错,这是一张 HMR 工作原理流程图。
上图显示了我们从修改代码开始触发 webpack 打包,到浏览器端热更新的一个流程,我已经通过小标识将步骤进行了标记。
- 在 webpack 的 dev 模式下, webpack 会 watch 文件系统的文件修改,一旦监听到文件变化, webpack 就会对相关模块进行重新打包,打包完之后会将代码保存在内存中。
- webpack 和 webpack-dev-server 之间的交互,其中,主要是利用 webpack-dev-server 里的 webpack-dev-middleware 这个中间件调用 webpack 暴露给外部的 API 对代码变化进行的监控。
- 第三步是 webpack-dev-server 对静态文件变化的监控,这一步和第一步不同,并不是要监控代码进行重新打包,而是监听配置文件中静态文件的变化,如果发生变化,则会通知浏览器需要重新加载,即 live reload (刷新),和 HMR 不一样。具体配置为,在相关配置文件配置 devServer.watchContentBase 。
- 服务器端的额 webpack-dev-server 利用 sockjs 在浏览器和服务器之间建立一个 websocket 长链接,将 webpack 打包变化信息告诉浏览器端的 webpack-dev-server ,这其中也包括静态文件的改变信息,当然,这里面最重要的就是每次打包生成的不同 hash 值。
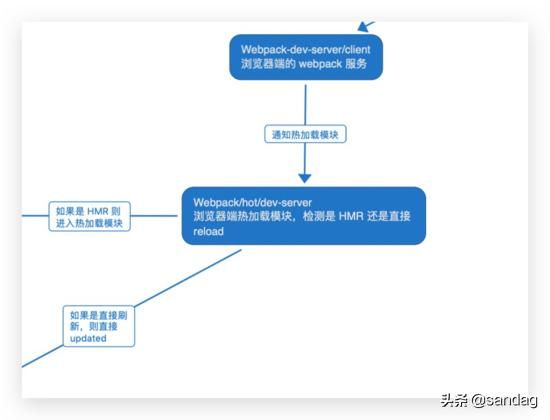
- 浏览器端的 webpack-dev-server 接收到服务器端的请求,他自身并不会进行代码的替换,他只是一个 中间商 ,当接收到的信息有变化时,他会通知 webpack/hot/dev-server , 这是 webpack 的功能模块,他会根据浏览器端的 webpack-dev-server 传递的信息以及 dev-server 的配置,决定浏览器是执行刷新操作还是热更新操作。
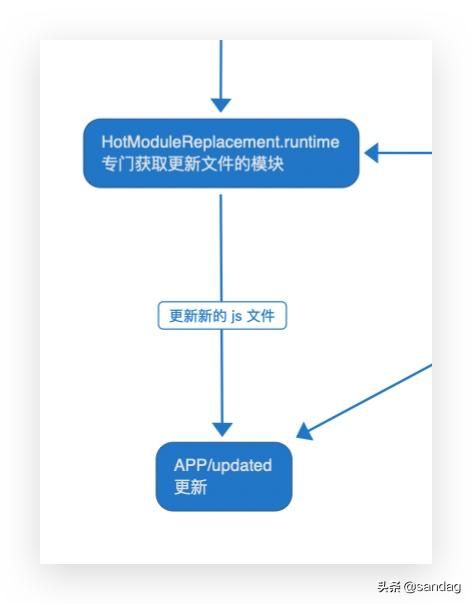
- 如果是刷新操作,则直接通知浏览器进行刷新。如果是热更新操作,则会通知热加载模块 HotModuleReplacement.runtime ,这个 HotModuleReplacement.runtime 是浏览器端 HMR 的中枢系统,他负责接收上一步传递过来的 hash 值,然后通知并等待下一个模块即 JsonpMainTemplate.runtime 向服务器发送请求的结果。
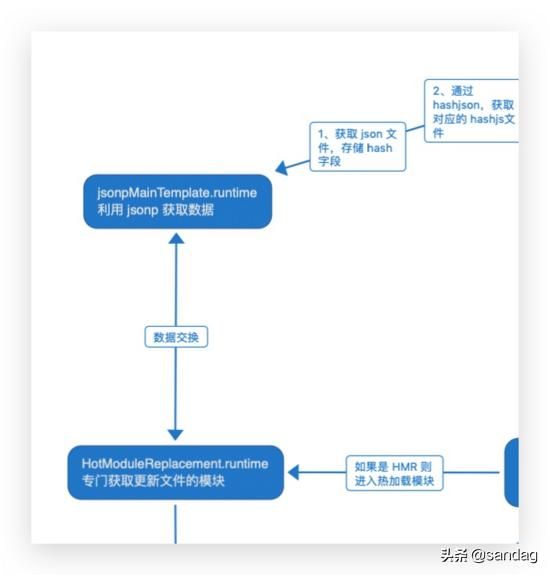
- HotModuleReplacement.runtime 通知 JsonpMainTemplate.runtime 模块要进行新的代码请求,并等待其返回的代码块。
- JsonpMainTemplate.runtime 先向服务端发送请求,请求包含 hash 值得 json 文件。
- 获取到所有要更新模块的 hash 值之后,再次向服务端发送请求,通过 jsonp 的形式,获取到最新的代码块,并将此代码块发送给 HotModulePlugin 。
- HotModulePlugin 将会对新旧模块进行对比,决定是否需要更新,若需要更新,则会检查其依赖关系,更新模块的同时更新模块间的引用。
HMR 用例详解
在上一个部分,作者根据示意图简述了 HMR 的工作原理,当然,你可能觉得了解了一个大概,细节部分仍然是很模糊,对上面出现的英文单词也感觉很陌生,没关系,接下来,我会通过最纯粹的一个小栗子,结合源码来一步一步说明每个部分的内容。
我们从最简单的例子开始说明,以下是这个 demo 的具体文件
--hello.js;--index.js;--index.html;--package.json;--webpack.config.js;其中 hello.js 为以下代码
const hello = () => 'hello world';export default hello;index.js 文件为以下代码
import hello from './hello.js';const div = document.createElemenet('div');div.innerHTML = hello();document.body.appendChild(div);webpack.config.js 文件为以下代码
const path = require('path');const webpack = require('webpack');module.exports = { entry: './index.js', output: { filename: 'bundle.js', path: path.join(__dirname, '/') }, devServer: { hot: true }};我们使用 npm install 安装完依赖,并启动 devServer 服务器。
接下来,我们进入关键环节,改变文件内容,触发 HMR 。
// hello.js- const hello = () => 'hello world'+ const hello = () => 'hello nice'这个时候页面就从 hello world 渲染为 hello nice 。 我们从这个过程,一步一步详细解析一下热更新的过程及原理。
第一步,webpack 对文件进行监测并打包
webpack-dev-middleware 调用 webpack 中的 api 来监测文件系统的改变,当 hello.js 文件发生了改变, webpack 对其进行重新打包,将打包的内容保存到内存中去。
具体代码如下:
// webpack-dev-middleware/lib/Shared.jsif (!options.lazy) { var watching = compiler.watch( options.watchOptions, share.handleCompilerCallback ); context.watching = watching;}那为什么 webpack 没有将文件直接打包到 output.path 呢?这些文件都没有了系统是怎么访问的呢?
原来 webpack 将文件打包到内存中去了。
为什么要将打包内容保存到内存中去呢
这样做的理由就是能更快的访问文件,减少代码写入的开销。这就归功于 memory-js 这个库, webpack-dev-middleware 依赖此库,同时将 webpack 中原来的 outputFileSystem 替换成了 MemoryFileSystem 实例,这样代码就输出到内存中去了,其中一部分源码如下:
// webpack-dev-middleware/lib/Shared.js// 首先判断当前 fileSystem 是否已经是 MemoryFileSystem 的实例var isMemoryFs = !compiler.compilers && compiler.outputFileSystem instanceof MemoryFileSystem;if (isMemoryFs) { fs = compiler.outputFileSystem;} else { // 如果不是,用 MemoryFileSystem 的实例替换 compiler 之前的 outputFileSystem fs = compiler.outputFileSystem = new MemoryFileSystem();}第二步,devServer 通知浏览器端文件发生变化
这一阶段,是利用 sockjs 来进行浏览器和服务器之间的通讯。
在启动 devServer 的时候, sockjs 在浏览器和服务器之间建立了一个 websocket 长链接,以便能够实时通知浏览器打包动向,这其中最关键的部分还是 webpack-dev-server 调用 webpack 的 api 来监听 compile 的 done 事件,当编译完成时, webpack-dev-server 通过 _sendStatus 方法将新模块的 hash 值发送给浏览器。其中关键代码如下:
// webpack-dev-server/lib/Server.jscompiler.plugin('done', (stats) => { // stats.hash 是最新打包文件的 hash 值 this._sendStats(this.sockets, stats.toJson(clientStats)); this._stats = stats;});...Server.prototype._sendStats = function (sockets, stats, force) { if (!force && stats && (!stats.errors || stats.errors.length === 0) && stats.assets && stats.assets.every(asset => !asset.emitted)) { return this.sockWrite(sockets, 'still-ok'); } // 调用 sockWrite 方法将 hash 值通过 websocket 发送到浏览器端 this.sockWrite(sockets, 'hash', stats.hash); if (stats.errors.length > 0) { this.sockWrite(sockets, 'errors', stats.errors); else if (stats.warnings.length > 0) { this.sockWrite(sockets, 'warnings', stats.warnings); } else { this.sockWrite(sockets, 'ok'); }};第三步,浏览器端的 webpack-dev-server/client 接受消息并作出响应
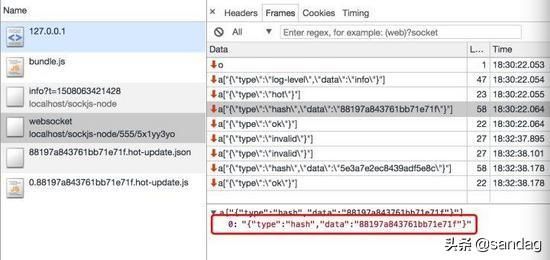
当 webpack-dev-server/client 接受到 type 为 hash 消息后,会将 hash 暂存起来,当接收到 type 为 ok 的消息后,对应执行 reload 操作
在 reload 中, webpack-dev-server/client 会根据 hot 配置决定是 HMR 热更新还是进行浏览器刷新,具体代码如下:
// webpack-dev-server/client/index.jshash: function msgHash(hash) { currentHash = hash;},ok: function msgOk() { // ... reloadApp();},// ...function reloadApp() { // 如果是热加载 if (hot) { log.info('[WDS] App hot update...'); const hotEmitter = require('webpack/hot/emitter'); hotEmitter.emit('webpackHotUpdate', currentHash); // 否则就刷新 } else { log.info('[WDS] App updated. Reloading...'); self.location.reload(); }}第四步,webpack 接收到最新 hash 值验证并请求模块代码
这一步,主要是 webpack 的三个模块之间的配合:
- webpack/hot/dev-derver 监听 webpack-dev-server/client 发送的 webpackHotUpdate ,并调用 HotModuleReplacement.runtime 中的 check 方法,监测是否有更新。
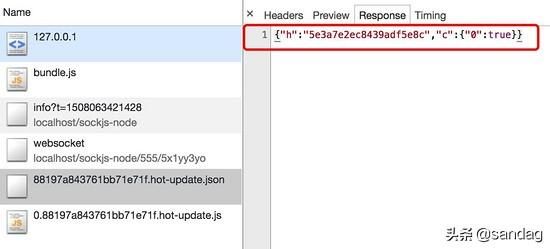
- 监测过程中会使用 JsonpMainTemplate.runtime 中的两个方法 hotDownloadUpdateChunk , hotDownloadManifest ,第二个方法是调用 ajax 想服务器发送请求是否有更新文件,如有,则将更新文件列表返回浏览器端,第一个方法是通过 jsonp 请求最新代码块,同时将代码返回给 HotModuleReplacement 。
- HotModuleReplacement 根据拿到的代码块做处理。
如上图所示,两次请求都是使用的上一次 hash 值拼接而成的文件名,一个是对应的 hash 值,一个是对应的代码块。
为什么不直接使用 websocket 来进行更新代码呢
我个人觉得,大概是作者想把功能解耦,各个模块干自己的事, websocket 在这里的设计只是进行消息的传递。 在使用 webpack-hot-middleware 中有件有意思的事,它没有使用 websocket ,而是使用的 EventSource ,感兴趣的可以去了解下。
第五步,HotModuleReplacement.runtime 进行热更新
这一步很关键,因为所有的热更新操作都在这一步完成,主要过程就在 HotModuleReplacement.runtime 的 hotApply 这个方法中,下面我摘取了部分代码片段:
// webpack/lib/HotModuleReplacement.runtimefunction hotApply() { // ... var idx; var queue = outdatedModules.slice(); while (queue.length > 0) { moduleId = queue.pop(); module = installedModules[moduleId]; // ... // 删除过期的模块 delete installedModules[moduleId]; // 删除过期的依赖 delete outdatedDependencies[moduleId]; // 移除所有子节点 for (j = 0; j < module.children.length; j++) { var child = installedModules[module.children[j]]; if (!child) continue; idx = child.parents.indexOf(moduleId); if (idx >= 0) { child.parents.splice(idx, 1); } } } // ... // 插入新的代码 for (moduleId in appliedUpdate) { if (Object.prototype.hasOwnProperty.call(appliedUpdate, moduleId)) { modules[moduleId] = appliedUpdate[moduleId]; } } // ...}上面的方法可以看出,这一共经历了三个阶段
- 找出过期模块和过期依赖
- 删除过期模块和过期依赖
- 将新的模块添加到 modules 中,当下次调用 __webpack_require__ 时,就是获取新的模块了。
当热更新出错了怎么办
如果在热更新过程中出现错误,热更新将回退到刷新浏览器,这部分代码在 dev-server 代码中,简要代码如下:
module.hot .check(true) .then(function(updatedModules) { // 是否有更新 if (!updatedModules) { // 没有就刷新 return window.location.reload(); } // ... }) .catch(function(err) { var status = module.hot.status(); // 如果出错 if (['abort', 'fail'].indexOf(status) >= 0) { // 刷新 window.location.reload(); } });最后更新页面
当用新的模块代码替换老的模块后,但是我们的业务代码并不能知道代码已经发生变化,也就是说,当 hello.js 文件修改后,我们需要在 index.js 文件中调用 HMR 的 accept 方法,添加模块更新后的处理函数,及时将 hello 方法的返回值插入到页面中。 以下是部分代码:
// index.jsif (module.hot) { module.hot.accept('./hello.js', function() { div.innerHTML = hello(); });}这就是 HMR 的整个工作流程了。
总结
这篇文章没有对 HMR 对过于详尽的解析,很多细节方面也没有说明,只是简述了一下 HMR 的工作流程,希望这篇文章能帮助你更好的了解 webpack 。
