Centerface + Facenet实现视频人脸识别(附代码)
Centerface + Facenet实现视频人脸识别
Facenet的pytorch版本:GitHub地址:https://github.com/timesler/facenet-pytorch
CenterFace:GitHub地址:https://github.com/Star-Clouds/CenterFace
我是先分别跑通了这两个开源项目,然后再用centerface替换了Facenet中的MTCNN人脸检测算法。两个项目跑通都比较容易,可以去网上找博客或者好好读读官方文档即可。
这里主要是对用Centerface做检测和Facenet做识别的新组合做解释。(项目是在Facenet原有基础上做改动)
项目结构介绍
改动后的项目结构和Facenet原有项目结构一致,不同的是将Centerface中的用于检测的脚本文件cnterface.py和与训练模型centerface.onnx复制到该项目下。我把centerface.py放到examples文件夹下,centerface.onnx放到models文件夹下。

data文件夹下是自己建的一些数据库,可以用爬虫脚本自动创建,后面会给出代码。

项目重要脚本介绍
face_database.py
该脚本是用于创建人脸特征数据库的,即对一个人脸数据集,计算出每个人脸的特征向量并保存,用于后续识别。
from facenet_pytorch import MTCNN, InceptionResnetV1
import torch
from torch.utils.data import DataLoader
from torchvision import datasets
import numpy as np
import pandas as pd
import os
from centerface import CenterFace, FaceExtract


# creat a new database
# 要保证数据库中的图片只有当前人脸
def CreatNewDB(DB_images_path, feature_path, cropped_save_pth=None):
    # 定义了一个数据集
    # 读取路径下的所有文件夹,每一个文件夹为一个类别,有对应的标签index
    # 所有文件夹下的图片按顺序都存储在dataset中,dataset为可遍历对象,每张图片的格式为元祖(data,label)
    dataset = datasets.ImageFolder(DB_images_path)

    # dataset.class_to_idx将类别转化为数字索引
    dataset.idx_to_class = {
     i: c for c, i in dataset.class_to_idx.items()}
    # 定义一个数据加载器,一张图片表示为(data,label)的元祖
    loader = DataLoader(dataset, collate_fn=collate_fn, num_workers=workers)
    names = []
    for name in dataset.class_to_idx.keys():
        names.append(name)
    # 保存所有剪裁过后的人脸,用于求特征向量
    cropped_faces = []
    # 每个类别的人脸数
    num_each_class = 10
    # image为图片,index为name对应的标签
    j = 0
    for image, index in loader:
        centerface = CenterFace()
        w, h = image.size
        boxes, lms = centerface(image, h, w, threshold=0.6)
        print(f"{names[index]} 检测人脸数:{len(boxes)}")
        extractFace = FaceExtract()
        resnet = InceptionResnetV1(pretrained='vggface2').eval().to(device)

        # j表示一个name下的第几张图片

        # i表示第几个人脸框
        for i, box in enumerate(boxes):
            box, score = box[:4], box[4]
            # 存储cropped face,创建文件夹
            path = cropped_save_pth + dataset.idx_to_class[index]
            if not os.path.exists(path):
                os.makedirs(path)
            save_path = path + f'/{j}.jpg'
            # face为tensor
            face = extractFace(image, box=box, save_path=save_path)
            cropped_faces.append(face)
            # tensor([[...]])
            #face_embedding = resnet(face.unsqueeze(0)).detach()
            # 每张图片只保存一个人脸向量
            #embedings.append(face_embedding[0])
        j += 1
        # break
        if j % num_each_class == 0:
            j = 0

    aligned = torch.stack(cropped_faces).to(device)
    # 返回所有人脸的特征向量,每个向量的长度是512维
    embedings = resnet(aligned).detach().cpu()

    # 一个人有多个人脸,求平均特征向量
    # [tensor([...])]
    mean_embedings = []
    for i in range(len(dataset.idx_to_class)):
        emd = embedings[i * num_each_class:(i + 1) * num_each_class].mean(0)        # ???
        mean_embedings.append(emd)

    # dicts = [[(e1 - e2).norm().item() for e2 in mean_embedings] for e1 in mean_embedings]
    # print(pd.DataFrame(dicts, columns=names, index=names))
    if not os.path.exists(feature_path):
        os.makedirs(feature_path)
    # 将人脸特征向量和标签保存下来
    # 人脸特征向量和标签的index保持一致
    # names中的顺序应该和数据集类别的顺序相同
    torch.save(mean_embedings, feature_path + 'features.pt')
    torch.save(names, feature_path + 'names.pt')


# add a new face to existing database
def AddNewFace2DB():
    a = 1


# 将一个list的sample组成一个mini-batch的函数
def collate_fn(x):
    return x[0]


if __name__ == "__main__":
    # os.name返回当前操作系统名字,nt为Windows,posix为linux
    # 线程数
    workers = 0 if os.name == 'nt' else 4
    device = torch.device("cuda:0" if torch.cuda.is_available() else "cpu")
    print(f"Running on {device}")

    DB = 3
    DB_path = f"../data/DB{DB}_images_school/"
    cropped_path = f"../data/DB{DB}_images_cropped/"
    feature_path = f"../data/DB{DB}_features/"
    CreatNewDB(DB_path, feature_path, cropped_path)
test_new_face.py
该脚本用于识别测试集中的人脸。实现了三个函数:detect_one用于识别单张图片,detect_multi识别一个数据集,detect_videos用于视频人脸识别。
from facenet_pytorch import MTCNN, InceptionResnetV1
import torch
from PIL import ImageDraw, Image, ImageFont
from torchvision import datasets
from torch.utils.data import DataLoader
import os
import time
import cv2
import numpy as np
from centerface import CenterFace, FaceExtract


# mtcnn = MTCNN(keep_all=True)

# 识别单张图片
def detect_one(img, names, embeddings):
    # 定义检测和识别人脸模型
    centerface = CenterFace(landmarks=True)
    extractFace = FaceExtract()
    resnet = InceptionResnetV1(pretrained='vggface2').eval()

    # 自定义字体格式
    fontStyle = ImageFont.truetype("SIMYOU.TTF", 24)

    # Image对象读大小
    w, h = img.size
    boxes, lms = centerface(img, h, w, threshold=0.5)

    # face = mtcnn(img)
    # boxes, prob = mtcnn.detect(img)  # 人脸检测器,直接返回人脸的位置坐标和概率

    frame_draw = img.copy()
    draw = ImageDraw.Draw(frame_draw)
    print("检测人脸数目:", len(boxes))
    for i, box in enumerate(boxes):
        # 人脸框,分数
        box, score = box[:4], box[4]
        x1, y1, x2, y2 = box
        draw.rectangle(box, outline=(255, 0, 0), width=2)

        # 人脸提取,返回的是标准化后的tensor
        face = extractFace(frame_draw, box=box)
        # 增加tensor维度,resnet输入参数为4维
        face_embedding = resnet(face.unsqueeze(0))
        # 求两个向量间的欧氏距离,tensor.norm()用于求2范数,即为欧氏距离
        probs = [(face_embedding - embeddings[i]).norm().item() for i in range(len(embeddings))]

        # 我们可以认为距离最近的那个就是最有可能的人,但也有可能出问题,数据库中可以存放一个人的多视角多姿态数据,对比的时候可以采用其他方法,如投票机制决定最后的识别人脸
        # 这里仅仅是简单地将向量归类为距离最近的那个向量,未设定阈值。
        # 改进思路:设定一个阈值范围,然后使用交叉验证计算训练集在不同阈值下的准确率,得到表现最好的阈值后,再利用该阈值在测试集上进行测试。该阈值将是我们区分不同人脸的重要阈值
        # 对应的索引就是判断的人脸

        # 保存最小的距离,保留三位小数
        distance = min(probs)
        # 设置一个阈值,超过阈值即为数据库中不存在的人脸
        # 这里的0.9只是根据部分结果观察得到的一个大概的阈值,并不是最准确的
        if distance > 0.9:
            name = 'unkonwn'
        else:
            index = probs.index(min(probs))
            name = names[index]

        # 打印出识别结果
        draw.text((x1 + 10, y1 + 5), str(name) + str(i + 1), fill='red', font=fontStyle, align='center')
        # 在左上角打印出每个人与识别出的类别之间的距离
        draw.text((0, i * 24), f"({i + 1}: {distance:.3f})", fill='red', font=fontStyle)
    return frame_draw


def collate_fn(x):
    return x[0]


# detect a face dataset and save its result
def detect_multi(dataset_path, names, embeddings, save_path=None):
    dataset = datasets.ImageFolder(dataset_path)
    # 数据集总数
    total_nums = len(dataset)
    # 人脸类别数
    class_nums = len(dataset.class_to_idx.items())
    # 每个类别中的图片数,此例中每类中图片数相等才可这样计算
    # 用于图片命名
    num_one_class = total_nums / class_nums

    # dic类型
    dataset.idx_to_class = {
     i: c for c, i in dataset.class_to_idx.items()}
    loader = DataLoader(dataset, collate_fn=collate_fn)

    i = 0
    # iamge类型为<'PIL.Image.Image'>
    for image, index in loader:
        name = dataset.idx_to_class[index]
        path = save_path + name + '/'
        if not os.path.exists(path):
            os.makedirs(path)

        # img = Image.open(image)
        img = detect_one(image, names=names, embeddings=embeddings)
        img.save(path + f"{name}_{i}.jpg")
        i += 1
        if i % num_one_class == 0:
            i = 0
        # img.show()
        # break


def detect_videos(video_path, names, embeddings, video_save_path=None):
    cap = cv2.VideoCapture(video_path)
    # frame是每一帧的图像,ret的类型为bool,表示是否读到图片
    ret, frame = cap.read()
    # 获取原视频帧数
    fps = cap.get(propId=cv2.CAP_PROP_FPS)
    print(fps)
    h, w = frame.shape[:2]

    fourcc = cv2.VideoWriter_fourcc('m', 'p', '4', 'v')
    out = cv2.VideoWriter(video_save_path, fourcc, fps, (w, h), True)
    while ret:
        # opencv转Image
        img = Image.fromarray(cv2.cvtColor(frame, cv2.COLOR_BGR2RGB))
        img = detect_one(img=img, names=names, embeddings=embeddings)
        # Image转Opencv
        frame = cv2.cvtColor(np.asarray(img),cv2.COLOR_RGB2BGR)
        out.write(frame)
        ret, frame = cap.read()
    cap.release()
    out.release()


# another way to read images dataset
# 可以替换ImageFolder的一种方法,最终未采用
def read_files(dataset_path, save_path):
    set_dirs = os.listdir(dataset_path)
    print(set_dirs)
    for class_name in set_dirs:
        dir_path = data_path + class_name + '/'
        imgs_dir = os.listdir(dir_path)
        for img_name in imgs_dir:
            img_path = dir_path + img_name
            img = Image.open(img_path)
            img = detect_one(img)
            path = save_path + class_name + '/'
            if not os.path.exists(path):
                os.makedirs(path)
            # img.save(path + f"{class_name}_{img_name}")
            print(path + f"{class_name}_{img_name}")
        break


if __name__ == '__main__':
    DB = 3
    # list
    names = torch.load(f"../data/DB{DB}_features/names.pt")
    print(len(names))
    # 元素为tensor的list,每一个tensor包含一个list,表示一个人脸
    embeddings = torch.load(f"../data/DB{DB}_features/features.pt")
    print(len(embeddings))
    # print(names)
    # print(embeddings)

    img = Image.open("../data/DB3_images_school/刘瑶瑶/刘瑶瑶202022021932.jpg")
    #test_img = detect_one(img, names, embeddings)
    #test_img.show()
    # test_img.save("result.jpg")

    data_path = f"../data/DB{DB}_images_test/"
    save_path = f"../data/DB{DB}_images_test_results/"

    vs_path = "../data/videos/"
    video_name = "school"
    video_path = vs_path + video_name + ".mp4"
    video_save_path = vs_path + video_name + "_result.mp4"
    start_time = time.time()
    # detect_multi(dataset_path=data_path, save_path=save_path, names=names, embeddings=embeddings)
    detect_videos(video_path=video_path, video_save_path=video_save_path, names=names, embeddings=embeddings)
    end_time = time.time()
    print(f"time(s): {end_time - start_time:.2f}")
clawer.py
用于从网页上爬取人脸图片并建立数据文件夹。
import requests
import re
import os
import time
import random


def get_parse_page(name, action, page=1, DB=1):
    for i in range(int(page)):
        # print(f"正在获取第{i + 1}页")

        # 百度搜索图片时的链接
        # 只需传入word和pn参数
        # word为查询关键字,pn为页数
        # flip参数为翻页查看,还有index为下滑查看,翻页利于爬取图片
        url = f"https://image.baidu.com/search/flip?tn=baiduimage&ie=utf-8&word={name}&pn={page}"
        headers = {

            "User-Agent": "Mozilla/5.0 (Windows NT 10.0; Win64; x64) AppleWebKit/537.36 (KHTML, like Gecko) Chrome/89.0.4389.90 Safari/537.36"}

        # 发送请求,获取响应
        response = requests.get(url, headers=headers)
        html = response.content.decode()

        # 正则表达式获取属性为objURL的value
        # 返回一个列表,元素为url地址,大小为一页60个
        results = re.findall('"objURL":"(.*?)",', html)

        # 这里的action根据用户的输入来下载图片到不同文件夹
        # origin:用于求人脸特征向量的原始图片
        # test:用于测试的数据集
        # single:用于测试的单张图片
        # save_path = None
        if action == 'origin':
            # 取每页的第一个10张
            results = results[:10]
            save_path = f"../data/DB{DB}_images/" + name
        elif action == 'test':
            # 取每页的第二个10张
            results = results[11:20]
            save_path = f"../data/DB{DB}_images_test/" + name
        elif action == 'single':
            # 随机取一张
            t = random.randint(0, 60)
            results = results[t]
            save_path = "../data/test_faces_single/" + name

        saveImages(results, save_path, i)


def saveImages(results, save_path, i):
    # 创建文件夹
    if not os.path.exists(save_path):
        os.makedirs(save_path)

    # 下载图片
    for j, result in enumerate(results):
        try:
            image = requests.get(result, timeout=5)
            # 随机休眠0~1秒钟
            time.sleep(random.random())
            # time.sleep(1)
        except:
            print(f"当前图片无法下载:\n{result}")
            continue

        # 这里应该要判断一下图片的大小,太大的图片不能要。

        # 图片按数字顺序命名:i为页数,j为偏移量
        image_name = save_path + f'/{i * 60 + j}.jpg'
        with open(image_name, 'wb') as f:
            f.write(image.content)


if __name__ == '__main__':
    names =['鹿晗', '关晓彤']
    # origin表示图片是用于计算特征向量的
    # test用于识别测试
    actions = ['origin', 'test']
    DB = 2
    for name in names:
        for action in actions:
            # page = input("请输入下载页数(1页有60张图片):")
            # action = input("请输入图片的用途(origin/test/single):")
            get_parse_page(name=name, action=action, DB=DB)
            print(f"{name}+{action} done!")
centerface.py
原有centerface.py只是检测出人脸,然后返回人脸框和关键点坐标。但是人脸识别需要提取图片中固定大小的人脸,因此在该脚本中增加了一个提取人脸的类,该类的方法来自于MTCNN中提取人脸的方法。
import numpy as np
import cv2
import datetime
import torch
from torchvision.transforms import functional as F
from torch.nn.functional import interpolate
from PIL import Image
import io


# 检测人脸
class CenterFace(object):
    def __init__(self, landmarks=True):
        self.landmarks = landmarks
        # 读取网络模型
        self.net = cv2.dnn.readNetFromONNX('../models/centerface-onnx/centerface.onnx')
        self.img_h_new, self.img_w_new, self.scale_h, self.scale_w = 0, 0, 1, 1

    # 1
    def __call__(self, img, height, width, threshold=0.5):
        # print(img.shape)
        self.img_h_new, self.img_w_new, self.scale_h, self.scale_w = self.transform(height, width)
        # print(self.img_h_new,self.img_w_new,self.scale_h,self.scale_w)

        # 将Image对象转为ndarray对象
        if not isinstance(img, np.ndarray):
            img = cv2.cvtColor(np.asarray(img),cv2.COLOR_RGB2BGR)
        # cv2.imshow("1",img)
        return self.inference_opencv(img, threshold)

    # 3
    def inference_opencv(self, img, threshold):
        # 对图像进行预处理:1 减均值;2 缩放;3 通道交换
        # mean为减去的均值————swapRB,OpenCV图像的通道顺序为BGR,要转换成RGB
        blob = cv2.dnn.blobFromImage(img, scalefactor=1.0, size=(self.img_w_new, self.img_h_new), mean=(0, 0, 0),
                                     swapRB=True, crop=False)
        # print(blob.shape)
        # 预训练模型中的函数?
        self.net.setInput(blob)
        begin = datetime.datetime.now()
        if self.landmarks:
            # 都是ndarray类型
            heatmap, scale, offset, lms = self.net.forward(["537", "538", "539", '540'])
        else:
            heatmap, scale, offset = self.net.forward(["535", "536", "537"])
        end = datetime.datetime.now()
        # print("cpu times = ", end - begin)
        return self.postprocess(heatmap, lms, offset, scale, threshold)

    # 2 这个函数的作用是???
    def transform(self, h, w):
        img_h_new, img_w_new = int(np.ceil(h / 32) * 32), int(np.ceil(w / 32) * 32)
        scale_h, scale_w = img_h_new / h, img_w_new / w
        return img_h_new, img_w_new, scale_h, scale_w

    # 4
    def postprocess(self, heatmap, lms, offset, scale, threshold):
        if self.landmarks:
            dets, lms = self.decode(heatmap, scale, offset, lms, (self.img_h_new, self.img_w_new), threshold=threshold)
        else:
            dets = self.decode(heatmap, scale, offset, None, (self.img_h_new, self.img_w_new), threshold=threshold)
        if len(dets) > 0:
            dets[:, 0:4:2], dets[:, 1:4:2] = dets[:, 0:4:2] / self.scale_w, dets[:, 1:4:2] / self.scale_h
            if self.landmarks:
                lms[:, 0:10:2], lms[:, 1:10:2] = lms[:, 0:10:2] / self.scale_w, lms[:, 1:10:2] / self.scale_h
        else:
            dets = np.empty(shape=[0, 5], dtype=np.float32)
            if self.landmarks:
                lms = np.empty(shape=[0, 10], dtype=np.float32)
        if self.landmarks:
            return dets, lms
        else:
            return dets

    # 5
    def decode(self, heatmap, scale, offset, landmark, size, threshold=0.1):
        heatmap = np.squeeze(heatmap)
        scale0, scale1 = scale[0, 0, :, :], scale[0, 1, :, :]
        offset0, offset1 = offset[0, 0, :, :], offset[0, 1, :, :]
        c0, c1 = np.where(heatmap > threshold)
        if self.landmarks:
            boxes, lms = [], []
        else:
            boxes = []
        if len(c0) > 0:
            for i in range(len(c0)):
                s0, s1 = np.exp(scale0[c0[i], c1[i]]) * 4, np.exp(scale1[c0[i], c1[i]]) * 4
                o0, o1 = offset0[c0[i], c1[i]], offset1[c0[i], c1[i]]
                s = heatmap[c0[i], c1[i]]
                x1, y1 = max(0, (c1[i] + o1 + 0.5) * 4 - s1 / 2), max(0, (c0[i] + o0 + 0.5) * 4 - s0 / 2)
                x1, y1 = min(x1, size[1]), min(y1, size[0])
                boxes.append([x1, y1, min(x1 + s1, size[1]), min(y1 + s0, size[0]), s])
                if self.landmarks:
                    lm = []
                    for j in range(5):
                        lm.append(landmark[0, j * 2 + 1, c0[i], c1[i]] * s1 + x1)
                        lm.append(landmark[0, j * 2, c0[i], c1[i]] * s0 + y1)
                    lms.append(lm)
            boxes = np.asarray(boxes, dtype=np.float32)
            keep = self.nms(boxes[:, :4], boxes[:, 4], 0.3)
            boxes = boxes[keep, :]
            if self.landmarks:
                lms = np.asarray(lms, dtype=np.float32)
                lms = lms[keep, :]
        if self.landmarks:
            return boxes, lms
        else:
            return boxes

    # 6
    def nms(self, boxes, scores, nms_thresh):
        x1 = boxes[:, 0]
        y1 = boxes[:, 1]
        x2 = boxes[:, 2]
        y2 = boxes[:, 3]
        areas = (x2 - x1 + 1) * (y2 - y1 + 1)
        order = np.argsort(scores)[::-1]
        num_detections = boxes.shape[0]
        suppressed = np.zeros((num_detections,), dtype=np.bool)

        keep = []
        for _i in range(num_detections):
            i = order[_i]
            if suppressed[i]:
                continue
            keep.append(i)

            ix1 = x1[i]
            iy1 = y1[i]
            ix2 = x2[i]
            iy2 = y2[i]
            iarea = areas[i]

            for _j in range(_i + 1, num_detections):
                j = order[_j]
                if suppressed[j]:
                    continue

                xx1 = max(ix1, x1[j])
                yy1 = max(iy1, y1[j])
                xx2 = min(ix2, x2[j])
                yy2 = min(iy2, y2[j])
                w = max(0, xx2 - xx1 + 1)
                h = max(0, yy2 - yy1 + 1)

                inter = w * h
                ovr = inter / (iarea + areas[j] - inter)
                if ovr >= nms_thresh:
                    suppressed[j] = True

        return keep


# 提取人脸
class FaceExtract(object):
    def __init__(self):
    	# 无意义,只是为了让构造函数非空
        self.empty = 1

    def __call__(self, img, box, target_size=160, margin=0, save_path=None, post_process=True):
        return self.extract_face(img, box, target_size=target_size, margin=margin, save_path=save_path,
                                 post_process=post_process)

    def extract_face(self, img, box, target_size, margin, save_path, post_process):
        """
        Extract face + margin from PIL Image given bounding box.
            Arguments:
                img {PIL.Image} -- A PIL Image.
                box {numpy.ndarray} -- Four-element bounding box.
                target_size {int} -- Output image size in pixels. The image will be square.
                margin {int} -- Margin to add to bounding box, in terms of pixels in the final image.
                    Note that the application of the margin differs slightly from the davidsandberg/facenet
                    repo, which applies the margin to the original image before resizing, making the margin
                    dependent on the original image size.
                save_path {str} -- Save path for extracted face image. (default: {None})

            Returns:
                torch.tensor -- tensor representing the extracted face.
            """

        # face = extract_face(img, box, target_size, margin, save_path)
        margin = [
            margin * (box[2] - box[0]) / (target_size - margin),
            margin * (box[3] - box[1]) / (target_size - margin),
        ]

        raw_img_size = self.get_image_size(img)

        # ???
        box = [
            int(max(box[0] - margin[0] / 2, 0)),
            int(max(box[1] - margin[1] / 2, 0)),
            int(min(box[2] + margin[0] / 2, raw_img_size[0])),
            int(min(box[3] + margin[1] / 2, raw_img_size[1])),
        ]

        # cv2读的图像为ndarray对象,(160,160,3)
        # PIL读的为Image对象
        face = self.crop_resize(img, box, target_size)

        if save_path is not None:
            self.save_img(face, save_path)

        # tensor
        face = F.to_tensor(np.float32(face))

        # 标准化
        if post_process:
            face = (face - 127.5) / 128.0

        return face

    def get_image_size(self, img):
        if isinstance(img, (np.ndarray, torch.Tensor)):
            return img.shape[1::-1]
        else:
            return img.size

    def crop_resize(self, img, box, target_size):
        """
        resize the shape of a face
        """
        if isinstance(img, np.ndarray):
            img = img[box[1]:box[3], box[0]:box[2]]
            out = cv2.resize(
                img,
                (target_size, target_size),
                interpolation=cv2.INTER_AREA
            ).copy()
        elif isinstance(img, torch.Tensor):
            img = img[box[1]:box[3], box[0]:box[2]]
            out = self.imresample(
                img.permute(2, 0, 1).unsqueeze(0).float(),
                (target_size, target_size)
            ).byte().squeeze(0).permute(1, 2, 0)
        else:
            out = img.crop(box).copy().resize((target_size, target_size), Image.BILINEAR)
        return out

    def save_img(self, img, path):
        """
        cv2读取的图片为 ndarray 格式,读图片时使用的是cv2,保存时直接imwrite
        PIL读取的为 Image 对象格式,读图片时用的是
        """
        if isinstance(img, np.ndarray):
            cv2.imwrite(path, img)
            # cv2.imwrite(path, cv2.cvtColor(img, cv2.COLOR_RGB2BGR))
        else:
            img.save(path)

    def imresample(self, img, sz):
        im_data = interpolate(img, size=sz, mode="area")
        return im_data
注意:
(1)以上脚本需要在跑通原本facenet项目基础上做改动,才能正确运行
(2)由于centerface读取图片采用的是opencv库,facenet用的是PIL库,两个库读取出的图片格式不相同,我曾尝试将其中一种换成另外一种,但是后面太麻烦了,放弃了。然后找到了一种两者之间相互转化的方法,很方便。还有就是需要在centerface.py脚本的__call__函数中也要注意格式转化。这些在上述代码中都有体现,读者读到了重点注意即可。
(3)上述项目代码都是自己一步一步写的,不容易啊,转载请注明出处!
项目结果展示
这是centerface的检测结果

这是MTCNN的检测结果
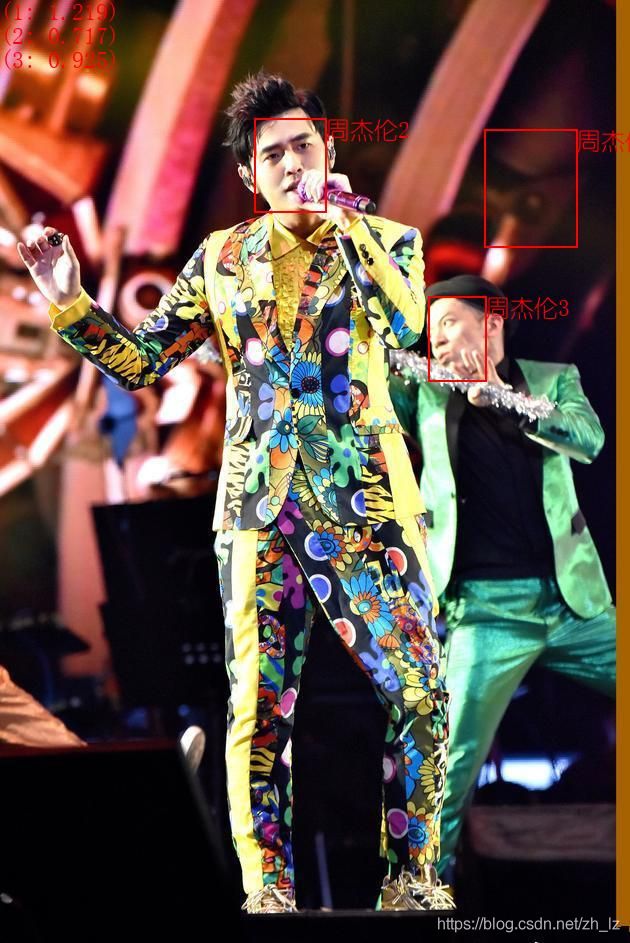
这里只用一张图片只是为了简单说明centerface的检测效果优于MTCNN(只在此项目中,不适用于其他项目),识别都是用facenet中的方法。
视频人脸识别
一个视频识别demo(爱情公寓5片段),本来想传到B站,但是审核未通过,就百度云分享
地址链接:https://pan.baidu.com/s/17rAoOYzwFaX47C1gaoiTHw 提取码:1v3v
最后
我是一名不知道入没入门的CV小菜鸟,欢迎大家一起讨论!!!
有问题请留言,看到会回复的。