YII 快速创建项目GII
Yii 是一个基于组件、纯OOP的、用于开发大型 Web 应用的高性能PHP框架。
它将Web编程中的可重用性发挥到极致,能够显著加速开发进程 。
Yii适合大流量的应用,如门户、BBS、CMS及B2B系统等,功能丰富,性能优异
1.在环境变量里添加 E:\yii framework;
2.在环境变量里添加 E:\wamp\bin\php(不添加提示php.exe不是内部命令)或yiic.bat中PHP_COMMAND= E:\wamp\bin\php.exe
3.开启pdo,pdo_数据库扩展
为了使用上面提到的 yiic 工具,CLI PHP 程序必须在命令搜索路径内(译者注:即php.exe 所在的目录必须在PATH环境变量中 ),注销后path配置会生效
1.通过cmd自动化的代码生成项目骨架
建立数据库连接
要在我们创建的程序骨架中使用这个数据库,我们需要修改它的应用配置 ,它保存在PHP脚本/protected/config/main.php 中。
执行data/schema.sqlite.sql脚本,连接sqlite配置
'db'=>array(

    'connectionString' => 'sqlite:protected/data/blog.db',

    'tablePrefix' => 'tbl_',

),
执行schema.mysql.sql脚本,连接mysql配置
首先我们需要安装 Gii. 打开文件protected/config/main.php ,添加如下代码:
上面的代码安装了一个名为 gii 的模块,这样我们就可以通过在浏览器中浏览如下URL来访问 Gii 模块:
http://localhost/test/index.php?r=gii,在弹出的窗口中输入Enter Your Password Here。如下图 
创建模型 Model
首先我们需要为每个数据表创建一个模型(Model)类 。模型类会使我们可以通过一种直观的、面向对象的风格访问数据库。稍后我们将会看到这一点。
点击 Model Generator 链接开始使用模型创建工具。
在 Model Generator 页中,在Table Name一栏输入 tbl_user (用户表的名字),Model Class 栏输入User(模块名字)
注意这里需要先在db中创建tbl_user表结构,譬如,我这里的实例是:
--drop table tbl_user;

create table tbl_user(

   id not null auto_increment primary key,

   username varchar(30) not null,

   password varchar(30) not null

);

--insert into tbl_user values(1,'duan','duan');
然后按下 Preview 按钮。一个预览表将显示在我们面前。我们可以点击表格中的链接来预览要生成的代码。如果一切OK,
我们可以按下 Generate 按钮来生成代码并将其保存在一个文件中。
生成的protected/models/User.php包含了继承自 CActiveRecord 的 User 类,可用于访问 tbl_user 数据表;
实现CRUD操作
模型类建好之后,我们就可以使用 Crud Generator来创建为这些模型实现CRUD操作的代码了。我们将对User模型执行此操作。
在 Crud Generator 页面中,Model Class 一栏输入User(就是我们刚创建的User模型的名字models/User.php) ,然后按下 Preview 按钮。
我们会看到有很多文件将被创建。按下Generate按钮来创建它们。
这样,我们就使用 yiic工具 生成了对于user表的增删改查。使用
访问下,看看自动生成的结果。
gii为我们生成的登录密码是写死的,请看protected\components\UserIdentity.php中的登录密码:
多模块(modules)设计
选择Module Generator-->在Module ID 输入框中输入要添加的模块(例如test)-->点击Preview按钮-->点击Generate按钮.至此,test模块便添加完成。对 应目录为/protected/modules/test目录
新加模块访问地址为:http://website/index.php?r=test
(中级)自定义Gii生成代码模板
我们使用一个例子来介绍如何定制代码模板。假设我们想要定制由 model 生成器生成的代码。
我们首先创建一个名为 protected/gii/model/templates/customer 的目录。这里的model意味着我们将要 override 默认的 model 生成器。templates/customer意味着我们将增加一个新的代码模板集名为customer。复制文件 framework/gii/generators/model/templates/default/model.php 到 protected/gii/model/templates/customer。现在是时候做点真正的工作了。打开文件 protected/gii/model/templates/customer/model.php 以编辑它。记得这个文件将作为类似一个视图文件被使用,意味着它可以包含 PHP 表达式和语句。让我们更改模板以便生成的代码里 attributeLabels() 方法使用 Yii::t() 来翻译属性标签:
- public function attributeLabels()
- {
- return array(
- <?php foreach($labels as $name=>$label): ?>
- <?php echo "'$name' => Yii::t('application', '$label'),\n"; ?>
- <?php endforeach; ?>
- );
- }
在每个代码模板中,我们可以访问一些预定义的变量,例如上面例子中的 $labels 。这些变量由对应的代码生成器提供。不同的代码生成器可能在他们的代码模板中提供不同的变量。请认真阅读默认代码模板中的描述。
现在打开 model 代码生成器页面。点击 Code Template 输入框。我们应当看到一个下拉列表 ,这个列表包含了我们新建的模板目录 customer。我们选择此模板生成代码文件。
框架生成Controller的模板为:framework/gii/generators/controller/templates/default/controller.php
框架生成Model的模板为:framework/gii/generators/model/templates/default/model.php
(高级 )创建新的生成器
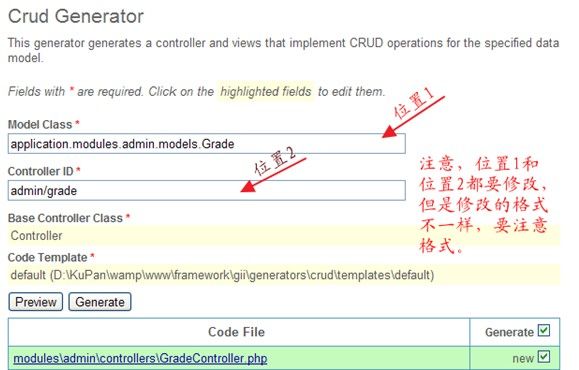
在framework/gii/generators创建widget文件夹,可以编写支持module的Crud Generator,moduleID下model class的写法application.modules.moduleID.models.modelClass 
可以把自己扩展的gii放到项目目录下面,配置如下
- 'modules' => array(
- 'gii' => array(
- 'class' => 'system.gii.GiiModule',
- 'password' => 'gii',
- 'generatorPaths' => array(
- 'application.gii.generators',//项目目录结构
- ),
- 'ipFilters' => array('127.0.0.1', '::1'),
- ),
- ),
上面的配置告诉 Gii在别名是application.gii.generators的目录中寻找生成器,以及默认的framework位置 system.gii.generators在不同的搜索路径有同名的生成器也是可以的。这种情况下,在 GiiModule::generatorPaths 指定目录中先出现的生成器有优先权 。
我遇到的错误:
1、yii-You are not allowed to access this page
yii-You are not allowed to access this page
Error 403
You are not allowed to access this page.
问题分析:yii处于安全考虑。默认情况下允许在本机运行gii组件。所以出现上述问题,一般都是服务器不是本机。
解决方法:编辑你的main.php配置文件
‘modules’=>array(
‘gii’=>array(
‘class’=>’system.gii.GiiModule’,
‘password’=>’password’,
‘ipFilters’=>array(‘127.0.0.1′,’::1′), //将此处的IP改为本机目前使用的IP
),
),
在ipFilters中设置你的本机IP (记住是你本机 客户端ip 而不是服务端ip)
