SpringBoot 开发之集成 websocket 协议实现前后端数据交互
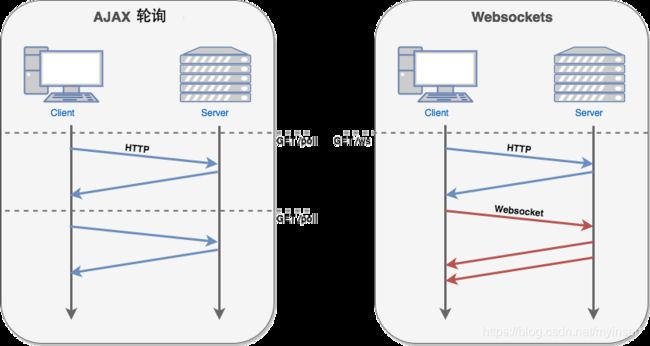
1、HTTP 协议交互与 WebSocket 协议交互对比
HTTP 协议是由请求和相应构成,是一个标准的客服端服务器 模型(B/S),由客户端发起请求,服务器回送相应。

当需要服务器与客户端数据交换时,HTTP 提供了两种方案,ajax轮询 和 long poll:
ajax轮询: 客户端定时向服务器发送Ajax请求,服务器接到请求后马上返回响应信息并关闭连接。
优点:后端程序编写比较容易。
缺点:请求中有大半是无用,浪费带宽和服务器资源。
实例:适于小型应用。
long poll::long poll 其实和 ajax 轮询类似,算是ajax 轮询的升级版,客户端向服务器发送Ajax请求,服务器采取的是阻塞模型,就是服务器接到请求后hold住连接,直到有新消息才返回响应信息并关闭连接,客户端处理完响应信息后再向服务器发送新的请求。
优点:在无消息的情况下不会频繁的请求,耗费资源小。
缺点:服务器hold连接会消耗资源,返回数据顺序无保证,难于管理维护。
实例:WebQQ、Hi网页版、Facebook IM。
从上面可以看出其实这两种方式,都是在不断地建立HTTP连接,然后等待服务端处理,可以体现HTTP协议的另外一个特点,被动性: 就是服务端不能主动联系客户端,只能有客户端发起。
ajax 轮询 需要服务器有很快的处理速度和资源。long poll 需要有很高的并发,也就是说同时接待客户的能力
WebSocket 协议是由浏览器和服务器通过 HTTP/HTTPS 协议发起一条特殊HTTP请求进行握手后创建一个用于交换数据的 TCP 连接,在建立连接之后,双方可以互相推送消息。
2、Maven 引入
   <!-- websocket-->
   <dependency>
       <groupId>org.springframework.boot</groupId>
       <artifactId>spring-boot-starter-web</artifactId>
   </dependency>
   <dependency>
       <groupId>org.springframework.boot</groupId>
       <artifactId>spring-boot-starter-websocket</artifactId>
   </dependency>
2、创建 WebSocketService 服务类,用于管理连接用户与发送消息
public interface IWebSocketService {

    void sendAllMessage(String var1);

    void sendMessage(String var1, String var2);

    void addSession(String var1, Session var2);

    void deleteSession(String var1, Session var2);

    Integer isOnline(String var1);

    Map<String, Map<String, Session>> getSession();
}
/**
 * 用户Id 和 websocket 会话对象 处理实现类
 */
public class WebSocketImpl implements IWebSocketService {


    private static final Map<String, Map<String, Session>> USER_SESSION = new ConcurrentHashMap();

    public WebSocketImpl() {

    }

    /**
     * 全部发送消息
     * @param message
     */
    public void sendAllMessage(String message) {

        for (String userId:USER_SESSION.keySet()){

            sendMessage(userId,message);

        }


    }

    /**
     * 根据用户ID 给客户端发生消息
     * @param userId
     * @param message
     */
    public void sendMessage(String userId, String message) {

        Map<String, Session> userSession = (Map)USER_SESSION.get(userId);
        if (userSession != null) {

            for(String key: userSession.keySet()){

                Session session = (Session)userSession.get(key);
                if (session == null) {

                    return;
                }
                session.getAsyncRemote().sendText(message);
            }
        }

    }

    /**
     * 保存用户Id   session会话
     * @param userId
     * @param session
     */
    public void addSession(String userId, Session session) {

        Map<String, Session> userSession = (Map)USER_SESSION.get(userId);
        if (userSession == null) {

            userSession = new ConcurrentHashMap();
        }

        ((Map)userSession).put(session.getId(), session);
        USER_SESSION.put(userId, userSession);
    }

    /**
     * 删除会话
     * @param userId
     * @param session
     */
    public void deleteSession(String userId, Session session) {

        Map<String, Session> user = (Map)USER_SESSION.get(userId);
        if (user != null) {

            Session userSession = (Session)user.get(session.getId());
            if (userSession != null) {

                user.remove(session.getId());
                if (user.size() == 0) {

                    USER_SESSION.remove(userId);
                }
            }
        }

    }

    /**
     * 判断是否在线
     * @param userId
     * @return
     */
    public Integer isOnline(String userId) {

        Integer flag = 0;
        Map<String, Session> user = (Map)USER_SESSION.get(userId);
        if (user != null) {

            flag = 1;
        }

        return flag;
    }

    /**
     * 获取会话对象
     * @return
     */
    public Map<String, Map<String, Session>> getSession() {

        return USER_SESSION;
    }
}
4、创建 WebSocketConfig 配置类,注入 websocket 服务
/**
 * bean都需要在@Configuration注解下进行创建
 */
@Configuration
@EnableWebSocket
public class WebSocketConfig {

    public WebSocketConfig() {

    }

    /**
     * 注入一个ServerEndpointExporter
     * 该Bean会自动注册使用@ServerEndpoint注解申明的websocket endpoint
     */
    /**
     * 打成 war 包报错: java.lang.IllegalStateException: javax.websocket.server.ServerContainer not available
     * 由于打包后项目不再依赖内置tomcat,导致了在springboot内置tomcat正常的代码到了外置容器就不能运行
     * @Profile 注解的参数为字符数组,当项目环境Active profiles为dev或者test时,@bean serverEndpointExporter会正常装配,当Active profiles是其他比如prod的时候,serverEndpointExporter会被忽略不进行装配
     */
    @Profile({
     "dev", "test"})
    @Bean
    public ServerEndpointExporter serverEndpointExporter() {

        return new ServerEndpointExporter();
    }
     //  在一个方法上使用@Bean注解就表明这个方法需要交给Spring进行管理
    @Bean
    public IWebSocketService setWebSocket() {

        // 创建其对应的实体类
        return new WebSocketImpl();
    }
}
5、创建 WebSocketController 控制类,管理 websocket 回调
@Component
@ServerEndpoint("/websocket/{shopId}")
public class WebSocketController {


    private static final Logger logger = LoggerFactory.getLogger(WebSocketController.class);

    /** 记录当前在线连接数 */
    private static AtomicInteger onlineCount = new AtomicInteger(0);

    private static IWebSocketService iwebSocketService;

    public WebSocketController() {

    }

    @Autowired
    public void setWebSocketService(IWebSocketService webSocketService) {

        iwebSocketService = webSocketService;
    }

    /**
     * 连接建立成功调用的方法
     */
    @OnOpen
    public void onOpen(@PathParam("shopId") String shopId, Session session) {

        iwebSocketService.addSession(shopId, session);
        onlineCount.incrementAndGet(); // 在线数加1
        logger.info("有新连接加入:{},当前在线人数为:{}", session.getId(), onlineCount.get());
    }

    /**
     * 连接关闭调用的方法
     */
    @OnClose
    public void onClose(@PathParam("shopId") String shopId, Session session) {

        onlineCount.decrementAndGet();
        logger.info("有连接断开:{},当前在线人数为:{}", session.getId(), onlineCount.get());
        iwebSocketService.deleteSession(shopId, session);
    }

    /**
     * 收到客户端消息后调用的方法
     *
     * @param message
     *            客户端发送过来的消息
     */
    @OnMessage
    public void onMessage(@PathParam("shopId") String shopId, String message, Session session) {

        iwebSocketService.sendMessage(shopId,"发送成功!");
    }

    /**
     * 错误调用的方法
     */
    @OnError
    public void onError(Session session, Throwable throwable) {

        logger.error("异常:", throwable.getMessage());
        try {

            session.close();
        } catch (IOException e) {

            e.printStackTrace();
        }
        throwable.printStackTrace();
    }

    /**
     * 服务端发送消息给客户端
     * 通过 session 发生消息
     */
    private void sendMessage(String message, Session toSession) {

        try {

            logger.info("服务端给客户端[{}]发送消息{}", toSession.getId(), message);
            toSession.getBasicRemote().sendText(message);
        } catch (Exception e) {

            logger.error("服务端发送消息给客户端失败:{}", e);
        }
    }
}
连接时将用户Id 加在连接路径后,用于确认每个用户的连接会话,发送消息时再根据用户Id 找到对应的会话推送
有一点需要注意一下:
在打成 war 包后项目不再依赖内置tomcat,导致了在springboot内置tomcat正常的代码到了外置容器就不能运行
项目启动会报错: java.lang.IllegalStateException: javax.websocket.server.ServerContainer not available
所以这边采用了 @Profile 注解,参数为字符数组,当项目环境Active profiles为dev或者test时
application.properties 文件中加
spring.profiles.active=dev
6、附:测试HTML
<!DOCTYPE HTML>
<html>
<head>
    <title>My WebSocket</title>
</head>

<body>
<input id="text" type="text" />
<button onclick="send()">Send</button>
<button onclick="closeWebSocket()">Close</button>
<div id="message"></div>
</body>

<script type="text/javascript">
    var websocket = null;

    //判断当前浏览器是否支持WebSocket, 主要此处要更换为自己的地址
    if ('WebSocket' in window) {

        websocket = new WebSocket("ws://localhost:18092/websocket/one");
    } else {

        alert('Not support websocket')
    }

    //连接发生错误的回调方法
    websocket.onerror = function() {

        setMessageInnerHTML("error");
    };

    //连接成功建立的回调方法
    websocket.onopen = function(event) {

        //setMessageInnerHTML("open");
    }

    //接收到消息的回调方法
    websocket.onmessage = function(event) {

        setMessageInnerHTML(event.data);
    }

    //连接关闭的回调方法
    websocket.onclose = function() {

        setMessageInnerHTML("close");
    }

    //监听窗口关闭事件,当窗口关闭时,主动去关闭websocket连接,防止连接还没断开就关闭窗口,server端会抛异常。
    window.onbeforeunload = function() {

        websocket.close();
    }

    //将消息显示在网页上
    function setMessageInnerHTML(innerHTML) {

        document.getElementById('message').innerHTML += innerHTML + '
';
    }

    //关闭连接
    function closeWebSocket() {

        websocket.close();
    }

    //发送消息
    function send() {

        var message = document.getElementById('text').value;
        websocket.send(message);
    }
</script>
</html>
附2:本人前端使用的 vue,发现在刷新浏览器和关闭窗口的时候后端会抛出异常,异常如下

查阅大量文章后发现窗口销毁快于JS 方法触发,连接还没有断开就已经把界面销毁了,我已在 beforeDestroy 回调函数中加入了 close() 方法还是没有效果
最终找到如下方式方得解决:
mounted() {

    // 监听窗口关闭事件,当窗口关闭时,主动去关闭websocket连接,防止连接还没断开就关闭窗口,server端会抛异常。
    // 界面销毁时有效果,在站内路由跳转时无效果
    window.addEventListener('beforeunload', e => this.beforeunload(e))
},
methods: {

   beforeunload() {

     this.websocket.close()
   }
},
destroyed() {

    window.removeEventListener('beforeunload', e => this.beforeunload(e))
}
beforeDestroy() {

  	// 在站内路由跳转时有效果,界面销毁时无效果,用于防止界面跳转导致会话Id越来越多
    this.websocket.close()
}
