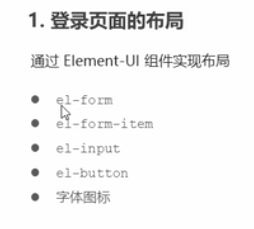
Vue电商后台管理
项目初始化

1 安装Vue 脚手架
npm install -g @vue/cli
2 通过Vue脚手架创建项目
输入vue ui 进入vue管理界面

选择创建 在指定的目录下创建项目


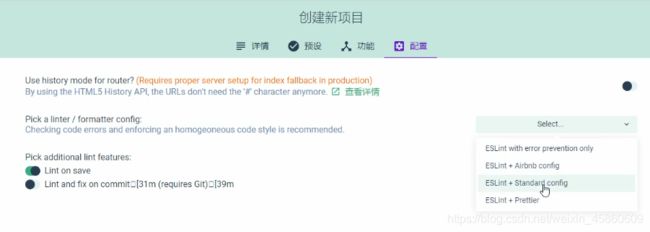
选择手动预设

勾选以下这些功能

![]()


点击下一步后
点击创建项目

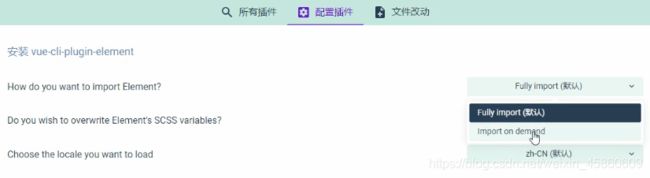
3 配置element-ui组件库

配置插件 将其改为按需导入
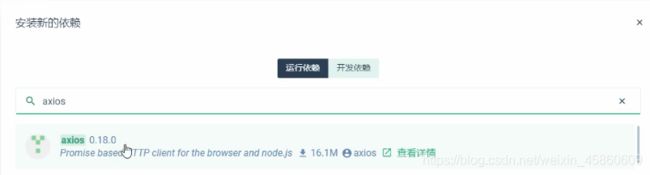
5 配置axios库
安装axios运行依赖
将代码托管至远程github仓储
后台项目环境配置

安装phpstudy

配置安装数据库
解压vue_api_server文件 用phpstudy执行db文件夹下的sql脚本去得到一个数据库

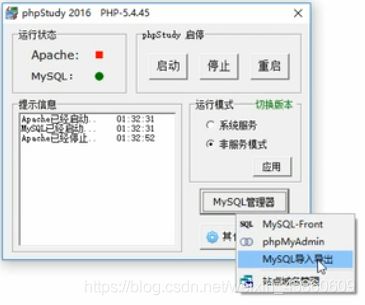
默认密码为root,要还原的文件为mydb.sql,还原到的数据库名要和文件名一致 点击导入

验证导入是否成功

该目录下有mydb文件夹 并且文件夹中有相关文件说明导入成功
在api_vue_server目录下安装所有的依赖包
![]()
启动后台项目
![]()
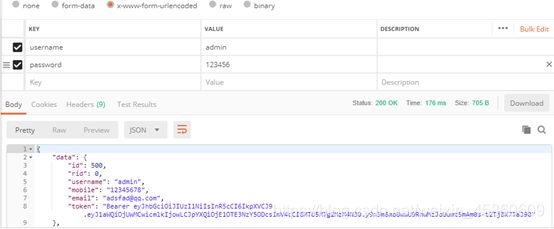
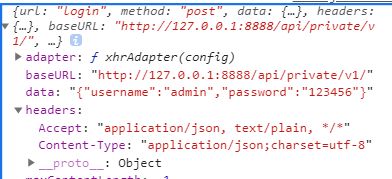
使用postman测试接口是否正常
安装postman
根据api文档验证登录接口
在url处输入本机请求基准地址(http://127.0.0.1:8888/api/private/v1/)作为根路径 在根路径后加上登录的地址(login) 选择post方式提交数据
![]()
选择body 以及数据提交的格式 输入要提交的数据 后点击send发送

没有改用户 输入一个正确的用户名和密码
token为客户端和服务器的状态保持机制 可以根据token来判断是否登录
登录功能

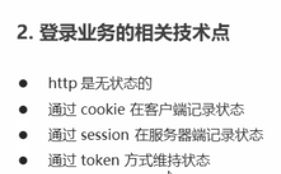
何时使用token的方式维持状态:
如果前端和后端的接口存在跨域问题 那么就要使用token来维持登录状态
token原理分析
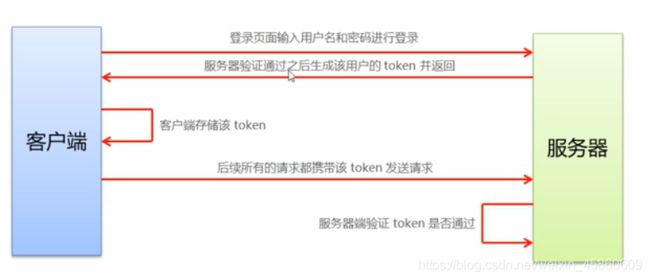
客户端和服务器都是通过token值来进行校验的
绘制登录界面
打开项目后 用git status判断工作区是否干净 如果是干净的就可以进行登录模块的项目开发
注意在开发一个功能模块时 都需要为其创建一个分支 开发完毕后在将其合并到主分支
为登录模块创建一个分支

查看当前分支 星号表示当前正处于的分支

查看项目运行效果
打开任务运行serve命令 编译成功后点击启动app

会得到一个默认的项目yemia

梳理项目结构
删除app,vue里的默认代码 清空页面内容
清空路由文件
index.js
import Vue from 'vue'
import VueRouter from 'vue-router'

Vue.use(VueRouter)

export default new VueRouter({

  routes: []
})
删除components的helloworld组件
关闭eslint rules的代码校验功能
在.eslintrc中删除vue/standard
module.exports = {

  root: true,
  env: {

    node: true
  },
  extends: [
    'plugin:vue/essential',
    // '@vue/standard'
  ],
  parserOptions: {

    parser: 'babel-eslint'
  },
  rules: {

    'no-console': process.env.NODE_ENV === 'production' ? 'warn' : 'off',
    'no-debugger': process.env.NODE_ENV === 'production' ? 'warn' : 'off',
  }
}
在components下创建Login.vue子组件
<template>
    <div>
        登录组件
    </div>
</template>
<script>
export default {
     }
</script>
<style lang="less" scoped>

</style>
配置路由关系
import Vue from 'vue'
import VueRouter from 'vue-router'

import login from '../components/Login.vue'

Vue.use(VueRouter)

export default new VueRouter({

  routes: [
  	 {
     path:'/',redirect:"/login"},
    {
     path:"/login",component:login}
  ]
})
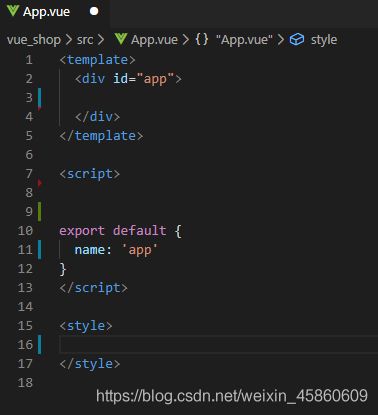
app.vue
<template>
  <div id="app">
     <router-view></router-view>
  </div>
</template>

<script>
export default {

  name: 'app'
}
</script>

<style>

</style>
运行

设置样式
login.vue
此时编译会报错 没有配置less-loader
在vue配置面板 安装less-loader为运行依赖
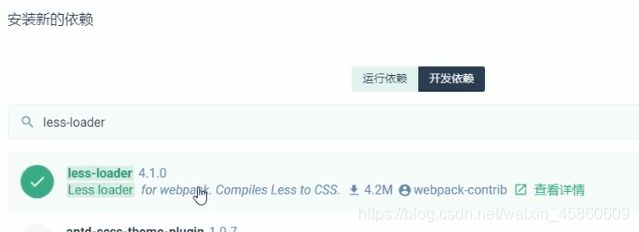
安装less开发依赖

在vue ui里安装less和less-loader 运行后报错
只能在命令行用使用yarn add less-loader -D 和yarn add less -D
设置背景颜色并绘制登录盒子
在assets下新建一个全局样式文件global.css
/* 全局样式表 */
html,body,#app{

    height: 100%;
    margin: 0;
    padding: 0;
}
在main.js导入改样式表
//导入全局样式表
import './assets/css/global.css'
Login.vue
<template>
    <div class="logon_container">
        <div class="login_box">

        </div>
    </div>
</template>

- 美化主页的header区域
.el-header{

    background-color: #373d41;
    display: flex;
    justify-content: space-between;
    padding-left: 0;
    align-items: center;
    color: #fff;
    div{

        display: flex;
        align-items: center;
        span{

            margin-left: 15px;
            font-size: 16px;
        }
    }
}
![]()
- 实现侧边栏菜单区域
使用element-ui的侧边栏组件 并修改代码
Home.vue
        <!-- 页面主体区域 -->
        <el-container>
            <el-aside width="200px">
                <!-- 侧边栏菜单区域 -->
                <el-menu
                    background-color="#333744"
                    text-color="#fff"
                    active-text-color="#ffd04b">
                    <!-- 一级菜单 -->
                    <el-submenu index="1">
                        <!-- 一级菜单模板区域 -->
                        <template slot="title">
                            <!-- 图标 -->
                            <i class="el-icon-location"></i>
                            <span>导航一</span>
                        </template>

                        <!-- 二级菜单 -->
                        <el-menu-item index="1-4-1">
                            <template slot="title">
                            <!--二级菜单同样要有 图标和文本 -->
                            <i class="el-icon-location"></i>
                            <span>导航一</span>
                        </template>
                        </el-menu-item>
                    </el-submenu>
                </el-menu>
            </el-aside>
注册组件
        Menu,
        Submenu,
        // MenuItemGroup,
        MenuItem

    } from 'element-ui'

	Vue.use( Menu)
	Vue.use( Submenu)
	// Vue.use(MenuItemGroup)
	Vue.use(MenuItem)

- 通过接口获取菜单数据
根据api文档提示 在登录之后进入主页所调用的api接口 都是需要授权的API

需要axios请求拦截器添加tokan,保证拥有获取数据的权限
如何添加:
- 调用axios的interceptors属性 该属性中有一个request成员 是一个请求拦截器,通过use为请求拦截器挂载一个回调函数(只要通过axios向服务器请求了数据 必然会通过use优先调用回调函数 对该请求进行预处理 return config表示 已经对请求头做了一次预处理)只有数据通过上述处理后 才会到达服务器进行下一步处理
main.js
在挂载axios之前首先设置拦截器
//设置拦截器
axios.interceptors.request.use(config=>{

  console.log(config)
  //在最后必须return config
  return config
})
Vue.prototype.$http=axios
此时header中并没有挂载Authorization字段 要为请求对象 添加token验证的Authorization字段 字段的值为曾今保存在seeionStorage的token值
axios.interceptors.request.use(config=>{


config.headers.Authorization=window.sessionStorage.getItem('token')

  return config
})
验证是否设置成功
点击登录后 查看network

该请求头下有Authorization字段 说明设置成功
但由于我们发起的是登录请求 登录期间服务器并没有颁发令牌
此时Authorization的值为null,如果登录之后在调用其他接口 再次监听该属性的值 那么就不是null了 而是真正的一个token令牌
这样的话服务器在接收这个请求时就会判断 Authorization是否符合要求 如果符合要求才会去响应 否则则会驳回这次的响应
- 获取左侧菜单的数据
Home.vue
data(){

        return{

            //左侧菜单数据
            menuList:[]
        }
    },
created(){

        this.getMenuList()
    },
//获取所有的菜单
        async getMenuList(){

            const{
     data:res}=await this.$http.get('menus')
            if(res.meta.status!==200) return this.$meeage.error(res.meta.msg)
            this.menuList=res.data

        }
- 通过双层for循环渲染左侧菜单
根据返回的数据可知有两重菜单其中children项为子菜单
<el-submenu :index="item.id+''" v-for="item in menuList" :key="item.id">
                        <!-- 一级菜单模板区域 -->
                        <template slot="title">
                            <!-- 图标 -->
                            <i class="el-icon-location"></i>
                            <span>{
     {
     item.authName}}</span>
                        </template>

                        <!-- 二级菜单 -->
                        <el-menu-item :index="subItem.id+''" v-for="subItem in item.children" :key="subItem.id">
                            <template slot="title">
                            <!--二级菜单同样要有 图标和文本 -->
                            <i class="el-icon-location"></i>
                            <span>{
     {
     subItem.authName}}</span>
                        </template>
                        </el-menu-item>
                    </el-submenu>
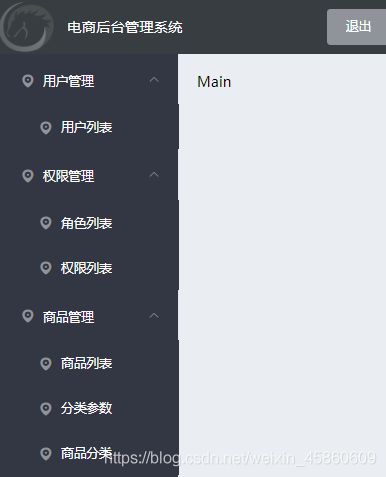
- 为选中项设置字体颜色并添加分类图标
为选中项添加高亮
 <el-menu
                    background-color="#333744"
                    text-color="#fff"
                    active-text-color="#409EFF">
为二级菜单添加统一图标
 <!-- 二级菜单 -->
                        <el-menu-item :index="subItem.id+''" v-for="subItem in item.children" :key="subItem.id">
                            <template slot="title">
                            <!--二级菜单同样要有 图标和文本 -->
                            <i class="el-icon-menu"></i>
                            <span>{
     {
     subItem.authName}}</span>
                        </template>
                        </el-menu-item>
由于一级菜单需要分别添加不同的图标 首先定义一个图标对象
将每一个菜单的id值作为键值 值为第三方图标库的类名
 //字体图标对象
            iconsObj:{

                '125':'iconfont icon-users',
                '103':'iconfont icon-tijikongjian',
                '101':'iconfont icon-shangpin',
                '102':'iconfont icon-danju',
                '145':'iconfont icon-baobiao'
            }
动态绑定一级菜单的图标值
<el-submenu :index="item.id+''" v-for="item in menuList" :key="item.id">
                        <!-- 一级菜单模板区域 -->
                        <template slot="title">
                            <!-- 图标 -->
                            <i :class="iconsObj[item.id]"></i>
                            <span>{
     {
     item.authName}}</span>
                        </template>
设置图标到标题的距离
.iconfont{ margin-right:10px ; }
- 每次只能打开一个菜单项 并解决边框问题
根据element-ui的文档加上 unique-opened
 <el-menu
                    background-color="#333744"
                    text-color="#fff"
                    active-text-color="#409EFF" unique-opened>
去除边框
 .el-menu{

        border-right: none;
    }
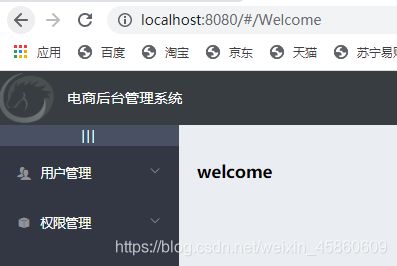
- 实现侧边栏的折叠与展开效果
在侧边栏菜单区域添加一个按钮给按钮绑定一个点击事件 控制菜单是否展开
 <!-- 侧边栏菜单区域 -->
                <div class="toggle-button" @click="toggleCollapse">
                    |||
                </div>
                <el-menu
设置样式
.toggle-button{

    background-color: #4a5064;
    font-size: 10px;
    line-height: 24px;
    color: #fff;
    text-align: center;
    letter-spacing: 0.2em;//线之间的距离
    cursor: pointer;

}
根据element-ui api 给el-menu添加collapse的属性 该属性是布尔值 此时是动态绑定
 <el-menu
                    background-color="#333744"
                    text-color="#fff"
                    active-text-color="#409EFF"
                    unique-opened
                    :collapse="isCollapse"
在data中添加 isCollapse值 默认不展开 为false
  //是否折叠展示
            isCollapse:false
定义点击按钮控制菜单展开的事件
 //点击顶部按钮 切换菜单折叠与展开
        toggleCollapse(){

            this.isCollapse=!this.isCollapse
        }
添加collapse-transiton属性 去除菜单折叠的动画
 <el-menu
                    background-color="#333744"
                    text-color="#fff"
                    active-text-color="#409EFF"
                    unique-opened
                    :collapse="isCollapse"
                    :collapse-transition="false"
根据菜单栏是否展开来动态设置侧边栏的宽度
<el-container>
            <el-aside :width="isCollapse?'64px':'200px'">

- 实现首页路由重定向到子组件Welcome的效果
创建Welcome子组件
实现home路由重定向 并设置对应的子组件的路由
index.js
{
     path:"/home",
      component:home,
      // 重定向到所嵌套的子组件
      redirect:'/Welcome',
      children:[{
     path:'/welcome',component:welcome}]  }
在首页的内容主体区域放置该子组件的占位符
 <!-- 右侧内容主题 -->
            <el-main>
                <!-- 放置子组件路由占位符 -->
                <router-view></router-view>
            </el-main>
这样已进入主页 就会默认显示Welcome子组件
- 实现侧边栏路由链接改造
根据element-ui提供的菜单api 添加router属性 为侧边栏开启路由模式
 <el-menu
                    background-color="#333744"
                    text-color="#fff"
                    active-text-color="#409EFF"
                    unique-opened
                    :collapse="isCollapse"
                    :collapse-transition="false"
                    :router="true"
                    >
给二级菜单的index绑定subItem的path作为路径的值 由于后端提供的path前没有’/’,要为其添加
<!-- 二级菜单 -->
                        <el-menu-item :index="'/'+subItem.path" v-for="subItem in item.children" :key="subItem.id">

用户列表
新建用户列表组件
创建路由关系
import users from '../components/user/Users.vue'
 children:[
        {
     path:'/welcome',component:welcome},
        {
     path:'/users',component:users}
      ] }
- 保存左侧菜单栏被点击后的激活(某一项的展开和高亮)状态
在data中定义被激活的链接地址
Home.vue
activePath:''
在点击时将每一个状态值保存到seesionStorage和data中
 <el-menu-item :index="'/'+subItem.path" v-for="subItem in item.children" :key="subItem.id"
                         @click="saveNavState('/'+subItem.path)">
//点击按钮 保存菜单的状态值
        saveNavState(activePath){

            window.sessionStorage.setItem('activePath',activePath)
            this.activePath=activePath
        }
根据element-ui提供的api 给el-menu添加default-active属性 动态绑定activePath的值 实现点击某一项 能够高亮显示
<el-menu
                    background-color="#333744"
                    text-color="#fff"
                    active-text-color="#409EFF"
                    unique-opened
                    :collapse="isCollapse"
                    :collapse-transition="false"
                    :router="true"
                    :default-active="activePath"
                    >
在created中给activePath赋值使其一打开页面就获取菜单的状态并渲染
this.activePath=window.sessionStorage.getItem('activePath')
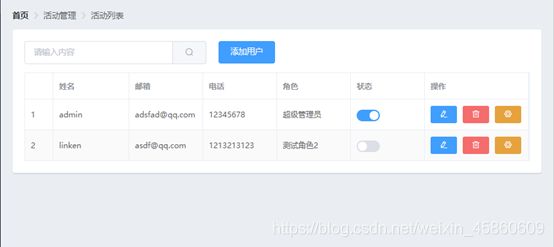
- 绘制用户列表的布局
使用element-ui提供的面包屑导航和卡片视图
Users.vue
<template>
    <div>
        <!-- 面包屑导航 -->
        <el-breadcrumb separator-class="el-icon-arrow-right">
            <el-breadcrumb-item :to="{ path: '/home' }">首页</el-breadcrumb-item>
            <el-breadcrumb-item>活动管理</el-breadcrumb-item>
            <el-breadcrumb-item>活动列表</el-breadcrumb-item>
        </el-breadcrumb>

        <!-- 卡片视图 -->
        <el-card >
            <!-- 搜索与添加区域 -->
            <!-- gutter组件中的间隙 -->
            <el-row :gutter="20">
                <!-- 使用elememt的栅格 span指定宽度 -->
                <el-col :span="9">
                    <el-input placeholder="请输入内容">
                        <el-button slot="append" icon="el-icon-search"></el-button>
                    </el-input>
                </el-col>
                <el-col :span="4">
                    <el-button type="primary">添加用户</el-button>
                </el-col>
            </el-row>
        </el-card>
    </div>
</template>
 Breadcrumb,
        BreadcrumbItem,
        Card,
        Col,
        Row
    } from 'element-ui'
Vue.use( Breadcrumb)
Vue.use( BreadcrumbItem)
Vue.use(Card)
Vue.use(Col)
Vue.use(Row)
global.css
.el-breadcrumb{

    margin-bottom: 15px;
    margin-right: 15px;
}
.el-card{

    box-shadow: 0 1px 1px rgba(0,0,0,0.15) !important;
}

- 获取用户列表数据
  data(){

        return{

            //获取用户列表的参数对象
            queryInfo:{

                query:'',
                pagenum:1,
                pagesize:2
            },
            userList:[],

            total:0
        }
    },
    created(){

        this.getUserList()
    },
    methods:{

        async getUserList(){

           const {
     data:res}=await this.$http.get('users',{
     params:this.queryInfo})
           if(res.meta.status!==200){

               return this.$message.error('获取用户列表失败')
           }
           this.userList=res.data.users
           this.total=res.data.total
        }
    }
- 使用el-tabel组件渲染基本的用户列表
 <!-- 用户列表区域 -->
            <!-- data指定表格数据源 stripe实现隔行变色-->
            <el-table :data="userList" border stripe>
                 <!-- label表格标题 prop对应的值-->
                <el-table-column label="姓名"  prop="username"></el-table-column>
                <el-table-column label="邮箱" prop="email"></el-table-column>
                <el-table-column label="电话" prop="mobile"></el-table-column>
                <el-table-column label="角色" prop="role_name"></el-table-column>
                <el-table-column label="状态" prop="mg_state"></el-table-column>
                <el-table-column label="操作"></el-table-column>
            </el-table>
global.css
.el-table{

    margin-top: 15px;
    font-size: 12px;
}
解决表头边框和内容边框不对其的问题
global.css
body .el-table th.gutter{

    display: table-cell!important;
}
添加索引列
设置type为index就行
  <el-table :data="userList" border stripe>
                <!-- 索引列 -->
                 <el-table-column type="index"></el-table-column>
- 使用作用域插槽来实现状态列显示效果
使用作用域插槽 通过slot-scope接收作用域数据 将mg_state的布尔值 渲染成一个开关状态 由于slot-scope的值会覆盖prop的值此时可以将prop属性删除
通过scope.row可以获取这一行的数据 因此在switch组件中可以使用v-model绑定该行数据的开关状态的值
<el-table-column label="状态">
                    <template slot-scope="scope">
                        <!-- 这一行的所有数据 -->
                        <!-- {
     {
     scope.row}} -->
                        <el-switch v-model="scope.row.mg_state"></el-switch>
                    </template>
                </el-table-column>

- 通过作用域渲染操作列
<el-table-column label="操作" width="180" >
                    <template>
                        <!-- 修改 -->
                       <el-button type="primary" size="mini" icon="el-icon-edit"></el-button>
                       <!-- 删除 -->
                       <el-button type="danger" size="mini" icon="el-icon-delete"></el-button>
                       <!-- 分配角色 -->
                       <el-tooltip class="item" effect="dark" content="分配角色" placement="top">
                           <!-- 鼠标放置有文字提示 enterable使鼠标离开后隐藏-->
                          <el-button type="warning" :enterable="false" size="mini" icon="el-icon-setting"></el-button>
                       </el-tooltip>
                    </template>
                </el-table-column>
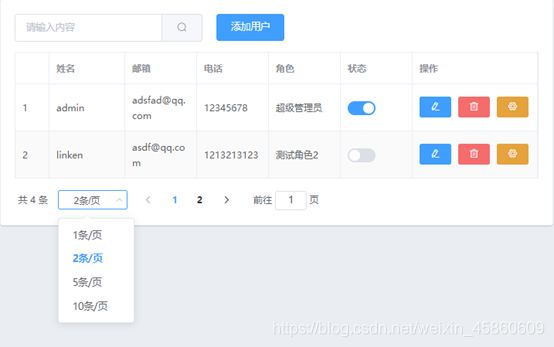
- 实现分页效果
使用element-ui的分页组件并修改
<!-- 分页区域
                 current-page 当前的页码
                 page-sizes 可以调整每一页的数据条数
                 page-size 当前每页显示多少条数据
                 layout指定页面上显示的布局结构-->
             <el-pagination
                @size-change="handleSizeChange"
                @current-change="handleCurrentChange"
                :current-page="queryInfo.pagenum"
                :page-sizes="[1, 2, 5,10]"
                :page-size="queryInfo.pagesize"
                layout="total, sizes, prev, pager, next, jumper"
                :total="total">
            </el-pagination>
定义handleSizeChange,handleCurrentChange事件
 //监听pageSize改变的事件
        handleSizeChange(newSize){

            this.queryInfo.pagesize=newSize
            this.getUserList()
        },

        //监听页码值改变的事件
        handleCurrentChange(newPage){

            this.queryInfo.pagenum=newPage
            this.getUserList()
        }
调整分页的样式
global.css
.el-pagination{

    margin-top: 15px;
}
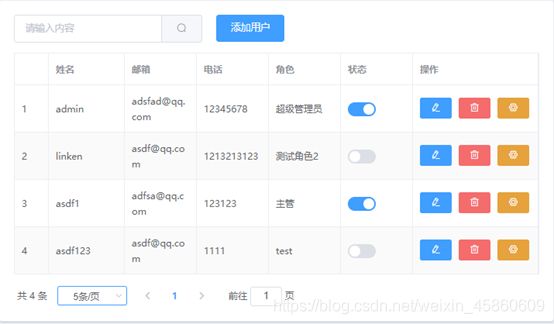
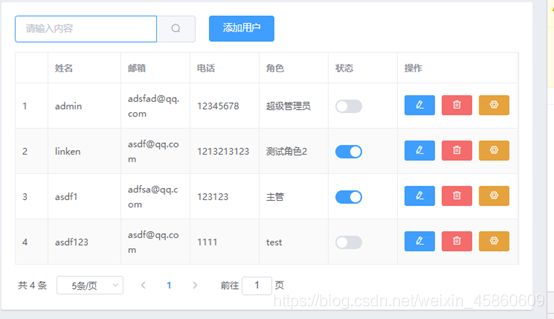
- 修改用户状态
当点击用户状态的开关按钮时 要将该状态同步保存到数据库中(不然刷新页面又回到了之前的状态)
根据element-ui提供的api 使用change监听开关状态的改变
v-model值双向数据绑定了scope.row.mg_state 当开关状态发生改变时 也会将数据同步到scope.row.mg_state上 所以要将该值作为参数传递
<el-switch v-model="scope.row.mg_state" @change="userstateChanged(scope.row)"></el-switch>
根据api文档 修改用户列表要用put请求
 //监听switch开关状态的改变
        async userstateChanged(userinfo){

            const {
     data:res}=await this.$http.put(`users/${
       userinfo.id}/state/${
       userinfo.mg_state}`)
            if(res.meta.status!==200){

                //更新数据失败 需要将开关状态恢复到之前的样子
                userinfo=!userinfo.mg_state
                return this.$message.error('更新用户信息失败')
            }
            this.$message.success('更新状态成功')
        }

- 实现搜索功能
v-model双向数据绑定queryInfo.query 并给搜索按钮绑定事件使其重新调用getUserList渲染数据
根据api 添加clearable属性 实现清空功能 并定义clear事件 使其清空后数据能够显示回之前的状态
<el-input placeholder="请输入内容" v-model="queryInfo.query" clearable @clear="getUserList">
                        <el-button slot="append" icon="el-icon-search"  @click="getUserList"></el-button>
                    </el-input>

添加用户
- 渲染添加用户对话框
  </el-card>

        <el-dialog
        title="提示"
        :visible.sync="dialogVisible"
        width="50%"
        >
            <span>这是一段信息</span>
            <span slot="footer" class="dialog-footer">
                <el-button @click="dialogVisible = false">取 消</el-button>
                <el-button type="primary" @click="dialogVisible = false">确 定</el-button>
            </span>
        </el-dialog>
在data中定义dialogVisible
dialogVisible:false
给添加用户按钮绑定弹框事件
<el-button type="primary" @click="dialogVisible = true">添加用户</el-button>

- 渲染添加用户表单
  <!-- 添加用户对话框 -->
        <el-dialog
        title="添加用户"
        :visible.sync="dialogVisible"
        width="50%"
        >
            <!-- 内容主体 -->
            <el-form ref="form" :model="addform" label-width="80px" :rules="addFormRules">
                <el-form-item label="用户名" prop="username">
                    <el-input v-model="addform.username"></el-input>
                </el-form-item>
                <el-form-item label="密码" prop="password">
                    <el-input v-model="addform.password"></el-input>
                </el-form-item>
                <el-form-item label="邮箱" prop="email">
                    <el-input v-model="addform.email"></el-input>
                </el-form-item>
                <el-form-item label="手机" prop="mobile">
                    <el-input v-model="addform.mobile"></el-input>
                </el-form-item>
            </el-form>
            <span slot="footer" class="dialog-footer">
                <el-button @click="dialogVisible = false">取 消</el-button>
                <el-button type="primary" @click="dialogVisible = false">确 定</el-button>
            </span>
        </el-dialog>
 //添加用户的表单数据
            addform:{

                username:'',
                password:'',
                email:'',
                mobile:''
            },
            //表单验证规则
            addFormRules:{

                username:[
                     {
      required: true, message: '请输入用户名称', trigger: 'blur' },
                    {
      min: 3, max: 10, message: '长度在 3 到 10 个字符', trigger: 'blur' }
                ],
                password:[
                    {
      required: true, message: '请输入密码', trigger: 'blur' },
                    {
      min: 7, max: 12, message: '长度在 7 到 12 个字符', trigger: 'blur' }
                ],
                email:[
                    {
      required: true, message: '请输入邮箱地址', trigger: 'blur' },
                    {
      type: 'email', message: '请输入正确的邮箱地址', trigger: ['blur', 'change'] }
                ],
               mobile:[
                     {
      required: true, message: '请输入手机号', trigger: 'blur' },
                    {
      min: 9, max: 12, message: '长度在 7 到 12 个数字', trigger: 'blur' }
                ]
            }

- 自定义邮箱和手机号的校验规则
根据element-ui的自定义规则
首先定义邮箱和手机号的规则
data(){

        //验证邮箱的规则
        var checkEmail=(rule,value,cb)=>{

            //验证邮箱的正则表达式
            const regEmail=/^([a-zA-Z0-9_-])+@([a-zA-Z0-9_-])+(\.[a-zA-Z0-9_-])+/
            if(regEmail.test(value)){

                //合法邮箱
                return cb()
            }
            cb(new Error('请输入合法的邮箱'))
        }

        //验证手机号的规则
        var checkMobile=(rule,value,cb)=>{

            const regMobile=/^(0|86|17951)?(13[0-9]|15[0123456789]|17[678]18[0-9]|14[57])[0-9]{8}$/
            if(regMobile.test(value)){

                return cb()
            }
            cb(new Error('请输入合法手机号'))
        }
在表单验证规则中添加自定义的邮箱和手机号规则
//表单验证规则
            addFormRules:{

                username:[
                     {
      required: true, message: '请输入用户名称', trigger: 'blur' },
                    {
      min: 3, max: 10, message: '长度在 3 到 10 个字符', trigger: 'blur' }
                ],
                password:[
                    {
      required: true, message: '请输入密码', trigger: 'blur' },
                    {
      min: 7, max: 12, message: '长度在 7 到 12 个字符', trigger: 'blur' }
                ],
                email:[
                    {
      required: true, message: '请输入邮箱地址', trigger: 'blur' },
                    {
      validator:checkEmail,  trigger: ['blur', 'change'] }
                ],
                mobile:[
                     {
      required: true, message: '请输入手机号', trigger: 'blur' },
                    {
       validator:checkMobile,trigger: 'blur' }
                ]
            }
- 实现关闭对话框表单的重置
绑定close事件
 <el-dialog
        title="添加用户"
        :visible.sync="dialogVisible"
        width="50%"
        @close="addDialogClose"
        >
//监听添加用户对话剧的关闭事件
        addDialogClose(){

            this.$refs.form.resetFields();
        }
- 点击确定按钮对表单进行预验证
给确定按钮绑定click事件
<el-button type="primary" @click="addUsers">确 定</el-button>
根据element-ui提供的api定义该预验证的方法
addUsers(){

         this.$refs.form.validate((valid) => {

          if (valid) {

            alert('submit!');
          } else {

            console.log('error submit!!');
            return false;
          }
        });
        }

- 调用api接口完成添加用户
由于data中的addform数据和调用接口时传递的参数一致 所以我们可以直接将addform作为传递参数的对象
//添加用户的表单数据
            addform:{

                username:'',
                password:'',
                email:'',
                mobile:''
            },
注意:该api的状态码为201
//点击确定按钮对表单进行预验证
        addUsers(){

         this.$refs.form.validate(async valid => {

            if(!valid) return

            //可以发起网络请求
            const {
     data:res}=await this.$http.post('users',this.addform)
            if(res.meta.status!==201){

                return this.$message.error('添加用户失败')
            }

            this.$message.success('添加用户成功')
            //隐藏添加用户的对话框
            this.dialogVisible=false
            //重新渲染列表
            this.getUserList()
        });
        }
修改用户
点击按钮实现修改用户的功能
给修改按钮绑定点击事件
  <!-- 修改 -->
                       <el-button @click="showEditDialog"  type="primary" size="mini" icon="el-icon-edit"></el-button>
<!-- 修改用户的对话框 -->
        <el-dialog
            title="修改用户"
            :visible.sync="editDiologVisible"
            width="50%"
           >
            <span>这是一段信息</span>
            <span slot="footer" class="dialog-footer">
                <el-button @click="editDiologVisible = false">取 消</el-button>
                <el-button type="primary" @click="editDiologVisible = false">确 定</el-button>
            </span>
        </el-dialog>
data中定义dialogVisible为false
dialogVisible:false,
弹框方法
// 展示编辑修改对话框
        showEditDialog(){

            this.editDiologVisible=true
        }
- 根据修改用户的id值查询用户的信息
在修改的方法中传递id值
  <!-- 修改 -->
                       <el-button @click="showEditDialog(scope.row.id)"  type="primary" size="mini" icon="el-icon-edit"></el-button>
在data中定义查询到的信息对象
 //查询到的用户信息对象
             editForm:{
     },
调用api接口 获取id值对应的用户信息
 // 展示编辑修改对话框
        async showEditDialog(id){

            const {
     data:res}=await this.$http.get('users/'+id)
            if(res.meta.status!==200){

                return this.$message.error('获取用户数据失败')
            }
            this.editForm=res.data
            this.editDiologVisible=true
        }
- 渲染修改用户的表单
给活动名称添加disable属性 使其不可修改
<el-form :model="editForm" :rules="editFormRules" ref="editFormRef" label-width="100px" class="demo-ruleForm">
                <el-form-item label="活动名称" >
                    <el-input v-model="editForm.username" disabled></el-input>
                </el-form-item>
                <el-form-item label="邮箱"  prop="email">
                    <el-input v-model="editForm.email" ></el-input>
                </el-form-item>
                <el-form-item label="手机号" prop="mobile" >
                    <el-input v-model="editForm.mobile" ></el-input>
                </el-form-item>
            </el-form>
//修改用户 弹框表单的校验规则
            editFormRules:{

                email:[
                    {
      required: true, message: '请输入邮箱地址', trigger: 'blur' },
                    {
      validator:checkEmail,  trigger: ['blur', 'change'] }
                ],
                 mobile:[
                     {
      required: true, message: '请输入手机号', trigger: 'blur' },
                    {
       validator:checkMobile,trigger: 'blur' }
                ]
            }

- 关闭后表单重置
<!-- 修改用户的对话框 -->
        <el-dialog
            title="修改用户"
            :visible.sync="editDiologVisible"
            width="50%"
            @close="editDialogClose"
           >
 editDialogClose(){

        this.$refs.editFormRef.resetFields()
      }
- 点击确定按钮完成表单预验证并完成修改数据
<el-button type="primary" @click="editUserInfo">确 定</el-button>
 //修改用户信息并提交
       editUserInfo(){

           this.$refs.editFormRef.validate(async valid=>{

               if(!valid) return

               //发起修改用户数据请求
              const {
     data:res}=await this.$http.put('users/'+this.editForm.id,{
     email:this.editForm.email,mobile:this.editForm.mobile})
              if(res.meta.status!==200){

                  return this.$message.error('修改用户数据失败')
              }

              //关闭对话框
              this.editDiologVisible=false
              //刷新数据列表
              this.getUserList()
              //提示修改成功
              this.$message.success('更新用户信息成功')
           })
       }


删除用户
- 点击删除弹框询问是否删除
给删除按钮绑定事件 并传递对应的id值
<el-button @click="removeUserById(scope.row.id)" type="danger" size="mini" icon="el-icon-delete"></el-button>
使用element-ui的messagebox弹框组件
在element.js下注册该组件
        MessageBox
    } from 'element-ui'
Vue.prototype.$confirm=MessageBox.confirm
定义删除用户信息的方法
 //根据id删除用户的信息
      async removeUserById(id){

           //弹框询问是否删除数据
           //该方法的返回值是一个promise 所以要用await async简化其操作
           const confirmResult=await this.$confirm('此操作将永久删除该用户, 是否继续?', '提示', {

                confirmButtonText: '确定',
                cancelButtonText: '取消',
                type: 'warning'
            })
            .catch(err=>{

                return err
            })
            //如果用户确认删除 则返回的字符串为confim
            //如果点击取消 则用catch捕获错误消息 并return出去 这样才不会报错 其返回的字符串为cancel
            // console.log(confirmResult)
            //如果confirmResult不为confim 说明用户不想删除则弹框取消从删除
            if(confirmResult!=='confirm'){

                return this.$message.info('已取消删除')
            }

            console.log('确认了删除')
       }


- 完成删除用户
//根据id删除用户的信息
      async removeUserById(id){

           //弹框询问是否删除数据
           //该方法的返回值是一个promise 所以要用await async简化其操作
           const confirmResult=await this.$confirm('此操作将永久删除该用户, 是否继续?', '提示', {

                confirmButtonText: '确定',
                cancelButtonText: '取消',
                type: 'warning'
            })
            .catch(err=>{

                return err
            })
            //如果用户确认删除 则返回的字符串为confim
            //如果点击取消 则用catch捕获错误消息 并return出去 这样才不会报错 其返回的字符串为cancel
            // console.log(confirmResult)
            //如果confirmResult不为confim 说明用户不想删除则弹框取消从删除
            if(confirmResult!=='confirm'){

                return this.$message.info('已取消删除')
            }

           const {
     data:res}=await this.$http.delete('users/'+id)
           if(res.meta.status!==200){

               return this.$message.error('删除用户失败')
           }
           this.$message.success('删除用户成功')
           this.getUserList()
       }
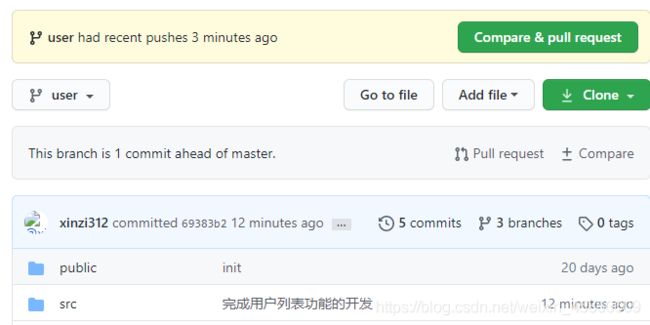
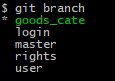
- 创建user子分支并将代码推送到github
查看当前分支
![]()
新建一个user分支并切换到该分支
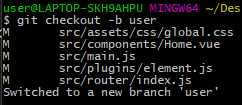
接着查看分支我们可以发现切换到了user分支 此时所有的修改的代码都在user分支

查看user分支下的代码状态

提交到暂存区 此时所有的代码都已经提交到了user子分支

查看状态

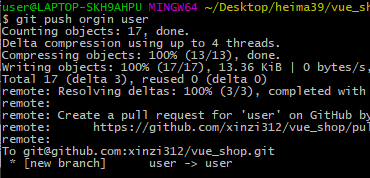
将本地新增的user分支推送到远程github
将远程仓库关联为orgin
![]()
由于是第一次推送该分支 所以要运行以下命令 表示将本地分支推送到远程orgin仓库中 同时以user分支进行保存
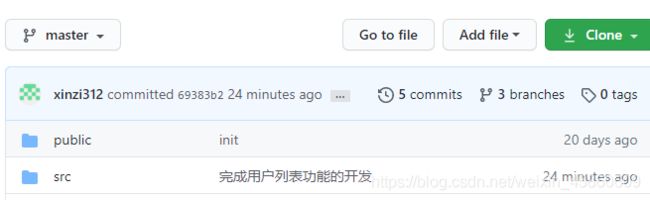
将所有代码合并到master主分支
首先先切换到master主分支
![]()
让主分支合并侧分支 此时master的代码也是最新的了

将本地master分支更新到远程
git push
如果出现报错则尝试$ git push --set-upstream origin master命令

此时github主分支也得以更新
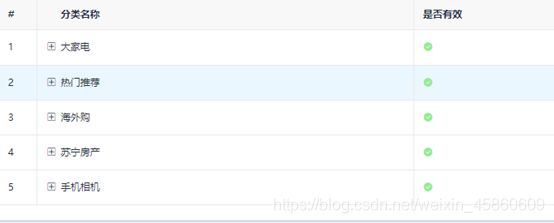
权限列表
查看当前所在分支

新建一个rights子分支
![]()
此时已经在rights子分支
推送到远程分支

接下来都在rights分支经行开发
- 创建权限列表组件 设置对应的路由关系
新建power文件夹 在其中新建Rights.vue
设置对应的路由关系
import rights from '../components/power/Rights.vue'
 children:[
        {
     path:'/welcome',component:welcome},
        {
     path:'/users',component:users},
        {
     path:'/rights',component:rights}
      ] }
rights.vue
<template>
    <div>
         <!-- 面包屑导航 -->
        <el-breadcrumb separator-class="el-icon-arrow-right">
            <el-breadcrumb-item :to="{ path: '/home' }">首页</el-breadcrumb-item>
            <el-breadcrumb-item>权限管理</el-breadcrumb-item>
            <el-breadcrumb-item>权限列表</el-breadcrumb-item>
        </el-breadcrumb>

        <!-- 卡片视图 -->
        <el-card>

        </el-card>
    </div>
</template>
<script>
export default {

    data(){

        return{


        }
    }
}
</script>
<style lang="less" scoped>

</style>

- 获取数据渲染权限列表
export default {

    data(){

        return{

            //权限列表
            rightsList:[]
        }
    },
    created(){

        this.getRightsList()
    },
    methods:{

         //获取所有的权限
       async getRightsList() {

         const{
     data:res}=await this.$http.get('rights/list')
         if(res.meta.status!==200){

            return this.$message.error('获取权限列表失败')
         }
         this.rightsList=res.data
         console.log( this.rightsList+'权限')
        }
    }
}
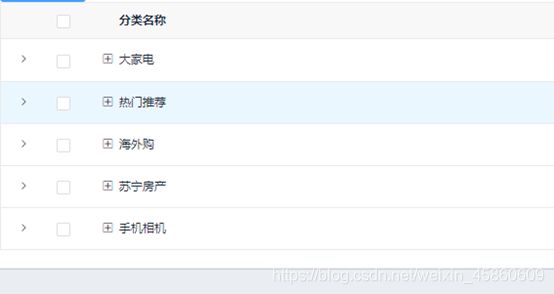
<el-card>
            <el-table :data="rightsList" stripe border >
                <el-table-column type="index"></el-table-column>
                <el-table-column label="权限名称" prop="authName"></el-table-column>
                <el-table-column label="路径" prop="path"></el-table-column>
                <el-table-column label="权限等级" prop="level">
                    <!-- 使用element 的 tag组件 -->
                    <template slot-scope="scope">
                        <!-- 使用v-if来按需显示 权限值所对应的哪一个 标签 -->
                        <el-tag v-if="scope.row.level==='0'">一级</el-tag>
                        <el-tag v-else-if="scope.row.level==='1'" type="success">二级</el-tag>
                        <el-tag v-else type="warning">三级</el-tag>
                    </template>
                </el-table-column>
            </el-table>
        </el-card>

角色列表
- 用户-角色-权限三者关系

在power下新建Roles.vue 创建对应的路由关系
绘制页面基础布局
<template>
    <div>
          <!-- 面包屑导航 -->
        <el-breadcrumb separator-class="el-icon-arrow-right">
            <el-breadcrumb-item :to="{ path: '/home' }">首页</el-breadcrumb-item>
            <el-breadcrumb-item>权限管理</el-breadcrumb-item>
            <el-breadcrumb-item>角色列表</el-breadcrumb-item>
        </el-breadcrumb>

        <el-card>
            <el-row>
                <el-col>
                    <el-button type="primary">添加角色</el-button>
                </el-col>
            </el-row>
        </el-card>
    </div>
</template>
获取角色列表数据
export default {

    data(){

        return{

            //所有角色列表数据
            roleList:[]
        }
    },
    created(){

        this.getRolesList()
    },
    methods:{

      async getRolesList(){

           const {
     data:res}=await this.$http.get('roles')
           if(res.meta.status!==200){

               return this.$message.console.error('获取角色列表失败');
           }
           this.roleList=res.data
           console.log(this.roleList)
        }
    }
}
- 渲染角色列表区域
 <!-- 角色列表区域 -->
            <el-table :data="roleList" border stripe>
                <!-- 展开列 -->
                <el-table-column type="expand"></el-table-column>
                <!-- 索引列 -->
                <el-table-column type="index"></el-table-column>
                <el-table-column label="角色名称" prop="roleName"></el-table-column>
                <el-table-column label="角色描述" prop="roleDesc"></el-table-column>
                 <el-table-column label="操作" width="300px">
                     <template >
                          <el-button size="mini" type="primary" icon="el-icon-edit">编辑</el-button>
                         <el-button size="mini" type="danger" icon="el-icon-delete">删除</el-button>
                         <el-button size="mini" type="warning" icon="el-icon-setting">分配权限</el-button>
                     </template>
                 </el-table-column>
            </el-table>

- 完成添加角色功能
<el-button type="primary" @click="addRoles">添加角色</el-button>
 <!-- 添加角色对话框 -->
        <el-dialog
            title="添加角色"
            :visible.sync="addRolesVisible"
            width="50%"
            @close="resetForm"
          >
            <el-form :model="addRolesForm" :rules="editRolesRules" ref="ruleFormRef" label-width="100px" class="demo-ruleForm">
                <el-form-item label="角色名称" prop="name">
                    <el-input v-model="addRolesForm.name"></el-input>
                </el-form-item>
                <el-form-item label="角色描述" prop="miaoShu">
                    <el-input v-model="addRolesForm.miaoShu"></el-input>
                </el-form-item>
            </el-form>
            <span slot="footer" class="dialog-footer">
                <el-button @click="resetForm">取 消</el-button>
                <el-button type="primary" @click="submitForm">确 定</el-button>
            </span>
        </el-dialog>
 addRolesVisible:false,
            addRolesForm:{

                name:'',
                miaoShu:''
            },
            addRolesRules: {

                name: [
                    {
      required: true, message: '请输入角色名称', trigger: 'blur' },
                    {
      min: 3, max: 5, message: '长度在 3 到 5 个字符', trigger: 'blur' }
                ],
                miaoShu:[
                    {
      required: true, message: '请输入角色描述', trigger: 'blur' },
                    {
       max: 20, message: '长度在20个字符之内', trigger: 'blur' }
                ]
             },
 // 弹出添加角色对话框
        addRoles(){

            this.addRolesVisible=true
        },
        // 重置添加角色对话框
        resetForm() {

         this.addRolesVisible=false
         this.$refs.ruleFormRef.resetFields();
        },
        //提交添加角色
        submitForm() {

            this.$refs.ruleFormRef.validate(async valid => {

            if (valid) {

                 this.addRolesVisible=false
                 const {
     data:res}=await this.$http.post('roles',
                 {
     roleName:this.addRolesForm.name,
                 roleDesc:this.addRolesForm.miaoShu},

                )
                if(res.meta.status!==201){

                      console.log(res)
                    return this.$message.error('添加角色失败')
                }
                this.$message.success('添加角色成功')
                this.getRolesList()

            } else {

                console.log('error submit!!');
                return false;
            }
         });
        },
- 编辑角色
<el-button size="mini" type="primary" icon="el-icon-edit" @click="editRoles(scope.row.id)">编辑</el-button>
<!-- 修改角色 -->
        <el-dialog
            title="修改角色"
            :visible.sync="editRolesVisible"
            width="50%"
            @close="editResetForm"
          >
            <el-form :model="editRolesForm" :rules="addRolesRules" ref="editRuleFormRef" label-width="100px" class="demo-ruleForm">
                <el-form-item label="角色名称" prop="name">
                    <el-input v-model="editRolesForm.name"></el-input>
                </el-form-item>
                <el-form-item label="角色描述" prop="miaoShu">
                    <el-input v-model="editRolesForm.miaoShu"></el-input>
                </el-form-item>
            </el-form>
            <span slot="footer" class="dialog-footer">
                <el-button @click="editResetForm">取 消</el-button>
                <el-button type="primary" @click="editSubmitForm">确 定</el-button>
            </span>
        </el-dialog>
 editRolesRules: {

                name: [
                    {
      required: true, message: '请输入角色名称', trigger: 'blur' },
                    {
      min: 3, max: 5, message: '长度在 3 到 5 个字符', trigger: 'blur' }
                ],
                miaoShu:[
                    {
      required: true, message: '请输入角色描述', trigger: 'blur' },
                    {
       max: 20, message: '长度在20个字符之内', trigger: 'blur' }
                ]
             },
            editRolesVisible:false,
            // 所编辑的角色信息
            editRolesForm:{

                id:'',
                name:'',
                miaoShu:''
            },
 // 获取编辑角色信息
       async editRoles(id){

            this.editRolesVisible=true
            const {
     data:res}=await this.$http.get('roles/'+id)
            if(res.meta.status!==200){

                console.log(res)
                return this.$message.error("获取角色信息失败")
            }
            this.editRolesForm.id=res.data.roleId
            this.editRolesForm.name=res.data.roleName
            this.editRolesForm.miaoShu=res.data.roleDesc
        },
        // 关闭 并 重置编辑角色表单
        editResetForm(){

            this.editRolesVisible=false
            this.$refs.editRuleFormRef.resetFields();
        },
        // 提交编辑角色内容
        editSubmitForm(){

             this.$refs.editRuleFormRef.validate(async valid => {

            if (valid) {

                 this.editRolesVisible=false
                 const {
     data:res}=await this.$http.put('roles/'+this.editRolesForm.id,
                 {
     roleName:this.editRolesForm.name,
                 roleDesc:this.editRolesForm.miaoShu},

                )
                if(res.meta.status!==200){

                      console.log(res)
                    return this.$message.error('编辑角色失败')
                }
                this.$message.success('编辑角色成功')
                this.getRolesList()

            } else {

                console.log('error submit!!');
                return false;
            }
         });
        },
- 删除角色
<el-button size="mini" type="danger" icon="el-icon-delete" @click="delRoles(scope.row.id)">删除</el-button>
 // 删除角色
       async delRoles(id){

         const confirmMes=await this.$confirm('此操作将永久删除该角色, 是否继续?', '提示', {

          confirmButtonText: '确定',
          cancelButtonText: '取消',
          type: 'warning'
        }).catch(err=>{

            return err
        })
        // console.log(confirmMes)
        if(confirmMes!=='confirm'){

            return this.$message.info('用户取消了该操作')
        }
        const {
     data:res}=await this.$http.delete('roles/'+id)
        if(res.meta.status!==200){

             return this.$message.error('删除失败')
        }
        this.$message.success('删除成功')
        this.getRolesList()
      }
- 渲染每一个角色下的所有权限
首先在展开列中通过作用域插槽来渲染每一个角色下所有的权限数据 通过pre来将权限数据格式化
 <!-- 角色列表区域 -->
            <el-table :data="roleList" border stripe>
                <!-- 展开列 -->
                <el-table-column type="expand">
                    <template slot-scope="scope">
                        <pre>{
     {
     scope.row.children}}</pre>
                    </template>
                </el-table-column>

其中第一层children值代表第一层权限 后面两层分别代表第二,三层权限
嵌套for循环渲染这三个层次的权限
<!-- 角色列表区域 -->
            <el-table :data="roleList" border stripe>
                <!-- 展开列 -->
                <el-table-column type="expand">
                    <template slot-scope="scope">
                        <!-- 栅格化分别渲染不同级别权限列 -->
                        <el-row :class="['bdbottom',i1===0?'bdtop':'','vcenter']" v-for="(item1,i1) in scope.row.children" :key="item1.id">
                            <!-- 渲染第一级权限 -->
                            <el-col :span="5">
                                <el-tag>{
     {
     item1.authName}}</el-tag>
                                <i class="el-icon-caret-right"></i>
                            </el-col>
                            <!-- 渲染第二级 -->
                             <el-col :span="19" >
                                 <el-row :class="[i2===0?'':'bdtop','vcenter']" v-for="(item2,i2) in item1.children" :key="item2.id">
                                   <el-col :span="5">
                                       <el-tag type="success">{
     {
     item2.authName}}</el-tag>
                                        <i class="el-icon-caret-right"></i>
                                   </el-col>
                                    <el-col :span="19">
                                        <!-- 第三级权限 -->
                                        <el-tag type="warning"  v-for="item3 in item2.children" :key="item3.id">{
     {
     item3.authName}}</el-tag>
                                         <i class="el-icon-caret-right"></i>
                                    </el-col>
                                 </el-row>

                            </el-col>


                        </el-row>
                    </template>
                </el-table-column>
对应样式
.el-tag{

    margin:7px
}
.bdtop{

    border-top: 1px solid #eee;
}
.bdbottom{

    border-bottom: 1px solid #eee;
}
.vcenter{

    display: flex;
    align-items: center;
}
设置最小宽度
.global.css
html,body,#app{
height: 100%;
margin: 0;
padding: 0;
min-width: 1366px;
}

- **删除角色下指定权限**
为标签绑定closable属性 使其变为可删除的标签 绑定删除事件
```javascript
"warning" v-for="item3 in item2.children" :key="item3.id" closable @close="removeRightById(scope.row,item3.id)">{
{
item3.authName}}
定义删除权限标签的事件
 // 删除权限标签
      async removeRightById(role,rightId){

        const confirm= await this.$confirm('此操作将永久删除该文件, 是否继续?', '提示', {

          confirmButtonText: '确定',
          cancelButtonText: '取消',
          type: 'warning'
        }).catch(err=>err)
        if(confirm!=='confirm'){

            return this.$message.info('用户取消了操作')
        }

        const {
     data:res}= await this.$http.delete(`roles/${
       role.id}/rights/${
       rightId}`)
        if(res.meta.status!==200){

            return this.$message.error('删除角色列表失败')
        }
        //为了防止调用getRolesList()会发生页面重新渲染 需要再一次手动
        //打开展开列 又由于返回的是完整的权限列表 只要重新将权限列表数据重新赋值
        role.children=res.data
      }
为第一级和第二级权限的标签也绑定该事件
 <!-- 角色列表区域 -->
            <el-table :data="roleList" border stripe>
                <!-- 展开列 -->
                <el-table-column type="expand">
                    <template slot-scope="scope">
                        <!-- 栅格化分别渲染不同级别权限列 -->
                        <el-row :class="['bdbottom',i1===0?'bdtop':'','vcenter']" v-for="(item1,i1) in scope.row.children" :key="item1.id">
                            <!-- 渲染第一级权限 -->
                            <el-col :span="5">
                                <el-tag closable @close="removeRightById(scope.row,item1.id)">{
     {
     item1.authName}}</el-tag>
                                <i class="el-icon-caret-right"></i>
                            </el-col>
                            <!-- 渲染第二级 -->
                             <el-col :span="19" >
                                 <el-row :class="[i2===0?'':'bdtop','vcenter']" v-for="(item2,i2) in item1.children" :key="item2.id">
                                   <el-col :span="5">
                                       <el-tag type="success" closable @close="removeRightById(scope.row,item2.id)">{
     {
     item2.authName}}</el-tag>
                                        <i class="el-icon-caret-right"></i>
                                   </el-col>

- 点击分配权限 展示分配权限对话框 并获取权限列表数据
<el-button size="mini" type="warning" icon="el-icon-setting" @click="showSetRightDialog">分配权限</el-button>
  setRightDialogVisible:false,
            // 所有权限的数据
            rightslist:[],
 // 展示分配权限的对话框
      async showSetRightDialog(){

          // 获取所有权限数据
          this.setRightDialogVisible=true
          // 由于渲染的是树状列表 所有根据api 路径中所携带的类型是tree
          const {
     data:res}=await this.$http.get('rights/tree')
          if(res.meta.status!==200){

              return this.$message.error('获取权限数据失败')
          }
          this.rightslist=res.data
          console.log(this.rightslist)
      }
使用树形控件渲染
<!-- 分配权限 -->
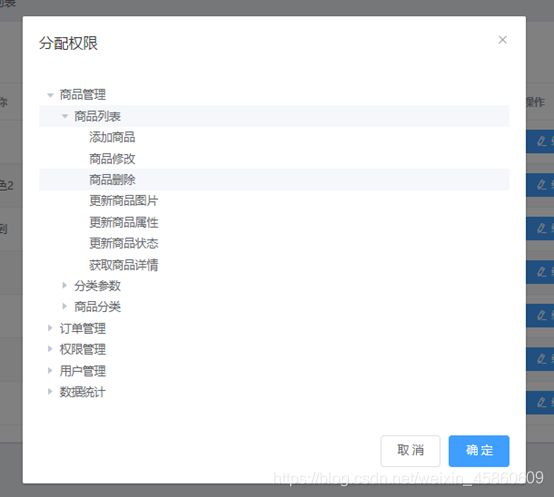
<el-dialog
title="分配权限"
:visible.sync="setRightDialogVisible"
width="50%"
>
<!-- 树形控件 -->
<el-tree :data="rightslist" :props="treeProps" ></el-tree>
<span slot="footer" class="dialog-footer">
<el-button @click="setRightDialogVisible = false">取 消</el-button>
<el-button type="primary" @click="setRightDialogVisible = false">确 定</el-button>
</span>
</el-dialog>
treeProps:{

                label:'authName',
                children:'children'
            }
在树状节点控件加node-key,default-expand-all属性
node-key:每个树节点用来作为唯一标识的属性,整棵树应该是唯一的
default-expand-all:默认将所有的选项展开
 <!-- 树形控件 -->
            <el-tree :data="rightslist"
             :props="treeProps"
             show-checkbox node-key="id"
             default-expand-all

- 在点击分配角色时 自动将树状列表中角色已经拥有的权限勾选
根据api增加default-checked-keys属性 表示默认的勾选项
 <!-- 树形控件 -->
            <el-tree :data="rightslist"
             :props="treeProps"
             show-checkbox node-key="id"
             default-expand-all
             :default-checked-keys="defKeys"></el-tree>
在data中定义该数组
defKeys:[]
通过递归的形式获取所有三级权限的id并保存到 defKeys数组中
 getLeafKeys(node,arr){

          //如果当前node节点不包含children属性 则是三级节点
          if(!node.children){

             //注意:不要缺少return
              return arr.push(node.id)
          }

          node.children.forEach(item=>this.getLeafKeys(item,arr))
      }
往showSetRightDialog方法传递所对应的角色列表参数
<el-button size="mini" type="warning" icon="el-icon-setting" @click="showSetRightDialog(scope.row)">分配权限</el-button>
在showSetRightDialog方法中调用递归函数
 // 展示分配权限的对话框
      async showSetRightDialog(role){

          //递归获取三级节点的id
          this.getLeafKeys(role,this.defKeys)

          // 获取所有权限数据
          this.setRightDialogVisible=true
          // 由于渲染的是树状列表 所有根据api 路径中所携带的类型是tree
          const {
     data:res}=await this.$http.get('rights/tree')
          if(res.meta.status!==200){

              return this.$message.error('获取权限数据失败')
          }
          this.rightslist=res.data

      },

- 在关闭分配权限对话框后需要对defKeys进行重置
<!-- 分配权限 -->
        <el-dialog
            title="分配权限"
            :visible.sync="setRightDialogVisible"
            width="50%"
            @close="setRightDialogCloesd"
//监听分配权限对话框的关闭事件
      setRightDialogCloesd(){

          this.defKeys=[]
      }
- 调用api完成分配权限
<el-button type="primary" @click="allotRights">确 定</el-button>
指定ref元素
 <!-- 树形控件 -->
            <el-tree :data="rightslist"
             :props="treeProps"
             show-checkbox node-key="id"
             default-expand-all
             :default-checked-keys="defKeys"
             ref="treeRef"></el-tree>
根据api 调用getCheckedKeys(),getHalfCheckedKeys()获取已勾选的节点和半勾选节点 使用…将其展开放到数组中
//点击为角色分配权限
        async allotRights(){

          const keys=[
              ...this.$refs.treeRef.getCheckedKeys(),
              ...this.$refs.treeRef.getHalfCheckedKeys()
          ]

          const idStr=keys.join(',')

          const {
     data:res}=await this.$http.post(`roles/${
       this.roleId}/rights`,{
     rids:idStr})

          if(res.meta.status!==200){

              return this.$message.error('分配权限失败')
          }
          this.$message.success('分配权限成功')
          this.getRolesList()
          this.setRightDialogVisible=false
      }

- 完成分配角色功能
Users.vue
给分配角色按钮绑定事件
 <!-- 分配角色 -->
                       <el-tooltip class="item" effect="dark" content="分配角色" placement="top">
                           <!-- 鼠标放置有文字提示 enterable使鼠标离开后隐藏-->
                          <el-button type="warning" :enterable="false" size="mini" icon="el-icon-setting"
                          @click="setRoles(scope.row)"></el-button>
                       </el-tooltip>
                       <!--这里scope.row的数据源是userList对应的那一行数据-->
分配角色对话框
<!-- 分配角色 -->
        <el-dialog
        title="提示"
        :visible.sync="roleDialogVisible"
        width="50%"

        >
        <div>
            <p>当前的用户:{
     {
     userInfo.username}}</p>
            <p>当前的角色:{
     {
     userInfo.role_name}}</p>

        </div>
        <span slot="footer" class="dialog-footer">
            <el-button @click="roleDialogVisible = false">取 消</el-button>
            <el-button type="primary" @click="saveRoleInfo">确 定</el-button>
        </span>
        </el-dialog>
在data中定义需要分配角色的用户信息,以及所有角色列表
// 需要分配角色的用户信息
			roleDialogVisible:false,
            userInfo:{
     },
            roleList:[],
定义分配角色对话框的事件
async setRoles(role){

            this.userInfo=role
            const {
     data:res}=await this.$http.get('roles')
            if(res.meta.status!==200){

                return this.$message.error('获取角色列表失败')
            }
            this.roleList=res.data
            this.roleDialogVisible=true
        },
增加分配角色下拉列表框组件
 <div>
            <p>当前的用户:{
     {
     userInfo.username}}</p>
            <p>当前的角色:{
     {
     userInfo.role_name}}</p>
            <p>分配新角色:
               <el-select v-model="selectRole" placeholder="请选择">
                <el-option
                v-for="item in roleList"
                :key="item.id"
                :label="item.roleName"
                :value="item.id">
                </el-option>
            </el-select>
            </p>
        </div>
在data中定义selectRole 表示当前所选中的哪一项
selectRole:''
点击确定按钮完成角色的分配
<el-button type="primary" @click="saveRoleInfo">确 定</el-button>
 // 点击按钮分配角色
        async saveRoleInfo(){

            if(!this.selectRole){

                return this.$message.error('请选择要分配的角色')
            }
            const {
     data:res}=await this.$http.put(`users/${
       this.userInfo.id}/role`,
            {

                rid:this.selectRole
            })

            if(res.meta.status!==200){

                return this.$message.error('更新角色失败')
            }

            this.$message.success('更新角色成功')
            this.getUserList()
            this.roleDialogVisible=false
        },
关闭对话框时重置
 <!-- 分配角色 -->
        <el-dialog
        title="提示"
        :visible.sync="roleDialogVisible"
        width="50%"
        @close="setRoleDialog"
        >
 // 关闭对话框重置
        setRoleDialog(){

            this.selectRole=''
            this.roleList=[]
        }

将完成的权限的相关功能上传到github
商品分类
- 创建新的分支 并上传到github

新建goods目录 在其中新建Cates.vue 并创建对应的路由关系
 children:[
        {
     path:'/welcome',component:welcome},
        {
     path:'/users',component:users},
        {
     path:'/rights',component:rights},
        {
     path:'/roles',component:roles},
        {
     path:'/categories',component:cates}
      ] }
初步绘制商品分类基本布局
<template>
    <div>
           <!-- 面包屑导航 -->
        <el-breadcrumb separator-class="el-icon-arrow-right">
            <el-breadcrumb-item :to="{ path: '/home' }">首页</el-breadcrumb-item>
            <el-breadcrumb-item>商品管理</el-breadcrumb-item>
            <el-breadcrumb-item>商品分类</el-breadcrumb-item>
        </el-breadcrumb>

        <el-card>
            <el-row>
                <el-button type="primary">商品分类</el-button>
            </el-row>
        </el-card>
    </div>
</template>
- 获取商品分类列表数据
Cates.vue
<script>
export default {

    data(){

        return{

            //查询条件
            queryInfo:{

                type:3,
                pagenum:1,
                pagesize:5
            },
            // 商品分类的数据列表 默认为空
            catelist:[],
            // 总数据条数
            total:0

        }
    },
    created(){

        this.getCateList()
    },
    methods:{

        // 获取商品分类列表数据

        async getCateList(){

            const {
     data:res}=await this.$http.get('categories',{

                params:this.queryInfo
            })
            if(res.meta.status!==200){

                return this.$message.error('获取分类数据失败')
            }
            this.catelist=res.data.result
            this.total=res.data.total
        }
    }
}
</script>
//注意1:传递的对象名称必须为params!!! 否则不会根据分页情况来显示数据 因为当对象名不为指定的params 会默认传递的type,pagesize,pagenum为空 从而返回所有的数据
//注意2 this.catelist要赋值为res.data.result 而不是res.data

- 使用vue-table-with-tree-grid第三方插件渲染下拉表格插件
在vue ui 安装vue-table-with-tree-grid运行环境依赖(不知道为啥安装不上 后来使用npm i vue-table-with-tree-grid --save)
根据该插件的github提供的api文档 和 example来具体使用该插件
注册插件
import TreeTable from 'vue-table-with-tree-grid'
Vue.component('tree-table',TreeTable)
Cates.vue
 <!-- 分类表格 -->
            <tree-table :data="catelist" :columns="columns"></tree-table>
在data中定义
columns:[{

                label:'分类名称',
                prop:'cat_name'
            }]
设置表格的属性
<tree-table :data="catelist" :columns="columns"
            :selection-type="false" :expand-type="false"
            :show-index="true" index-text="#" border>
selection-type 是否为多选类型表格
expand-type 是否为展开行类型表格
show-index 是否展示索引列
index-text 索引列标题

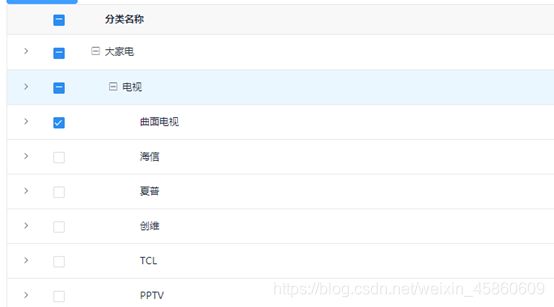
- 使用自定义模板列渲染表格数据
根据提供的example可知
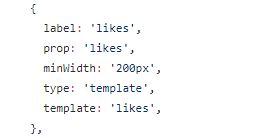
type:template 指定这一列要渲染成自定义模板列
template:likes 指定该自定义模板列使用的作用域插槽名
在data中定义
columns:[{

                label:'分类名称',
                prop:'cat_name'
            },{

                label:'是否有效',
                // 表示将当前定义为模板列
                type:'template',
                // 表示当前这一列使用的模板名称
                template:'isok'
            }]
使用slot给自定义模板列命名 并且v-if按需显示对应的图标
 <!-- 分类表格 -->
            <tree-table :data="catelist" :columns="columns"
            :selection-type="false" :expand-type="false"
            :show-index="true" index-text="#" border>
                <template slot="isok" slot-scope="scope">
                    <i class="el-icon-success" v-if="scope.row.cat_deleted===false"
                    style="color:lightgreen"></i>
                    <i class="el-icon-error" v-else style="color:lightgreen"></i>
                </template>
            </tree-table>
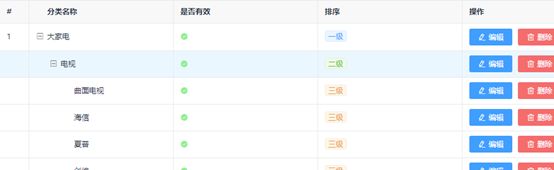
- 渲染排序列
在columns中定义
{

                label:'排序',
                type:'template',
                template:'order'
            }
按需显示对应的标签等级
 <!-- 排序 -->
                <template slot="order" slot-scope="scope">
                    <el-tag size="mini" v-if="scope.row.cat_level===0">一级</el-tag>
                    <el-tag size="mini" v-else-if="scope.row.cat_level===1" type="success">二级</el-tag>
                    <el-tag size="mini" v-else type="warning">三级</el-tag>
                </template>
- 渲染操作列
{

                label:'操作',
                type:'template',
                template:'opt'
            }
 <!-- 操作 -->
                <template slot="opt" >
                    <el-button type="primary" icon="el-icon-edit" size="mini">编辑</el-button>
                    <el-button type="danger" icon="el-icon-delete" size="mini">删除</el-button>
                </template>
- 实现分页功能
<!-- 分页 -->
            <el-pagination
            @size-change="handleSizeChange"
            @current-change="handleCurrentChange"
            :current-page="queryInfo.pagenum"
            :page-sizes="[4,6,8,10]"
            :page-size="queryInfo.pagesize"
            layout="total, sizes, prev, pager, next, jumper"
            :total="total">
           </el-pagination>
 // 监听一页显示数据的多少
        handleSizeChange(newSize){

            this.queryInfo.pagesize=newSize
            this.getCateList()
        },
        // 监听页码的多少
        handleCurrentChange(newpage){

            this.pagenum=newpage
        },

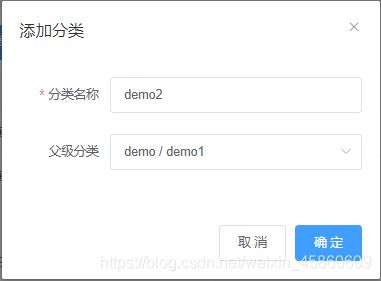
- 添加分类
 <!-- 添加分类的对话框 -->
        <el-dialog
        title="添加分类"
        :visible.sync="addCateDialogVisible"
        width="40%"

        >
        <el-form :model="addCateForm" :rules="addCateRules" ref="addCateFormRef" label-width="100px"  class="demo-ruleForm">
            <el-form-item label="分类名称" prop="cat_name">
                <el-input v-model="addCateForm.cat_name"></el-input>
            </el-form-item>

        </el-form>
        <span slot="footer" class="dialog-footer">
            <el-button @click="addCateDialogVisible = false">取 消</el-button>
            <el-button type="primary" @click="addCateDialogVisible = false">确 定</el-button>
        </span>
        </el-dialog>
addCateDialogVisible:false,
            addCateForm:{

                cat_name:'',

            },
            addCateRules: {

                cat_name: [
                    {
      required: true, message: '请输入分类名称', trigger: 'blur' },
                    {
       max: 10, message: '长度在10个字符以内', trigger: 'blur' }
                ],
            },
注意:表单校验规则的名称要和v-model双向数据绑定的名称一致 都要为cat_name
<el-button type="primary" @click="showAddCateDialog">添加分类</el-button>
 // 点击按钮展示添加分类的对话框
        showAddCateDialog(){

            this.addCateDialogVisible=true
        },
        resetaddCateForm(){

            this.$refs.addCateFormRef.resetFields()
        }
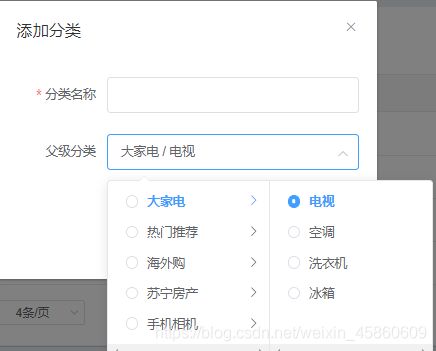
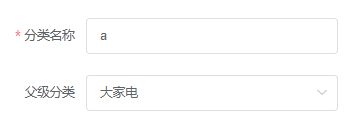
- 渲染级联选择框控件
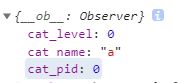
在addCateForm新增两个属性
  addCateForm:{

                cat_name:'',
                 // 父级分类的id
                cat_pid:0,
                // 默认要添加分类的等级是1级分类
                cat_level:0
            },
定义父级分类列表数组
parenCateList:[]
定义获取父级分类的数据列表方法
传递的对象参数名必须为params
 async getParentCateList(){

            // type:2 获取前两级的所有分类
            const {
     data:res}=await this.$http.get('categories',{
     params:{
     type:2}})
            if(res.meta.status!==200){

                return this.$message.error('获取父级分类失败')
            }
            this.parenCateList=res.data
        }
调用
 // 点击按钮展示添加分类的对话框
        showAddCateDialog(){

            // 获取父级分类的数据列表
            this.getParentCateList()
            this.addCateDialogVisible=true

        },
一共获取到了30个父级分类

使用级联控件 并修改设置属性
 <el-form-item label="分类名称" prop="name">
                <el-input v-model="addCateForm.cat_name"></el-input>
            </el-form-item>
            <el-form-item label="父级分类">
                <!-- option 用来指定的数据源
                     props 指定相应的配置对象
                     clearable 是否可以清空
                     change-on-select 是否可以选中任意一级
                     (默认只能选中最后一级)-->
               <el-cascader
                :options="parenCateList"
                @change="parentCateChange"
                :props="cascaderProps"
                v-model="selectedKeys"
                class="cas-width"
                clearable
                change-on-select
                >
               </el-cascader>
其中 父级分类不需要进行表单验证 因为当什么都没有选择时默认将添加的分类 作为父级分类添加(最高一级)
props属性说明
value:指定选项的值为选项对象的某个属性值
label 指定选项标签为选项对象的某个属性值
children:指定选项的子选项为选项对象的某个属性值
// 父级分类的列表
            parenCateList:[],
            // 指定级联选择器的数据对象
            cascaderProps:{

                expandTrigger: 'hover' ,
                value:'cat_id',
                label:'cat_name',
                children:'children'
            },
            // 选中的父级分类id数组
            selectedKeys:[]
定义parentCateChange 当选项发生改变时立即触发
// 选择项改变立即触发这个函数
        parentCateChange(){

			 console.log(this.selectedKeys)
        }


由于 默认的级联控件过高 导致一部分数据被顶部覆盖 所以可以在全局中设置对应样式
global.css
.el-cascader-panel {

    height: 200px !important
}
使该控件的宽度为100%
.cas-width{

    width: 100%;
}


- 根据父分类的变换来处理表单中的数据
// 选择项改变立即触发这个函数
        parentCateChange(){


            //如果seletedKeys数组中的length大于0 证明选中的父级分类
            //繁殖 就说明没有选中任何父级分类
            if(this.selectedKeys.length>0){

                //父级分类的id
                this.addCateForm.cat_pid=this.selectedKeys[this.selectedKeys.length-1]
                  //为当前分类的等级赋值
                this.addCateForm.cat_level=this.selectedKeys.length
                return
            }else{

                //父级分类的id
                this.addCateForm.cat_pid=0
                  //为当前分类的等级赋值
                this.addCateForm.cat_level=0
            }
        }
<el-button type="primary" @click="addCate">确 定</el-button>
addCate(){

            console.log(this.addCateForm)
        }
此时点击确定按钮 addCateForm中的数据会随着父级分类选项框的变化而变化


点击关闭和取消重置表单
<!-- 添加分类的对话框 -->
        <el-dialog
        title="添加分类"
        :visible.sync="addCateDialogVisible"
        width="40%"
        @close="resetaddCateForm"

        >
<el-button @click="resetaddCateForm">取 消</el-button>
resetaddCateForm(){

            this.$refs.addCateFormRef.resetFields()
            this.selectedKeys=[]
            this.addCateForm.cat_level=0
            this.addCateForm.cat_pid=0
        }
- 完成商品分类
注意:此处post 不能写为params:{this.addCateForm} (之前就必须这么写,不知道为啥。。。)
addCate(){

            // console.log(this.addCateForm)
             this.$refs.addCateFormRef.validate(async valid=>{

                 if(!valid) return
                 const {
     data:res}=await this.$http.post('categories',this.addCateForm)
                 if(res.meta.status!==201){

                     return this.$message.error('添加分类失败')
                 }
                 this.$message.success('添加分类成功')
                 this.getCateList()
                 this.addCateDialogVisible=false
             })
        },


- 上传代码
将代码提交到本地仓储


![]()

将本地goods_cate分支提交到远程
![]()
切换到主分支合并goods_cate分支

将主分支提交到github
![]()
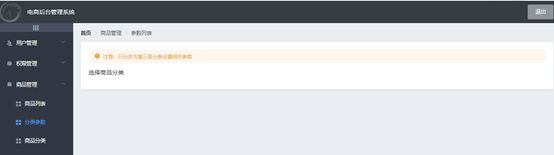
分类参数
- 创建新的分支上传到github

- 参数管理功能介绍

新建组件params.vue 并创建对应的路由关系
- 初步绘制ui
params.vue
<template>
<div>
<!-- 面包屑导航 -->
<el-breadcrumb separator-class="el-icon-arrow-right">
<el-breadcrumb-item :to="{ path: '/home' }">首页</el-breadcrumb-item>
<el-breadcrumb-item>商品管理</el-breadcrumb-item>
<el-breadcrumb-item>参数列表</el-breadcrumb-item>
</el-breadcrumb>
<el-card>
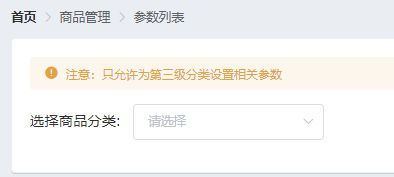
<el-alert
title="注意:只允许为第三级分类设置相关参数"
type="warning"
show-icon
:closable="false">
</el-alert>
<!-- 选择商品分类区域 -->
<el-row class="cat_opt">
<el-col>
<span>选择商品分类</span>
</el-col>
</el-row>
</el-card>
</div>
</template>
.cat_opt{

    margin: 15px 0;
}
- 实现级联选择功能
获取所有商品分类数据
 data(){

        return{

            cateList:[],
created(){

        this.getCateList()
    },
    methods:{

        // 获取所有商品分类
        async  getCateList(){

            const {
     data:res}=await this.$http.get('categories')
            if(res.meta.status!==200){

                return this.$message.error('获取商品分类列表失败')
            }
            this.cateList=res.data
            console.log(this.cateList)
        },
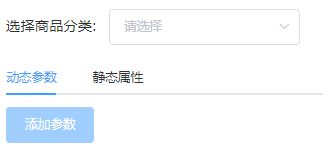
<!-- 选择商品分类区域 -->
            <el-row class="cat_opt">
                <el-col>
                    <span class="sel_span">选择商品分类:</span>
                    <el-cascader
                    v-model="sel_key"
                    :options="cateList"
                    :props="props"
                    @change="handleChange"></el-cascader>
                </el-col>
            </el-row>
  // 级联选择框双向绑定的数组
            sel_key:[],
            props:{

                expandTrigger: 'hover',
                value:'cat_id',
                label:'cat_name',
                children:'children'
            }
 // 选中分类发生变化
        handleChange(val){


            // 证明选中的不是三级分类
            if(this.sel_key.length!==3){

                this.sel_key=[]
                return
            }

            // 证明选中的是三级分类

        }
二级菜单选中无效

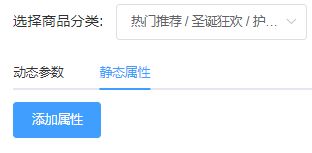
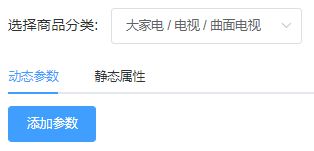
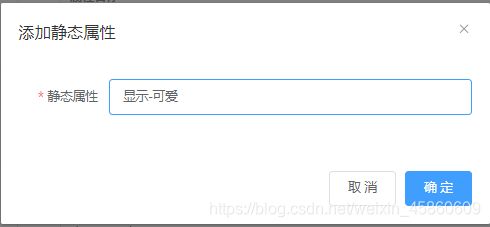
- 渲染动态参数和静态属性的标签页
<!-- tab 页签区域 -->
            <el-tabs v-model="activeName" @tab-click="handleClick">
                <el-tab-pane label="动态参数" name="first">动态参数</el-tab-pane>
                <el-tab-pane label="静态属性" name="second">静态属性</el-tab-pane>

            </el-tabs>
默认展示first 动态参数
// 被激活的页签名称
            activeName:'first'
handleClick(){


        }

- 渲染添加参数和添加属性按钮 并控制其选中状态
如果级联选择器选择的不是三级分类 或者未做选择按钮都为禁用状态
  computed:{

        isBtnDisabled(){

            if(this.sel_key.length!==3){

                return true
            }
            return false
        }
    }
<el-tab-pane label="动态参数" name="first">
                    <el-button type="primary" :disabled="isBtnDisabled">添加参数</el-button>
                </el-tab-pane>
                <el-tab-pane label="静态属性" name="second">
                    <el-button type="primary" :disabled="isBtnDisabled">添加属性</el-button>
                </el-tab-pane>

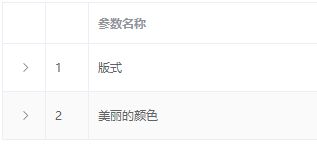
- 获取参数列表数据
根据api 文档 要传递分类id和参数sel sel值不能为空,通过 only 或 many 来获取分类静态参数还是动态参数
将激活的页面名称分别改为many,only
<el-tab-pane label="动态参数" name="many">
<el-tab-pane label="静态属性" name="only">
在computed中定义cateId()方法 计算当前选中的三级分类的id
// 当前选中的三级分类的id
        cateId(){

            if(this.sel_key.length===3){

                return this.sel_key[this.sel_key.length-1]
            }
            return null
        }
当选中的分类发生变化时 事实获取对应的分类参数
 // 选中分类发生变化
        async handleChange(val){


            // 证明选中的不是三级分类
            if(this.sel_key.length!==3){

                this.sel_key=[]
                return
            }

            // 证明选中的是三级分类
            // 根据所选分类的id 和当前所处的面板 获取对应的参数
            const{
     data:res}=await this.$http.get(`categories/${
       this.cateId}/attributes`,
                {
     params:{
     sel:this.activeName}
            })
            if(res.meta.status!==200){


                return this.$message.error('获取参数列表失败')
            }
            console.log(res.data)

        },


- 切换tabs面板后重新获取参数列表数据
由于之前handleChange里的获取分类数据只属于级联选择器 当切换面板时 并不会重新获取数据 所以应该将handleChange里所有的代码抽离出一个单独的方法 之后在handleChange 和 handleClick 中都分别调用这两个方法
   // 获取参数的列表数据
        async getParamsData(){

             // 证明选中的不是三级分类
            if(this.sel_key.length!==3){

                this.sel_key=[]
                return
            }
            // 证明选中的是三级分类
            // 根据所选分类的id 和当前所处的面板 获取对应的参数
            const{
     data:res}=await this.$http.get(`categories/${
       this.cateId}/attributes`,
                {
     params:{
     sel:this.activeName}
            })
            if(res.meta.status!==200){


                return this.$message.error('获取参数列表失败')
            }
            console.log(res.data)
        },
// 选中分类发生变化
        handleChange(){

           this.getParamsData()
        },

        // 标签页面板发生变化
        handleClick(){

            this.getParamsData()
        }


- 将获取到的参数挂载到不同的数据源上
由于不同的标签页面板所使用的返回的数据不同 我们需要绑定到不同的数据源上
// 动态参数的数据
            manyTableData:[],
            // 静态属性的数据
            onlyTableData:[]
   // 获取参数的列表数据
        async getParamsData(){

             // 证明选中的不是三级分类
            if(this.sel_key.length!==3){

                this.sel_key=[]
                return
            }
            // 证明选中的是三级分类
            // 根据所选分类的id 和当前所处的面板 获取对应的参数
            const{
     data:res}=await this.$http.get(`categories/${
       this.cateId}/attributes`,
                {
     params:{
     sel:this.activeName}
            })
            if(res.meta.status!==200){


                return this.$message.error('获取参数列表失败')
            }
            console.log(res.data)
            // 绑定不同的数据源
            if(this.activeName==='many'){

                this.manyTableData=res.data
            }else{

                this.onlyTableData=res.data
            }
        },
- 渲染动态参数和静态属性表格
<!-- tab 页签区域 -->
<el-tabs v-model="activeName" @tab-click="handleClick">
<el-tab-pane label="动态参数" name="many">
<el-button type="primary" :disabled="isBtnDisabled">添加参数</el-button>
<!-- 动态参数表格 -->
<el-table :data="manyTableData" border stripe>
<!-- 展开行 -->
<el-table-column type="expand"></el-table-column>
<!-- 索引列 -->
<el-table-column type="index"></el-table-column>
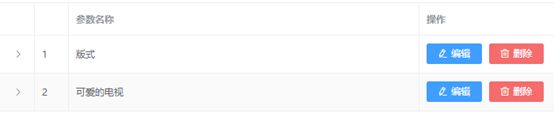
<el-table-column label="参数名称" prop="attr_name"></el-table-column>
<el-table-column label="操作">
<template >
<el-button type="primary" icon="el-icon-edit" size="mini">编辑</el-button>
<el-button type="danger" icon="el-icon-delete" size="mini">删除</el-button>
</template>
</el-table-column>
</el-table>
</el-tab-pane>
<el-tab-pane label="静态属性" name="only">
<el-button type="primary" :disabled="isBtnDisabled">添加属性</el-button>
<!-- 静态属性表格 -->
<el-table :data="onlyTableData" border stripe>
<!-- 展开行 -->
<el-table-column type="expand"></el-table-column>
<!-- 索引列 -->
<el-table-column type="index"></el-table-column>
<el-table-column label="属性名称" prop="attr_name"></el-table-column>
<el-table-column label="操作">
<template >
<el-button type="primary" icon="el-icon-edit" size="mini">编辑</el-button>
<el-button type="danger" icon="el-icon-delete" size="mini">删除</el-button>
</template>
</el-table-column>
</el-table>
</el-tab-pane>
</el-tabs>


- 实现添加参数对话框
此时两个标签页的按钮可以使用同一个对话框 此时对话框的title等一些属性要根据点击不同标签页的不同按钮动态绑定
在computed中定义titleText() 动态计算标题的面板
// 动态计算标题的面板
        titleText(){

            if(this.activeName==='many'){

                return '动态参数'
            }
            return '静态属性'
        }
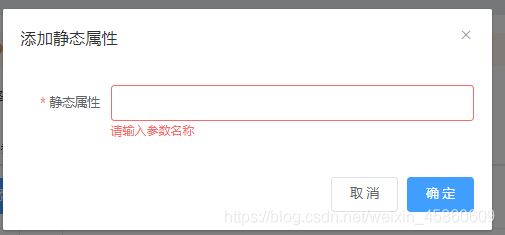
<!-- 添加参数的对话框 -->
        <el-dialog
        :title="'添加'+titleText"
        :visible.sync="addDialogVisible"
        width="50%"
        @close="addDialogClose"
        >
        <!-- 添加参数的表单 -->
        <el-form :model="addForm" :rules="addFormRules" ref="addFormRef" label-width="100px" class="demo-ruleForm">
            <el-form-item :label="titleText" prop="attr_name">
                <el-input v-model="addForm.attr_name"></el-input>
            </el-form-item>
        </el-form>
        <span slot="footer" class="dialog-footer">
            <el-button @click="addDialogVisible = false">取 消</el-button>
            <el-button type="primary" @click="addDialogVisible = false">确 定</el-button>
        </span>
        </el-dialog>
 // 控制添加对话框的显示与隐藏
            addDialogVisible:false,
            // 添加参数的表单数据
            addForm:{

                 attr_name:''
            },
            addFormRules:{

               attr_name: [
                    {
      required: true, message: '请输入参数名称', trigger: 'blur' },
                    {
      min: 3, max: 5, message: '长度在 3 到 5 个字符', trigger: 'blur' }
                ]
            }
 // 监听添加对话框的关闭事件
        addDialogClose(){

            this.$refs.addFormRef.resetFields();
        }

- 完成动态参数和静态属性的操作
<el-button type="primary" @click="addParams">确 定</el-button>
根据api 其中传递的id参数为分类id 可以根据computed的cateId来获取
 addParams(){

            this.$refs.addFormRef.validate(async valid=>{

                if(!valid) return
                const {
     data:res}=await this.$http.post(`categories/${
       this.cateId}/attributes`,{

                    attr_name:this.addForm.attr_name,
                    attr_sel:this.activeName
                })

                if(res.meta.status!==201){

                    return this.$message.error('添加参数失败')
                }

                this.$message.success('添加参数成功')
                this.addDialogVisible=false

                this.getParamsData()
            })
        }

![]()
- 渲染编辑对话框
分别给动态参数和静态属性的编辑按钮绑定showEditDialog事件
<el-button type="primary" icon="el-icon-edit" size="mini" @click="showEditDialog">编辑</el-button>
 <!-- 修改参数的对话框 -->
        <el-dialog
        :title="'修改'+titleText"
        :visible.sync="editDialogVisible"
        width="50%"
        @close="editDialogClose"
        >
        <!-- 修改参数的表单 -->
        <el-form :model="editForm" :rules="editFormRules" ref="editFormRef" label-width="100px" class="demo-ruleForm">
            <el-form-item :label="titleText" prop="attr_name">
                <el-input v-model="editForm.attr_name"></el-input>
            </el-form-item>
        </el-form>
        <span slot="footer" class="dialog-footer">
            <el-button @click="editDialogVisible = false">取 消</el-button>
            <el-button type="primary" @click="editParams">确 定</el-button>
        </span>
        </el-dialog>
// 修改参数对话框
            editDialogVisible:false,
            editForm:{

                attr_name:''
            },
            editFormRules:{

                attr_name: [
                    {
      required: true, message: '请输入参数名称', trigger: 'blur' },
                    {
      min: 3, max: 5, message: '长度在 3 到 5 个字符', trigger: 'blur' }
                ]
            }
 // 修改参数对话框
        showEditDialog(){

            this.editDialogVisible=true
        },
        editDialogClose(){

             this.$refs.editFormRef.resetFields();
        },
        editParams(){


        }


- 提交编辑参数
<el-button type="primary" @click="editParams">确 定</el-button>
 // 提交编辑参数
        editParams(){

            this.$refs.editFormRef.validate(async valid => {

               console.log(this.editForm)
                if (valid) {

                   const {
     data:res}=await this.$http.put(`categories/${
       this.cateId}/attributes/${
       this.editForm.attr_id}`,{


                           attr_name:this.editForm.attr_name,
                           attr_sel:this.activeName

                   })
                   if(res.meta.status!==200){

                    //    console.log(res.meta)
                       return this.$message.error('编辑参数失败')
                   }
                   this.getParamsData()
                   this.editDialogVisible=false
                } else {

                    console.log('error submit!!');
                    return false;
                }
            });
        },


![]()


- 删除参数
<el-button type="danger" icon="el-icon-delete" size="mini" @click="delAttr(scope.row.attr_id)">删除</el-button>
<el-button type="danger" icon="el-icon-delete" size="mini" @click="delAttr(scope.row.attr_id)">删除</el-button>
// 删除参数
        async delAttr(attrId){

            const msg=await this.$confirm('此操作将永久删除该参数, 是否继续?', '提示', {

            confirmButtonText: '确定',
            cancelButtonText: '取消',
            type: 'warning'
            }).catch(err=>err)
            console.log(msg)
            if(msg=='cancel'){

                return this.$message.info("用户取消了操作")
            }
            const {
     data:res}=await this.$http.delete(`categories/${
       this.cateId}/attributes/${
       attrId}`)
            if(res.meta.status!==200){

                return this.$message.error('删除参数失败')
            }
            this.getParamsData()
        }

- 渲染参数下的可选项
由于参数列表中attr_vals是一个以空格分割的字符串 所以要将其变为一个数组
  // 获取参数的列表数据
        async getParamsData(){

             // 证明选中的不是三级分类
            if(this.sel_key.length!==3){

                this.sel_key=[]
                return
            }
            // 证明选中的是三级分类
            // 根据所选分类的id 和当前所处的面板 获取对应的参数
            const{
     data:res}=await this.$http.get(`categories/${
       this.cateId}/attributes`,
                {
     params:{
     sel:this.activeName}
            })
            if(res.meta.status!==200){


                return this.$message.error('获取参数列表失败')
            }

            // 将字符串变为数组
            res.data.forEach((item)=>{


                item.attr_vals=item.attr_vals.split(' ')

            })
            if(this.activeName==='many'){

                this.manyTableData=res.data
            }else{

                this.onlyTableData=res.data
            }
        },
在展开行中用tag渲染
  <!-- 动态参数表格 -->
                    <el-table :data="manyTableData" border stripe>
                        <!-- 展开行 -->
                         <el-table-column type="expand">
                             <template slot-scope="scope">
                                 <el-tag closable v-for="(item,i) in scope.row.attr_vals" :key="i">
                                     {
     {
     item}}
                                 </el-tag>
                             </template>
                         </el-table-column>

- 解决attr_vals为空时出现的bug
当attr_vals为空时 此时按照空格经行分割会得到空字符串

应该对分割前进行判断
注意:在三元判断中当attr_vals为空时应该等于一个空数组而不是’ '(空)值
  res.data.forEach((item)=>{


                item.attr_vals=item.attr_vals===''?[]:item.attr_vals.split(' ')

            })
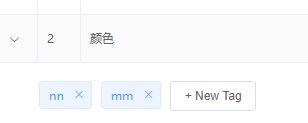
- 控制文本框与按钮的切换显示
使用新建标签的组件
 <!-- new tag -->
 <!--@keyup.enter.native:按回车
     @blur:失去焦点-->
                                 <!-- 输入文本框 -->
                                 <el-input
                                class="input-new-tag"
                                v-if="inputVisible"
                                v-model="inputValue"
                                ref="saveTagInput"
                                size="small"
                                @keyup.enter.native="handleInputConfirm"
                                @blur="handleInputConfirm"
                                >
                                </el-input>
                                <!-- 添加按钮 -->
                                <el-button v-else class="button-new-tag" size="small" @click="showInput">+ New Tag</el-button>
 // 控制按钮与文本框的切换显示
            inputVisible: false,
            // 文本框中输入的内容
            inputValue: ''
 // 文本框失去了焦点或者按enter键都会触发
        handleInputConfirm() {


        },
        // 显示文本输入框
        showInput() {

          this.inputVisible = true;

        },
修改样式
.input-new-tag {

    width: 90px;
  }
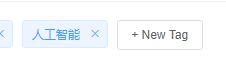

- 为每一行的数据单独提供inputVisible和inputValue
由于共同绑定了这一个数据源 所以当编辑一个文本框的时候 会影响到其他行
我们需要为每一行数据单独提供这两个值
循环为每一项增加这两个属性值
 async getParamsData(){

             // 证明选中的不是三级分类
            if(this.sel_key.length!==3){

                this.sel_key=[]
                return
            }
            // 证明选中的是三级分类
            // 根据所选分类的id 和当前所处的面板 获取对应的参数
            const{
     data:res}=await this.$http.get(`categories/${
       this.cateId}/attributes`,
                {
     params:{
     sel:this.activeName}
            })
            if(res.meta.status!==200){


                return this.$message.error('获取参数列表失败')
            }

            // 将字符串变为数组
            res.data.forEach((item)=>{

                item.attr_vals=item.attr_vals===''?'':item.attr_vals.split(' ')
                // 控制文本框的显示与隐藏
                item.inputVisible=false
                // 文本框中输入的值
                item.inputValue=""
            })
            if(this.activeName==='many'){

                this.manyTableData=res.data
            }else{

                this.onlyTableData=res.data
            }
        }
修改组件之前绑定的数据源
 <el-input
                                class="input-new-tag"
                                v-if="scope.row.inputVisible"
                                v-model="scope.row.inputValue"
                                ref="saveTagInput"
                                size="small"
                                @keyup.enter.native="handleInputConfirm"
                                @blur="handleInputConfirm"
                                >
                                </el-input>
                                <!-- 添加按钮 -->
                                <el-button v-else class="button-new-tag" size="small"
                                @click="showInput(scope.row)">+ New Tag</el-button>
 // 显示文本输入框
        showInput(row) {

         row.inputVisible=true

        },
- 让文本框自动获得焦点
showInput(row) {

            row.inputVisible=true
            //  让文本框自动获得焦点
            // $nextTick方法的作用 就是当row.inputVisible重置为true
            //  后 页面并没有重新渲染 此时并没有input这个元素 所以要等
            //   将页面重新渲染之后 才会指定回调函数中的代码
            this.$nextTick(_ => {

                this.$refs.saveTagInput.$refs.input.focus();
            });
失去焦点或者按enter
<!-- 输入文本框 -->
                                 <el-input
                                class="input-new-tag"
                                v-if="scope.row.inputVisible"
                                v-model="scope.row.inputValue"
                                ref="saveTagInput"
                                size="small"
                                @keyup.enter.native="handleInputConfirm(scope.row)"
                                @blur="handleInputConfirm(scope.row)"
                                >
                                </el-input>
  // 文本框失去了焦点或者按enter键都会触发
        handleInputConfirm(row) {

            // 若输入的全是空格 失去焦点清空重置
           if(row.inputValue.trim().length===0){

               row.inputValue=''
               row.inputVisible=false
               return
           }
        //    如果没有return 则证明输入的内容 需要做后续处理
        }
- 完成参数可选项的添加操作
 // 文本框失去了焦点或者按enter键都会触发
        async handleInputConfirm(row) {

            // 若输入的全是空格 失去焦点清空重置
           if(row.inputValue.trim().length===0){

               row.inputValue=''
               row.inputVisible=false
               return
           }
        //    如果没有return 则证明输入的内容 需要做后续处理
            row.attr_vals.push(row.inputValue.trim())
            row.inputValue=''
            row.inputVisible=false
            // 需要发起请求 保存
            const {
     data:res}=await this.$http.put(`categories/${
       this.cateId}/attributes/${
       row.attr_id}`,{

                attr_name:row.attr_name,
                attr_sel:row.attr_sel,
                attr_vals:row.attr_vals.join(' ')
                //由于服务端作为以空格字符串存储 所以要将数组转为字符串
            })
            if(res.meta.status!==200){

                return this.$message.error('修改参数失败')
            }
            this.$message.success('修改参数成功')
        },

- 删除对应参数可选项
 <el-tag closable @close="handleClose(i,scope.row)" v-for="(item,i) in scope.row.attr_vals" :key="i">
                                     {
     {
     item}}
                                 </el-tag>
将原先handleInputConfirm方法内的部分代码封装
// 将对attr_vals的操作 保存到数据库
        async saveAttrVals(row){


            // 需要发起请求 保存
            const {
     data:res}=await this.$http.put(`categories/${
       this.cateId}/attributes/${
       row.attr_id}`,{

                attr_name:row.attr_name,
                attr_sel:row.attr_sel,
                attr_vals:row.attr_vals.join(' ')
                //由于服务端作为以空格字符串存储 所以要将数组转为字符串
            })
            if(res.meta.status!==200){

                return this.$message.error('修改参数失败')
            }
            this.$message.success('修改参数成功')
        },
在handleInputConfirm中调用
 // 文本框失去了焦点或者按enter键都会触发
        async handleInputConfirm(row) {

            // 若输入的全是空格 失去焦点清空重置
           if(row.inputValue.trim().length===0){

               row.inputValue=''
               row.inputVisible=false
               return
           }
        //    如果没有return 则证明输入的内容 需要做后续处理
            row.attr_vals.push(row.inputValue.trim())
            row.inputValue=''
            row.inputVisible=false
            this.saveAttrVals(row)
        },
同时定义handleClose 在其中调用
 // 删除对应参数的可选项
        handleClose(i,row){

            row.attr_vals.splice(i,1)

            this.saveAttrVals(row)
        }

- 当选中二级分类时清空表格数据
 // 获取参数的列表数据
        async getParamsData(){

             // 证明选中的不是三级分类
            if(this.sel_key.length!==3){

                this.sel_key=[]
                this.manyTableData=[]
                this.onlyTableData=[]
                return
            }


商品列表
创建goods_list分支 并上传到github
创建list.vue组件 并建立对应路由关系
初始化界面
<template>
    <div>
          <!-- 面包屑导航 -->
        <el-breadcrumb separator-class="el-icon-arrow-right">
            <el-breadcrumb-item :to="{ path: '/home' }">首页</el-breadcrumb-item>
            <el-breadcrumb-item>商品管理</el-breadcrumb-item>
            <el-breadcrumb-item>商品列表</el-breadcrumb-item>
        </el-breadcrumb>

        <el-card>
            <el-row :gutter="20">
                <el-col :span="8" >
                    <el-input placeholder="请输入密码">
                        <el-button slot="append" icon="el-icon-search"></el-button>
                    </el-input>
                </el-col>
                <el-col :span="4">
                    <el-button type="primary">添加商品</el-button>
                </el-col>
            </el-row>
        </el-card>
    </div>
</template>
<script>
export default {

    data(){

        return{


        }
    },
    created(){


    },
    methods:{


    }
}
</script>

<style lang="less" scoped>

</style>

获取商品列表数据
data(){
return{
pagenum:1,
pagesize:5,
query:'',
goodslist:[],
total:0
}
},
async getGoodsList(){
const {
data:res}=await this.$http.get('goods',{
params:{
query:this.query,
pagenum:this.pagenum,
pagesize:this.pagesize
}
})
if(res.meta.status!==200){
console.log(res.meta)
return this.$message.error('获取列表失败')
}
this.goodslist=res.data.goods
this.total=res.data.total
this.$message.success('获取列表成功')
// console.log(this.goodslist)
},
created(){
this.getGoodsList()
},
渲染商品列表
<el-table
:data="goodslist"
border
style="width: 100%"
stripe>
<el-table-column type="index" label="#">
</el-table-column>
<el-table-column
prop="goods_name"
label="商品名称"
width="580"
>
</el-table-column>
<el-table-column
prop="goods_price"
label="商品价格(元)"
width="100"
>
</el-table-column>
<el-table-column
prop="goods_weight"
label="商品重量"
width="100"
>
</el-table-column>
<el-table-column label="创建时间">
<template slot-scope="scope">
<span>{
{
scope.row.add_time}}</span>
</template>
</el-table-column>
<el-table-column label="操作">
<template slot-scope="scope">
<el-button type="primary" size="mini" icon="el-icon-edit" ></el-button>
<el-button type="danger" size="mini" icon="el-icon-delete" @click="deleteGoods(scope.row.goods_id)" ></el-button>
</template>
</el-table-column>
</el-table>
- 添加全局过滤器格式时间
main.js
Vue.filter('dataFormat',function(originVal){
const dt=new Date(originVal)
const y=dt.getFullYear()
const m=(dt.getMonth()+1+'').padStart(2,'0')
const d=(dt.getDate()+'').padStart(2,'0')
const hh=(dt.getHours()+'').padStart(2,'0')
const mm=(dt.getMinutes()+'').padStart(2,'0')
const ss=(dt.getSeconds()+'').padStart(2,'0')
return `${
y}-${
m}-${
d} ${
hh}:${
mm}:${
ss}`
})
<template slot-scope="scope">
<span>{
{
scope.row.add_time|dataFormat}}</span>
</template>
实现分页功能
<el-pagination
@size-change="handleSizeChange"
@current-change="handleCurrentChange"
:current-page="this.pagenum"
:page-sizes="[5, 8, 9, 12]"
:page-size="this.pagesize"
layout="total, sizes, prev, pager, next, jumper"
:total="this.total">
</el-pagination>
handleSizeChange(newSize){
this.pagesize=newSize
this.getGoodsList()
},
handleCurrentChange(newPage){
this.pagenum=newPage
this.getGoodsList()
},
- 实现搜素和清空功能
给v-model绑定query数据源 绑定click点击事件调用获取商品列表方法
<el-input placeholder="请输入内容" v-model="query">
<el-button slot="append" icon="el-icon-search" @click="getGoodsList"></el-button>
</el-input>
添加clearable属性 绑定clear事件 清空后默认获取全部的数据
<el-input placeholder="请输入内容" v-model="query" clearable @clear="getGoodsList">
<el-button slot="append" icon="el-icon-search" @click="getGoodsList"></el-button>

实现删除功能
<template slot-scope="scope">
<el-button type="primary" size="mini" icon="el-icon-edit" ></el-button>
<el-button type="danger" size="mini" icon="el-icon-delete" @click="deleteGoods(scope.row.goods_id)" ></el-button>
</template>
async deleteGoods(id){
const confirm=await this.$confirm('此操作将永久删除该商品, 是否继续?', '提示', {
confirmButtonText: '确定',
cancelButtonText: '取消',
type: 'warning'
}).catch(err=>err)
// console.log(confirm)
if(confirm=='cancel'){
return this.$message.info('用户取消了操作')
}
else{
const {
data:res}=await this.$http.delete(`goods/${
id}`)
if(res.meta.status!==200){
return this.$message.error('删除商品失败')
}
this.getGoodsList()
}
}

添加商品
- 点击添加商品通过编程式导航跳转到添加商品页面
list.vue
<el-col :span="4">
<el-button type="primary" @click="goAddpage">添加商品</el-button>
</el-col>
goAddpage(){
this.$router.push('/goods/add')
}
创建Add.vue组件
建立路由对应关系
import add from '../components/goods/Add.vue'
{
path:'/goods/add',component:add}

- 添加提示信息组件和步骤条组件
<el-card>
<el-alert
title="添加商品信息"
type="info"
show-icon>
</el-alert>
<el-steps :space="200" :active="activeIndex" finish-status="success" align-center>
<el-step title="基本信息"></el-step>
<el-step title="商品参数"></el-step>
<el-step title="商品属性"></el-step>
<el-step title="商品图片"></el-step>
<el-step title="商品内容"></el-step>
<el-step title="完成"></el-step>
</el-steps>
</el-card>
return{
activeIndex:0
}
设置全局样式
.global.css
.el-steps{
margin: 15px 0;
}
.el-step_title{
font-size: 13px;
}

- 渲染tab栏区域
<el-tabs :tab-position="'left'" style="height: 200px;">
<el-tab-pane label="基本信息">基本信息</el-tab-pane>
<el-tab-pane label="商品参数">商品参数</el-tab-pane>
<el-tab-pane label="商品属性">商品属性</el-tab-pane>
<el-tab-pane label="商品图片">商品图片</el-tab-pane>
<el-tab-pane label="商品内容">商品内容</el-tab-pane>
</el-tabs>

- 实现步骤条和tab栏的数据联动
给tabs数据绑定activeIndex 并增加name属性 是其改变时将name的值同步到v-model
<el-tabs :tab-position="'left'" v-model="activeIndex" style="height: 200px;">
<el-tab-pane label="基本信息" name="0">基本信息</el-tab-pane>
<el-tab-pane label="商品参数" name="1">商品参数</el-tab-pane>
<el-tab-pane label="商品属性" name="2">商品属性</el-tab-pane>
<el-tab-pane label="商品图片" name="3">商品图片</el-tab-pane>
<el-tab-pane label="商品内容" name="4">商品内容</el-tab-pane>
</el-tabs>
此时steps的active也绑定的是activeIndex 但由于该组件的active属性必须是数字类型 所以要转化
<el-steps :space="200" :active="activeIndex-0" finish-status="success" align-center>
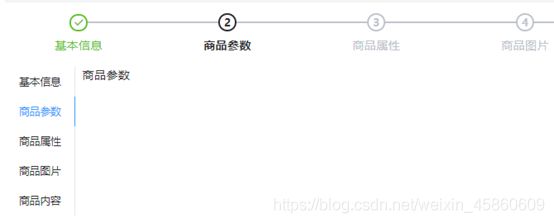

在tab外围添加表单组件
<el-form :model="addForm" :rules="addRules" ref="addRuleForm" label-width="100px" label-position="top">
<el-tabs :tab-position="'left'" v-model="activeIndex" style="height: 200px;">
<el-tab-pane label="基本信息" name="0">基本信息</el-tab-pane>
<el-tab-pane label="商品参数" name="1">商品参数</el-tab-pane>
<el-tab-pane label="商品属性" name="2">商品属性</el-tab-pane>
<el-tab-pane label="商品图片" name="3">商品图片</el-tab-pane>
<el-tab-pane label="商品内容" name="4">商品内容</el-tab-pane>
</el-tabs>
</el-form>
addForm:{
}
- 绘制基本信息面板ui结构
将tab的固定高度200去除
<el-tab-pane label="基本信息" name="0">
<el-form-item label="商品名称" prop="goods_name">
<el-input v-model="addForm.goods_name"></el-input>
</el-form-item>
<el-form-item label="商品价格" prop="goods_price">
<el-input v-model="addForm.goods_price" type="number"></el-input>
</el-form-item>
<el-form-item label="商品重量" prop="goods_weight">
<el-input v-model="addForm.goods_weight" type="number"></el-input>
</el-form-item>
<el-form-item label="商品数量" prop="goods_number">
<el-input v-model="addForm.goods_number" type="number"></el-input>
</el-form-item>
</el-tab-pane>
addForm:{
goods_name:'',
goods_price:0,
goods_weight:0,
goods_number:0
},
addRules:{
goods_name:[
{
required: true, message: '请输入商品名称', trigger: 'blur' },
{
min: 2, max: 10, message: '长度在 2 到 10 个字符', trigger: 'blur' }
],
goods_price:[
{
required: true, message: '请输入商品价格', trigger: 'blur' },
{
min: 2, max: 10, message: '长度在 2 到 10 个字符', trigger: 'blur' }
],
goods_weight:[
{
required: true, message: '请输入商品重量', trigger: 'blur' },
{
min: 2, max: 10, message: '长度在 2 到 10 个字符', trigger: 'blur' }
],
goods_number:[
{
required: true, message: '请输入商品数量', trigger: 'blur' },
{
min: 2, max: 10, message: '长度在 2 到 10 个字符', trigger: 'blur' }
],
}
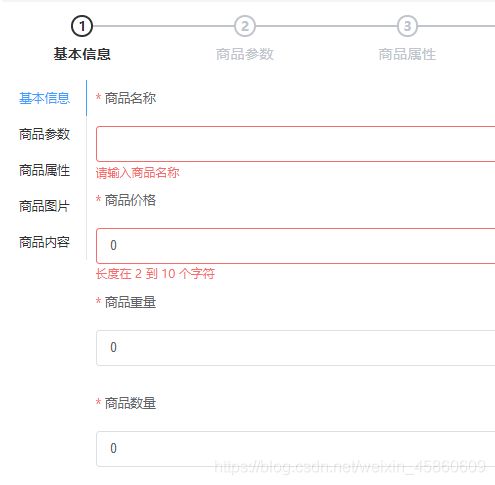
- 绘制商品分类级联选择器
async getCateList(){
const {
data:res}=await this.$http.get('categories')
if(res.meta.status!==200){
return this.$message.error('获取商品分类失败')
}
this.catelist=res.data
},
created(){
this.getCateList()
},
catelist:[],
<el-form-item label="商品分类">
<el-cascader
v-model="addForm.goods_cat"
:options="catelist"
:props="cateProps"
@change="handleChange">
</el-cascader>
</el-form-item>
在addForm中添加goods_cat属性
addForm:{
goods_name:'',
goods_price:0,
goods_weight:0,
goods_number:0,
// 商品所属的分类数组
goods_cat:[]
},
cateProps:{
expandTrigger: 'hover',
label:'cat_name',
value:'cat_id',
children:'children'
}
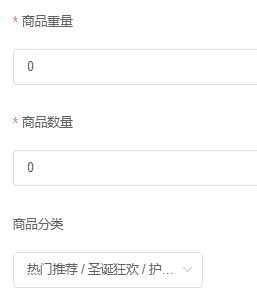
只允许选中三级分类
handleChange(){
if(this.addForm.goods_cat.length!==3){
this.addForm.goods_cat=[]
return
}
}
- 如果是在第一页并且没有选择商品分类则阻止标签页切换
<el-tabs :tab-position="'left'" v-model="activeIndex" :before-leave="beforeTabLeave" >
beforeTabLeave(activeName,oldActiveName){
// activeName 即将进入的标签页名
// oldActiveName 即将离开的标签页名
// 阻止标签页切换
if(oldActiveName=='0'&&this.addForm.goods_cat.length!==3){
this.$message.error('请先选择商品分类')
return false
}
}
- 进入商品参数标签页后获取动态参数列表数据
首先在切换标签页时判断访问的是动态参数面板
监听标签页的切换
<el-tabs :tab-position="'left'" v-model="activeIndex"
:before-leave="beforeTabLeave" @tab-click="tabClicked" >
证明访问的是动态参数面板(activeIndex===‘1’),获取动态参数列表数据
// 动态参数列表数据
manyTableData:[]
async tabClicked(){
// 证明访问的是动态参数面板
if(this.activeIndex==='1'){
const {
data:res}=await this.$http.get(`categories/${
this.cateId}/attributes`,{
params:{
sel:'many'}
})
if(res.meta.status!==200){
return this.$message.error('获取动态参数列表失败')
}
this.manyTableData=res.data
}
}
用computed计算goods_cat的值
computed:{
cateId(){
if(this.addForm.goods_cat.length===3){
return this.addForm.goods_cat[2]
}
return null
}
}
- 绘制商品参数面板中的复选框
循环渲染出每一个label项 其中label项是指分类参数名称
<el-tab-pane label="商品参数" name="1">
<el-form-item :label="item.attr_name" v-for="item in manyTableData" :key="item.attr_id">
</el-form-item>
</el-tab-pane>
将attr_vals分割成数组 并且判断attr_vals是否是否为空 防止分割成含有空字符串的数组
// 证明访问的是动态参数面板
if(this.activeIndex==='1'){
const {
data:res}=await this.$http.get(`categories/${
this.cateId}/attributes`,{
params:{
sel:'many'}
})
if(res.meta.status!==200){
return this.$message.error('获取动态参数列表失败')
}
res.data.forEach(item=>{
item.attr_vals=item.attr_vals.length===0?[]:item.attr_vals.split(' ')
})
this.manyTableData=res.data
}
渲染复选框组
<el-tab-pane label="商品参数" name="1">
<el-form-item :label="item.attr_name" v-for="item in manyTableData" :key="item.attr_id">
<!-- 复选框组 -->
<el-checkbox-group v-model="item.attr_vals">
<el-checkbox border :label="cb" v-for="(cb,i) in item.attr_vals" :key="i">
</el-checkbox>
</el-checkbox-group>
</el-form-item>
</el-tab-pane>

将一个复选框的构取消时 对应的复选框会消失 并且attr_vals也会减少一项数据
- 获取静态属性列表数据
// 证明访问的是静态属性面板
else if(this.activeIndex==='2'){
const {
data:res}=await this.$http.get(`categories/${
this.cateId}/attributes`,{
params:{
sel:'only'}
})
if(res.meta.status!==200){
return this.$message.error('获取动态参数列表失败')
}
this.onlyTableDate=res.data
}
// 静态属性列表数据
onlyTableDate:[]
<el-tab-pane label="商品属性" name="2">
<el-form-item :label="item.attr_name" v-for="item in onlyTableDate" :key="item.attr_id">
<el-input v-model="item.attr_vals"></el-input>
</el-form-item>
</el-tab-pane>
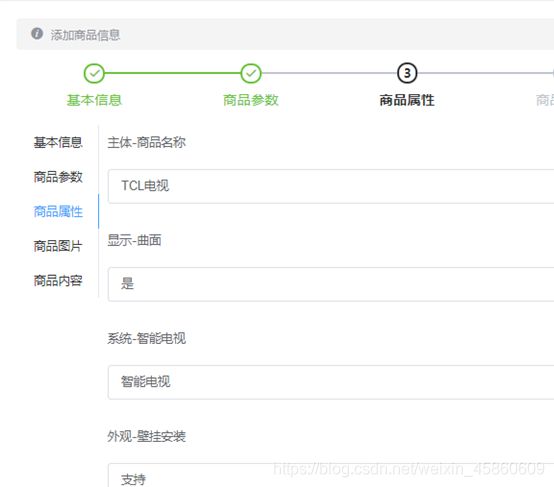
- 初步使用upload上传组件
<el-tab-pane label="商品图片" name="3">
<!-- action:表示图片要上传到的后台api地址 -->
<!-- on-preview:处理图片预览效果 -->
<!-- on-remove:处理图片关闭事件 -->
<!-- list-type:指定当前预览组件的呈现的方式 -->
<el-upload
:action="uploadURL"
:on-preview="handlePreview"
:on-remove="handleRemove"
list-type="picture">
<el-button size="small" type="primary">点击上传</el-button>
<div slot="tip" class="el-upload__tip">只能上传jpg/png文件,且不超过500kb</div>
</el-upload>
</el-tab-pane>
// 上传图片的url地址
uploadURL:'http://127.0.0.1:8888/api/private/v1/upload'
handlePreview(){
},
handleRemove(){
}

- 解决图片上传失败 token值无效的问题
由于除了登录 其他任何请求都需要提供token值 该组件使用的是内部所封装的发ajax请求的功能 并没有通过自己所设置的拦截器来添加token值 所以需要手动为其设置请求头添加token值
添加headers属性设置请求头
<el-upload
:headers="headerObj"
// 图片上传组件的headers请求头对象
headerObj:{
Authorization:window.sessionStorage.getItem('token')
}
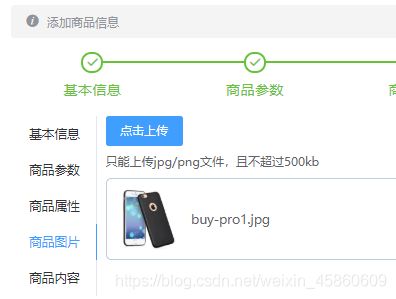
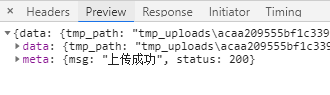
根据api接口 添加商品的请求数据包含一个上传的图片临时路径(对象)

监听图片上传成功的事件 on-success
<el-upload
:headers="headerObj"
:action="uploadURL"
:on-preview="handlePreview"
:on-remove="handleRemove"
list-type="picture"
:on-success="handleSuccess">
handleSuccess(responce){
//responce 服务器返回的数据对象
console.log(responce)
}
此时打印出服务器返回的数据对象

tmp_path:临时路径
在添加商品的表单数据对象中添加一个pics 数组
// 添加商品的表单数据对象
addForm:{
goods_name:'',
goods_price:0,
goods_weight:0,
goods_number:0,
// 商品所属的分类数组
goods_cat:[],
pics:[]
},
在handleSuccess方法中首先拼接得到一个图片信息对象
在将图片信息对象push到 pics数组
handleSuccess(responce){
//responce 服务器返回的数据对象
// 拼接得到一个图片信息对象
const picInfo={
pic:responce.data.tmp_path}
// 将图片信息对象push到 pics数组
this.addForm.pics.push(picInfo)
}

- 移除图片
监听upload组件的on-remove事件
handleRemove(file){
console.log(file)
},
监听移除图片事件,打印出将要移除的图片的信息对象
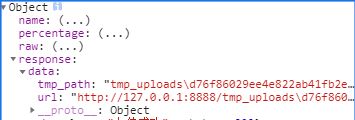
实现移除功能
handleRemove(file){
// 1 获取将要删除的图片临时路径
const filePath=file.response.data.tmp_path
// 2 从pics数组中 找到这个图片对应的索引值
const i=this.addForm.pics.findIndex(item=>item.pic===filePath)
// 3 调用数组数组的splice方法 把图片信息对象 从pics数组中移除
this.addForm.pics.splice(i,1)
console.log(this.addForm)
}


- 添加实现图片预览效果
<!-- 图片预览 -->
<el-dialog
title="预览"
:visible.sync="imgDialogVisible"
width="40%"
>
<div class="imgbox">
<img :src="previewPath" class="preview">
</div>
</el-dialog>
previewPath:'',
imgDialogVisible:false
handlePreview(file){
// 此时应该获取完整路径 url 而不是tmp_path(路径不完整)
this.previewPath=file.response.data.url
this.imgDialogVisible=true
},

- 实现商品详情页的富文本编辑器
将正在运行的网页关闭 停止项目运行 安装vue-quill-editor运行依赖
在main.js导入
// 导入富文本编辑器
import VueQuillEditor from 'vue-quill-editor'
Vue.use(VueQuillEditor)
// 富文本编辑器对应的样式
import 'quill/dist/quill.core.css' // import styles
import 'quill/dist/quill.snow.css' // for snow theme
import 'quill/dist/quill.bubble.css'
在data的addForm添加商品详情属性
addForm:{
goods_name:'',
goods_price:0,
goods_weight:0,
goods_number:0,
// 商品所属的分类数组
goods_cat:[],
pics:[],
// 商品的详情描述
goods_introduce:''
},
根据该插件提供的使用文档的spa说明模块来添加该插件
<el-tab-pane label="商品内容" name="4">
<!-- 富文本编辑器组件 -->
<quill-editor v-model="addForm.goods_introduce"></quill-editor>
<el-button type="primary" class="btn_add">添加商品</el-button>
</el-tab-pane>
在global.css设置该编辑器高度
.ql-editor{
min-height: 300px;
}

- 实现表单数据预验证
<el-button type="primary" class="btn_add" @click="add">添加商品</el-button>
// 添加商品
add(){
this.$refs.addRuleForm.validate(valid=>{
if(!valid){
return this.$message.error('请填写必要的表单项')
}
})
}
- 在发起请求前要将addForm.goods_cat属性转为字符串
注意:直接将其转为字符串 在点击添加商品时会报错
因为级联选择器绑定的数据源也为addForm.goods_cat
而级联选择器中有规定 v-model绑定的数据源必须为数组
所以我们需要 安装lodash运行依赖 利用该插件先将addForm深拷贝 得到一个新对象 将该对象转为字符串 这样就不会影响原本addForm中的数据
导入
import _ from 'lodash'
export default {
add(){
this.$refs.addRuleForm.validate(valid=>{
if(!valid){
return this.$message.error('请填写必要的表单项')
}
// 执行添加的业务逻辑
// 深拷贝
const form=_.cloneDeep(this.addForm)
form.goods_cat=form.goods_cat.join(',')
})
}
- 处理attrs数组
根据api接口文档需要传一个attrs参数
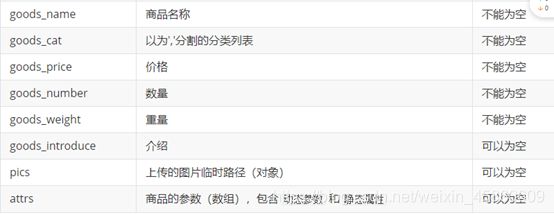
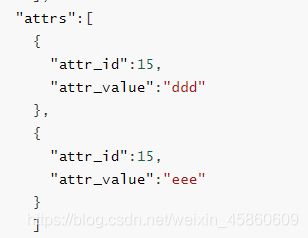
首先在addForm新增attrs属性
addForm:{
goods_name:'',
goods_price:0,
goods_weight:0,
goods_number:0,
// 商品所属的分类数组
goods_cat:[],
pics:[],
// 商品的详情描述
goods_introduce:'',
attrs:[]
},
分别遍历 动态参数和静态属性的数组 拼接出包含attr_id和attr_value的对象 将该数据对象依次添加到addForm的attrs数组中 由于我们添加商品所上传的数据对象是form 所以还有将addForm.attrs赋值给form.attrs
// 添加商品
add(){
this.$refs.addRuleForm.validate(valid=>{
if(!valid){
return this.$message.error('请填写必要的表单项')
}
// 执行添加的业务逻辑
// 深拷贝
const form=_.cloneDeep(this.addForm)
form.goods_cat=form.goods_cat.join(',')
// 处理动态参数和静态属性
this.manyTableData.forEach(item=>{
const newInfo={
attr_id:item.attr_id,
// 接口中规定 attr_value的类型要为字符串类型
attr_value:item.attr_vals.join(' ')
}
this.addForm.attrs.push(newInfo)
})
this.onlyTableDate.forEach(item=>{
const newInfo={
attr_id:item.attr_id,
attr_value:item.attr_vals}
this.addForm.attrs.push(newInfo)
})
form.attrs=this.addForm.attrs
console.log(form)
})
}

- 完成添加商品
注意:如果在add函数内部直接写发起请求的相关代码 就会报错而 如果将发起请求的代码重新封装成一个函数 接着在add方法中调用就不会报错
以下报错:Parsing error: Can not use keyword ‘await’ outside an async function
所以只能如下
// 添加商品
add(){
this.$refs.addRuleForm.validate(valid=>{
if(!valid){
return this.$message.error('请填写必要的表单项')
}
// 执行添加的业务逻辑
// 深拷贝
const form=_.cloneDeep(this.addForm)
form.goods_cat=form.goods_cat.join(',')
// 处理动态参数和静态属性
this.manyTableData.forEach(item=>{
const newInfo={
attr_id:item.attr_id,
// 接口中规定 attr_value的类型要为字符串类型
attr_value:item.attr_vals.join(' ')
}
this.addForm.attrs.push(newInfo)
})
this.onlyTableDate.forEach(item=>{
const newInfo={
attr_id:item.attr_id,
attr_value:item.attr_vals}
this.addForm.attrs.push(newInfo)
})
form.attrs=this.addForm.attrs
// 发起请求添加商品 商品的名称必须是唯一的(会报错)
this.getPost(form)
})
}
async getPost(form){
const {
data:res}=await this.$http.post('goods',form)
if(res.meta.status!==201){
console.log(res.meta)
return this.$message.error('添加商品失败')
}
this.$message.success('添加商品成功')
// 路由导航回到商品列表
this.$router.push('/goods')
}
git提交代码
订单列表
新建一个order子分支 并上传到github
新建order目录 建立Order.vue 初始化界面 并创建对应的路由关系
- 获取订单列表数据
export default {
data(){
return {
queryInfo:{
query:'',
pagenum:1,
pagesize:10
},
total:0,
orderList:[]
}
},
created(){
this.getOrderList()
},
methods:{
async getOrderList(){
const {
data:res}=await this.$http.get('orders',{
params:this.queryInfo
})
if(res.meta.status!==200){
return this.$message.error('获取订单列表失败')
}
this.orderList=res.data.goods
this.total=res.data.total
}
}
}
渲染订单列表
<el-card>
<el-row>
<el-col :span="8">
<el-input placeholder="请输入内容" class="input-with-select">
<el-button slot="append" icon="el-icon-search"></el-button>
</el-input>
</el-col>
</el-row>
<el-table :data="orderList" border stripe>
<el-table-column type="index"></el-table-column>
<el-table-column label="订单编号" prop="order_number"></el-table-column>
<el-table-column label="订单价格" prop="order_price"></el-table-column>
<el-table-column label="是否付款" prop="pay_status">
<template slot-scope="scope">
<el-tag type="success" v-if="scope.row.order_pay==='1'?true:false">已付款</el-tag>
<el-tag type="danger" v-else>未付款</el-tag>
</template>
</el-table-column>
<el-table-column label="是否发货" prop="is_send">
<template slot-scope="scope">
{
{
scope.row.is_send}}
</template>
</el-table-column>
<el-table-column label="下单时间" prop="create_time">
<template slot-scope="scope">
{
{
scope.row.create_time|dataFormat}}
</template>
</el-table-column>
<el-table-column label="操作" >
<template >
<el-button size="mini" type="primary" icon="el-icon-edit"></el-button>
<el-button size="mini" type="success" icon="el-icon-location"></el-button>
</template>
</el-table-column>
</el-table>
</el-card>
</div>
实现分页
<el-pagination
@size-change="handleSizeChange"
@current-change="handleCurrentChange"
:current-page="queryInfo.pagenum"
:page-sizes="[5, 10, 15]"
:page-size="queryInfo.pagesize"
layout="total, sizes, prev, pager, next, jumper"
:total="total">
</el-pagination>
handleSizeChange(newSize){
this.queryInfo.pagesize=newSize
this.getOrderList()
},
handleCurrentChange(newPage){
this.queryInfo.pagenum=newPage
this.getOrderList()
}

- 实现修改地址 弹出修改地址对话框 在对话框内部实现省市数据联动
导入城市数据 并将数据放到data中
import cityData from '../../citydata.js'
addressDialogVisible:false,
addressForm:{
address1:[],
address2:''
},
// 表单验证
addressFormRules: {
address1: [
{
required: true, message: '请选择省市区/县', trigger: 'blur' },
],
address2: [
{
required: true, message: '请输入详细地址', trigger: 'blur' },
],
},
cityData,
<el-dialog
title="修改地址"
:visible.sync="addressDialogVisible"
width="40%"
@close="addressClosed">
<el-form :model="addressForm" :rules="addressFormRules" ref="addressRuleFormRef" label-width="100px" class="demo-ruleForm">
<el-form-item label="省市区/县" prop="address1">
<!--实现数据联动-->
<el-cascader :options="cityData" v-model="addressForm.address1"></el-cascader>
</el-form-item>
<el-form-item label="详细地址" prop="address2">
<el-input v-model="addressForm.address2"></el-input>
</el-form-item>
</el-form>
<span slot="footer" class="dialog-footer">
<el-button @click="addressDialogVisible = false">取 消</el-button>
<el-button type="primary" @click="addressDialogVisible = false">确 定</el-button>
</span>
</el-dialog>
给编辑按钮绑定事件 弹出对话框
<el-button size="mini" type="primary" icon="el-icon-edit" @click="showBox"></el-button>
showBox(){
// console.log(1)
this.addressDialogVisible=true
},
点击关闭重置表单
addressClosed(){
this.$refs.addressRuleFormRef.resetFields()
},
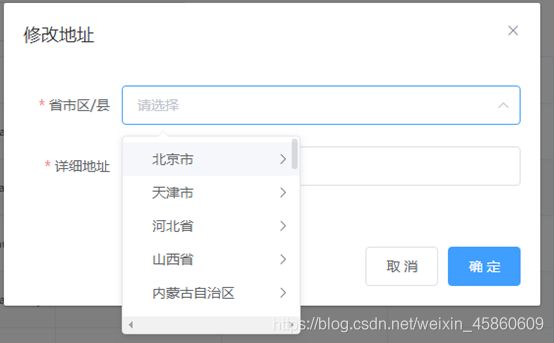
- 点击位置按钮显示快递进度
导入并注册element-ui的timeline组件
弹出对话框并获取物流信息
<el-button size="mini" type="success" icon="el-icon-location" @click="showProgress"></el-button>
progressVisible:false,
progressInfo:[]
async showProgress(){
const {
data:res}=await this.$http.get('/kuaidi/804909574412544580')
if(res.meta.status!==200){
return this.$message.error('获取物流进度失败')
}
this.progressInfo=res.data
// console.log(this.progressInfo)
this.progressVisible=true
}
<el-dialog
title="物流进度"
:visible.sync="progressVisible"
width="40%"
>
<el-timeline >
<el-timeline-item
v-for="(activity, index) in progressInfo"
:key="index"
:timestamp="activity.time">
{
{
activity.context}}
</el-timeline-item>
</el-timeline>
</el-dialog>
上传提交orders分支代码
数据统计
建立文件夹report 新建report.vue组件 创建路由关系
- 完成数据图表显示
安装echars运行依赖 并导入
根据官方文档 放置对应的组件
import echarts from 'echarts'
<el-card>
<div id="main" style="width: 750px;height:400px;"></div>
</el-card>
在mounted中初始化echars实例 并且获取图标数据 根据后台api文档说明 要将获取的数据和options对象合并 才能显示具体信息鼠标跟随显示的效果

将后台提供的options数据放到data中
// 需要合并的数据
options: {
title: {
text: '用户来源'
},
tooltip: {
trigger: 'axis',
axisPointer: {
type: 'cross',
label: {
backgroundColor: '#E9EEF3'
}
}
},
grid: {
left: '3%',
right: '4%',
bottom: '3%',
containLabel: true
},
xAxis: [
{
boundaryGap: false
}
],
yAxis: [
{
type: 'value'
}
]
}
}
导入lodash 调用merge方法将两个对象合并 形成一个新的对象
import _ from 'lodash'
// dom初始化完毕
async mounted(){
// 初始化echars实例
var myChart = echarts.init(document.getElementById('main'));
const {
data:res}=await this.$http.get('reports/type/1')
if(res.meta.status!==200){
return this.$message.error('获取图表数据失败')
}
// 准备数据源和配置项
const result=_.merge(res.data,this.options)
// 显示数据
myChart.setOption(result)
},
鼠标跟随效果

将代码上传github
项目优化和上线

- 安装NProgress运行依赖 实现页面加载时的进度条效果
Main.js
//导入NProgress 包对应的JS和CSS
import NProgress from 'nprogress'
import 'nprogress/nprogress.css'
分别在axios设置拦截器的发起请求和响应请求中调用start()显示 和done()隐藏方法
//设置拦截器
axios.interceptors.request.use(config=>{
config.headers.Authorization=window.sessionStorage.getItem('token')
NProgress.start()
//在最后必须return config
return config
})
axios.interceptors.response.use(config=>{
NProgress.done()
return config
})
- 只在发布阶段移除所有的console
安装transform-remove-console运行依赖
在vue可视化面板 在运行时可以看到 --mode 后面输出的值为development

在编译阶段可以看到输出的值为

这两个值分别代表开发阶段和发布阶段
在babel.config.js中定义一个数组表示这是在项目发布阶段用到的插件 接着获取以上的那两个值 判断是否在发布阶段 如果在发布阶段就将transform-remove-console 插件放到该数组中
// 这是在项目发布阶段用到的插件
const prodPlugins=[]
if(process.env.NODE_ENV==='production'){
prodPlugins.push('transform-remove-console')
}
module.exports = {
presets: [
'@vue/cli-plugin-babel/preset'
],
plugins: [
[
'component',
{
libraryName: 'element-ui',
styleLibraryName: 'theme-chalk'
}
],
// 展开运算符放置发布产品时候的插件数组
...prodPlugins
]
}
- 生成打包报告
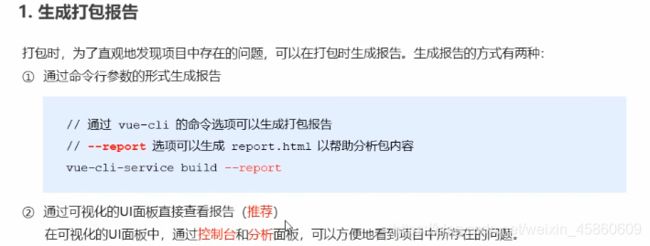
我们可以发现有些资源和依赖项体积太大 此时需要做进一步的优化

- 优化

新建一个vue.config.js配置文件

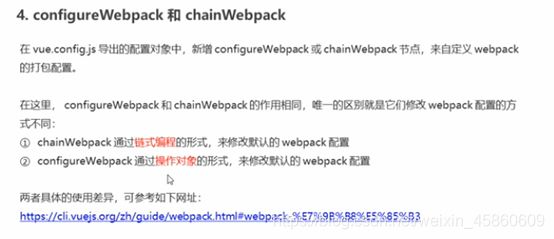

将自己项目的main.js文件重命名为main-dev.js 并复制其中代码 在新建一个main-prod.js 将代码粘贴到其中 指定两个不同的打包入口文件
在vue.config.js中输入
module.exports={
chainWebpack:config=>{
// 判断所处的是哪一种模式
// 发布阶段 打包默认入口修改
config.when(process.env.NODE_ENV==='production',config=>{
// 调用clear()清空默认的打包入口文件main.js 在调用add 追加自己新建的打包入口
config.entry('app').clear().add('./src/main-prod.js')
})
config.when(process.env.NODE_ENV==='development',config=>{
// 调用clear()清空默认的打包入口文件main.js 在调用add 追加自己新建的打包入口
config.entry('app').clear().add('./src/main-dev.js')
})
}
}
在vue面板中重新编译并运行
- 通过externals 加载CDN外部资源

此时我们可以发现chunk-venders.js很大 原因是将那些依赖项都打包了这个文件中

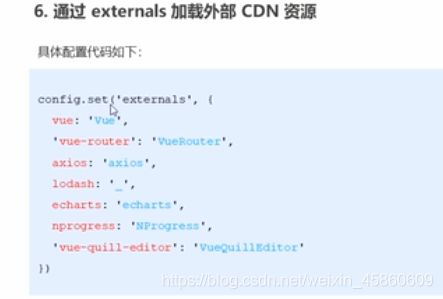
在发布阶段添加如下代码
config.when(process.env.NODE_ENV==='production',config=>{
// 调用clear()清空默认的打包入口文件main.js 在调用add 追加自己新建的打包入口
config.entry('app').clear().add('./src/main-prod.js')
config.set('externals',{
vue:'Vue',
"vue-router":"VueRouter",
axios:'axios',
lodash:'_',
echarts:'echarts',
nprogress:'NProgress',
"vue-quill-editor":'VueQuillEditor'
})
})

将main-prod.js 中 引入的富文本编辑器和NProgress样式文件删除
import 'quill/dist/quill.core.css' // import styles
import 'quill/dist/quill.snow.css' // for snow theme
import 'quill/dist/quill.bubble.css'
import 'nprogress/nprogress.css'
将样式文件直接放到public/index.html中
<!-- noprogress的样式表文件 -->
<link rel="stylesheet" href="https://cdn.staticfile.org/nprogress/0.2.0/nprogress.min.css"/>
<!-- 富文本编辑器的样式表文件 -->
<link rel="stylesheet" href="https://cdn.staticfile.org/quill/1.3.4/quill.core.min.css"/>
<link rel="stylesheet" href="https://cdn.staticfile.org/quill/1.3.4/quill.snow.min.css"/>
<link rel="stylesheet" href="https://cdn.staticfile.org/quill/1.3.4/quill.bubble.min.css"/>
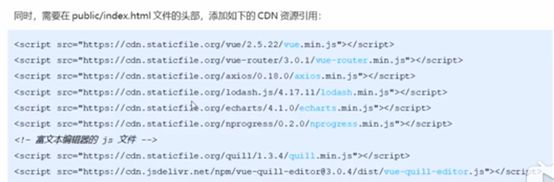
这些js文件也正是刚才在config.js中设置的那些文件
<script src="https://cdn.staticfile.org/vue/2.6.11/vue.min.js"></script>
<script src="https://cdn.staticfile.org/vue-router/3.3.2/vue-router.min.js"></script>
<script src="https://cdn.staticfile.org/axios/0.19.2/axios.min.js"></script>
<script src="https://cdn.staticfile.org/lodash.js/4.17.19/lodash.min.js"></script>
<script src="https://cdn.staticfile.org/echarts/4.8.0/echarts.min.js"></script>
<script src="https://cdn.staticfile.org/nprogress/0.2.0/nprogress.min.js"></script>
<!-- 富文本编辑器的 js 文件 -->
<script src="https://cdn.staticfile.org/quill/1.3.4/quill.min.js"></script>
<script src="https://cdn.jsdelivr.net/npm/[email protected]/dist/vue-quill-editor.js"></script>
此时编译 可能会出现以下错误
ERROR Error: No module factory available for dependency type: CssDependency
Error: No module factory available for dependency type: CssDependency
at addDependency (C:\Users\user\Desktop\heima39\vue_shop\node_modules\webpack\lib\Compilation.js:800:12)
at iterationOfArrayCallback
Error: Callback was already called.
at throwError (C:\Users\user\Desktop\heima39\vue_shop\node_modules\neo-async\async.
js:16:11)
at C:\Users\user\Desktop\heima39\vue_
shop\node_modules\neo-async\async.js:2818:7
at processTicksAndRej
需要在config.js中配置
module.exports={
css:{
extract:false
},
此时编译结果 可以发现chunk-vanders体积明显减少 并且之前的echarts等依赖性也没有出现在右侧中

- 通过CDN优化ElementUI这些组件的打包
此时第一个js文件的体积还是过大 主要是element-ui占了绝大空间

此时将main-prod.js中导入element.js注释
// import './plugins/element.js'
在index.html中添加
<!-- element-ui 的样式表文件 -->
<link rel="stylesheet" href="https://cdn.staticfile.org/element-ui/2.13.2/theme-chalk/index.css" />
<!-- element-ui 的 js 文件 -->
<script src="https://cdn.staticfile.org/element-ui/2.13.2/index.js"></script>
再次build编译 此时vander.js和app的文件大小只有100多kb了
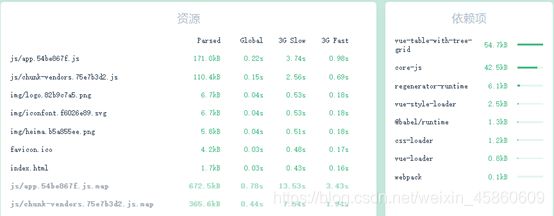
- 定制首页内容
在开发模式下打开页面会显示-dev 电商管理系统 而在发布模式下则不会显示
![]()
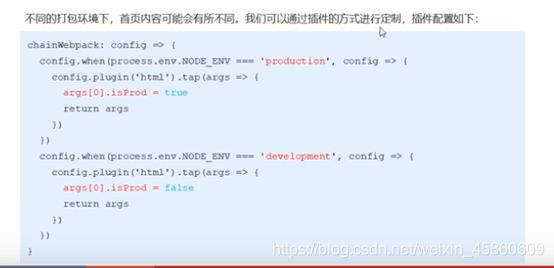

在config.js的不同模式中配置 config.plugin(‘html’)
chainWebpack:config=>{
// 判断所处的是哪一种模式
// 发布阶段 打包默认入口修改
config.when(process.env.NODE_ENV==='production',config=>{
// 调用clear()清空默认的打包入口文件main.js 在调用add 追加自己新建的打包入口
config.entry('app').clear().add('./src/main-prod.js')
config.set('externals',{
vue:'Vue',
"vue-router":"VueRouter",
axios:'axios',
lodash:'_',
echarts:'echarts',
nprogress:'NProgress',
"vue-quill-editor":'VueQuillEditor'
})
config.plugin('html').tap(args=>{
args[0].isProd=true
return args
})
})
config.when(process.env.NODE_ENV==='development',config=>{
// 调用clear()清空默认的打包入口文件main.js 在调用add 追加自己新建的打包入口
config.entry('app').clear().add('./src/main-dev.js')
config.plugin('html').tap(args=>{
args[0].isProd=false
return args
})
})
}
在index.html中根据isProd的值是否为true来显示标题是否要带dev
<title><%= htmlWebpackPlugin.options.isProd ? '':'dev - '%>电商后台管理系统</title>
并且通过if来根据isProd的值显示所引入的文件 如果是在发布阶段则显示这些文件
<% if(htmlWebpackPlugin.options.isProd){
%>
<!-- noprogress的样式表文件 -->
<link rel="stylesheet" href="https://cdn.staticfile.org/nprogress/0.2.0/nprogress.min.css"/>
<!-- 富文本编辑器的样式表文件 -->
<link rel="stylesheet" href="https://cdn.staticfile.org/quill/1.3.4/quill.core.min.css"/>
<link rel="stylesheet" href="https://cdn.staticfile.org/quill/1.3.4/quill.snow.min.css"/>
<link rel="stylesheet" href="https://cdn.staticfile.org/quill/1.3.4/quill.bubble.min.css"/>
<!-- element-ui 的样式表文件 -->
<link rel="stylesheet" href="https://cdn.staticfile.org/element-ui/2.13.2/theme-chalk/index.css" />
<script src="https://cdn.staticfile.org/vue/2.6.11/vue.min.js"></script>
<script src="https://cdn.staticfile.org/vue-router/3.3.2/vue-router.min.js"></script>
<script src="https://cdn.staticfile.org/axios/0.19.2/axios.min.js"></script>
<script src="https://cdn.staticfile.org/lodash.js/4.17.19/lodash.min.js"></script>
<script src="https://cdn.staticfile.org/echarts/4.8.0/echarts.min.js"></script>
<script src="https://cdn.staticfile.org/nprogress/0.2.0/nprogress.min.js"></script>
<!-- 富文本编辑器的 js 文件 -->
<script src="https://cdn.staticfile.org/quill/1.3.4/quill.min.js"></script>
<script src="https://cdn.jsdelivr.net/npm/[email protected]/dist/vue-quill-editor.js"></script>
<!-- element-ui 的 js 文件 -->
<script src="https://cdn.staticfile.org/element-ui/2.13.2/index.js"></script>
<% } %>
此时在vue面板中server运行 可以看见 在开发模式 带了-dev前缀

- 路由懒加载
import中后面的红色字体部分 表示路由真正存放的路径 前面类似于注释的部分表示路由所属的组 位于同一个组的路由会被打包到同一个js文件中 并且会同时请求

安装@babel/plugin-syntax-dynamic-import开发依赖(注意是:开发依赖)
在babel.config.js中配置 @babel/plugin-syntax-dynamic-import
// 这是在项目发布阶段用到的插件
const prodPlugins=[]
if(process.env.NODE_ENV==='production'){
prodPlugins.push('transform-remove-console')
}
module.exports = {
presets: [
'@vue/cli-plugin-babel/preset'
],
plugins: [
[
'component',
{
libraryName: 'element-ui',
styleLibraryName: 'theme-chalk'
}
],
// 展开运算符放置发布产品时候的插件数组
...prodPlugins,
"@babel/plugin-syntax-dynamic-import"
]
}
将index.js中的部分导入路由形式改造成懒加载形式导入
import Vue from 'vue'
import VueRouter from 'vue-router'
// import login from '../components/Login.vue'
// import home from '../components/Home.vue'
// import welcome from '../components/Welcome.vue'
// import users from '../components/user/Users.vue'
// import rights from '../components/power/Rights.vue'
// import roles from '../components/power/Roles.vue'
// import cates from '../components/goods/Cates.vue'
// import params from '../components/goods/Params.vue'
// import list from '../components/goods/List.vue'
// import add from '../components/goods/Add.vue'
// import order from '../components/order/Order.vue'
// import report from '../components/report/Report.vue'
// 懒加载形式导入路由组件
const login=()=>import(/* webpackChunkName: "login_home_welcome" */ '../components/Login.vue' )
const home=()=>import(/* webpackChunkName: "login_home_welcome" */ '../components/Home.vue' )
const welcome=()=>import(/* webpackChunkName: "login_home_welcome" */ '../components/Welcome.vue' )
const users=()=>import(/* webpackChunkName: "users_rights_roles" */ '../components/user/Users.vue' )
const rights=()=>import(/* webpackChunkName: "users_rights_roles" */ '../components/power/Rights.vue' )
const roles=()=>import(/* webpackChunkName: "users_rights_roles" */ '../components/power/Roles.vue' )
const cates=()=>import(/* webpackChunkName: "cates_params" */ '../components/goods/Cates.vue' )
const params=()=>import(/* webpackChunkName: "cates_params" */ '../components/goods/Params.vue' )
const list=()=>import(/* webpackChunkName: "list_add" */ '../components/goods/List.vue' )
const add=()=>import(/* webpackChunkName: "list_add" */ '../components/goods/Add.vue' )
const order=()=>import(/* webpackChunkName: "order_report" */ '../components/order/Order.vue' )
const report=()=>import(/* webpackChunkName: "order_report" */ '../components/report/Report.vue' )
此时build编译 会发现原来的app.js和chunk-vander.js体积更小了

- 项目上线

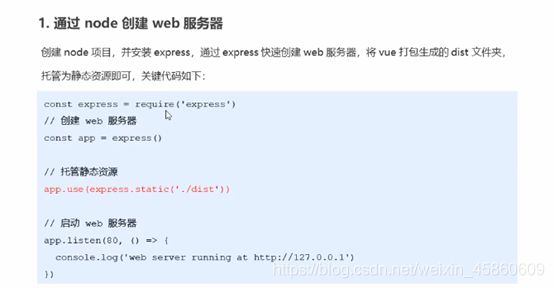
新建vue_shop_目录 将原来的vue_shop文件剪切到其中 在该目录中在新建vue_shop_server 并用npm init -y 初始化

安装express包
npm i express -S
将vue-shop生成的dist包放到该文件夹中

新建app.js文件
const express=require('express')
const app=express()
app.use(express.static('./dist'))
app.listen(80,()=>{
console.log('server running at http://127.0.0.1')
})
node app.js运行该文件 在浏览器打开http://127.0.0.1即可
- 开启文件的Gzip网络格式压缩
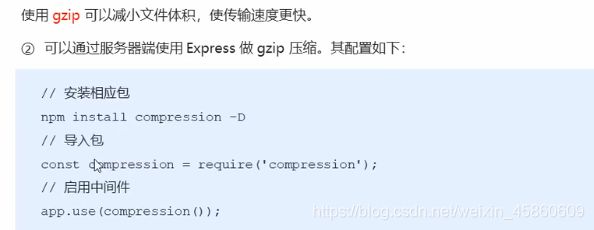
安装 npm i compression -S
const express=require('express')
const app=express()
const compression=require('compression')
// 一定要把这一行代码 写道静态资源托管之前
app.use(compression())
app.use(express.static('./dist'))
app.listen(80,()=>{
console.log('server running at http://127.0.0.1')
})
此时重新运行可以发现 在网络请求资源中chunk-vander.js被压缩到只要20多k
![]()
- 配置https服务(一般作为后台开发人员经行)


安装compression
npm i compression -S
将生成的公钥和私钥文件放到 该文件夹下
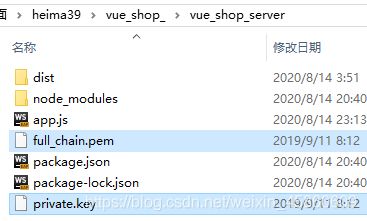
app.js
const express=require('express')
const app=express()
const compression=require('compression')
const https=require('https')
const fs=require('fs')
const options={
cert:fs.readFileSync('./full_chain.pem'),
key:fs.readFileSync('./private.key')
}
const compression=require('compression')
// 一定要把这一行代码 写道静态资源托管之前
app.use(compression())
app.use(express.static('./dist'))
// app.listen(80,()=>{
// console.log('server running at http://127.0.0.1')
// })
// https创建服务器 https协议的网站默认运行在443端口
https.createServer(options,app).listen(443)
- 使用pm2管理应用
此时我们还是将项目运行到本机
app.listen(80,()=>{
console.log('server running at http://127.0.0.1')
})
// https创建服务器 https协议的网站默认运行在443端口
// https.createServer(options,app).listen(443)
此时运行node app.js 打开http://127.0.0.1是可以访问的 但是在关闭运行终端以后服务就会被关闭网站就不能被打开 此时需要启用pm2实现再关闭终端后也能访问

安装
npm i pm2 -g
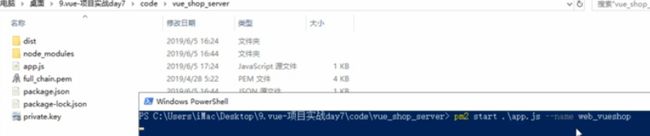
此时关闭终端也能运行
通过pm2 ls 可以查看运行状态

停止项目 后面可跟随项目id