rm记录第三阶段(二):海康威视工业相机的使用,cmake的复习
前言
相机到了,这也是我的第一次使用相机,然后呢在大符识别的程序完事后也是搁了很长的时间,然后工训的省赛也是比完了,反正这次比赛我深刻的认识到现场环境对视觉的影响真的是太大了,所以现在我也是得考虑现场的因素啥的,还有就是最近也是自己没有很上进,想得也是太多了,其实我更应该注重当下呀!
那来把啊,注重当下,开干!
我们使用的是海康的工业相机,先了解一下什么是工业相机去!
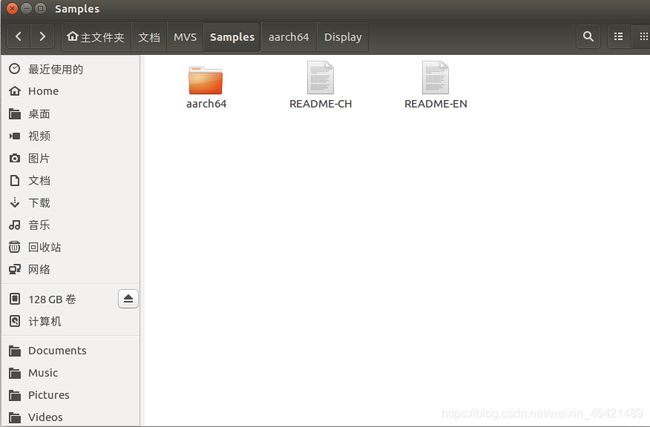
首先我们在官网上下载客户端和sdk,然后我下载的是arrch64的,这个是网站:https://www.hikrobotics.com/machinevision/service/download?module=0
然后的话就是先要运行一下那个 setup.sh 那个,然后记住这里要用sudo否则没有权限!
然后的话也是将第一个案例成功的运行了,但是图像采集的不太好呀啊!
Cmake
然后我们学一下cmake,其实我感觉忘我的cmake老是学得不透,那么趁着这次我再次学一下。
然后的话通过几个例子来学习一下下:
1.最简单的就是先设置一个版本号然后就是工程的名字,最后就是生成一个可执行文件
cmake_minimum_required (VERSION 2.6)
project (Tutorial)
add_executable(Tutorial tutorial.cxx)
2.配置头文件,这里以前确实是没有注意到呀。这个就是设置个目录不是添加某文件
添加头文件目录INCLUDE_DIRECTORIES
语法: include_directories([AFTER|BEFORE] [SYSTEM] dir1 [dir2 ...]) 它相当于g++选项中的-I参数的作用,也相当于环境变量中增加路径到CPLUS_INCLUDE_PATH变量的作用:
如:include_directories(../../../thirdparty/comm/include)cmake_minimum_required (VERSION 2.6)
project (Tutorial)
# The version number.
set (Tutorial_VERSION_MAJOR 1)
set (Tutorial_VERSION_MINOR 0)
# configure a header file to pass some of the CMake settings
# to the source code
configure_file (
"${PROJECT_SOURCE_DIR}/TutorialConfig.h.in"
"${PROJECT_BINARY_DIR}/TutorialConfig.h"
)
# add the binary tree to the search path for include files
# so that we will find TutorialConfig.h
include_directories("${PROJECT_BINARY_DIR}")
# add the executable
add_executable(Tutorial tutorial.cxx)3.添加一个 库
添加需要链接的库文件目录LINK_DIRECTORIES
语法: link_directories(directory1 directory2 ...) 它相当于g++命令的-L选项的作用,也相当于环境变量中增加LD_LIBRARY_PATH的路径的作用。
如:link_directories("/home/server/third/lib")现在我们为我们的工程添加一个库。这个库包含了自己实现的一个用来计算数的平方根函数。应用程序可以使用这个库来计算平方根,而不是使用编译器提供的标准库。教程里我们会把这个库放到一个叫做”MathFunctions”的子文件夹中。它包含一个只有一行内容的CMakeLists.txt文件,这里注意一下就是我们是分子文件夹的。
add_library(MathFunctions mysqrt.cxx)文件”mysqrt.cxx”有一个叫做mysqrt的函数,它跟编译器提供的sqrt函数类似。为了使用这个新库,我们要在顶层的CMakeLists.txt中添加”add_subdirectory”调用,以便使这个库能够被编译到.我们还需要添加另外一个包含文件夹以便找到包含在头文件”MathFunctions/MathFunctions.h”中的函数原型.最后把新库添加到应用程序当中,在顶层的CMakeLists.txt文件中添加如下内容:
include_directories ("${PROJECT_SOURCE_DIR}/MathFunctions")
add_subdirectory (MathFunctions)
# add the executable
add_executable (Tutorial tutorial.cxx)
target_link_libraries (Tutorial MathFunctions)
然后这里说下流程:先在子文件夹中生成一个自己生成的库然后下一步在主的cmakelisits里包含这个目录,然后添加这个库,最后将这个库链接到可执行文件上去。
4.最后就是去添加库文件
这个一会直接上案例,看最后一行
然后的话:记住在main文件里的要写绝对路径
最后运行成功了,然后看一下CMakeLists.txt是怎么写的吧:用时记得换路径

project(fan)
CMAKE_MINIMUM_REQUIRED(VERSION 3.10)

find_package(OpenCV REQUIRED)
find_package(OpenCV QUIET COMPONENTS core highgui imgproc imgcodecs videoio)

AUX_SOURCE_DIRECTORY(./ DIR_SRCS)

include_directories(${OpenCV_INCLUDE_DIRS})
include_directories(/home/dji/文档/RM2021/capture/MVS/inlude)
link_directories(${OpenCV_LIBRARY_DIRS})
link_directories("/home/dji/文档/RM2021/capture/MVS/lib/aarch64")
link_libraries("/home/dji/文档/RM2021/capture/MVS/lib/aarch64/libMvCameraControl.so")
SET(EXECUTABLE_OUTPUT_PATH ${PROJECT_BINARY_DIR}/bin)
add_compile_options(-std=c++11)
#-Wall -Werror
ADD_EXECUTABLE(fan ${DIR_SRCS})
target_link_libraries(fan ${OpenCV_LIBS})
target_link_libraries(fan -lpthread -luuid -lMvCameraControl -lX11)
target_link_libraries(fan libMvCameraControl.so)
开始使用相机
然后我们就学一下这个display.cpp这个文件,也就是如何调用相机
然后我们从主函数看起:这个主函数有点蒙呀,主要我不知道这个库有那些函数呀,直接看代码有点看不懂呀.........要不我就直接套用,然后吧其中的图像处理的换成我们想用的!试试看吧!ImageProcess.cpp看这个cpp文件!
现在我在想怎么将获得的图像转 换 成mat对象呢!: https://www.hikvision.com/cn/download_60.html 这个是海康的官网吧,去看看去!
然后我也是参考了一些的博客先了解了一下相机的工作流程:
- 枚举设备
-
判断设备类型:基于以上枚举设备接口调用获取的设备列表,可以获取设备是哪种类型设备并对其中的信息加以利用和输出;
-
输入连接设备
-
创建相机实例并创建句柄
-
打开设备
-
获取相关参数
-
获取图像:在海康的接口调用中,取图方式分为两种方式,第一种是主动取图,第二种是回调取图;
-
开始取流
-
停止取流
-
销毁句柄
感觉好复杂呀.......不过好像复杂的就是前面的几步吧,因为毕竟是网络摄像头,然后就是可能opencv的capture类用惯了,一时有点不适应,那么我感觉还是把一个例子看懂吧,否则一直都不会懂的,也不要着急,一步步来!
那么我们就说下这些东西吧!
直接main函数看起,对了这个是ImageProcess.cpp
    int nRet = MV_OK;

    void* handle = NULL;
	unsigned char * pData = NULL;
    unsigned char *pDataForRGB = NULL;
    unsigned char *pDataForSaveImage = NULL;
上来先来几个定义:后面遇到时再说是什么。
然后是一个do,while的结构,我们直接看里面的:
        MV_CC_DEVICE_INFO_LIST stDeviceList;
        memset(&stDeviceList, 0, sizeof(MV_CC_DEVICE_INFO_LIST));
然后上了2行,第一行就是初始化一个列表对象,然后第二行的函数的作用是初始化的作用,就是初始化这个列表对象。(不过,我感觉我应该深度学一下c了,这个函数我居然是第一次看见..........)
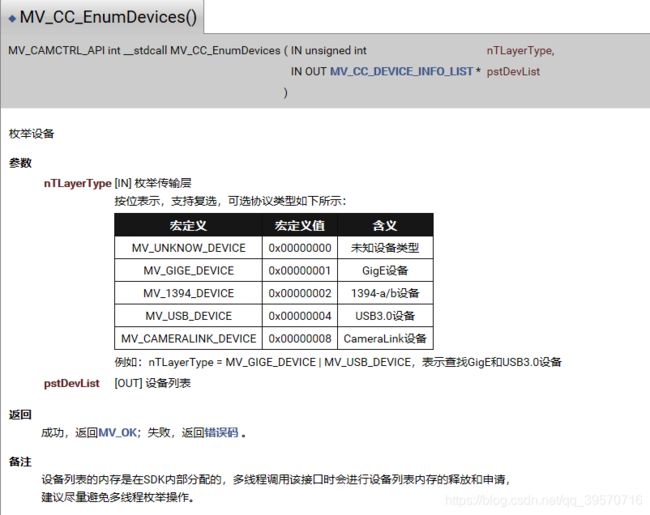
        // 枚举设备
        // enum device
        nRet = MV_CC_EnumDevices(MV_GIGE_DEVICE | MV_USB_DEVICE, &stDeviceList);
        if (MV_OK != nRet)
        {
            printf("MV_CC_EnumDevices fail! nRet [%x]\n", nRet);
            break;
        }
        if (stDeviceList.nDeviceNum > 0)
        {
            for (int i = 0; i < stDeviceList.nDeviceNum; i++)
            {
                printf("[device %d]:\n", i);
                MV_CC_DEVICE_INFO* pDeviceInfo = stDeviceList.pDeviceInfo[i];
                if (NULL == pDeviceInfo)
                {
                    break;
                }
                PrintDeviceInfo(pDeviceInfo);
            }
        }
        else
        {
            printf("Find No Devices!\n");
            break;
        }

        printf("Please Intput camera index: ");
然后就是枚举设备了,因为 我们就是用一个相机,所以上面的代码也没有必要深究,但要知道我们的相机索引是0。
        unsigned int nIndex = 0;
        scanf("%d", &nIndex);

        if (nIndex >= stDeviceList.nDeviceNum)
        {
            printf("Intput error!\n");
            break;
        }
然后这里是输入一个数,那么我一会开发的时候肯定会把这句话去掉的。
        // 选择设备并创建句柄
        // select device and create handle
        nRet = MV_CC_CreateHandle(&handle, stDeviceList.pDeviceInfo[nIndex]);
        if (MV_OK != nRet)
        {
            printf("MV_CC_CreateHandle fail! nRet [%x]\n", nRet);
            break;
        }
然后下一步就是选择我们的相机创建句柄了。
        // 打开设备
        // open device
        nRet = MV_CC_OpenDevice(handle);
        if (MV_OK != nRet)
        {
            printf("MV_CC_OpenDevice fail! nRet [%x]\n", nRet);
            break;
        }
之后就是打开我们的设备了。以上两步其实很简单就是调用库的函数就行了。
然后下面的代码是对网络摄像头的代码所以我直接选择略过。
        // ch:获取数据包大小 | en:Get payload size
        MVCC_INTVALUE stParam;
        memset(&stParam, 0, sizeof(MVCC_INTVALUE));
        nRet = MV_CC_GetIntValue(handle, "PayloadSize", &stParam);
        if (MV_OK != nRet)
        {
            printf("Get PayloadSize fail! nRet [0x%x]\n", nRet);
            break;
        }
然后这步不知道有什么用?先往下看:
        // 开始取流
        // start grab image
        nRet = MV_CC_StartGrabbing(handle);
        if (MV_OK != nRet)
        {
            printf("MV_CC_StartGrabbing fail! nRet [%x]\n", nRet);
            break;
        }

        MV_FRAME_OUT_INFO_EX stImageInfo = {0};
        memset(&stImageInfo, 0, sizeof(MV_FRAME_OUT_INFO_EX));
        pData = (unsigned char *)malloc(sizeof(unsigned char) * stParam.nCurValue);
        if (NULL == pData)
        {
            break;
        }
开始取流了。这些代码一会直接套用。
        nRet = MV_CC_GetOneFrameTimeout(handle, pData, nDataSize, &stImageInfo, 1000);
        if (nRet == MV_OK)
        {
            printf("Now you GetOneFrame, Width[%d], Height[%d], nFrameNum[%d]\n\n",
                stImageInfo.nWidth, stImageInfo.nHeight, stImageInfo.nFrameNum);


            // 处理图像
            // image processing
            printf("	0 	to do nothing\n");
			printf("	1 	to convert RGB\n");
			printf("	2 	to save as BMP\n");
			printf("Please Input Index: ");
            int nInput = 0;
            scanf("%d", &nInput);
            switch (nInput)
            {
                // 不做任何事,继续往下走
                // do nothing, and go on next
            case 0:
                {
                    break;
                }
                // 转换图像为RGB格式,用户可根据自身需求转换其他格式
                // convert image format to RGB, user can convert to other format by their requirement
            case 1:
                {
                    pDataForRGB = (unsigned char*)malloc(stImageInfo.nWidth * stImageInfo.nHeight * 4 + 2048);
                    if (NULL == pDataForRGB)
                    {
                        break;
                    }
                    // 像素格式转换
                    // convert pixel format
                    MV_CC_PIXEL_CONVERT_PARAM stConvertParam = {0};
                    // 从上到下依次是:图像宽,图像高,输入数据缓存,输入数据大小,源像素格式,
                    // 目标像素格式,输出数据缓存,提供的输出缓冲区大小
                    // Top to bottom are:image width, image height, input data buffer, input data size, source pixel format,
                    // destination pixel format, output data buffer, provided output buffer size
                    stConvertParam.nWidth = stImageInfo.nWidth;
                    stConvertParam.nHeight = stImageInfo.nHeight;
                    stConvertParam.pSrcData = pData;
                    stConvertParam.nSrcDataLen = stImageInfo.nFrameLen;
                    stConvertParam.enSrcPixelType = stImageInfo.enPixelType;
                    stConvertParam.enDstPixelType = PixelType_Gvsp_RGB8_Packed;
                    stConvertParam.pDstBuffer = pDataForRGB;
                    stConvertParam.nDstBufferSize = stImageInfo.nWidth * stImageInfo.nHeight *  4 + 2048;
                    nRet = MV_CC_ConvertPixelType(handle, &stConvertParam);
                    if (MV_OK != nRet)
                    {
                        printf("MV_CC_ConvertPixelType fail! nRet [%x]\n", nRet);
                        break;
                    }

                    FILE* fp = fopen("AfterConvert_RGB.raw", "wb");
                    if (NULL == fp)
                    {
                        printf("fopen failed\n");
                        break;
                    }
                    fwrite(pDataForRGB, 1, stgtConvertParam.nDstLen, fp);
                    fclose(fp);
                    printf("convert succeed\n");
                    break;
                }
            case 2:
                {
                    pDataForSaveImage = (unsigned char*)malloc(stImageInfo.nWidth * stImageInfo.nHeight * 4 + 2048);
                    if (NULL == pDataForSaveImage)
                    {
                        break;
                    }
                    // 填充存图参数
                    // fill in the parameters of save image
                    MV_SAVE_IMAGE_PARAM_EX stSaveParam;
                    memset(&stSaveParam, 0, sizeof(MV_SAVE_IMAGE_PARAM_EX));
                    // 从上到下依次是:输出图片格式,输入数据的像素格式,提供的输出缓冲区大小,图像宽,
                    // 图像高,输入数据缓存,输出图片缓存,JPG编码质量
                    // Top to bottom are:
                    stSaveParam.enImageType = MV_Image_Bmp;
                    stSaveParam.enPixelType = stImageInfo.enPixelType;
                    stSaveParam.nBufferSize = stImageInfo.nWidth * stImageInfo.nHeight * 4 + 2048;
                    stSaveParam.nWidth      = stImageInfo.nWidth;
                    stSaveParam.nHeight     = stImageInfo.nHeight;
                    stSaveParam.pData       = pData;
                    stSaveParam.nDataLen    = stImageInfo.nFrameLen;
                    stSaveParam.pImageBuffer = pDataForSaveImage;
                    stSaveParam.nJpgQuality = 80;

                    nRet = MV_CC_SaveImageEx2(handle, &stSaveParam);
                    if(MV_OK != nRet)
                    {
                        printf("failed in MV_CC_SaveImage,nRet[%x]\n", nRet);
                        break;
                    }

                    FILE* fp = fopen("image.bmp", "wb");
                    if (NULL == fp)
                    {
                        printf("fopen failed\n");
                        break;
                    }
                    fwrite(pDataForSaveImage, 1, stSaveParam.nImageLen, fp);
                    fclose(fp);
                    printf("save image succeed\n");
                    break;
                }
            default:
                break;
            }
        }
		else
		{
			printf("No data[%x]\n", nRet);
		}
这些代码呢,就是先取一帧图像,然后进行图像处理,这里我发现一个事,就是好像这些函数再执行完函数后有个哦返回值,然后根据这个返回值在进行下一步操作,我也可以学习这种设计方式,好处就是不会出现空值啥的。
一会我用的时候直接用rgb的!
        // 停止取流
        // end grab image
        nRet = MV_CC_StopGrabbing(handle);
        if (MV_OK != nRet)
        {
            printf("MV_CC_StopGrabbing fail! nRet [%x]\n", nRet);
            break;
        }

        // 销毁句柄
        // destroy handle
        nRet = MV_CC_DestroyHandle(handle);
        if (MV_OK != nRet)
        {
            printf("MV_CC_DestroyHandle fail! nRet [%x]\n", nRet);
            break;
        }
然后的话就是停止取流和摧毁句柄了
自己去实现 一回,要是成功了,下一步就加线程了,就可以了,开干:
- 我试了很长时间但是发现还是实现不了,于是我又看了一圈博客,发现得用回调,然后视频解码真的难搞,不过也是得学习一波:https://blog.csdn.net/CSDNwei/article/details/73896535?utm_medium=distribute.pc_relevant.none-task-blog-baidujs_title-4&spm=1001.2101.3001.4242,这个也只是学个思路感觉还是得自己去写,难搞!可恶呀,那么接下来的话我应该先学一下回调取流,然后在加线程
看一下回调取流的例子:Grab_ImageCallback.cpp
然后我们在看完上一个例子,看这个例子的时候就不会那么蒙了,然后的就是多了几个函数,还有就是主函数的几行有变化,那么现在开始:
        // 设置触发模式为off
        // set trigger mode as off
        nRet = MV_CC_SetEnumValue(handle, "TriggerMode", 0);
        if (MV_OK != nRet)
        {
            printf("MV_CC_SetTriggerMode fail! nRet [%x]\n", nRet);
            break;
        }

        // 注册抓图回调
        // register image callback
        nRet = MV_CC_RegisterImageCallBackEx(handle, ImageCallBackEx, handle);
        if (MV_OK != nRet)
        {
            printf("MV_CC_RegisterImageCallBackEx fail! nRet [%x]\n", nRet);
            break;
        }
主函数就这几行不一样:
这个触发现在用不到,然后的话下面这行就是最重要的了,其实就一个要主意就是那个中间的参数,这个是我们写的函数,然后就是会执行,一会我们改进,opencv转化就在这个函数里写。
好,现在开始改进。
改了很长时间,然后本来我还合计那个博客的库哪来的呢,后来我去查了一下,发现是海康的库,这..................https://www.hikvision.com/cn/download_61.html,下载那个播放库和网路的,然后会用到几个.h文件,然后加在cmakelists.txt里面就行了。
怎么说呢,虽然花费了这么长时间,但是对海康的库有了个大体的认知了吧。
然后经过2天得到调试可算将图像显示出来了,但是还没有转成mat对象,这个一会再说,先说下我是怎么调出来的吧!首先必须下载一个软件,直接下linux的,然后的话就是这个页面:

然后的话就是连接,之后最重要的就是调各种参数,然后一定要保存,之后再用display这个案例就好使了,然后下一步就是调为mat对象了,但是我的那个代码有问题就是解出来图像有问题,代码的问题?去看看去。不过说一句,开始时觉得海康的不行吧,但是后来的话会用之后感觉还是可以的!
我突然想到个事,就是在识别后要用将图像传到网络上去,我差点忘了,然后的话就是要也要学习一下网络相机哪方面的东西,一步步来吧!
网络摄像头:想弄明白这个得先知道网络摄像头的工作原理:网络摄像头是传统摄像机与网络视频技术相结合的新一代产品,除了具备一般传统摄像机所有的图像捕捉功能外,机内还内置了数字化压缩控制器和基于WEB的操作系统,使得视频数据经压缩加密后,通过局域网,internet或无线网络送至终端用户。
最后发现根本用不到,然后的话最后我借鉴了opencv和海康的官方例子最后成功的解决了,下面我放上我的代码:
#include
#include
#include
#include
#include "opencv2/opencv.hpp"
#include
#include "/home/dji/文档/MVS/include/MvCameraControl.h"
#include "/home/dji/文档/MVS/include/PlayM4.h"
#include "/home/dji/文档/MVS/include/plaympeg4.h"
#include "/home/dji/文档/MVS/include/HCNetSDK.h"
#include
#include
#include
#define USECOLOR 1
#include

clock_t begin2, end2,end3,end4;

using namespace std;
using namespace cv;


/***************************************************************************************************
*
* Notes about how to configure your OpenCV environment and project.
* 1. You can prepare the required installation package from the official website. https://opencv.org/releases.html
* 2. If the *.lib files doesn't exist in the package download, you need to compile by yourself with the CMake tool.
* 3. Add the 'bin' folder path to the PATH.
* 4. Configure the 'Additional Include Directories', 'Additional Library Directories' and 'Additional Dependencies' for current project property.
*
* If there is any question or request, please feel free to contact us.

***************************************************************************************************/

#include "opencv2/imgproc/imgproc.hpp"
#include "opencv2/highgui/highgui.hpp"
#include "string.h"

unsigned int g_nPayloadSize = 0;

enum CONVERT_TYPE
{
    OpenCV_Mat        = 0,    // Most of the time, we use 'Mat' format to store image data after OpenCV V2.1
    OpenCV_IplImage       = 1,   //we may also use 'IplImage' format to store image data, usually before OpenCV V2.1
};


// print the discovered devices information to user
bool PrintDeviceInfo(MV_CC_DEVICE_INFO* pstMVDevInfo)
{
    if (NULL == pstMVDevInfo)
    {
        printf("The Pointer of pstMVDevInfo is NULL!\n");
        return false;
    }
    if (pstMVDevInfo->nTLayerType == MV_GIGE_DEVICE)
    {
        int nIp1 = ((pstMVDevInfo->SpecialInfo.stGigEInfo.nCurrentIp & 0xff000000) >> 24);
        int nIp2 = ((pstMVDevInfo->SpecialInfo.stGigEInfo.nCurrentIp & 0x00ff0000) >> 16);
        int nIp3 = ((pstMVDevInfo->SpecialInfo.stGigEInfo.nCurrentIp & 0x0000ff00) >> 8);
        int nIp4 = (pstMVDevInfo->SpecialInfo.stGigEInfo.nCurrentIp & 0x000000ff);

        // print current ip and user defined name
        printf("CurrentIp: %d.%d.%d.%d\n" , nIp1, nIp2, nIp3, nIp4);
        printf("UserDefinedName: %s\n\n" , pstMVDevInfo->SpecialInfo.stGigEInfo.chUserDefinedName);
    }
    else if (pstMVDevInfo->nTLayerType == MV_USB_DEVICE)
    {
        printf("UserDefinedName: %s\n", pstMVDevInfo->SpecialInfo.stUsb3VInfo.chUserDefinedName);
        printf("Serial Number: %s\n", pstMVDevInfo->SpecialInfo.stUsb3VInfo.chSerialNumber);
        printf("Device Number: %d\n\n", pstMVDevInfo->SpecialInfo.stUsb3VInfo.nDeviceNumber);
    }
    else
    {
        printf("Not support.\n");
    }

    return true;
}


int RGB2BGR( unsigned char* pRgbData, unsigned int nWidth, unsigned int nHeight )
{
    if ( NULL == pRgbData )
    {
        return MV_E_PARAMETER;
    }

    for (unsigned int j = 0; j < nHeight; j++)
    {
        for (unsigned int i = 0; i < nWidth; i++)
        {
            unsigned char red = pRgbData[j * (nWidth * 3) + i * 3];
            pRgbData[j * (nWidth * 3) + i * 3]     = pRgbData[j * (nWidth * 3) + i * 3 + 2];
            pRgbData[j * (nWidth * 3) + i * 3 + 2] = red;
        }
    }

    return MV_OK;
}


// convert data stream in Mat format
bool Convert2Mat(MV_FRAME_OUT_INFO_EX* pstImageInfo, unsigned char * pData)
{
    cv::Mat srcImage;
    if ( pstImageInfo->enPixelType == PixelType_Gvsp_Mono8 )
    {
        srcImage = cv::Mat(pstImageInfo->nHeight, pstImageInfo->nWidth, CV_8UC1, pData);
        //imshow("1",srcImage);
        //waitKey(10);
    }
    else if ( pstImageInfo->enPixelType == PixelType_Gvsp_RGB8_Packed )
    {
        RGB2BGR(pData, pstImageInfo->nWidth, pstImageInfo->nHeight);
        srcImage = cv::Mat(pstImageInfo->nHeight, pstImageInfo->nWidth, CV_8UC3, pData);
        //imshow("1",srcImage);
        //waitKey(10);
    }
    else
    {
        printf("unsupported pixel format\n");
        return false;
    }

    if ( NULL == srcImage.data )
    {
        return false;
    }


    srcImage.release();

    return true;
}


// convert data stream in Ipl format
bool Convert2Ipl(MV_FRAME_OUT_INFO_EX* pstImageInfo, unsigned char * pData)
{
    IplImage* srcImage = NULL;
    if ( pstImageInfo->enPixelType == PixelType_Gvsp_Mono8 )
    {
        srcImage = cvCreateImage(cvSize(pstImageInfo->nWidth, pstImageInfo->nHeight), IPL_DEPTH_8U, 1);
    }
    else if ( pstImageInfo->enPixelType == PixelType_Gvsp_RGB8_Packed )
    {
        RGB2BGR(pData, pstImageInfo->nWidth, pstImageInfo->nHeight);
        srcImage = cvCreateImage(cvSize(pstImageInfo->nWidth, pstImageInfo->nHeight), IPL_DEPTH_8U, 3);
    }
    else
    {
        printf("unsupported pixel format\n");
        return false;
    }
    if ( NULL == srcImage )
    {
        printf("CreatImage failed.\n");
        return false;
    }

    srcImage->imageData = (char *)pData;

    // save converted image in a local file
    try {
        cvSaveImage("IplImage.bmp", srcImage);
    }
    catch (cv::Exception& ex) {
        fprintf(stderr, "Exception saving image to bmp format: %s\n", ex.what());
    }

    cvReleaseImage(&srcImage);
    return true;
}


int main()
{
    int nRet = MV_OK;
    void* handle = NULL;


        // Enum device
        MV_CC_DEVICE_INFO_LIST stDeviceList;
        memset(&stDeviceList, 0, sizeof(MV_CC_DEVICE_INFO_LIST));
        nRet = MV_CC_EnumDevices(MV_GIGE_DEVICE | MV_USB_DEVICE, &stDeviceList);
        if (MV_OK != nRet)
        {
            printf("Enum Devices fail! nRet [0x%x]\n", nRet);
        }

        if (stDeviceList.nDeviceNum > 0)
        {
            for (unsigned int i = 0; i < stDeviceList.nDeviceNum; i++)
            {
                printf("[device %d]:\n", i);
                MV_CC_DEVICE_INFO* pDeviceInfo = stDeviceList.pDeviceInfo[i];
                if (NULL == pDeviceInfo)
                {
                    break;
                }
                PrintDeviceInfo(pDeviceInfo);
            }
        }
        else
        {
            printf("Find No Devices!\n");
        }

        unsigned int nFormat = 0;

        // select device to connect
        printf("Please Input camera index(0-%d):", stDeviceList.nDeviceNum-1);
        unsigned int nIndex = 0;
                // Select device and create handle
        nRet = MV_CC_CreateHandle(&handle, stDeviceList.pDeviceInfo[nIndex]);
        if (MV_OK != nRet)
        {
            printf("Create Handle fail! nRet [0x%x]\n", nRet);

        }

        // open device
        nRet = MV_CC_OpenDevice(handle);
        if (MV_OK != nRet)
        {
            printf("Open Device fail! nRet [0x%x]\n", nRet);

        }

    do
    {

        begin2 = clock();


        // Detection network optimal package size(It only works for the GigE camera)
        if (stDeviceList.pDeviceInfo[nIndex]->nTLayerType == MV_GIGE_DEVICE)
        {
            int nPacketSize = MV_CC_GetOptimalPacketSize(handle);
            if (nPacketSize > 0)
            {
                nRet = MV_CC_SetIntValue(handle,"GevSCPSPacketSize",nPacketSize);
                if(nRet != MV_OK)
                {
                    printf("Warning: Set Packet Size fail nRet [0x%x]!", nRet);
                }
            }
            else
            {
                printf("Warning: Get Packet Size fail nRet [0x%x]!", nPacketSize);
            }
        }

        // Set trigger mode as off
        /*nRet = MV_CC_SetEnumValue(handle, "TriggerMode", 0);
        if (MV_OK != nRet)
        {
            printf("Set Trigger Mode fail! nRet [0x%x]\n", nRet);
            break;
        }
        */
        // Get payload size
        MVCC_INTVALUE stParam;
        memset(&stParam, 0, sizeof(MVCC_INTVALUE));
        nRet = MV_CC_GetIntValue(handle, "PayloadSize", &stParam);
        if (MV_OK != nRet)
        {
            printf("Get PayloadSize fail! nRet [0x%x]\n", nRet);
        }
        g_nPayloadSize = stParam.nCurValue;

        // Start grab image
        nRet = MV_CC_StartGrabbing(handle);
        if (MV_OK != nRet)
        {
            printf("Start Grabbing fail! nRet [0x%x]\n", nRet);
        }

        MV_FRAME_OUT_INFO_EX stImageInfo = {0};
        memset(&stImageInfo, 0, sizeof(MV_FRAME_OUT_INFO_EX));
        unsigned char * pData = (unsigned char *)malloc(sizeof(unsigned char) * (g_nPayloadSize));
        if (pData == NULL)
        {
            printf("Allocate memory failed.\n");

        }

        // get one frame from camera with timeout=1000ms
        nRet = MV_CC_GetOneFrameTimeout(handle, pData, g_nPayloadSize, &stImageInfo, 1000);
        if (nRet == MV_OK)
        {
            printf("Get One Frame: Width[%d], Height[%d], nFrameNum[%d]\n",
                stImageInfo.nWidth, stImageInfo.nHeight, stImageInfo.nFrameNum);
        }
        else
        {
            printf("No data[0x%x]\n", nRet);
            free(pData);
            pData = NULL;
            break;
        }
        end3 = clock();
        unsigned uRunTime2 = (end3 - begin2) * 1.0 / CLOCKS_PER_SEC * 1000;
        cout<<"1:"<
然后的话是cmakelists.txt
project(fan)
CMAKE_MINIMUM_REQUIRED(VERSION 3.10)

find_package(OpenCV REQUIRED)
find_package(OpenCV QUIET COMPONENTS core highgui imgproc imgcodecs videoio)

AUX_SOURCE_DIRECTORY(./ DIR_SRCS)

include_directories(${OpenCV_INCLUDE_DIRS})
include_directories(/home/dji/文档/RM2021/capture/MVS/inlude)
link_directories(${OpenCV_LIBRARY_DIRS})
link_directories("/home/dji/文档/RM2021/capture/MVS/lib/aarch64")
link_libraries("/home/dji/文档/RM2021/capture/MVS/lib/aarch64/libMvCameraControl.so")
SET(EXECUTABLE_OUTPUT_PATH ${PROJECT_BINARY_DIR}/bin)
add_compile_options(-std=c++11)
#-Wall -Werror
ADD_EXECUTABLE(fan ${DIR_SRCS})
target_link_libraries(fan ${OpenCV_LIBS})
target_link_libraries(fan -lpthread -luuid -lMvCameraControl -lX11 )
target_link_libraries(fan libMvCameraControl.so)