Docker安装RabbitMq及java对接
一、安装一个RabbitMq服务节点
1.1 安装环境
系统环境:CentOS Linux release 7.7.1908 (Core)
Docker安装版本:19.03.5
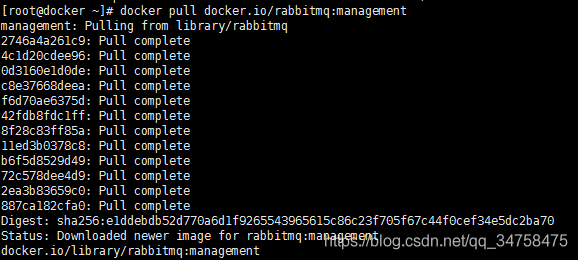
1.2 使用docker下载镜像
# docker pull docker.io/rabbitmq:management1.3 运行镜像
# docker run -d --restart=always -p 15672:15672 --name shop-rabbitmq -e RABBITMQ_DEFAULT_USER=guest -e RABBITMQ_DEFAULT_PASS=guest -v /var/lib/rabbitmq:/var/lib/rabbitmq rabbitmq:management参数说明:
-d ##后台运行容器
--name ##指定容器名称
-p ##暴露服务运行的端口(15672:控制台Web端口号)
-e 指定环境变量(RABBITMQ_DEFAULT_USER:默认的用户名;RABBITMQ_DEFAULT_PASS:默认用户名的密码)
rabbitmq配置文件在/etc/rabbitmq/rabbitmq.conf(这是容器内位置)
RabbitMQ默认端口:
4369 -- erlang发现端口
5672 --client端通信端口,应用访问端口
15672 -- 管理界面ui端口,控制台Web端口号
25672 -- server间内部通信端口
二、安装RabbitMq集群
2.1 安装环境
系统环境:CentOS Linux release 7.7.1908 (Core)
Docker安装版本:19.03.5
2.2 使用docker下载镜像源
# docker pull rabbitmq:3.6.15-management2.3 安装RabbitMQ容器
# docker run -d --hostname rabbit1 --name myrabbit1 -p 15672:15672 -p 5672:5672 -e RABBITMQ_ERLANG_COOKIE='rabbitcookie' rabbitmq:3.6.15-management# docker run -d --hostname rabbit2 --name myrabbit2 -p 5673:5672 --link myrabbit1:rabbit1 -e RABBITMQ_ERLANG_COOKIE='rabbitcookie' rabbitmq:3.6.15-management# docker run -d --hostname rabbit3 --name myrabbit3 -p 5674:5672 --link myrabbit1:rabbit1 --link myrabbit2:rabbit2 -e RABBITMQ_ERLANG_COOKIE='rabbitcookie' rabbitmq:3.6.15-management具体的参数含义,参见上文“启动RabbitMQ”部分。
注意点:
- 多个容器之间使用“--link”连接,此属性不能少;
- Erlang Cookie值必须相同,也就是RABBITMQ_ERLANG_COOKIE参数的值必须相同,原因见下文“配置相同Erlang Cookie”部分;
2.4 加入RabbitMQ节点到集群
2.4.1 设置节点1
[root@docker ~]# docker exec -it myrabbit1 bash
root@rabbit1:/# rabbitmqctl stop_app
Stopping rabbit application on node rabbit@rabbit1
root@rabbit1:/# rabbitmqctl reset
Resetting node rabbit@rabbit1
root@rabbit1:/# rabbitmqctl start_app
Starting node rabbit@rabbit1
root@rabbit1:/# exit
exit
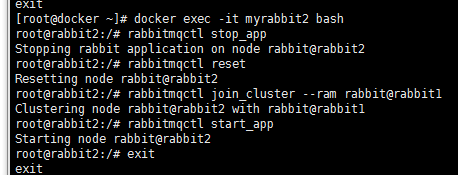
2.4.2 设置节点2,并加入集群
[root@docker ~]# docker exec -it myrabbit2 bash
root@rabbit2:/# rabbitmqctl stop_app
Stopping rabbit application on node rabbit@rabbit2
root@rabbit2:/# rabbitmqctl reset
Resetting node rabbit@rabbit2
root@rabbit2:/# rabbitmqctl join_cluster --ram rabbit@rabbit1
Clustering node rabbit@rabbit2 with rabbit@rabbit1
root@rabbit2:/# rabbitmqctl start_app
Starting node rabbit@rabbit2
root@rabbit2:/# exit
exit
参数“--ram”表示设置为内存节点,忽略次参数默认为磁盘节点。
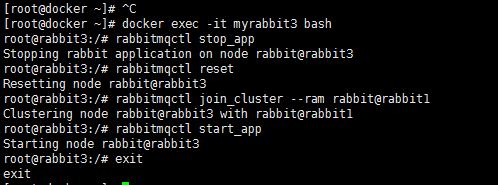
2.4.3 设置节点3,加入到集群:
[root@docker ~]# docker exec -it myrabbit3 bash
root@rabbit3:/# rabbitmqctl stop_app
Stopping rabbit application on node rabbit@rabbit3
root@rabbit3:/# rabbitmqctl reset
Resetting node rabbit@rabbit3
root@rabbit3:/# rabbitmqctl join_cluster --ram rabbit@rabbit1
Clustering node rabbit@rabbit3 with rabbit@rabbit1
root@rabbit3:/# rabbitmqctl start_app
Starting node rabbit@rabbit3
root@rabbit3:/# exit
exit
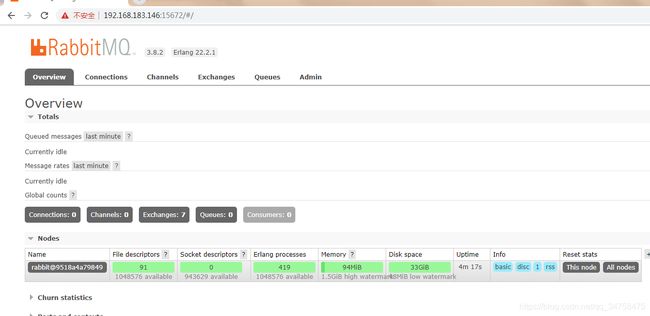
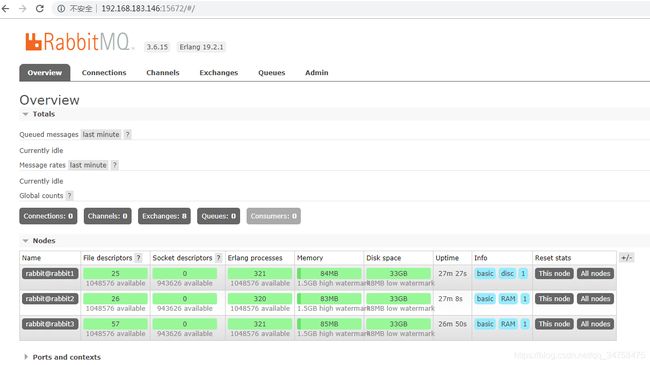
设置好之后,使用http://本机ip:15672 进行访问了,默认账号密码是guest/guest,效果如下图:
启动了3个节点,1个磁盘节点和2个内存节点。
2.5 配置相同Erlang Cookie
有些特殊的情况,比如已经运行了一段时间的几个单个物理机,我们在之前没有设置过相同的Erlang Cookie值,现在我们要把单个的物理机部署成集群,实现我们需要同步Erlang的Cookie值。
因为RabbitMQ是用Erlang实现的,Erlang Cookie相当于不同节点之间相互通讯的秘钥,Erlang节点通过交换Erlang Cookie获得认证。
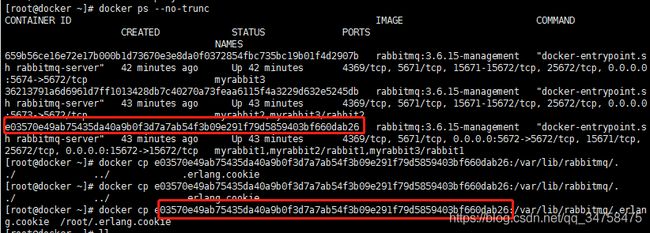
要想知道Erlang Cookie位置,首先要取得RabbitMQ启动日志里面的home dir路径,作为根路径。使用:“docker logs 容器名称”查看,如下图:
现将节点1的cookie值复制到本地:
[root@docker ~]# docker cp e03570e49ab75435da40a9b0f3d7a7ab54f3b09e291f79d5859403bf660dab26:/var/lib/rabbitmq/.erlang.cookie /root/.erlang.cookie然后将本地的cookie值复制到节点2和3的服务器:
[root@docker ~]# docker cp /root/.erlang.cookie  36213791a6d6961d7ff1013428db7c40270a73feaa6115f4a3229d632e5245db:/var/lib/rabbitmq/.erlang.cookie
[root@docker ~]# docker cp /root/.erlang.cookie  659b56ce16e72e17b000b1d73670e3e8da0f0372854fbc735bc19b01f4d2907b:/var/lib/rabbitmq/.erlang.cookie
三、使用java连接RabbitMQ(直连型交换机)
3.1 使用docker运行RabbitMQ
[root@docker ~]# docker run -d --restart=always -p 15672:15672 -p 5672:5672 -e RABBITMQ_DEFAULT_USER=guest -e RABBITMQ_DEFAULT_PASS=guest rabbitmq:management注意点:
-d:表示后台运行容器
--restart=always:表示随着docker重启服务
-p 15672:15672 -p 5672:5672:表示映射端口,以便其他电脑访问
-e RABBITMQ_DEFAULT_USER=guest -e RABBITMQ_DEFAULT_PASS=guest:表示设置RabbitMQ的用户名以及密码
rabbitmq:management:表示运行的镜像以及版本
3.2 使用springboot创建RabbitMq的生产者
3.2.1 创建rabbitmqprovider(生产者项目),项目目录如下:
3.2.2 配置pom.xml文件以及application.yml文件
pom.xml文件配置
   org.springframework.boot
   spring-boot-starter-amqp


   org.springframework.boot
   spring-boot-starter-web
application.yml文件配置
server:
  port: 8021
spring:
  #给项目来个名字
  application:
    name: rabbitmq-provider
  #配置rabbitMq 服务器
  rabbitmq:
    host: 192.168.183.146
    port: 5672
    username: guest
    password: guest
    #虚拟host 可以不设置,使用server默认host
virtual-host: /注意点:virtual-host:配置的主机名一定要与控制台的Admin配置相同,否则会出现An unexpected connection driver error occured的报错:
3.2.3 创建DirectRabbitConfig类,创建direct exchange(直连型交换机)
package com.qhr.rabbitmqprovider.config;

import org.springframework.amqp.core.Binding;
import org.springframework.amqp.core.BindingBuilder;
import org.springframework.amqp.core.DirectExchange;
import org.springframework.amqp.core.Queue;
import org.springframework.context.annotation.Bean;
import org.springframework.context.annotation.Configuration;

/**
 * @Author : qhr520
 * @Date :  2020/1/9 9:13
 * @Version : 01
 * @Description :
 * @ProjectName : rabbitmqprovider
 */
@Configuration
public class DirectRabbitConfig {
    //队列 起名:TestDirectQueue
    @Bean
    public Queue TestDirectQueue() {
        return new Queue("TestDirectQueue",true);  //true 是否持久
    }

    //Direct交换机 起名:TestDirectExchange
    @Bean
    DirectExchange TestDirectExchange() {
        return new DirectExchange("TestDirectExchange");
    }

    //绑定  将队列和交换机绑定, 并设置用于匹配键:TestDirectRouting
    @Bean
    Binding bindingDirect() {
        return BindingBuilder.bind(TestDirectQueue()).to(TestDirectExchange()).with("TestDirectRouting");
    }

}
3.2.4 创建SendMessageController类,用于消息推送
package com.qhr.rabbitmqprovider.controller;

import org.springframework.amqp.rabbit.core.RabbitTemplate;
import org.springframework.beans.factory.annotation.Autowired;
import org.springframework.web.bind.annotation.GetMapping;
import org.springframework.web.bind.annotation.RestController;

import java.time.LocalDateTime;
import java.time.format.DateTimeFormatter;
import java.util.HashMap;
import java.util.Map;
import java.util.UUID;

/**
 * @Author : qhr520
 * @Date :  2020/1/9 9:16
 * @Version : 01
 * @Description :
 * @ProjectName : rabbitmqprovider
 */
@RestController
public class SendMessageController {

    @Autowired
    RabbitTemplate rabbitTemplate;  //使用RabbitTemplate,这提供了接收/发送等等方法

    @GetMapping("/sendDirectMessage")
    public String sendDirectMessage() {
        String messageId = String.valueOf(UUID.randomUUID());
        String messageData = "test message, hello!";
        String createTime = LocalDateTime.now().format(DateTimeFormatter.ofPattern("yyyy-MM-dd HH:mm:ss"));
        Map map=new HashMap<>();
        map.put("messageId",messageId);
        map.put("messageData",messageData);
        map.put("createTime",createTime);
        //将消息携带绑定键值:TestDirectRouting 发送到交换机TestDirectExchange
        rabbitTemplate.convertAndSend("TestDirectExchange", "TestDirectRouting", map);
        return "ok";
    }

}
3.2.5 运行rabbitmqprovider项目
把rabbitmqprovider项目运行,调用下接口:
因为我们目前还没弄消费者 rabbitmqconsumer,消息没有被消费的,我们去rabbitMq管理页面看看,是否推送成功:
再看看队列:
如图所示,消息已经推送成功了.
3.3 创建rabbitmqconsumer(消费者)项目
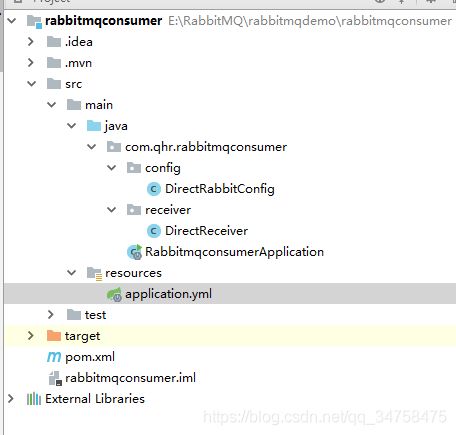
3.3.1 创建rabbitmqconsumer(消费者)项目,项目目录如下:
3.3.2 配置pom.xml文件以及application.yml文件
配置pom.xml文件
   org.springframework.boot
   spring-boot-starter-amqp


   org.springframework.boot
   spring-boot-starter
配置application.yml文件
server:
  port: 8022
spring:
  #给项目来个名字
  application:
    name: rabbitmq-consumer
  #配置rabbitMq 服务器
  rabbitmq:
    host: 192.168.183.146
    port: 5672
    username: guest
    password: guest
    #虚拟host 可以不设置,使用server默认host
    virtual-host: /
注意点:virtual-host:配置的主机名一定要与控制台的Admin配置相同,否则会出现An unexpected connection driver error occured的报错:
3.3.3 创建DirectRabbitConfig类
package com.qhr.rabbitmqconsumer.config;

import org.springframework.amqp.core.Binding;
import org.springframework.amqp.core.BindingBuilder;
import org.springframework.amqp.core.DirectExchange;
import org.springframework.amqp.core.Queue;
import org.springframework.context.annotation.Bean;
import org.springframework.context.annotation.Configuration;

/**
 * @Author : qhr520
 * @Date :  2020/1/9 9:13
 * @Version : 01
 * @Description :
 * @ProjectName : rabbitmqconsumer
 */
@Configuration
public class DirectRabbitConfig {

    //队列 起名:TestDirectQueue
    @Bean
    public Queue TestDirectQueue() {
        return new Queue("TestDirectQueue",true);
    }

    //Direct交换机 起名:TestDirectExchange
    @Bean
    DirectExchange TestDirectExchange() {
        return new DirectExchange("TestDirectExchange");
    }

    //绑定  将队列和交换机绑定, 并设置用于匹配键:TestDirectRouting
    @Bean
    Binding bindingDirect() {
        return BindingBuilder.bind(TestDirectQueue()).to(TestDirectExchange()).with("TestDirectRouting");
    }
}
3.3.4 创建DirectReceiver类,用于接收生产发送的消息
package com.qhr.rabbitmqconsumer.receiver;

import org.springframework.amqp.rabbit.annotation.RabbitHandler;
import org.springframework.amqp.rabbit.annotation.RabbitListener;
import org.springframework.stereotype.Component;

import java.util.Map;

/**
 * @Author : qhr520
 * @Date :  2020/1/9 10:52
 * @Version : 01
 * @Description :
 * @ProjectName : rabbitmqconsumer
 */
@Component
@RabbitListener(queues = "TestDirectQueue")//监听的队列名称 TestDirectQueue
public class DirectReceiver {

    @RabbitHandler
    public void process(Map testMessage) {
        System.out.println("DirectReceiver消费者收到消息  : " + testMessage.toString());
    }

}
3.3.5 运行rabbitmqconsumer项目
并且比较RabbitMq的控制台页面
之前rabbitmqprovider发送的信息,已经被接收,队列里已经没有消息在等待处理了.然后可以再继续调用rabbitmq-provider项目的推送消息接口,可以看到消费者即时消费消息:
四、配置主题交换机
4.1 配置生产者项目:
4.1.1 在rabbitmqprovider项目里面创建TopicRabbitConfig.java:
package com.qhr.rabbitmqprovider.config;

import org.springframework.amqp.core.Binding;
import org.springframework.amqp.core.BindingBuilder;
import org.springframework.amqp.core.Queue;
import org.springframework.amqp.core.TopicExchange;
import org.springframework.context.annotation.Bean;

/**
 * @Author : qhr520
 * @Date :  2020/1/9 11:28
 * @Version : 01
 * @Description :
 * @ProjectName : rabbitmqprovider
 */
public class TopicRabbitConfig {
    //绑定键
    public final static String man = "topic.man";
    public final static String woman = "topic.woman";

    @Bean
    public Queue firstQueue() {
        return new Queue(TopicRabbitConfig.man);
    }

    @Bean
    public Queue secondQueue() {
        return new Queue(TopicRabbitConfig.woman);
    }

    @Bean
    TopicExchange exchange() {
        return new TopicExchange("topicExchange");
    }


    //将firstQueue和topicExchange绑定,而且绑定的键值为topic.man
    //这样只要是消息携带的路由键是topic.man,才会分发到该队列
    @Bean
    Binding bindingExchangeMessage() {
        return BindingBuilder.bind(firstQueue()).to(exchange()).with(man);
    }

    //将secondQueue和topicExchange绑定,而且绑定的键值为用上通配路由键规则topic.#
    // 这样只要是消息携带的路由键是以topic.开头,都会分发到该队列
    @Bean
    Binding bindingExchangeMessage2() {
        return BindingBuilder.bind(secondQueue()).to(exchange()).with("topic.#");
    }

}
4.1.2 然后添加多2个接口,用于推送消息到主题交换机:
@GetMapping("/sendTopicMessage1")
public String sendTopicMessage1() {
    String messageId = String.valueOf(UUID.randomUUID());
    String messageData = "message: M A N ";
    String createTime = LocalDateTime.now().format(DateTimeFormatter.ofPattern("yyyy-MM-dd HH:mm:ss"));
    Map manMap = new HashMap<>();
    manMap.put("messageId", messageId);
    manMap.put("messageData", messageData);
    manMap.put("createTime", createTime);
    rabbitTemplate.convertAndSend("topicExchange", "topic.man", manMap);
    return "ok";
}

@GetMapping("/sendTopicMessage2")
public String sendTopicMessage2() {
    String messageId = String.valueOf(UUID.randomUUID());
    String messageData = "message: woman is all ";
    String createTime = LocalDateTime.now().format(DateTimeFormatter.ofPattern("yyyy-MM-dd HH:mm:ss"));
    Map womanMap = new HashMap<>();
    womanMap.put("messageId", messageId);
    womanMap.put("messageData", messageData);
    womanMap.put("createTime", createTime);
    rabbitTemplate.convertAndSend("topicExchange", "topic.woman", womanMap);
    return "ok";
}
4.1.3 生产者配置完成的项目目录:
配置完成,暂时不要运行项目。
4.2 配置消费者项目:
4.2.1 在rabbitmqconsumer项目上,创建TopicManReceiver.java:
package com.qhr.rabbitmqconsumer.receiver;

import org.springframework.amqp.rabbit.annotation.RabbitHandler;
import org.springframework.amqp.rabbit.annotation.RabbitListener;
import org.springframework.stereotype.Component;

import java.util.Map;

/**
 * @Author : qhr520
 * @Date :  2020/1/9 11:30
 * @Version : 01
 * @Description :
 * @ProjectName : rabbitmqconsumer
 */
@Component
@RabbitListener(queues = "topic.man")
public class TopicManReceiver {
    @RabbitHandler
    public void process(Map testMessage) {
        System.out.println("TopicManReceiver消费者收到消息  : " + testMessage.toString());
    }

}
4.2.2 再创建一个TopicTotalReceiver.java:
package com.qhr.rabbitmqconsumer.receiver;

import org.springframework.amqp.rabbit.annotation.RabbitHandler;
import org.springframework.amqp.rabbit.annotation.RabbitListener;
import org.springframework.stereotype.Component;

import java.util.Map;

/**
 * @Author : qhr520
 * @Date :  2020/1/9 11:32
 * @Version : 01
 * @Description :
 * @ProjectName : rabbitmqconsumer
 */
@Component
@RabbitListener(queues = "topic.woman")
public class TopicTotalReceiver {
    @RabbitHandler
    public void process(Map testMessage) {
        System.out.println("TopicTotalReceiver消费者收到消息  : " + testMessage.toString());
    }

}
4.2.3 同样,加主题交换机的相关配置,TopicRabbitConfig.java:
package com.qhr.rabbitmqconsumer.config;

import org.springframework.amqp.core.Binding;
import org.springframework.amqp.core.BindingBuilder;
import org.springframework.amqp.core.Queue;
import org.springframework.amqp.core.TopicExchange;
import org.springframework.context.annotation.Bean;
import org.springframework.context.annotation.Configuration;

/**
 * @Author : qhr520
 * @Date :  2020/1/9 11:34
 * @Version : 01
 * @Description :
 * @ProjectName : rabbitmqconsumer
 */
@Configuration
public class TopicRabbitConfig {
    //绑定键
    public final static String man = "topic.man";
    public final static String woman = "topic.woman";

    @Bean
    public Queue firstQueue() {
        return new Queue(TopicRabbitConfig.man);
    }

    @Bean
    public Queue secondQueue() {
        return new Queue(TopicRabbitConfig.woman);
    }

    @Bean
    TopicExchange exchange() {
        return new TopicExchange("topicExchange");
    }


    //将firstQueue和topicExchange绑定,而且绑定的键值为topic.man
    //这样只要是消息携带的路由键是topic.man,才会分发到该队列
    @Bean
    Binding bindingExchangeMessage() {
        return BindingBuilder.bind(firstQueue()).to(exchange()).with(man);
    }

    //将secondQueue和topicExchange绑定,而且绑定的键值为用上通配路由键规则topic.#
    // 这样只要是消息携带的路由键是以topic.开头,都会分发到该队列
    @Bean
    Binding bindingExchangeMessage2() {
        return BindingBuilder.bind(secondQueue()).to(exchange()).with("topic.#");
    }

}
4.2.4 消费者配置完成的项目目录
4.3 然后把rabbitmqprovider,rabbitmqconsumer两个项目都跑起来
4.3.1 调用sendTopicMessage1接口:
然后看消费者rabbitmq-consumer的控制台输出情况:
TopicManReceiver监听队列1,绑定键为:topic.man
TopicTotalReceiver监听队列2,绑定键为:topic.#
而当前推送的消息,携带的路由键为:topic.man
4.3.2 调用sendTopicMessage2接口
然后看消费者rabbitmq-consumer的控制台输出情况:
TopicManReceiver监听队列1,绑定键为:topic.man
TopicTotalReceiver监听队列2,绑定键为:topic.#
而当前推送的消息,携带的路由键为:topic.woman
运行结果:
4.4 总结
主题交换机,这个交换机其实跟直连交换机流程差不多,但是它的特点就是在它的路由键和绑定键之间是有规则的。
简单地介绍下规则:
* (星号) 用来表示一个单词 (必须出现的)
# (井号) 用来表示任意数量(零个或多个)单词
通配的绑定键是跟队列进行绑定的,举个小例子
队列Q1 绑定键为 *.TT.* 队列Q2绑定键为 TT.#
如果一条消息携带的路由键为 A.TT.B,那么队列Q1将会收到;
如果一条消息携带的路由键为TT.AA.BB,那么队列Q2将会收到;
五、Fanout Exchang 扇型交换机
5.1 配置生产者项目
5.1.1 先在rabbitmqprovIder项目上创建FanoutRabbitConfig.java:
package com.qhr.rabbitmqprovider.config;

import org.springframework.amqp.core.Binding;
import org.springframework.amqp.core.BindingBuilder;
import org.springframework.amqp.core.FanoutExchange;
import org.springframework.amqp.core.Queue;
import org.springframework.context.annotation.Bean;
import org.springframework.context.annotation.Configuration;

/**
 * @Author : qhr520
 * @Date :  2020/1/9 14:32
 * @Version : 01
 * @Description :
 * @ProjectName : rabbitmqprovider
 */
@Configuration
public class FanoutRabbitConfig {

    /**
     *  创建三个队列 :fanout.A   fanout.B  fanout.C
     *  将三个队列都绑定在交换机 fanoutExchange 上
     *  因为是扇型交换机, 路由键无需配置,配置也不起作用
     */


    @Bean
    public Queue queueA() {
        return new Queue("fanout.A");
    }

    @Bean
    public Queue queueB() {
        return new Queue("fanout.B");
    }

    @Bean
    public Queue queueC() {
        return new Queue("fanout.C");
    }

    @Bean
    FanoutExchange fanoutExchange() {
        return new FanoutExchange("fanoutExchange");
    }

    @Bean
    Binding bindingExchangeA() {
        return BindingBuilder.bind(queueA()).to(fanoutExchange());
    }

    @Bean
    Binding bindingExchangeB() {
        return BindingBuilder.bind(queueB()).to(fanoutExchange());
    }

    @Bean
    Binding bindingExchangeC() {
        return BindingBuilder.bind(queueC()).to(fanoutExchange());
    }

}
5.1.2 在SendMessageController类中,添加一个接口用于推送消息
@GetMapping("/sendFanoutMessage")
public String sendFanoutMessage() {
    String messageId = String.valueOf(UUID.randomUUID());
    String messageData = "message: testFanoutMessage ";
    String createTime = LocalDateTime.now().format(DateTimeFormatter.ofPattern("yyyy-MM-dd HH:mm:ss"));
    Map map = new HashMap<>();
    map.put("messageId", messageId);
    map.put("messageData", messageData);
    map.put("createTime", createTime);
    rabbitTemplate.convertAndSend("fanoutExchange", null, map);
    return "ok";
}
5.1.3 生产者配置完成的项目目录:
5.2 配置消费者项目
5.2.1 在rabbitmqconsumer项目上创建FanoutReceiverA、FanoutReceiverB、FanoutReceiverC三个类
FanoutReceiverA类:
package com.qhr.rabbitmqconsumer.receiver;

import org.springframework.amqp.rabbit.annotation.RabbitHandler;
import org.springframework.amqp.rabbit.annotation.RabbitListener;
import org.springframework.stereotype.Component;

import java.util.Map;

/**
 * @Author : qhr520
 * @Date :  2020/1/9 14:45
 * @Version : 01
 * @Description :
 * @ProjectName : rabbitmqconsumer
 */
@Component
@RabbitListener(queues = "fanout.A")
public class FanoutReceiverA {

    @RabbitHandler
    public void process(Map testMessage) {
        System.out.println("FanoutReceiverA消费者收到消息  : " +testMessage.toString());
    }
}
FanoutReceiverB类:
package com.qhr.rabbitmqconsumer.receiver;

import org.springframework.amqp.rabbit.annotation.RabbitHandler;
import org.springframework.amqp.rabbit.annotation.RabbitListener;
import org.springframework.stereotype.Component;

import java.util.Map;

/**
 * @Author : qhr520
 * @Date :  2020/1/9 14:47
 * @Version : 01
 * @Description :
 * @ProjectName : rabbitmqconsumer
 */
@Component
@RabbitListener(queues = "fanout.B")
public class FanoutReceiverB {

    @RabbitHandler
    public void process(Map testMessage) {
        System.out.println("FanoutReceiverB消费者收到消息  : " +testMessage.toString());
    }

}
FanoutReceiverC类:package com.qhr.rabbitmqconsumer.receiver;
import org.springframework.amqp.rabbit.annotation.RabbitHandler;
import org.springframework.amqp.rabbit.annotation.RabbitListener;
import org.springframework.stereotype.Component;
import java.util.Map;
/**
* @Author : qhr520
* @Date : 2020/1/9 14:54
* @Version : 01
* @Description :
* @ProjectName : rabbitmqconsumer
*/
@Component
@RabbitListener(queues = "fanout.C")
public class FanoutReceiverC {
@RabbitHandler
public void process(Map testMessage) {
System.out.println("FanoutReceiverC消费者收到消息 : " +testMessage.toString());
}
}
5.2.2 创建FanoutRabbitConfig类
package com.qhr.rabbitmqconsumer.config;

import org.springframework.amqp.core.Binding;
import org.springframework.amqp.core.BindingBuilder;
import org.springframework.amqp.core.FanoutExchange;
import org.springframework.amqp.core.Queue;
import org.springframework.context.annotation.Bean;

/**
 * @Author : qhr520
 * @Date :  2020/1/9 14:59
 * @Version : 01
 * @Description :
 * @ProjectName : rabbitmqconsumer
 */
public class FanoutRabbitConfig {
    /**
     *  创建三个队列 :fanout.A   fanout.B  fanout.C
     *  将三个队列都绑定在交换机 fanoutExchange 上
     *  因为是扇型交换机, 路由键无需配置,配置也不起作用
     */


    @Bean
    public Queue queueA() {
        return new Queue("fanout.A");
    }

    @Bean
    public Queue queueB() {
        return new Queue("fanout.B");
    }

    @Bean
    public Queue queueC() {
        return new Queue("fanout.C");
    }

    @Bean
    FanoutExchange fanoutExchange() {
        return new FanoutExchange("fanoutExchange");
    }

    @Bean
    Binding bindingExchangeA() {
        return BindingBuilder.bind(queueA()).to(fanoutExchange());
    }

    @Bean
    Binding bindingExchangeB() {
        return BindingBuilder.bind(queueB()).to(fanoutExchange());
    }

    @Bean
    Binding bindingExchangeC() {
        return BindingBuilder.bind(queueC()).to(fanoutExchange());
    }

}
5.2.3 由于扇形交换机不需要传递键值,所以没有自动加入队列,我们必须手动在RabbitMQ网页控制台手动添加,如下图所示
注:若无添加队列会报Failed to declare queue(s):[XXX]错误5.2.4 消费者配置完成项目目录
5.3 然后把rabbitmqprovider,rabbitmqconsumer两个项目都跑起来
调用sendFanoutMessage :
查看rabbitmqconsumer项目控制台:六、消息确认回调函数
6.1 在rabbitmq-provider项目的application.yml文件上,加上消息确认的配置项后:
server:
  port: 8021
spring:
  #给项目来个名字
  application:
    name: rabbitmq-provider
  #配置rabbitMq 服务器
  rabbitmq:
    host: 192.168.183.146
    port: 5672
    username: test
    password: qhr7788995201314.
    #虚拟host 可以不设置,使用server默认host
    virtual-host: demo

    #消息确认配置项
    #确认消息已发送到交换机(Exchange)
    publisher-confirms: true
    #确认消息已发送到队列(Queue)
    publisher-returns: true
6.2 配置相关的消息确认回调函数,RabbitConfig.java:
package com.qhr.rabbitmqprovider.config;

import org.springframework.amqp.core.Message;
import org.springframework.amqp.rabbit.connection.ConnectionFactory;
import org.springframework.amqp.rabbit.connection.CorrelationData;
import org.springframework.amqp.rabbit.core.RabbitTemplate;
import org.springframework.context.annotation.Bean;
import org.springframework.context.annotation.Configuration;

/**
 * @Author : 邱杭锐
 * @Date :  2020/1/9 15:52
 * @Version : 01
 * @Description :
 * @ProjectName : rabbitmqprovider
 */
@Configuration
public class RabbitConfig {
    @Bean
    public RabbitTemplate createRabbitTemplate(ConnectionFactory connectionFactory){
        RabbitTemplate rabbitTemplate = new RabbitTemplate();
        rabbitTemplate.setConnectionFactory(connectionFactory);
        //设置开启Mandatory,才能触发回调函数,无论消息推送结果怎么样都强制调用回调函数
        rabbitTemplate.setMandatory(true);

        rabbitTemplate.setConfirmCallback(new RabbitTemplate.ConfirmCallback() {
            @Override
            public void confirm(CorrelationData correlationData, boolean ack, String cause) {
                System.out.println("ConfirmCallback:     "+"相关数据:"+correlationData);
                System.out.println("ConfirmCallback:     "+"确认情况:"+ack);
                System.out.println("ConfirmCallback:     "+"原因:"+cause);
            }
        });

        rabbitTemplate.setReturnCallback(new RabbitTemplate.ReturnCallback() {
            @Override
            public void returnedMessage(Message message, int replyCode, String replyText, String exchange, String routingKey) {
                System.out.println("ReturnCallback:     "+"消息:"+message);
                System.out.println("ReturnCallback:     "+"回应码:"+replyCode);
                System.out.println("ReturnCallback:     "+"回应信息:"+replyText);
                System.out.println("ReturnCallback:     "+"交换机:"+exchange);
                System.out.println("ReturnCallback:     "+"路由键:"+routingKey);
            }
        });

        return rabbitTemplate;
    }

}
到这里,生产者推送消息的消息确认调用回调函数已经完毕。可以看到上面写了两个回调函数,一个叫 ConfirmCallback ,一个叫 RetrunCallback;那么以上这两种回调函数都是在什么情况会触发呢? 先从总体的情况分析,推送消息存在四种情况:
①消息推送到server,但是在server里找不到交换机②消息推送到server,找到交换机了,但是没找到队列③消息推送到sever,交换机和队列啥都没找到④消息推送成功那么我先写几个接口来分别测试和认证下以上4种情况,消息确认触发回调函数的情况:
6.2.1 消息推送到server,但是在server里找不到交换机:
在SendMessageController中添加接口:
public String TestMessageAck() {
    String messageId = String.valueOf(UUID.randomUUID());
    String messageData = "message: non-existent-exchange test message ";
    String createTime = LocalDateTime.now().format(DateTimeFormatter.ofPattern("yyyy-MM-dd HH:mm:ss"));
    Map map = new HashMap<>();
    map.put("messageId", messageId);
    map.put("messageData", messageData);
    map.put("createTime", createTime);
    rabbitTemplate.convertAndSend("non-existent-exchange", "TestDirectRouting", map);
    return "ok";
}
结果:![]()
结论:
这种情况触发的是 ConfirmCallback 回调函数。
6.2.2 消息推送到server,找到交换机了,但是没找到队列:
在DirectRabbitConfig类中添加:@Bean
DirectExchange lonelyDirectExchange() {
return new DirectExchange("lonelyDirectExchange");
}
在SendMessageController中添加接口:@GetMapping("/TestMessageAck2")
public String TestMessageAck2() {
String messageId = String.valueOf(UUID.randomUUID());
String messageData = "message: lonelyDirectExchange test message ";
String createTime = LocalDateTime.now().format(DateTimeFormatter.ofPattern("yyyy-MM-dd HH:mm:ss"));
Map map = new HashMap<>();
map.put("messageId", messageId);
map.put("messageData", messageData);
map.put("createTime", createTime);
rabbitTemplate.convertAndSend("lonelyDirectExchange", "TestDirectRouting", map);
return "ok";
}
结果: 结论: 这种情况触发的是 ConfirmCallback和RetrunCallback两个回调函数.6.2.3 消息推送到sever,交换机和队列啥都没找到
在SendMessageController中添加接口:@GetMapping("/TestMessageAck3")
public String TestMessageAck3() {
String messageId = String.valueOf(UUID.randomUUID());
String messageData = "message: non-existent-exchange test message ";
String createTime = LocalDateTime.now().format(DateTimeFormatter.ofPattern("yyyy-MM-dd HH:mm:ss"));
Map map = new HashMap<>();
map.put("messageId", messageId);
map.put("messageData", messageData);
map.put("createTime", createTime);
rabbitTemplate.convertAndSend("non-existent-exchange", "non-existent-routing", map);
return "ok";
}
结果:
结论: 这种情况与①一样触发的是 ConfirmCallback 回调函数。6.2.4 消息推送成功
直接调用sendDirectMessage接口结果: 结论: 这种情况触发的是 ConfirmCallback 回调函数。七、消息确认机制
7.1 三种模式
①自动确认, 这也是默认的消息确认情况。AcknowledgeMode.NONERabbitMQ成功将消息发出(即将消息成功写入TCP Socket)中立即认为本次投递已经被正确处理,不管消费者端是否成功处理本次投递。所以这种情况如果消费端消费逻辑抛出异常,也就是消费端没有处理成功这条消息,那么就相当于丢失了消息。一般这种情况我们都是使用try catch捕捉异常后,打印日志用于追踪数据,这样找出对应数据再做后续处理。 ② 不确认,这个不做介绍③ 手动确认 ,这个比较关键,也是我们配置接收消息确认机制时,多数选择的模式。消费者收到消息后,手动调用basic.ack/basic.nack/basic.reject后,RabbitMQ收到这些消息后,才认为本次投递成功。basic.ack用于肯定确认 basic.nack用于否定确认(注意:这是AMQP 0-9-1的RabbitMQ扩展) basic.reject用于否定确认,但与basic.nack相比有一个限制:一次只能拒绝单条消息
消费者端以上的3个方法都表示消息已经被正确投递,但是basic.ack表示消息已经被正确处理,但是basic.nack,basic.reject表示没有被正确处理,但是RabbitMQ中仍然需要删除这条消息。7.2 在rabbitmqconsumer项目创建MessageListenerConfig.java
package com.qhr.rabbitmqconsumer.config;

import com.qhr.rabbitmqconsumer.receiver.DirectReceiver;
import com.qhr.rabbitmqconsumer.receiver.FanoutReceiverA;
import org.springframework.amqp.core.AcknowledgeMode;
import org.springframework.amqp.rabbit.connection.CachingConnectionFactory;
import org.springframework.amqp.rabbit.listener.SimpleMessageListenerContainer;
import org.springframework.beans.factory.annotation.Autowired;
import org.springframework.context.annotation.Bean;
import org.springframework.context.annotation.Configuration;

/**
 * @Author : qhr520
 * @Date :  2020/1/9 16:29
 * @Version : 01
 * @Description :
 * @ProjectName : rabbitmqconsumer
 */
@Configuration
public class MessageListenerConfig {
    @Autowired
    private CachingConnectionFactory connectionFactory;
    @Autowired
    private DirectReceiver directReceiver;//Direct消息接收处理类
    //@Autowired
    //FanoutReceiverA fanoutReceiverA;//Fanout消息接收处理类A
    @Autowired
    DirectRabbitConfig directRabbitConfig;
    //@Autowired
    //FanoutRabbitConfig fanoutRabbitConfig;
    @Bean
    public SimpleMessageListenerContainer simpleMessageListenerContainer() {
        SimpleMessageListenerContainer container = new SimpleMessageListenerContainer(connectionFactory);
        container.setConcurrentConsumers(1);
        container.setMaxConcurrentConsumers(1);
        container.setAcknowledgeMode(AcknowledgeMode.MANUAL); // RabbitMQ默认是自动确认,这里改为手动确认消息
        container.setQueues(directRabbitConfig.TestDirectQueue());
        container.setMessageListener(directReceiver);
        //container.addQueues(fanoutRabbitConfig.queueA());
        //container.setMessageListener(fanoutReceiverA);
        return container;
    }

}
7.3 修改DirectReceiver.java类
package com.qhr.rabbitmqconsumer.receiver;

import com.rabbitmq.client.Channel;
import org.springframework.amqp.core.Message;
import org.springframework.amqp.rabbit.annotation.RabbitHandler;
import org.springframework.amqp.rabbit.annotation.RabbitListener;
import org.springframework.amqp.rabbit.listener.api.ChannelAwareMessageListener;
import org.springframework.stereotype.Component;

import java.util.HashMap;
import java.util.Map;

/**
 * @Author : 邱杭锐
 * @Date :  2020/1/9 10:52
 * @Version : 01
 * @Description :
 * @ProjectName : rabbitmqconsumer
 */
@Component
@RabbitListener(queues = "TestDirectQueue")//监听的队列名称 TestDirectQueue
public class DirectReceiver implements ChannelAwareMessageListener {

    @Override
    public void onMessage(Message message, Channel channel) throws Exception {
        long deliveryTag = message.getMessageProperties().getDeliveryTag();
        try {
            //因为传递消息的时候用的map传递,所以将Map从Message内取出需要做些处理
            String msg = message.toString();
            String[] msgArray = msg.split("'");//可以点进Message里面看源码,单引号直接的数据就是我们的map消息数据
            Map msgMap = mapStringToMap(msgArray[1].trim());
            String messageId=msgMap.get("messageId");
            String messageData=msgMap.get("messageData");
            String createTime=msgMap.get("createTime");
            System.out.println("messageId:"+messageId+"  messageData:"+messageData+"  createTime:"+createTime);
            channel.basicAck(deliveryTag, true);
//       channel.basicReject(deliveryTag, true);//为true会重新放回队列
        } catch (Exception e) {
            channel.basicReject(deliveryTag, false);
            e.printStackTrace();
        }
    }

    //{key=value,key=value,key=value} 格式转换成map
    private Map mapStringToMap(String str) {
        str = str.substring(1, str.length() - 1);
        String[] strs = str.split(",");
        Map map = new HashMap();
        for (String string : strs) {
            String key = string.split("=")[0].trim();
            String value = string.split("=")[1];
            map.put(key, value);
        }
        return map;
    }

}
