npm run eject后的create-react-app项目自定义eslint配置方式
前言:
当我们需要对create-react-app项目的配置进行高度修改的时候,我们需要npm run eject,把配置文件都暴露出来。
这时候如果我们想要在项目中配置自定义eslint,可以参照以下步骤进行。
一、首先检查是否安装了 eslint和babel-eslint
查看package.json文件,一般npm run eject之后都会看到已经安装了。
如果尚未安装,则需要安装。
全局安装:
npm install eslint babel-eslint -g
当前项目安装(推荐):
npm install eslint babel-eslint -D
二、创建配置文件.eslintrc.js
建议使用npx命令安装,而不是直接在项目中创建文件。因为使用命令安装还能根据提示一步一步选择选项并安装相关依赖。
npx是执行Node软件包的工具,它从 npm5.2版本开始,就与npm捆绑在一起。
npx的作用如下:
- 默认情况下,首先检查路径中是否存在要执行的包(即在项目中);
- 如果存在,它将执行;
- 若不存在,意味着尚未安装该软件包,npx将安装其最新版本,然后执行它;
创建配置文件.eslintrc.js的命令:
npx eslint --init
 选好上面的配置项之后,紧接着会询问你安装这些插件(可能会存在版本差异,只需把他提示的依赖给安装好就行):
(如果默认安装不成功,建议使用cnpm安装,安装在devDependencies中)
cnpm install -D eslint-plugin-react@^7.21.5 eslint-config-airbnb@latest eslint@^7.2.0 eslint-plugin-import@^2.22.1 eslint-plugin-jsx-a11y@^6.4.1 eslint-plugin-react-hooks@^4
注意:因为我们重新安装的插件在devDependencies中,可能dependencies中会有重复的插件,可以删掉dependencies中对应的依赖件。
可以把node_modules包整体删掉再装,或者是运行命令逐个删掉。
上面我安装的是Airbnb编码风格(这个的规范比较流行),Airbnb编码风格规范资料参考:点击这里
三、修改.eslintrc.js配置
eslint详细配置解析参考: 点击这里
我们需要对.eslintrc.js进行配置,最终如下:
module.exports = {

    env: {

        browser: true,
        es6: true,
        commonjs: true,
        node: true,
    },
    parser: 'babel-eslint',
    extends: [
        'plugin:react/recommended',
        'airbnb',
    ],
    globals: {

        Atomics: 'readonly',
        SharedArrayBuffer: 'readonly',
    },
    parserOptions: {

        ecmaFeatures: {

            experimentalObjectRestSpread: true,
            jsx: true,
        },
        ecmaVersion: 2018,
        sourceType: 'module',
    },
    plugins: [
        'react',
    ],
    // rules中为自定义的规则校验,根据项目需要自行修改即可
    rules: {

        'no-unused-vars': ['warn', {
      args: 'none' }],
        'react/jsx-filename-extension': [1, {
      extensions: ['.js', '.jsx'] }],
        'linebreak-style': ['off', 'windows'],
        'no-console': 'off',
        'import/no-unresolved': 'off',
        'react/destructuring-assignment': 0,
        'react/prop-types': 0,
        'import/no-extraneous-dependencies': 'off',
        'no-use-before-define': 'off',
        'no-param-reassign': 'off',
        'no-plusplus': 'off',
        'react/jsx-props-no-spreading': 'off',
        'no-lonely-if': 'off',
        'jsx-a11y/no-static-element-interactions': 'off',
        'jsx-a11y/click-events-have-key-events': 'off',
        'consistent-return': 'off',
        'jsx-a11y/label-has-associated-control': 'off',
        'no-unused-expressions': ['error', {
      allowShortCircuit: true, allowTernary: true }],
        'global-require': 'off',
        'array-callback-return': 'off',
        'import/prefer-default-export': 'off',
        'prefer-promise-reject-errors': 'off',
        'no-continue': 'off',
        indent: ['error', 4, {
      SwitchCase: 1 }],
        'react/jsx-indent': ['error', 4],
        'react/jsx-indent-props': ['error', 4],
        'no-trailing-spaces': 'off',
        'react/jsx-no-bind': 'off',
        'import/no-dynamic-require': 'off',
        'jsx-a11y/no-noninteractive-element-interactions': 'off',
        'no-shadow': 'off',
        'max-len': ['error', {

            ignoreComments: true,
            code: 100,
            ignoreTrailingComments: true,
            ignoreUrls: true,
            ignoreStrings: true,
            ignoreTemplateLiterals: true,
            ignoreRegExpLiterals: true,
        }],
        eqeqeq: ['warn', 'smart'],
        radix: ['error', 'as-needed'],
        'no-underscore-dangle': 'off',
    },
};
四、vscode编辑器开启eslint插件校验
1、检查vscode是否添加了eslint插件扩展
如果尚未安装,记得先安装:

2、当前项目开启eslint校验

五、在package.json中添加自动修复指令
"fix": "eslint --fix src"

六、打开项目中任意js文件进行查看是否成功配置了eslint校验
双击红色部分,就可以看到有个蓝色的灯泡,移上去可以点击选择自动修复改文件中所有的eslint校验问题(偶尔有些不能自动修复,则需手动修改。)

七、自动修复的eslint,直接运行命令进行整个项目的修复
npm run fix
1、运行启动项目命令(npm run start)
如果项目中的eslint校验尚未修改完成时,命令行和浏览器页面会显示相应文件和需要相应修改的地方。如下:

修改后保存文件,项目会再次编译,有报错就继续修改,直至项目能正确运行即为修改完成。
八、如果修改了.eslintrc.js文件时,项目的eslint校验没有生效的话,记得重新运行项目启动命令(npm run start)
因为期间我们可能会根据项目对eslint校验规则的配置文件进行修改,比如增加某些规则的关闭校验。
九、添加编辑器统一编码风格 .editorconfig文件
EditorConfig帮助开发人员在不同的编辑器和IDE之间定义和维护一致的编码样式。
EditorConfig项目由用于定义编码样式的文件格式和一组文本编辑器插件组成,这些插件使编辑器能够读取文件格式并遵循定义的样式。EditorConfig文件易于阅读,并且与版本控制系统配合使用。”
详细配置参考资料:点击这里
1、在项目中创建 .editorconfig 文件
直接在项目根目录下新建文件,命名为 .editorconfig 即可。
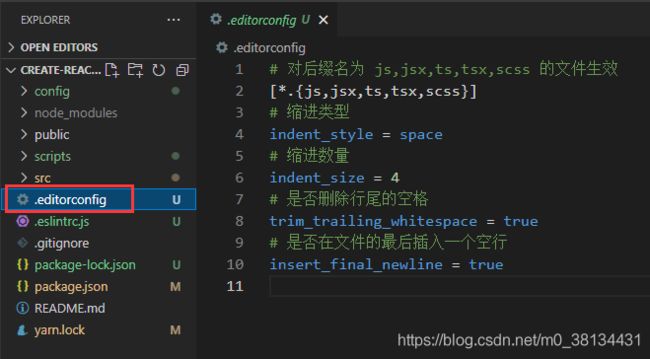
2、配置.editorconfig
根据上面我们配置的eslint校验规则来进行配置。
比如上面我们eslint配置了代码缩进为4个空格:
 在
在.editorconfig中的配置为(常用的配置如下):
# 对后缀名为 js,jsx,ts,tsx,scss 的文件生效
[*.{
     js,jsx,ts,tsx,scss}]
# 缩进类型
indent_style = space
# 缩进数量
indent_size = 4
# 是否删除行尾的空格
trim_trailing_whitespace = true
# 是否在文件的最后插入一个空行
insert_final_newline = true
配置好了之后我们在开发过程中在当前行回车就会自动以四个空格缩进换行;
保存代码后当前文件的最后一行如果没加空行,那么会自动插入一个空行;
之前代码缩进不符合配置上写的也会默认帮你自动重置缩进。