Image Processing with Numpy —— github
请先看用numpy做图像处理(上)
- 涵盖知识:
图像读取与裁剪,通道分离,颜色变换(爱因斯坦求和约定),动态gif生成,灰阶转换
图像卷积, 图像分割(大津二值,KMeans像素聚类),图像矢量化(轮廓提取,内边缘判断,轮廓填充)
卷积(下)
-
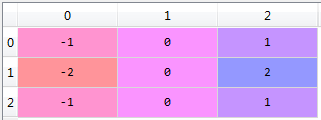
让我们再使用一个新的窗口滤波器:Sobel滤波器,它被用来近似图像在某一方向上的梯度(也就是边缘检测),它的窗口形式是这样的:
让我们对X和Y方向都使用一次该窗口,然后对每个像素点的两次处理结果求平方和再开根号作为该点的值
n=100
sobel_x = np.c_[
    [-1,0,1],
    [-2,0,2],
    [-1,0,1]
]

sobel_y = np.c_[
    [1,2,1],
    [0,0,0],
    [-1,-2,-1]
]
# 或者使用sobel_y = sobel_x.transpose()

ims = []
for d in range(3):
    sx = convolve2d(im_small[:,:,d], sobel_x, mode="same", boundary="symm")
    sy = convolve2d(im_small[:,:,d], sobel_y, mode="same", boundary="symm")
    ims.append(np.sqrt(sx*sx + sy*sy)) # 平方和再开根号,叠加两次处理效果

im_conv = np.stack(ims, axis=2).astype("uint8")

plti(im_conv)
- 我们再试试组合中值滤波和sobel滤波的效果
im_smoothed = median_filter_all_colours(im_small, 71)
# 先利用之前设置的函数进行中值滤波,再对图像进行sobel滤波
sobel_x = np.c_[
    [-1,0,1],
    [-2,0,2],
    [-1,0,1]
]

sobel_y = np.c_[
    [1,2,1],
    [0,0,0],
    [-1,-2,-1]
]

ims = []
for d in range(3):
    sx = convolve2d(im_smoothed[:,:,d], sobel_x, mode="same", boundary="symm")
    sy = convolve2d(im_smoothed[:,:,d], sobel_y, mode="same", boundary="symm")
    ims.append(np.sqrt(sx*sx + sy*sy))

im_conv = np.stack(ims, axis=2).astype("uint8")

plti(im_conv)
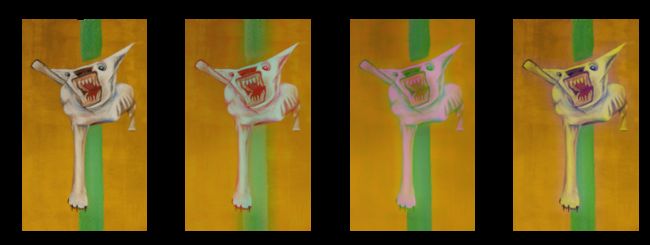
- 到目前为止,我们都是对图像的所有通道一起操作,让我们看看如果一次只对图像的某一通道进行模糊,会有什么效果
fig, axs = plt.subplots(nrows=1, ncols=4, figsize=(15,5))
# 得到1x4的画图结构
ax= axs[0]
ax.imshow(im_small)
ax.set_title("Original", fontsize=20)
ax.set_axis_off()
# 画原图
w=75
window = np.ones((w,w))
window /= np.sum(window)
# 设置均值模糊窗口
ax= axs[1]
ims = []
for d in range(3):
    if d == 0:
        im_conv_d = convolve2d(im_small[:,:,d],window, mode="same", boundary="symm")
    else:
        im_conv_d = im_small[:,:,d]
    ims.append(im_conv_d)
ax.imshow(np.stack(ims, axis=2).astype("uint8"))
ax.set_title("Red Blur", fontsize=20)
ax.set_axis_off()
# 只作用于R通道
ax= axs[2]
ims = []
for d in range(3):
    if d == 1:
        im_conv_d = convolve2d(im_small[:,:,d], window, mode="same", boundary="symm")
    else:
        im_conv_d = im_small[:,:,d]
    ims.append(im_conv_d)
ax.imshow(np.stack(ims, axis=2).astype("uint8"))
ax.set_title("Blue Blur", fontsize=20)
ax.set_axis_off()
# 只作用于G通道
ax= axs[3]
ims = []
for d in range(3):
    if d == 2:
        im_conv_d = convolve2d(im_small[:,:,d], window, mode="same", boundary="symm")
    else:
        im_conv_d = im_small[:,:,d]
    ims.append(im_conv_d)
ax.imshow(np.stack(ims, axis=2).astype("uint8"))
ax.set_title("Green Blur", fontsize=20)
ax.set_axis_off()
# 只作用于B通道
分割
- 图像处理的另一个主要领域分割图像成不同的区域,比如前景和背景。
- 最简单的方式是将图片转换为灰阶,然后找到一个阈值,以像素值与阈值的比较判断其为前景还是背景。我们先随便设一组阈值,看看不同大小的阈值的效果区别
def simple_threshold(im, threshold=128):
    return ((im > threshold) * 255).astype("uint8")
# 以阈值对灰度图像做二值处理
# np.array([1,2,3,4,5,6]) > 3 得到
# array([False, False, False,  True,  True,  True], dtype=bool)
# assert( True * 255 == 255 )

thresholds = [100,120,128,138,150]
# 预设的阈值列表
fig, axs = plt.subplots(nrows=1, ncols=len(thresholds), figsize=(20,5));
gray_im = to_grayscale(im)
# 先将图片转换为灰阶
for t, ax in zip(thresholds, axs):
    # 循环阈值列表,依次处理画图
    ax.imshow(simple_threshold(gray_im, t), cmap='Greys');
    ax.set_title("Threshold: {}".format(t), fontsize=20);
    ax.set_axis_off();
- 随机选取阈值具有不确定性,而我们会希望在分割图片时,使得类内像素点值的差距最小,而类间差距最大,一种方式就是使用大津二值化算法
def otsu_threshold(im):

    pixel_counts = [np.sum(im == i) for i in range(256)]
    # 得到图片的以0-255索引的像素值个数列表
    s_max = (0,-10)
    ss = []
    for threshold in range(256):
    # 遍历所有阈值,根据公式挑选出最好的

        # 更新
        w_0 = sum(pixel_counts[:threshold]) # 得到阈值以下像素个数
        w_1 = sum(pixel_counts[threshold:]) # 得到阈值以上像素个数

        mu_0 = sum([i * pixel_counts[i] for i in range(0,threshold)]) / w_0 if w_0 > 0 else 0
        # 得到阈值下所有像素的均值
        # 注意 if else 用法意义: 如果 w_0 > 0 则 mu_0 = sum/w_0 否则 mu_0 = 0
        mu_1 = sum([i * pixel_counts[i] for i in range(threshold, 256)]) / w_1 if w_1 > 0 else 0
        # 得到阈值上所有像素的均值

        # 根据公式计算
        s = 1.0 * w_0 * w_1 * (mu_0 - mu_1) ** 2
        # 直接使用w_0 * w_1可能会造成整数相乘溢出,所以先乘一个1.0变为浮点数
        ss.append(s)

        # 取最大的
        if s > s_max[1]:
            s_max = (threshold, s)

    return s_max[0]

t = otsu_threshold(gray_im)
# 先根据大津算法算出阈值t,再使用阈值t来分割图像
plti(simple_threshold(gray_im, t), cmap='Greys')
- 但是处理效果并不理想,很可能是在将图片转化为灰阶的时候我们丢失了一些图像信息,让我们对图像的每个通道分别处理试试
fig, axs = plt.subplots(nrows=1, ncols=3, figsize=(15,5))

c_ims = []
# c_ims收集各通道处理结果以待进一步处理

for c, ax in zip(range(3), axs): # 依次处理每个通道,画到相应的子图上
    tmp_im = im[:,:,c]
    t = otsu_threshold(tmp_im)
    tmp_im = simple_threshold(tmp_im, t)
    ax.imshow(tmp_im, cmap='Greys')
    c_ims.append(tmp_im)
    ax.set_axis_off()
- 将三个通道的处理结果合并
# 黑色值为255,白色值为0
# 255 & 255 = 255; 0 & 0 = 0; 0 & 255 = 0
plti(c_ims[0] & c_ims[1] & c_ims[2], cmap='Greys')
- 这样就好多了
- 如果不是寻找一个门槛,而是发现色彩的集群,我们可以使用K-means聚类技术,可以结合scikit.KMeans的最简例子理解:
from sklearn.cluster import KMeans

h,w = im_small.shape[:2]
# 获取图像的高和宽
im_small_long = im_small.reshape((h * w, 3))
# 将图像转化为 RGB三值表示的三维空间坐标点 的列表
im_small_wide = im_small_long.reshape((h,w,3))
# 可以将im_small_long恢复为原尺寸

km = KMeans(n_clusters=3)
# 分3个聚类
km.fit(im_small_long)
# 对所有RGB三维空间点分类,每个点获得一个分类标签

cc = km.cluster_centers_.astype(np.uint8)
# 得到每个聚类的中心点坐标,并保证在np.uint8范围内
out = np.asarray([cc[i] for i in km.labels_]).reshape((h,w,3))
# 以每一类的中心点坐标所映射的RGB色彩 替代该类中所有点的色彩,并转换为原始尺寸
# km.labels_是所有空间点的标签列表,列表中元素的值(即标签)为0,1或2,表示3个不同类

plti(out)
- 看上去还不错,我们试试看如果随机给三个类赋予色彩,会不会有意外的艺术效果:
rng = range(4)

fig, axs = plt.subplots(nrows=1, ncols=len(rng), figsize=(15,5))

for t, ax in zip(rng, axs):
    rnd_cc = np.random.randint(0,256, size = (3,3))
    # 随机色彩,RGB为1x3, 3个色彩就是3x3的矩阵
    out = np.asarray([rnd_cc[i] for i in km.labels_]).reshape((h,w,3))
    ax.imshow(out)
    ax.set_axis_off()
矢量化
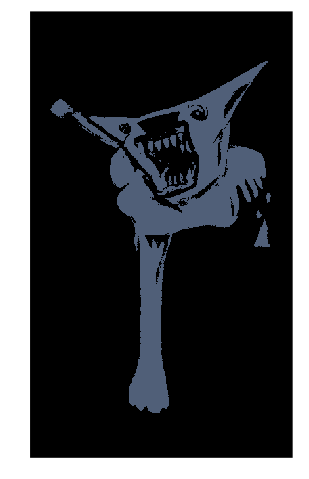
- 到现在为止,我们都是将图片作位图处理。最后,我们将把狗的部分从图像中取出,将它转换为矢量图
- 我们先利用聚类的结果将狗的部分提取出来
dog = np.asarray([cc[i] if i == 1 else [0,0,0] for i in km.labels_]).reshape((h,w,3))

plti(dog)
- 现在,我们可以使用来自Scikit-Image的轮廓跟踪算法(measure.find_contours)来勾勒它
from skimage import measure

seg = np.asarray([(1 if i == 1 else 0)
                  for i in km.labels_]).reshape((h,w))
# 由聚类结果得到0,1二值单通道图像

contours = measure.find_contours(seg, 0.5, fully_connected="high")
# 找到轮廓,返回每个连续轮廓的列表,每个连续轮廓是一组坐标点

simplified_contours = [measure.approximate_polygon(c, tolerance=5) for c in contours]
# 简化轮廓,近似为多边形,tolerance决定精度

plt.figure(figsize=(5,10))

for n, contour in enumerate(simplified_contours):
    plt.plot(contour[:, 1], contour[:, 0], linewidth=2)
    # 连点成线,循环画出每个轮廓

plt.ylim(h,0) # 设置y轴显示范围
plt.axes().set_aspect('equal') # 设置x,y轴对数据的比例相同
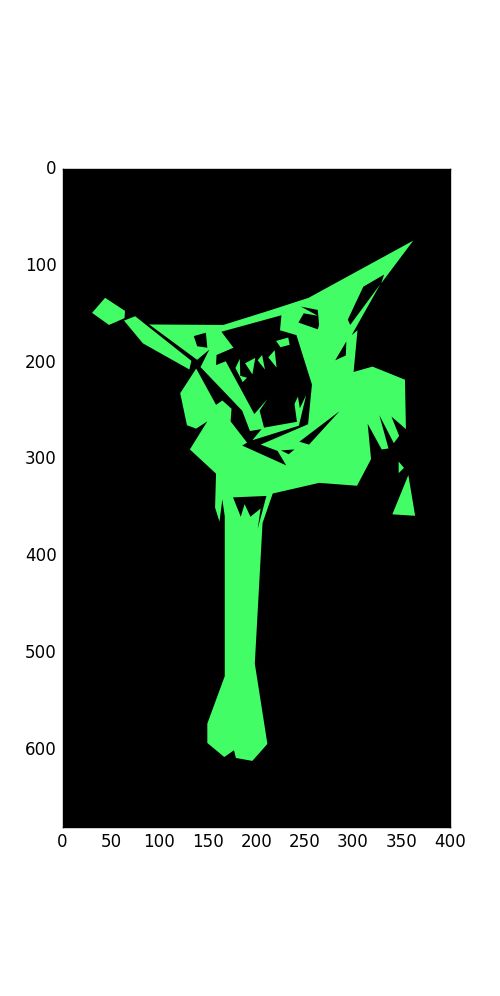
- 要画出它,我们将轮廓线变为图块补丁并填充
from matplotlib.patches import PathPatch
from matplotlib.path import Path

# 先翻转轮廓的坐标(交换x,y的位置),使其和matplotlib一致
paths = [[[v[1], v[0]] for v in vs] for vs in simplified_contours]

def get_path(vs):
    codes = [Path.MOVETO] + [Path.LINETO] * (len(vs)-2) + [Path.CLOSEPOLY]
    return PathPatch(Path(vs, codes))
    # 返回当前轮廓绕出的图块补丁对象
    # [Path.MOVETO] + [Path.LINETO] + [Path.CLOSEPOLY] = [1, 2, 79]
    # [Path.LINETO] *3 = [2, 2, 2]

plt.figure(figsize=(5,10))

ax = plt.gca()
# gca获取当前坐标轴

for n, path in enumerate(paths):
    ax.add_patch(get_path(path))

plt.ylim(h,0)
plt.xlim(0,w)

plt.axes().set_aspect('equal')
- 我们碰到一个问题,有些轮廓不是形状的外边缘,而是内边缘。我们来解决这个问题。
- 我们使用ray casting method来考察一个点是在多边形内还是多边形外,并且基于我们现在处理的例子中,多边形之间没有交叠的状况:一个多边形要么是在另一个多边形里面,要么是在它外面。最终subsume函数将所有多边形组合进我们的多边形对象中,它描述了外边缘和可能的内边。
class Polygon:
    def __init__(self, outer, inners):
        self.outer = outer
        self.inners = inners

    def clone(self):
        return Polygon(self.outer[:], [c.clone() for c in self.inners])

def crosses_line(point, line):
    """
    Checks if the line project in the positive x direction from point
    crosses the line between the two points in line
    """
    p1,p2 = line

    x,y = point
    x1,y1 = p1
    x2,y2 = p2

    if x <= min(x1,x2) or x >= max(x1,x2):
        return False

    dx = x1 - x2
    dy = y1 - y2

    if dx == 0:
        return True

    m = dy / dx

    if y1 + m * (x - x1) <= y:
        return False

    return True

def point_within_polygon(point, polygon):
    """
    Returns true if point within polygon
    """
    crossings = 0

    for i in range(len(polygon.outer)-1):
        line = (polygon.outer[i], polygon.outer[i+1])
        crossings += crosses_line(point, line)

    if crossings % 2 == 0:
        return False

    return True

def polygon_inside_polygon(polygon1, polygon2):
    """
    Returns true if the first point of polygon1 is inside
    polygon 2
    """
    return point_within_polygon(polygon1.outer[0], polygon2)


def subsume(original_list_of_polygons):
    """
    Takes a list of polygons and returns polygons with insides.

    This function makes the unreasonable assumption that polygons can
    only be complete contained within other polygons (e.g. not overlaps).

    In the case where polygons are nested more then three levels,
    """
    list_of_polygons = [p.clone() for p in original_list_of_polygons]
    polygons_outside = [p for p in list_of_polygons
                        if all(not polygon_inside_polygon(p, p2)
                               for p2 in list_of_polygons
                               if p2 != p)]

    polygons_inside = [p for p in list_of_polygons
                        if any(polygon_inside_polygon(p, p2)
                               for p2 in list_of_polygons
                               if p2 != p)]

    for outer_polygon in polygons_outside:
        for inner_polygon in polygons_inside:
            if polygon_inside_polygon(inner_polygon, outer_polygon):
                outer_polygon.inners.append(inner_polygon)

    return polygons_outside

    for p in polygons_outside:
        p.inners = subsume(p.inners)

    return polygons_outside


polygons = [Polygon(p,[]) for p in paths]
subsumed_polygons = subsume(polygons)


def build_path_patch(polygon, **kwargs):
    """
    Builds a matplotlb patch to plot a complex polygon described
    by the Polygon class.
    """
    verts = polygon.outer[:]
    codes = [Path.MOVETO] + [Path.LINETO] * (len(verts)-2) + [Path.CLOSEPOLY]

    for inside_path in polygon.inners:
        verts_tmp = inside_path.outer
        codes_tmp = [Path.MOVETO] + [Path.LINETO] * (len(verts_tmp)-2) + [Path.CLOSEPOLY]

        verts += verts_tmp
        codes += codes_tmp

    drawn_path = Path(verts, codes)

    return PathPatch(drawn_path, **kwargs)


def rnd_color():
    """Returns a randon (R,G,B) tuple"""
    return tuple(np.random.random(size=3))

plt.figure(figsize=(5,10))
ax = plt.gca()
c = rnd_color()

for n, polygon in enumerate(subsumed_polygons):
    ax.add_patch(build_path_patch(polygon, lw=0, facecolor=c))

plt.ylim(h,0)
plt.xlim(0,w)
ax.set_axis_bgcolor('k')
plt.axes().set_aspect('equal')
plt.show()
- 到现在,我们只是做了图像处理的最基本的一些东西,但这已经不少了。如果要进一步学习,可以参考一些图片库所提供的例子。


