-
什么是碎片
碎片是一种可以嵌入在Activity当中的UI片段,它能让程序更加合理和充分的利用大屏幕空间。因此在平板上应用非常广泛。
1.碎片的简单实用
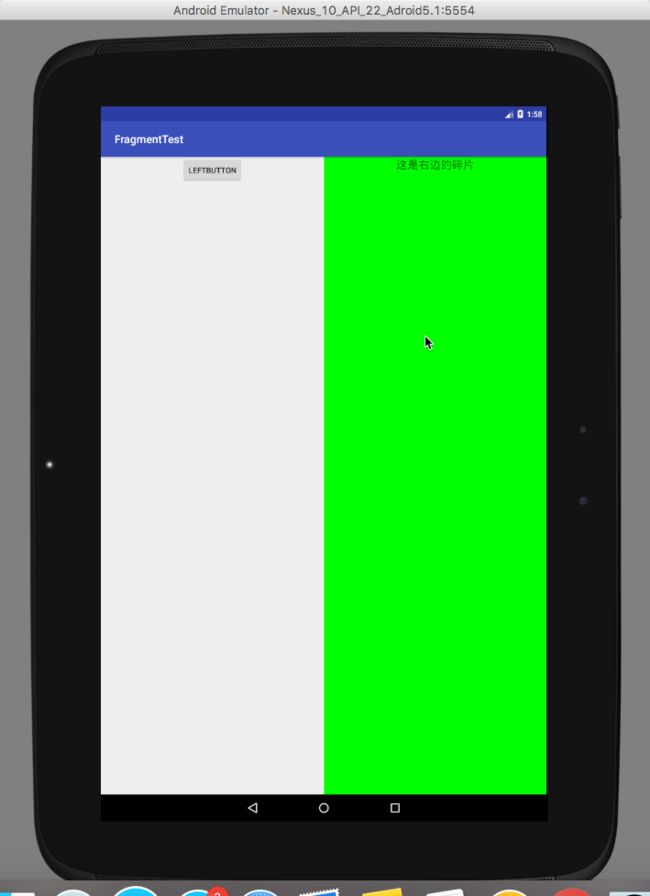
使用碎片搭建一个简单静态界面
第一步:创建左边碎片界面布局
添加一个水平居中的按钮
第二步:创建右边碎片界面布局
添加一个背景颜色为绿色的布局,并加入一个标签
第三步:创建LeftFragment类
让LeftFragment类继承自support-v4库中的Fragment类。
package com.example.anwser_mac.fragmenttest;

import android.os.Bundle;
import android.support.annotation.Nullable;
import android.support.v4.app.Fragment;
import android.view.LayoutInflater;
import android.view.View;
import android.view.ViewGroup;

/**
 * Created by anwser_mac on 2017/4/6.
 */

public class LeftFragment extends Fragment {

    @Nullable
    @Override
    public View onCreateView(LayoutInflater inflater, @Nullable ViewGroup container, @Nullable Bundle savedInstanceState) {
        //重写onCreateView方法,然后通过infalte()方法将刚才定义的left_fragment布局加载进来
        View view = inflater.inflate(R.layout.left_fragmen, container, false);
        return view;
    }
}
第四步:创建RightFragment类
同第三步
package com.example.anwser_mac.fragmenttest;

import android.os.Bundle;
import android.support.annotation.Nullable;
import android.support.v4.app.Fragment;
import android.view.LayoutInflater;
import android.view.View;
import android.view.ViewGroup;

/**
 * Created by anwser_mac on 2017/4/6.
 */

public class RightFragment extends Fragment {

    @Nullable
    @Override
    public View onCreateView(LayoutInflater inflater, @Nullable ViewGroup container, @Nullable Bundle savedInstanceState) {
        View view = inflater.inflate(R.layout.right_fragment, container, false);
        return view;
    }
}
第五步:修改activity_main.xml中的代码
将创建的碎片,加入到界面布局文件
- 运行结果如下
![Uploading 2017-04-06_17-24-28_256277.gif . . .]
2.动态添加碎片
碎片真正强大之处在于它可以在程序运行时动态地添加到活动当中。根据具体的情况添加碎片,可以将程序界面定制得更加多样化。
第一步:在1项目的基础上再创建一个碎片用来切换显示
第二步:创建对应的Fragment类
package com.example.anwser_mac.fragmenttest;

import android.os.Bundle;
import android.support.annotation.Nullable;
import android.support.v4.app.Fragment;
import android.view.LayoutInflater;
import android.view.View;
import android.view.ViewGroup;

/**
 * Created by anwser_mac on 2017/4/6.
 */

public class AnotherRightFragment extends Fragment {

    @Nullable
    @Override
    public View onCreateView(LayoutInflater inflater, @Nullable ViewGroup container, @Nullable Bundle savedInstanceState) {
        View view = inflater.inflate(R.layout.another_right_fragment, container, false);
        return view;
    }
}
第三步: 修改界面布局文件
第四步:修改Activity的代码如下
package com.example.anwser_mac.fragmenttest;

import android.support.v4.app.Fragment;
import android.support.v4.app.FragmentManager;
import android.support.v4.app.FragmentTransaction;
import android.support.v7.app.AppCompatActivity;
import android.os.Bundle;
import android.view.View;
import android.widget.Button;
import android.widget.TextView;

public class MainActivity extends AppCompatActivity implements View.OnClickListener {

    @Override
    protected void onCreate(Bundle savedInstanceState) {
        super.onCreate(savedInstanceState);
        setContentView(R.layout.main_layout);
        //给按钮添加一个点击事件
        Button button = (Button) findViewById(R.id.left_button);
        button.setOnClickListener(this);
        replaceFragment(new RightFragment());
    }

    @Override
    public void onClick(View v) {
        switch (v.getId()) {

            case R.id.left_button:
                TextView textView = (TextView) findViewById(R.id.right_textview);
                //判断哪个碎片需要进行切换
                if (textView != null) {
                    replaceFragment(new AnotherRightFragment());
                } else {
                    replaceFragment(new RightFragment());
                }
        }
    }

    ///切换右边显示的碎片
    //fragment : 要切换的碎片
    private void replaceFragment(Fragment fragment) {

        FragmentManager fragmentManager = getSupportFragmentManager();
        FragmentTransaction tansaction = fragmentManager.beginTransaction();
        tansaction.replace(R.id.right_layout, fragment);
        tansaction.commit();
    }
}
- 运行效果如下:
综上,动态添加碎片可以分为以下5个步骤
- 创建待添加的碎片实例。
- 获取FragmentManager(在活动中可以直接通过调用getSupportFragmentManager()方法得到)
- 开启一个事务,通过调用beginTransaction()方法开启。
- 向容器内添加或替换碎片,一般使用replace()方法实现,需要传入容器的id和待添加的碎片实例。
3. 在碎片中模拟返回栈
在前面的练习中已经实现了动态添加返回栈,但是当切换了几次之后,按下back键程序会直接退出。所以如果需要给碎片提供一个返回栈的效果,需要调用FragmentTransaction中提供的addToBackStack()方法,可以用于将一个事务添加到返回栈中。
    ///切换右边显示的碎片
    //fragment : 要切换的碎片
    private void replaceFragment(Fragment fragment) {

        FragmentManager fragmentManager = getSupportFragmentManager();
        FragmentTransaction tansaction = fragmentManager.beginTransaction();
        tansaction.replace(R.id.right_layout, fragment);
        tansaction.addToBackStack(null);
        tansaction.commit();
    }
4.碎片和活动之间进行通信
-
在活动中调用碎片中的方法
通过FragmentManager提供的findFragmentById()方法,获得碎片实例,从而调用碎片中的方法
RightFragment rightFragment = (RightFragment) getFragmentManager().findFragmentById(R.id.right_fragment); 在碎片中调用活动中的方法
在碎片中可以通过调用getActivity()方法来得到和当前碎片相关联的活动实例
```
MainActiviy activity = (MainActivity) getActivity;
####5.碎片的生命周期
> 碎片和活动一样都有自己的生命周期
1. **运行状态**
>当一个碎片时可见的,并且它所关联的活动正处于运行状态时,该碎片也处于运行状态。
2. 暂停状态
> 当一个活动进入暂停状态时(由于另一个未沾满屏幕的活动被添加到了栈顶),与它相关联的可见碎片就会进入到暂停状态。
3. 停止状态
> 当一个活动进入停止状态时,与它相关联的碎片就会进入到停止状态,通过调用FragmentTransaction的remove()、replace()方法将碎片从活动中移除;或者在事务提交前调用了addToBackStack()方法,这时的碎片也会进入到停止状态,总的来说。进入停止状态的碎片对用户来说时完全不可见的。有可能会被系统回收。
4. 销毁状态
> 当活动被销毁时,与它相关联的碎片就会进入到销毁状态。或者通过调用FragmentTransaction的remove()、replace()方法将碎片从活动中移除、也或者在事务提交前调用了addToBackStack()方法。
#####5.1碎片的状态回调
1. onAttach()
>当碎片和活动建立关联的时候调用。
2. onCreateView()
> 为碎片创建视图(加载布局)时调用
3. onActivityCreated()
> 确保与碎片相关联的活动一定已经创建完毕的时候调用。
4. onDestroyView()
> 当与碎片关联的视图被移除的时候调用。
5. onDetach()
> 当碎片和活动解除关联的时候调用。
- 下图展示了,添加碎片时,活动级碎片的回调顺序

- 》另外还有一点需要注意的是:在碎片中也
可以通过onSaveInstanceState()方法来保存数据。
----
####6.动态加载布局的技巧
6.1 使用限定符
> 通常在平板中采用的是双页模式,在手机采用的是单页模式,限定符的作用就是系统根据屏幕的大小,来加载不同的界面布局文件。从而达到自动分页的效果
第一步:如下图所示,创建一个根activity布局文件同名的large布局文件

第二步:写入在平板下的布局代码
android:layout_height="match_parent">
第三步: 同时也要记得将原来的界面布局改为单页的界面布局。
android:layout_width="match_parent"
android:layout_height="match_parent">
- 在不同设备下运行效果分别如下。
![
![Uploading 2017-04-06_17-34-42_845768.png . . .]
](http://upload-images.jianshu.io/upload_images/2897594-83b233c3e75f01ad.png?imageMogr2/auto-orient/strip%7CimageView2/2/w/1240)
- 下图是一些常见的限定符,图片来自《第一行代码》

6.2 使用最小宽度限定符
>最小宽度限定符允许我们对屏幕的宽度制定一个最小值(以dp为单位),然后以这个最小值为临界点,屏幕宽度大于这个值的设备就加载一个布局。屏幕宽度小于这个值就加载另一个布局。
- 如下图所示,新建一个**layout_sw600dp**的文件,在这个文件中搭建布局。也就意味着当屏幕宽度大于600dp的时候会加载这个文件;当屏幕小于600dp的时候默认加载main_layout文件。
