YOLOv5:代码阅读(一):train.py;yaml文件
YOLOv5:代码阅读(一)
文章目录
- YOLOv5:代码阅读(一)
-
- 1.yaml文件
-
- 1.1 从yaml文件中解析yolov5整体基本框架
- 问题:Focus是啥模块?
- 问题:Conv的咋定义的
- 问题:CSPNet是如何实现的
- 问题:SPP的实现
- 问题:head是怎样的
- 问题:如何根据yaml文件生成模型
- 2. train.py[^2]
-
- 问题: yolov5训练方式
- 问题: 训练策略
- 问题: nbs是什么
- ==问题: yolov5用的loss是怎么样的==
- 问题:check_anchor函数
- 问题:使用超参数进化算法[^5]
1.yaml文件
1.1 从yaml文件中解析yolov5整体基本框架
# YOLOv5 backbone
backbone:
  # [from, number, module, args]
  [[-1, 1, Focus, [64, 3]],  # 0-P1/2
   [-1, 1, Conv, [128, 3, 2]],  # 1-P2/4
   [-1, 3, BottleneckCSP, [128]],
   [-1, 1, Conv, [256, 3, 2]],  # 3-P3/8
   [-1, 9, BottleneckCSP, [256]],
   [-1, 1, Conv, [512, 3, 2]],  # 5-P4/16
   [-1, 9, BottleneckCSP, [512]],
   [-1, 1, Conv, [1024, 3, 2]],  # 7-P5/32
   [-1, 1, SPP, [1024, [5, 9, 13]]],
   [-1, 3, BottleneckCSP, [1024, False]],  # 9
  ]

# YOLOv5 head
head:
  [[-1, 1, Conv, [512, 1, 1]],
   [-1, 1, nn.Upsample, [None, 2, 'nearest']],
   [[-1, 6], 1, Concat, [1]],  # cat backbone P4
   [-1, 3, BottleneckCSP, [512, False]],  # 13

   [-1, 1, Conv, [256, 1, 1]],
   [-1, 1, nn.Upsample, [None, 2, 'nearest']],
   [[-1, 4], 1, Concat, [1]],  # cat backbone P3
   [-1, 3, BottleneckCSP, [256, False]],  # 17 (P3/8-small)

   [-1, 1, Conv, [256, 3, 2]],
   [[-1, 14], 1, Concat, [1]],  # cat head P4
   [-1, 3, BottleneckCSP, [512, False]],  # 20 (P4/16-medium)

   [-1, 1, Conv, [512, 3, 2]],
   [[-1, 10], 1, Concat, [1]],  # cat head P5
   [-1, 3, BottleneckCSP, [1024, False]],  # 23 (P5/32-large)

   [[17, 20, 23], 1, Detect, [nc, anchors]],  # Detect(P3, P4, P5)
  ]
问题:Focus是啥模块?
Focus源代码:
class Focus(nn.Module):
    # Focus wh information into c-space
    def __init__(self, c1, c2, k=1, s=1, p=None, g=1, act=True):  # ch_in, ch_out, kernel, stride, padding, groups
        super(Focus, self).__init__()
        self.conv = Conv(c1 * 4, c2, k, s, p, g, act)

    def forward(self, x):  # x(b,c,w,h) -> y(b,4c,w/2,h/2)
        return self.conv(torch.cat([x[..., ::2, ::2], x[..., 1::2, ::2], x[..., ::2, 1::2], x[..., 1::2, 1::2]], 1))
一种下采样方法,该方法将原图尺寸变为原来的一半,即步长设为2,然后将通道变为原来的4倍,这样信息没丢,但是尺度变小了。
问题:Conv的咋定义的
源代码:
class Conv(nn.Module):
    # Standard convolution
    def __init__(self, c1, c2, k=1, s=1, p=None, g=1, act=True):  # ch_in, ch_out, kernel, stride, padding, groups
        super(Conv, self).__init__()
        self.conv = nn.Conv2d(c1, c2, k, s, autopad(k, p), groups=g, bias=False)
        self.bn = nn.BatchNorm2d(c2)
        self.act = nn.Hardswish() if act else nn.Identity()

    def forward(self, x):
        return self.act(self.bn(self.conv(x)))

    def fuseforward(self, x):
        return self.act(self.conv(x))

def autopad(k, p=None):  # kernel, padding
    # Pad to 'same'
    if p is None:
        p = k // 2 if isinstance(k, int) else [x // 2 for x in k]  # auto-pad
    return p
CONV层使用的激活函数是Hardswish;
atuopad是自动填padding的值,在k=1的时候,padding=0,在k=3的时候padding=1
问题:CSPNet是如何实现的
根据源代码:
class BottleneckCSP(nn.Module):
    # CSP Bottleneck https://github.com/WongKinYiu/CrossStagePartialNetworks
    def __init__(self, c1, c2, n=1, shortcut=True, g=1, e=0.5):  # ch_in, ch_out, number, shortcut, groups, expansion
        super(BottleneckCSP, self).__init__()
        c_ = int(c2 * e)  # hidden channels
        self.cv1 = Conv(c1, c_, 1, 1)
        self.cv2 = nn.Conv2d(c1, c_, 1, 1, bias=False)
        self.cv3 = nn.Conv2d(c_, c_, 1, 1, bias=False)
        self.cv4 = Conv(2 * c_, c2, 1, 1)
        self.bn = nn.BatchNorm2d(2 * c_)  # applied to cat(cv2, cv3)
        self.act = nn.LeakyReLU(0.1, inplace=True)
        self.m = nn.Sequential(*[Bottleneck(c_, c_, shortcut, g, e=1.0) for _ in range(n)])

    def forward(self, x):
        y1 = self.cv3(self.m(self.cv1(x)))
        y2 = self.cv2(x)
        return self.cv4(self.act(self.bn(torch.cat((y1, y2), dim=1))))
得到如下图:
先用一层网络(CV1,CV2)将通道降为原来的一半(话说这个真的是CSP吗?),然后分为两个路径,一个路径进行特征提取,另一个不进行(CSP的操作),最后将两个路径concat起来。
倘若该层后面有BN层的话,一般选择bias=False(BN有偏置),而后面没有的时候bias=True。上面的CONV层和CSPNet也是这个规律
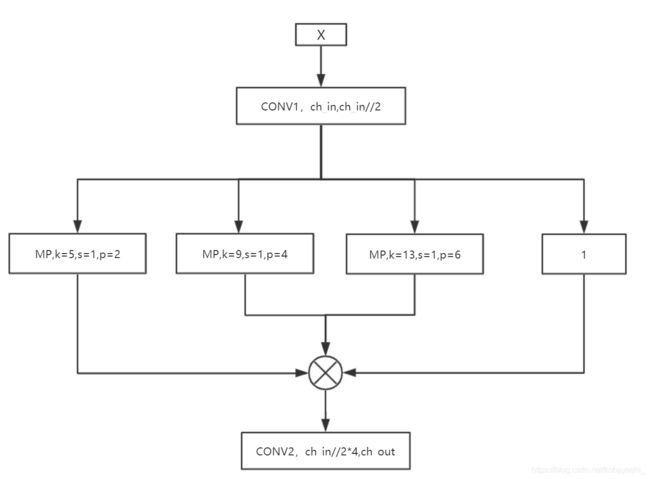
问题:SPP的实现
源代码:
class SPP(nn.Module):
    # Spatial pyramid pooling layer used in YOLOv3-SPP
    def __init__(self, c1, c2, k=(5, 9, 13)):
        super(SPP, self).__init__()
        c_ = c1 // 2  # hidden channels
        self.cv1 = Conv(c1, c_, 1, 1)
        self.cv2 = Conv(c_ * (len(k) + 1), c2, 1, 1)
        self.m = nn.ModuleList([nn.MaxPool2d(kernel_size=x, stride=1, padding=x // 2) for x in k])

    def forward(self, x):
        x = self.cv1(x)
        return self.cv2(torch.cat([x] + [m(x) for m in self.m], 1))//
首先明确一点,
nn.ModuleList和python的list是一样的,它是一个储存不同 module,并自动将每个 module 的 parameters 添加到网络之中的容器。其次,
[x] + [m(x) for m in self.m]返回值是一个list,torch.cat([x] + [m(x) for m in self.m], 1)是将list在通道层面合并;当2*padding=k_size+1的时候,特征图输出尺寸不变
最后,SPP是这样的,其中1代表不作变换。
问题:head是怎样的
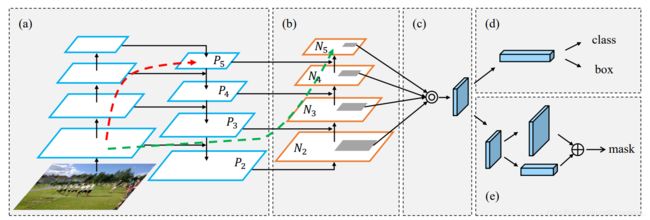
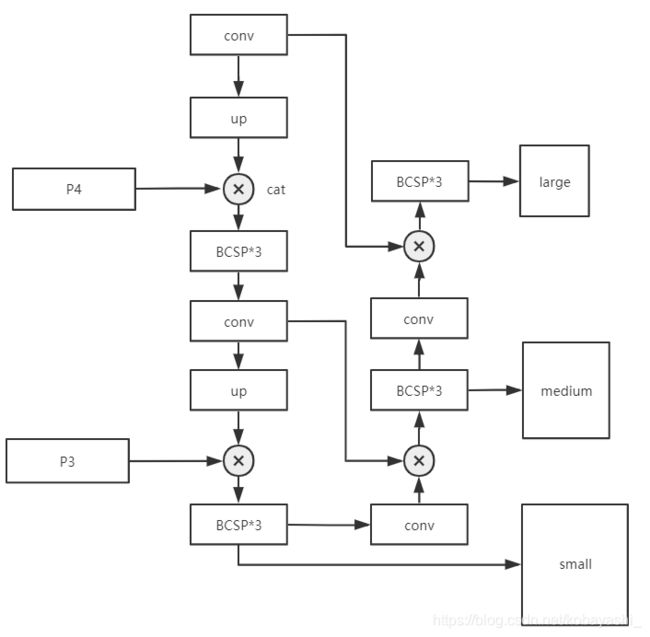
yolov5使用的head是PANet1
# YOLOv5 head
head:
  [[-1, 1, Conv, [512, 1, 1]],
   [-1, 1, nn.Upsample, [None, 2, 'nearest']],
   [[-1, 6], 1, Concat, [1]],  # cat backbone P4
   [-1, 3, BottleneckCSP, [512, False]],  # 13

   [-1, 1, Conv, [256, 1, 1]],
   [-1, 1, nn.Upsample, [None, 2, 'nearest']],
   [[-1, 4], 1, Concat, [1]],  # cat backbone P3
   [-1, 3, BottleneckCSP, [256, False]],  # 17 (P3/8-small)

   [-1, 1, Conv, [256, 3, 2]],
   [[-1, 14], 1, Concat, [1]],  # cat head P4
   [-1, 3, BottleneckCSP, [512, False]],  # 20 (P4/16-medium)

   [-1, 1, Conv, [512, 3, 2]],
   [[-1, 10], 1, Concat, [1]],  # cat head P5
   [-1, 3, BottleneckCSP, [1024, False]],  # 23 (P5/32-large)

   [[17, 20, 23], 1, Detect, [nc, anchors]],  # Detect(P3, P4, P5)
  ]
不过也可以使用FPN
# YOLOv5 FPN head
head:
  [[-1, 3, BottleneckCSP, [1024, False]],  # 10 (P5/32-large)

   [-1, 1, nn.Upsample, [None, 2, 'nearest']],
   [[-1, 6], 1, Concat, [1]],  # cat backbone P4
   [-1, 1, Conv, [512, 1, 1]],
   [-1, 3, BottleneckCSP, [512, False]],  # 14 (P4/16-medium)

   [-1, 1, nn.Upsample, [None, 2, 'nearest']],
   [[-1, 4], 1, Concat, [1]],  # cat backbone P3
   [-1, 1, Conv, [256, 1, 1]],
   [-1, 3, BottleneckCSP, [256, False]],  # 18 (P3/8-small)

   [[18, 14, 10], 1, Detect, [nc, anchors]],  # Detect(P3, P4, P5)
  ]
问题:如何根据yaml文件生成模型
生成的代码在yolo.py中。
2. train.py2
问题: yolov5训练方式
main函数。
 for _ in range(100):  # generations to evolve
            if os.path.exists('evolve.txt'):  # if evolve.txt exists: select best hyps and mutate
                # Select parent(s)
                # 选择进化方式
                parent = 'single'  # parent selection method: 'single' or 'weighted'
                # 加载evolve.txt
                x = np.loadtxt('evolve.txt', ndmin=2)
                # 选取至多前5次进化的结果
                n = min(5, len(x))  # number of previous results to consider
                x = x[np.argsort(-fitness(x))][:n]  # top n mutations
                # 根据results计算hyp的权重
                w = fitness(x) - fitness(x).min()  # weights
                # 根据不同进化方式获得base hyp
                if parent == 'single' or len(x) == 1:
                    # x = x[random.randint(0, n - 1)]  # random selection
                    x = x[random.choices(range(n), weights=w)[0]]  # weighted selection
                elif parent == 'weighted':
                    x = (x * w.reshape(n, 1)).sum(0) / w.sum()  # weighted combination

                # Mutate
                # 超参数进化
                mp, s = 0.9, 0.2  # mutation probability, sigma
                npr = np.random
                npr.seed(int(time.time()))
                # 获取突变初始值
                g = np.array([x[0] for x in meta.values()])  # gains 0-1
                ng = len(meta)
                v = np.ones(ng)
                # 设置突变
                while all(v == 1):  # mutate until a change occurs (prevent duplicates)
                    v = (g * (npr.random(ng) < mp) * npr.randn(ng) * npr.random() * s + 1).clip(0.3, 3.0)
                # 将突变添加到base hyp上
                # [i+7]是因为x中前七个数字为results的指标(P, R, mAP, F1, test_losses=(GIoU, obj, cls)),之后才是超参数hyp
                for i, k in enumerate(hyp.keys()):  # plt.hist(v.ravel(), 300)
                    hyp[k] = float(x[i + 7] * v[i])  # mutate

            # Constrain to limits
            # 修剪hyp在规定范围里
            for k, v in meta.items():
                hyp[k] = max(hyp[k], v[1])  # lower limit
                hyp[k] = min(hyp[k], v[2])  # upper limit
                hyp[k] = round(hyp[k], 5)  # significant digits

            # Train mutation
            # 训练
            results = train(hyp.copy())

            # Write mutation results
            """
            写入results和对应的hyp到evolve.txt
            evolve.txt文件每一行为一次进化的结果
            一行中前七个数字为(P, R, mAP, F1, test_losses=(GIoU, obj, cls)),之后为hyp
            保存hyp到yaml文件
            """
            print_mutation(hyp.copy(), results, yaml_file, opt.bucket)

        # Plot results
        plot_evolution(yaml_file)
        print('Hyperparameter evolution complete. Best results saved as: %s\nCommand to train a new model with these '
              'hyperparameters: $ python train.py --hyp %s' % (yaml_file, yaml_file))
问题: 训练策略
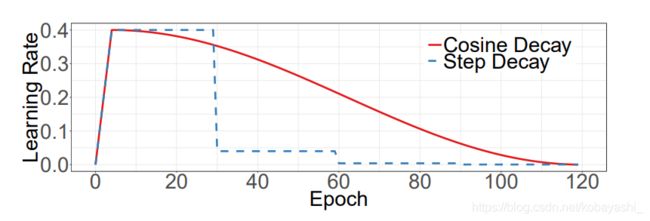
 # Scheduler https://arxiv.org/pdf/1812.01187.pdf
    # https://pytorch.org/docs/stable/_modules/torch/optim/lr_scheduler.html#OneCycleLR
    lf = lambda x: ((1 + math.cos(x * math.pi / epochs)) / 2) * (1 - hyp['lrf']) + hyp['lrf']  # cosine
    scheduler = lr_scheduler.LambdaLR(optimizer, lr_lambda=lf)
    # plot_lr_scheduler(optimizer, scheduler, epochs)
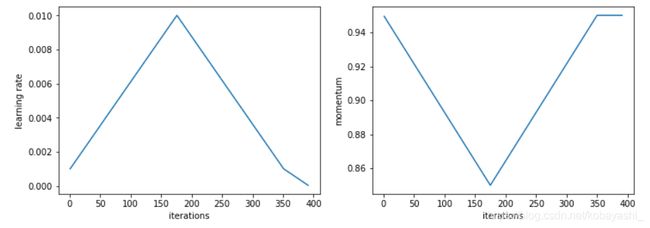
根据代码给的连接,查到了OneCycleLR.3
可以将学习率和动量分为3个部分,学习率先上升,接着下降,然后继续下降;动量先下降,然后上升,然后不变.
1.当模型刚开始训练的时候,模型见到的数据都新的,这意味着模型能够很快地根据数据进行修正.这个时候如果学习过大,很容易导致模型对该数据过拟合,后面要通过很多轮才能拉回来,所以需要warmup.
2.在 Cycle 中期,高学习率将作为正则化的角色,并使 NN 不会过拟合。它们将阻止模型落在损失函数的陡峭区域,而是找到更平坦的最小值。
3.然后训练的最后一部分,学习率下降直到消失,将允许我们得到更平滑的部分内的局部最小值。
不过,学习率函数定义的是Cosine Learning Rate Decay,余弦方式进行学习率衰减,OneCycleLR可能是以后的版本会用到.
问题: nbs是什么
nbs = 64  #名义batch_size
accumulate = max(round(nbs / total_batch_size), 1)  # accumulate loss before optimizing,累积loss,即保证无论batch_size多大,都是使用batch_size=64来更新
hyp['weight_decay'] *= total_batch_size * accumulate / nbs  # scale weight_decay
这个做法是保证每次都是每64个batch才进行梯度更新,nbs:nomial batch size,名义批次大小.
gradient accumulation
问题: yolov5用的loss是怎么样的
general.py
首先要清楚anchor的设置4。
1.yolov5的anchor根据形状规则选择,而不是iou阈值;
2.bbox使用3个grid来预测,一个目标grid+2个最近grid。
根据[4]做了如下标注:
def build_targets(p, targets, model):
	# Build targets for compute_loss(), input targets(image,class,x,y,w,h)
    det = model.module.model[-1] if is_parallel(model) else model.model[-1]  # Detect() module
    na, nt = det.na, targets.shape[0]  # number of anchors, targets
    tcls, tbox, indices, anch = [], [], [], []
    gain = torch.ones(7, device=targets.device)  # normalized to gridspace gain
    ai = torch.arange(na, device=targets.device).float().view(na, 1).repeat(1, nt)  # same as .repeat_interleave(nt)
    targets = torch.cat((targets.repeat(na, 1, 1), ai[:, :, None]), 2)  # append anchor indices,<将anchor重复3次?>

    g = 0.5  # bias
    #附近4个点
    off = torch.tensor([[0, 0],
                        [1, 0], [0, 1], [-1, 0], [0, -1],  # j,k,l,m
                        # [1, 1], [1, -1], [-1, 1], [-1, -1],  # jk,jm,lk,lm
                        ], device=targets.device).float() * g  # offsets

    for i in range(det.nl):#分配网络预测的框,3个预测框
        anchors = det.anchors[i]
        gain[2:6] = torch.tensor(p[i].shape)[[3, 2, 3, 2]]  # xyxy gain;增益,用于将特征图转换到原图,这里是赋4个值

        # Match targets to anchors
        t = targets * gain
        if nt:
            # Matches
    '''1.先计算anchor和wh的比值得到r;
       2.和阈值比较,小于阈值(4)的保留,然后过滤t=t[j]。如果r过高,说明anchor和wh匹配程度不高应该舍弃,不强制进行回归;
    '''
            r = t[:, :, 4:6] / anchors[:, None]  # wh ratio
            j = torch.max(r, 1. / r).max(2)[0] < model.hyp['anchor_t']  # compare
            # j = wh_iou(anchors, t[:, 4:6]) > model.hyp['iou_t']  # iou(3,n)=wh_iou(anchors(3,2), gwh(n,2))
            t = t[j]  # filter

            # Offsets
      '''1.计算目标中心点最近的2个网格,将这两个网格也加入预测,正样本个数x3
      '''
            gxy = t[:, 2:4]  # grid xy
            gxi = gain[[2, 3]] - gxy  # inverse
            j, k = ((gxy % 1. < g) & (gxy > 1.)).T
            l, m = ((gxi % 1. < g) & (gxi > 1.)).T
            j = torch.stack((torch.ones_like(j), j, k, l, m))
            t = t.repeat((5, 1, 1))[j]
            offsets = (torch.zeros_like(gxy)[None] + off[:, None])[j]
        else:
            t = targets[0]
            offsets = 0

        # Define
        b, c = t[:, :2].long().T  # image, class
        gxy = t[:, 2:4]  # grid xy
        gwh = t[:, 4:6]  # grid wh
        gij = (gxy - offsets).long()
        gi, gj = gij.T  # grid xy indices

        # Append
        a = t[:, 6].long()  # anchor indices
        indices.append((b, a, gj, gi))  # image, anchor, grid indices
        tbox.append(torch.cat((gxy - gij, gwh), 1))  # box
        anch.append(anchors[a])  # anchors
        tcls.append(c)  # class

    return tcls, tbox, indices, anch
损失函数组成:
1.分类损失,置信度损失用的是BCELoss;
2.bbox回归使用CIOU损失
def compute_loss(p, targets, model):  # predictions, targets, model
    device = targets.device
    lcls, lbox, lobj = torch.zeros(1, device=device), torch.zeros(1, device=device), torch.zeros(1, device=device)
    tcls, tbox, indices, anchors = build_targets(p, targets, model)  # targets
    h = model.hyp  # hyperparameters

    # Define criteria
    BCEcls = nn.BCEWithLogitsLoss(pos_weight=torch.Tensor([h['cls_pw']])).to(device)
    BCEobj = nn.BCEWithLogitsLoss(pos_weight=torch.Tensor([h['obj_pw']])).to(device)

    # Class label smoothing https://arxiv.org/pdf/1902.04103.pdf eqn 3
    cp, cn = smooth_BCE(eps=0.0) #标签平滑,eps=0意味着不使用

    # Focal loss
    g = h['fl_gamma']  # focal loss gamma,使用focal loss,如果hyp.yaml中fl_gamma>0则使用focal loss
    if g > 0:
        BCEcls, BCEobj = FocalLoss(BCEcls, g), FocalLoss(BCEobj, g)

    # Losses
    nt = 0  # number of targets
    np = len(p)  # number of outputs
    balance = [4.0, 1.0, 0.4] if np == 3 else [4.0, 1.0, 0.4, 0.1]  # P3-5 or P3-6
    for i, pi in enumerate(p):  # layer index, layer predictions
        b, a, gj, gi = indices[i]  # image, anchor, gridy, gridx
        tobj = torch.zeros_like(pi[..., 0], device=device)  # target obj

        n = b.shape[0]  # number of targets
        if n:
            nt += n  # cumulative targets
            ps = pi[b, a, gj, gi]  # prediction subset corresponding to targets

            # Regression
            pxy = ps[:, :2].sigmoid() * 2. - 0.5
            pwh = (ps[:, 2:4].sigmoid() * 2) ** 2 * anchors[i]
            pbox = torch.cat((pxy, pwh), 1).to(device)  # predicted box
            iou = bbox_iou(pbox.T, tbox[i], x1y1x2y2=False, CIoU=True)  # iou(prediction, target) ],CIOU损失
            lbox += (1.0 - iou).mean()  # iou loss

            # Objectness
            tobj[b, a, gj, gi] = (1.0 - model.gr) + model.gr * iou.detach().clamp(0).type(tobj.dtype)  # iou ratio

            # Classification
            if model.nc > 1:  # cls loss (only if multiple classes)
                t = torch.full_like(ps[:, 5:], cn, device=device)  # targets
                t[range(n), tcls[i]] = cp
                lcls += BCEcls(ps[:, 5:], t)  # BCE

            # Append targets to text file
            # with open('targets.txt', 'a') as file:
            #     [file.write('%11.5g ' * 4 % tuple(x) + '\n') for x in torch.cat((txy[i], twh[i]), 1)]

        lobj += BCEobj(pi[..., 4], tobj) * balance[i]  # obj loss

    s = 3 / np  # output count scaling
    lbox *= h['box'] * s
    lobj *= h['obj'] * s * (1.4 if np == 4 else 1.)
    lcls *= h['cls'] * s
    bs = tobj.shape[0]  # batch size

    loss = lbox + lobj + lcls
    return loss * bs, torch.cat((lbox, lobj, lcls, loss)).detach()
问题:check_anchor函数
# Anchors
if not opt.noautoanchor:
    check_anchors(dataset, model=model, thr=hyp['anchor_t'], imgsz=imgsz)
check_anchor根据网络的输出与数据集里面的anchor计算best possible recall,bpr,如果召回率低于0.98,用kmean来修改anchor。因为提供的anchor是COCO上聚类的,在使用自己的数据集的时候可以使用这个功能。
def check_anchors(dataset, model, thr=4.0, imgsz=640):
    # Check anchor fit to data, recompute if necessary
    print('\nAnalyzing anchors... ', end='')
    m = model.module.model[-1] if hasattr(model, 'module') else model.model[-1]  # Detect()
    shapes = imgsz * dataset.shapes / dataset.shapes.max(1, keepdims=True)
    scale = np.random.uniform(0.9, 1.1, size=(shapes.shape[0], 1))  # augment scale
    wh = torch.tensor(np.concatenate([l[:, 3:5] * s for s, l in zip(shapes * scale, dataset.labels)])).float()  # wh

    def metric(k):  # compute metric
        r = wh[:, None] / k[None]
        x = torch.min(r, 1. / r).min(2)[0]  # ratio metric
        best = x.max(1)[0]  # best_x
        aat = (x > 1. / thr).float().sum(1).mean()  # anchors above threshold
        bpr = (best > 1. / thr).float().mean()  # best possible recall
        return bpr, aat

    bpr, aat = metric(m.anchor_grid.clone().cpu().view(-1, 2))
    print('anchors/target = %.2f, Best Possible Recall (BPR) = %.4f' % (aat, bpr), end='')
    if bpr < 0.98:  # threshold to recompute
        print('. Attempting to generate improved anchors, please wait...' % bpr)
        na = m.anchor_grid.numel() // 2  # number of anchors
        new_anchors = kmean_anchors(dataset, n=na, img_size=imgsz, thr=thr, gen=1000, verbose=False)
        new_bpr = metric(new_anchors.reshape(-1, 2))[0]
        if new_bpr > bpr:  # replace anchors
            new_anchors = torch.tensor(new_anchors, device=m.anchors.device).type_as(m.anchors)
            m.anchor_grid[:] = new_anchors.clone().view_as(m.anchor_grid)  # for inference
            m.anchors[:] = new_anchors.clone().view_as(m.anchors) / m.stride.to(m.anchors.device).view(-1, 1, 1)  # loss
            check_anchor_order(m)
            print('New anchors saved to model. Update model *.yaml to use these anchors in the future.')
        else:
            print('Original anchors better than new anchors. Proceeding with original anchors.')
    print('')  # newline
问题:使用超参数进化算法5
YOLOv5可以使用遗传算法(GA)对超参数进行进化,包括数据增强的设置。
1.超参数初始化
好的先验能够带来好的结果。
yolov5/data/hyp.scratch.yaml
2.定义适应度
yolov5/utils/general.py
 def fitness(x):
     # Returns fitness (for use with results.txt or evolve.txt)
     w = [0.0, 0.0, 0.1, 0.9]  # weights for [P, R, [email protected], [email protected]:0.95]
     return (x[:, :4] * w).sum(1)
3.进化
命令如下
# Single-GPU
python train.py --epochs 10 --data coco128.yaml --weights yolov5s.pt --cache --evolve

# Multi-GPU
for i in 0 1 2 3; do
  nohup python train.py --epochs 10 --data coco128.yaml --weights yolov5s.pt --cache --evolve --device $i &
done
这会使用300轮来进化超参数。
不过在使用这个的时候遇到了如下错误:
Namespace(adam=False, batch_size=16, bucket='', cache_images=True, cfg='./models/yolov5s.yaml', data='./data/coco128.yaml', device='', epochs=3, evolve=True, global_rank=-1, hyp='data/hyp.scratch.yaml', image_weights=False, img_size=[640, 640], local_rank=-1, logdir='runs/', multi_scale=False, name='', noautoanchor=False, nosave=False, notest=False, rect=False, resume=False, single_cls=False, sync_bn=False, total_batch_size=16, weights='', workers=8, world_size=1)
Traceback (most recent call last):
File "train.py", line 525, in
hyp[k] = max(hyp[k], v[1]) # lower limit
KeyError: 'anchors'
我们需要注释掉 ‘anchors’: (2, 2.0, 10.0),
meta = {
     'lr0': (1, 1e-5, 1e-1),  # initial learning rate (SGD=1E-2, Adam=1E-3)
                'lrf': (1, 0.01, 1.0),  # final OneCycleLR learning rate (lr0 * lrf)
                'momentum': (0.3, 0.6, 0.98),  # SGD momentum/Adam beta1
                'weight_decay': (1, 0.0, 0.001),  # optimizer weight decay
                'warmup_epochs': (1, 0.0, 5.0),  # warmup epochs (fractions ok)
                'warmup_momentum': (1, 0.0, 0.95),  # warmup initial momentum
                'warmup_bias_lr': (1, 0.0, 0.2),  # warmup initial bias lr
                'box': (1, 0.02, 0.2),  # box loss gain
                'cls': (1, 0.2, 4.0),  # cls loss gain
                'cls_pw': (1, 0.5, 2.0),  # cls BCELoss positive_weight
                'obj': (1, 0.2, 4.0),  # obj loss gain (scale with pixels)
                'obj_pw': (1, 0.5, 2.0),  # obj BCELoss positive_weight
                'iou_t': (0, 0.1, 0.7),  # IoU training threshold
                'anchor_t': (1, 2.0, 8.0),  # anchor-multiple threshold
                # 'anchors': (2, 2.0, 10.0),  # anchors per output grid (0 to ignore)#如果使用进化算法需要注释这一行
                'fl_gamma': (0, 0.0, 2.0),  # focal loss gamma (efficientDet default gamma=1.5)
                'hsv_h': (1, 0.0, 0.1),  # image HSV-Hue augmentation (fraction)
                'hsv_s': (1, 0.0, 0.9),  # image HSV-Saturation augmentation (fraction)
                'hsv_v': (1, 0.0, 0.9),  # image HSV-Value augmentation (fraction)
                'degrees': (1, 0.0, 45.0),  # image rotation (+/- deg)
                'translate': (1, 0.0, 0.9),  # image translation (+/- fraction)
                'scale': (1, 0.0, 0.9),  # image scale (+/- gain)
                'shear': (1, 0.0, 10.0),  # image shear (+/- deg)
                'perspective': (0, 0.0, 0.001),  # image perspective (+/- fraction), range 0-0.001
                'flipud': (1, 0.0, 1.0),  # image flip up-down (probability)
                'fliplr': (0, 0.0, 1.0),  # image flip left-right (probability)
                'mosaic': (1, 0.0, 1.0),  # image mixup (probability)
                'mixup': (1, 0.0, 1.0)}  # image mixup (probability)
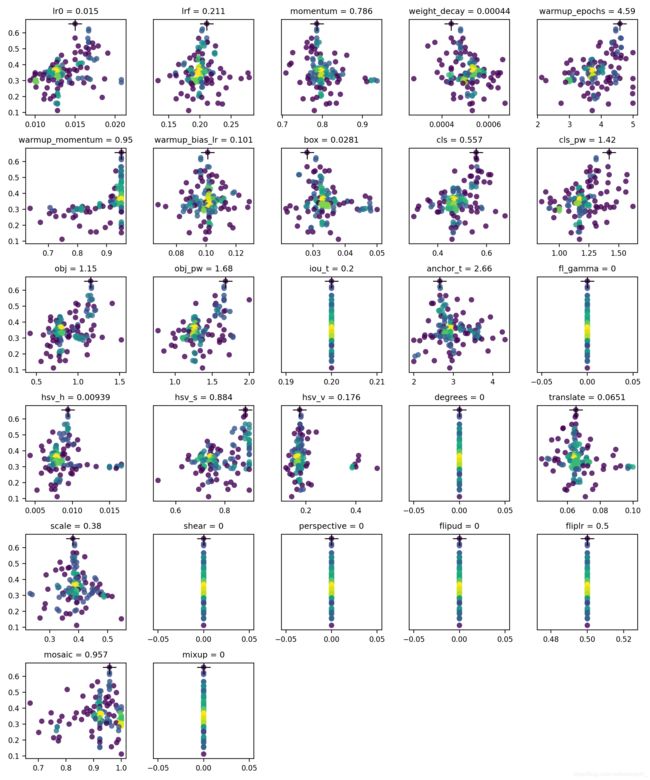
跑了100次,每次10个epoch。得到结果如下,x轴代表超参数的值,y轴代表fitness。
yolov5/evolve.png
https://arxiv.org/pdf/1803.01534.pdf ,PANet ↩︎
https://blog.csdn.net/Q1u1NG/article/details/107463417 ↩︎
文章:https://sgugger.github.io/the-1cycle-policy.html?utm_source=ld246.com,论文:https://arxiv.org/pdf/1708.07120.pdf, pytorch:https://pytorch.org/docs/stable/_modules/torch/optim/lr_scheduler.html#OneCycleLR ↩︎
https://zhuanlan.zhihu.com/p/183838757 ↩︎
https://github.com/ultralytics/yolov5/issues/607 ↩︎

