为什么要用Spring的依赖注入,解耦,统一管理,面向接口编程,易于程序的扩展,有利于程序的维护
解耦合,比如A需要用到B,我们需要把B对象 set 到 A对象里,那C也需要用到B对象,此时也需要把B set 到C里,那么怎么获取到B对象的引用了?
比如A用到B,C,D,B又用到E,C又用到F,D又用到G,这样靠手动操作是不是很麻烦。
常的java开发中,程序员在某个类中需要依赖其它类的方法,则通常是new一个依赖类再调用类实例的方法,这种开发存在的问题是new的类实例不好统一管理,spring提出了依赖注入的思想,即依赖类不由程序员实例化,而是通过spring容器帮我们new指定实例并且将实例注入到需要该对象的类中。依赖注入的另一种说法是“控制反转”,通俗的理解是:平常我们new一个实例,这个实例的控制权是我们程序员,而控制反转是指new实例工作不由我们程序员来做而是交给spring容器来做。
面向接口编程,接口不变,改动实现类就可以,不需要改写现有代码,减少对系统的影响。
在使用面向接口的编程过程中,将具体逻辑与实现分开,减少了各个类之间的相互依赖,当各个类变化时,不需要对已经编写的系统进行改动,添加新的实现类就可以了,不在担心新改动的类对系统的其他模块造成影响。
注入方式
构造函数注入,setter方法注入,注解注入
1.构造函数注入
在bean标签的内部使用constructor-arg标签就可以进行构造函数注入了。
constructor-arg标签的属性:
type:用于指定要注入的数据的数据类型,该数据类型也是构造函数中某个或某些参数的类型
index:用于指定要注入的数据给构造函数中指定索引位置的参数赋值,索引的位置从0开始
name:用于给指定构造函数中指定名称的参数赋值
value:用于提供基本类型和String类型的数据
ref:用于指定其他的bean类型数据,就是在IOC容器中出现过的bean对象
AccountServiceImpl 类
public class AccountServiceImpl implements AccountService {

    private String name;
    private Integer age;
    private Date birthday;
    private String[] myStrs;
    private List myList;
    private Set mySet;
    private Map myMap;
    private Properties myProps;

    public String getName() {
        return name;
    }

    public void setName(String name) {
        this.name = name;
    }

    public Integer getAge() {
        return age;
    }

    public void setAge(Integer age) {
        this.age = age;
    }

    public Date getBirthday() {
        return birthday;
    }

    public void setBirthday(Date birthday) {
        this.birthday = birthday;
    }

    public AccountServiceImpl(String name, Integer age, Date birthday) {
        System.out.println("含参的构造方法被调用了");
        this.name = name;
        this.age = age;
        this.birthday = birthday;
    }

    public AccountServiceImpl() {
        System.out.println("构造方法调用");
    }

    @Override
    public int addMoney(int money) {
        System.out.println("向账户中加钱:" + money);
        return 0;
    }

    @Override
    public void saveAccount(Account account) {
        System.out.println("saveAccount方法执行了");
    }
}
测试
@Test
public void test8() {
    ApplicationContext applicationContext = new ClassPathXmlApplicationContext("classpath:bean.xml");;
    AccountService accountService = (AccountService) applicationContext.getBean("accountService");
    System.out.println(accountService.toString());
}
2.setter方法注入
在bean标签内部使用property标签进行配置。
property标签的属性:
name:用于指定注入时所调用的set方法名称
value:用于提供基本类型和String类型的数据
ref:用于指定其他的bean类型数据
这里面我们注入了基本类型、包装类型、日期类型数据。
优势:创建对象时没有明确的限制,可以直接使用默认构造函数。
缺点:如果又某个成员必须有值,则获取对象有可能是set方法没有执行。
3.对集合类型数据进行注入
AAA
BBB
CCC
list1
list2
list3
set1
set2
set3
柯森
23
4.注解注入
假设此时只有一个AccountDao的实现类,并且这个类也加上了@Repository注解,那么我们这样注入是可以成功的,但是如果容器中存在多个AccountDao的实现类,此时仅仅使用AccountDao是不能完成数据注入的,需要配合@Qualifier注解使用注入数据。
@Component
public class AccountService4Impl implements AccountService3 {

    //错误写法,默认会去容器中查找名称为accountDao的bean
     //@Autowired
    //private AccountDao accountDao;

    //正确写法
    //@Autowired
    //private AccountDao accountDao1

    //正确写法
    @Autowired
    @Qualifier("accountDao1")
    private AccountDao accountDao;

    @Override
    public void addMoney(int money) {
        System.out.println("向账户中加钱....AccountService3Impl");
    }
}
@Value注解的基本使用
在使用@Value注入基本类型和String类型的数据时使用"#“号;使用@Value读取配置文件的值时需要使用”$"符号,同时使用@PropertySource注解指定配置文件的位置。
@Component
@PropertySource("classpath:db.properties")
public class AccountService4Impl implements AccountService3 {

    @Autowired
    @Qualifier("accountDao1")
    private AccountDao accountDao;

    //使用SPEL表达式只注入值
    @Value("#{19 - 9}")
    private int age;

    @Value("zhangsan")
    private String name;

    //读取操作系统的名称
    @Value("#{systemProperties['os.name']}")
    private String osname;

    //读取数据库配置文件中的值
    @Value("${password}")
    private String password;

    @Override
    public void addMoney(int money) {
        System.out.println("向账户中加钱....AccountService3Impl");
    }
}
通过 xml 和 annotation 获取到 Bean 的描述信息后, 肯定需要将其统一存储和管理起来。 在 Spring 框架代码中, Bean 的描述信息的最终存储形式即为 BeanDefinition。
Spring的核心是控制反转(IoC)和面向切面(AOP)
方便解耦,简化开发 (高内聚低耦合)
Spring就是一个大工厂(容器),可以将所有对象创建和依赖关系维护,交给Spring管理,spring工厂是用于生成bean
AOP编程的支持
Spring提供面向切面编程,可以方便的实现对程序进行权限拦截、运行监控等功能
声明式事务的支持
方便集成各种优秀框架
Spring不排斥各种优秀的开源框架,其内部提供了对各种优秀框架(如:Struts、Hibernate、MyBatis、Quartz等)的直接支持
降低JavaEE API的使用难度
Spring 对JavaEE开发中非常难用的一些API(JDBC、JavaMail、远程调用等),都提供了封装,使这些API应用难度大大降低
Spring容器就是一个实现了ApplicationContext接口的对象
Spring 容器是 Spring 框架的核心,是用来管理对象的。容器将创建对象,把它们连接在一起,配置它们,并管理他们的整个生命周期从创建到销毁。
如何实例化一个Bean?
1.构造方法
2.通过静态工厂方法
3.通过实例工厂方法
Spring通过解析我们的配置元数据,以及我们提供的类对象得到一个Beanfinition对象。通过这个对象可以实例化出一个java bean对象。
依赖注入
依赖注入主要分为两种方式
1.构造函数注入
2.Setter方法注入
1.IOC控制反转
将我们创建对象的控制权反转交给spring去创建
- 之前创建对象是这么写的
UserService userService = new UserServiceImpl();
userService.addUser();
- 现在都由spring来创建,后面开发也都通过扫描配置文件里注入的bean,对象直接从spring容器获取不需要自己创建
在xml里配置bean
2.DI依赖注入
service里是这么写的,通过setBookDao方法进行注入bookDao
private BookDao bookDao;

public void setBookDao(BookDao bookDao) {
    this.bookDao = bookDao;
}

@Override
public void addBook(){
    this.bookDao.save();
}
上面可以像下面这样用spring配置文件实现,使用
3.核心Api
BeanFactory :这是一个工厂,用于生成任意bean,采取延迟加载,第一次getBean时才会初始化Bean,懒加载
ApplicationContext:是BeanFactory的子接口,功能更强大。(国际化处理、事件传递、Bean自动装配、各种不同应用层的Context实现)。当配置文件被加载,就进行对象实例化,饿汉式,直接会实例bean
ClassPathXmlApplicationContext 用于加载classpath(类路径、src)下的xml
加载xml运行时位置 --> /WEB-INF/classes/...xml
FileSystemXmlApplicationContext 用于加载指定盘符下的xml
加载xml运行时位置 --> /WEB-INF/...xml
通过java web ServletContext.getRealPath() 获得具体盘符
4.装配bean
- 默认构造
- 静态工厂
常用与spring整合其他框架(工具)
静态工厂:用于生成实例对象,所有的方法必须是static
例如:bean.xml配置文件
public class MyBeanFactory {
    public UserService createService(){
      return new UserServiceImpl();
    }
}
String xmlPath = "com/itheima/c_inject/b_static_factory/beans.xml";
ApplicationContext applicationContext = new ClassPathXmlApplicationContext(xmlPath);
UserService userService = applicationContext.getBean("userServiceId" ,UserService.class);
userService.addUser();
通过userServiceId获得factory并调用createService方法
- 实例工厂
必须先有工厂实例对象,通过实例对象创建对象。提供所有的方法都是“非静态”的。
5.作用域
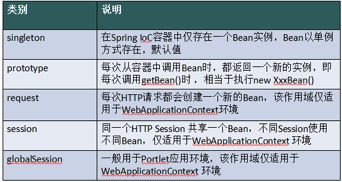
singleton 单例,默认值。
prototype 多例,每执行一次getBean将获得一个实例。例如:struts整合spring,配置action多例。
6.生命周期
- 初始化和销毁
目标类
public class UserServiceImpl implements UserService {
    @Override
    public void addUser() {
        System.out.println("e_lifecycle add user");
    }

    public void myInit(){
        System.out.println("初始化");
    }
    public void myDestroy(){
        System.out.println("销毁");
    }
}
spring配置
测试
@Test
public void demo02() throws Exception{
    //spring 工厂
    String xmlPath = "com/itheima/e_lifecycle/beans.xml";
    ClassPathXmlApplicationContext applicationContext = new ClassPathXmlApplicationContext(xmlPath);
    UserService userService = (UserService) applicationContext.getBean("userServiceId");
    userService.addUser();

    //要求:1.容器必须close,销毁方法执行; 2.必须是单例的
       //applicationContext.getClass().getMethod("close").invoke(applicationContext);
    // * 此方法接口中没有定义,实现类提供
    applicationContext.close();
}
BeanPostProcessor 后处理Bean
spring 提供一种机制,只要实现此接口BeanPostProcessor,并将实现类提供给spring容器,spring容器将自动执行,在初始化方法前执行before(),在初始化方法后执行after() 。 配置
spring提供工厂勾子,用于修改实例对象,可以生成代理对象,是AOP底层。
public class MyBeanPostProcessor implements BeanPostProcessor {
    @Override
    public Object postProcessBeforeInitialization(Object bean, String beanName) throws BeansException {
        System.out.println("前方法 : " + beanName);
        return bean;
    }

    @Override
    public Object postProcessAfterInitialization(final Object bean, String beanName) throws BeansException {
        System.out.println("后方法 : " + beanName);
        // bean 目标对象
        // 生成 jdk 代理
        return Proxy.newProxyInstance(
                    MyBeanPostProcessor.class.getClassLoader(),
                    bean.getClass().getInterfaces(),
                    new InvocationHandler(){
                        @Override
                        public Object invoke(Object proxy, Method method, Object[] args) throws Throwable {
                            System.out.println("------开启事务");

                            //执行目标方法
                            Object obj = method.invoke(bean, args);

                            System.out.println("------提交事务");
                            return obj;
                        }});
    }
}
将后处理的实现类注册给spring
问题1:后处理bean作用某一个目标类,还是所有目标类?
所有
问题2:如何只作用一个?
通过“参数2”beanName进行控制
Bean的生命周期,生命周期详情
- instantiate bean对象实例化
- populate properties 封装属性
- 如果Bean实现BeanNameAware 执行 setBeanName
- 如果Bean实现BeanFactoryAware 或者 ApplicationContextAware 设置工厂 setBeanFactory 或者上下文对象 setApplicationContext
- 如果存在类实现 BeanPostProcessor(后处理Bean) ,执行postProcessBeforeInitialization
- 如果Bean实现InitializingBean 执行 afterPropertiesSet
- 调用
指定初始化方法 init - 如果存在类实现 BeanPostProcessor(处理Bean) ,执行postProcessAfterInitialization
- 执行业务处理
- 如果Bean实现 DisposableBean 执行 destroy
- 调用
指定销毁方法 customerDestroy
参考:
https://www.jianshu.com/p/0e629af94415