Unity UGUI高斯模糊背景效果 简易解决方案
Unity UGUI高斯模糊背景效果简易解决方案
-
- 功能描述
- 简易界面框架搭建
- 如何获取下层UI界面的画面抓取
- 如何使用shader处理模糊效果
- 如何统一管理界面的模糊功能
- 功能拓展和坑点小汇总
本文欢迎转载,转载请标明出处!
功能描述
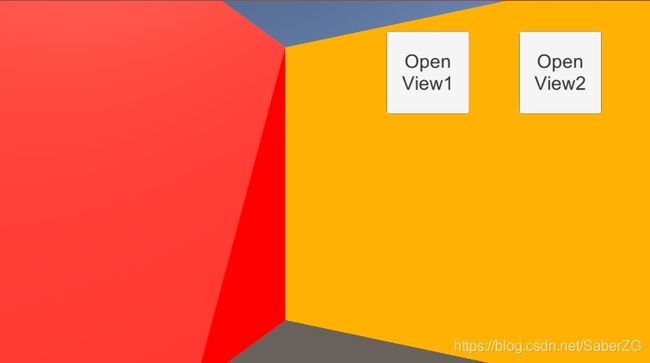
在我们玩游戏的时候,经常会看到一些游戏会对UI做类似这样的处理,以《明日方舟》为例:

可以看到,新开的上层UI界面会以下层UI界面的模糊效果图做背景。这种模糊效果可以起到让玩家的注意力集中在上层UI界面的作用,倘若加入了透明度动画强化模糊过度也可以让UI界面的叠加看上去更加流畅和舒适。
这种便是本文想要实现的一个功能:UI背景高斯模糊。
这种效果的原理可以分为几个部分:
- 如何获取下层UI界面的画面抓取;
- 如何使用shader处理模糊效果;
- 如何统一管理界面的模糊功能;
- 功能拓展和坑点小汇总;
接下来笔者将针对上述几个部分逐一讲解并分享这个具体实现方法。
简易界面框架搭建
正式开始实现效果之前,我们需要准备好一个简单的Demo界面框架。笔者使用的是Unity2018.4.16版本,不过具体的实现基本上与版本没有太大关联,不要太低就行。
首先先搭建好一个简易的实现场景。用四个适当拉伸过并赋予不同颜色材质球的Cube组合出一个“游戏世界”场景,方便我们看具体的模糊效果。同时,我们也要养成一个比较好的习惯,将材质球和以后可能会用到的像sprite,shader和prefab等各自开一个文件夹存放。

特别需要注意的是摄像机的LayerMask要修改成只拍摄UI层。
然后是创建一个Canvas。将Canvas的RenderMode修改为ScreenSpace-Camera,然后将刚才新建的UI摄像机挂载到这个Canvas的RenderCamera上。
同时,修改CanvasScaler的UI Scale Mode为Scale With Screen Size,调整一个适合的分辨率并将Match调成0.5。

在Canvas中创建两个按钮,用于做点击按钮弹出界面的功能。
如何获取下层UI界面的画面抓取
抓取画面的方式,比较实用的方法是RenderTexture(渲染纹理,后面简称RT)渲染摄像机拍摄到的画面,并对这张RT进行处理。Shader中有GrabPass抓取屏幕的方法但是这个方法极其不推荐使用,因为这个方法在移动端会有大概率不能正常运作,同时性能开销也比较大。
不过这边的抓取并不是创建一张RT然后放在UI摄像机中直接输出,而是使用MonoBehaviour的OnRenderImage()对当前摄像机拍摄的画面方法进行模糊处理并输出,也就是俗称的屏幕后处理。
// src为当前摄像机拍摄到的RT  dest为目标输出的RT
void OnRenderImage(RenderTexture src, RenderTexture dest)
    {

    	// 通过这个函数进行渲染,只不过我们要用的是它的其他重载,可以添加材质球的那个
    	// 第二个参数不一定要是dest,也可以是其他RT
    	// 但是在OnRenderImage作用域内,输出dest的渲染必须是最后一次Blit,否则会有Warning警告
    	Graphics.Blit(src, dest);
    }
我们新建一个类:ScreenBlurEffect 。这个类就是我们进行后处理的类,把它挂在UI摄像机下,并先写入下面这段代码:
using System;
using UnityEngine;
// 这段代码保证了挂载的时候一定要有Camera组件
[RequireComponent(typeof(Camera))]
public class ScreenBlurEffect : MonoBehaviour
{

    RenderTexture final_blur_rt;
    // 模糊后处理的主要方法
    void OnRenderImage(RenderTexture src, RenderTexture dest)
    {

		int width = src.width;
		int height = src.height;
		// 将当前摄像机画面渲染到目标RT上
		final_blur_rt = RenderTexture.GetTemporary(width, height, 0);
		Graphics.Blit(src, final_blur_rt);
		// 我们只是想获得摄像机的画面,所以完事之后别忘了把画面正常输出出去
		Graphics.Blit(src, dest);
    }
}
这样我们就可以获得当前摄像机拍摄到的画面了(虽然这段代码很简单粗糙)。
如何使用shader处理模糊效果
模糊效果我们一般使用的是高斯模糊。
这块的内容网上搜就可以搜到很多教程及源码,这边就简单介绍介绍:
高斯模糊的处理流程简单来说就是对目标图中每个像素周边的n个像素进行采样后,通过特定的权值与当前像素和周边像素的颜色进行相乘累加,并以这个颜色作为最终颜色输出。由于图像中每个像素最终输出都会受到周边像素的影响,所以像素之间的颜色过度就会变得更加“平滑”,从而达成模糊的效果。
我们新建一个Shader文件:BlurShader,并创建一个新的材质球将shader挂在上面,代码如下:
Shader "Unlit/BlurShader"
{

    Properties
    {

        _MainTex ("Texture", 2D) = "white" {
     } // 主纹理,我们进行模糊处理的对象就是它
        _BlurSize("BlurSize", Range(0, 127)) = 1.0 // 对周边采样的偏移量
    }
    SubShader
    {

        CGINCLUDE
            #include "UnityCG.cginc"

            sampler2D _MainTex;
            half4 _MainTex_TexelSize;
            fixed _BlurSize;

            struct v2f{

                float4 pos : SV_POSITION;
                half2 uv[5] : TEXCOORD0;
            };

            // 水平uv数据扩展采样
            v2f vert_hor(appdata_img v)
            {

                v2f o;
                o.pos = UnityObjectToClipPos(v.vertex);
                half2 uv = v.texcoord;

                // 下标从0开始,分别取到当前像素,偏移1单位和2单位的uv位置
                o.uv[0] = uv;
                o.uv[1] = uv + half2(_MainTex_TexelSize.x * 1.0, 0.0) * _BlurSize;
                o.uv[2] = uv - half2(_MainTex_TexelSize.x * 1.0, 0.0) * _BlurSize;

                o.uv[3] = uv + half2(_MainTex_TexelSize.x * 2.0, 0.0) * _BlurSize;
                o.uv[4] = uv - half2(_MainTex_TexelSize.x * 2.0, 0.0) * _BlurSize;

                return o;
            }

            // 水平uv数据扩展采样
            v2f vert_ver(appdata_img v)
            {

                v2f o;
                o.pos = UnityObjectToClipPos(v.vertex);
                half2 uv = v.texcoord;

                // 下标从0开始,分别取到当前像素,偏移1单位和2单位的uv位置
                o.uv[0] = uv;
                o.uv[1] = uv + half2(0.0, _MainTex_TexelSize.y * 1.0) * _BlurSize;
                o.uv[2] = uv - half2(0.0, _MainTex_TexelSize.y * 1.0) * _BlurSize;

                o.uv[3] = uv + half2(0.0, _MainTex_TexelSize.y * 2.0) * _BlurSize;
                o.uv[4] = uv - half2(0.0, _MainTex_TexelSize.y * 2.0) * _BlurSize;

                return o;
            }

            // 处理模糊片元
            fixed4 frag(v2f i) : SV_TARGET
            {

                // 模糊算子,分别决定了当前像素,上下(左右)偏移1个单位和2个单位的计算权重
                // 算子决定了模糊的质量,算子越大越复杂效果越好,当然性能上就要差一些
                half weight[3] = {
     0.4026, 0.2442, 0.0545};

                // 当前像素片元颜色(乘以权重)
                fixed3 color = tex2D(_MainTex, i.uv[0]).rgb * weight[0];
                // 根据权重叠加上下(左右)像素颜色
                color += tex2D(_MainTex, i.uv[1]).rgb * weight[1];
                color += tex2D(_MainTex, i.uv[2]).rgb * weight[1];
                color += tex2D(_MainTex, i.uv[3]).rgb * weight[2];
                color += tex2D(_MainTex, i.uv[4]).rgb * weight[2];

                return fixed4(color, 1.0);
            }
        ENDCG

        Cull Off
        ZWrite Off
        Pass // 0:处理水平模糊
        {

            Name "BLUR_HORIZONTAL"
            CGPROGRAM
            #pragma vertex vert_hor
            #pragma fragment frag
            ENDCG
        }

        Pass // 1:处理垂直模糊
        {

            Name "BLUR_VERTICAL"
            CGPROGRAM
            #pragma vertex vert_ver
            #pragma fragment frag
            ENDCG
        }
    }

    Fallback Off
}

修改之前的ScreenBlurEffect脚本,修改后的代码如下:
using System;
using UnityEngine;
// 这段代码保证了挂载的时候一定要有Camera组件
[RequireComponent(typeof(Camera))]
public class ScreenBlurEffect : MonoBehaviour
{

    // 预先定义shader渲染用的pass
    const int BLUR_HOR_PASS = 0;
    const int BLUR_VER_PASS = 1;
    bool is_support; // 判断当前平台是否支持模糊

    RenderTexture final_blur_rt;
    RenderTexture temp_rt;
    [SerializeField]
    public Material blur_mat; // 模糊材质球

    // 外部参数
    [Range(0, 127)]
    float blur_size = 1.0f; // 模糊额外散步大小
    [Range(1, 10)]
    public int blur_iteration = 4; // 模糊采样迭代次数
    public float blur_spread = 1; // 模糊散值
    int cur_iterate_num = 1; // 当前迭代次数
    public int blur_down_sample = 4; // 模糊初始降采样比率
    public bool render_blur_effect = false; // 是否开始渲染模糊效果

    void Awake()
    {

        is_support = SystemInfo.supportsImageEffects;
    }

    void OnRenderImage(RenderTexture src, RenderTexture dest)
    {

		if(is_support && blur_mat != null && render_blur_effect){

            // 首先对输出的结果做一次降采样,也就是降低分辨率,减小RT图的大小
            int width = src.width / blur_down_sample;
            int height = src.height / blur_down_sample;
            // 将当前摄像机画面渲染到被降采样的RT上
            final_blur_rt = RenderTexture.GetTemporary(width, height, 0);
            Graphics.Blit(src, final_blur_rt);

            cur_iterate_num = 1; // 初始化迭代
            while(cur_iterate_num <= blur_iteration)
            {

                blur_mat.SetFloat("_BlurSize", (1.0f + cur_iterate_num * blur_spread) * blur_size);  // 设置模糊扩散uv偏移
                temp_rt = RenderTexture.GetTemporary(width, height, 0);
                // 使用blit的其他重载,针对对应的材质球和pass进行渲染并输出结果
                Graphics.Blit(final_blur_rt, temp_rt, blur_mat, BLUR_HOR_PASS);
                Graphics.Blit(temp_rt, final_blur_rt, blur_mat, BLUR_VER_PASS);
                RenderTexture.ReleaseTemporary(temp_rt);   // 释放临时RT
                cur_iterate_num ++;
            }
            Graphics.Blit(final_blur_rt, dest);
            RenderTexture.ReleaseTemporary(final_blur_rt);  // final_blur_rt作用已经完成,可以回收了
        }
        else{

            Graphics.Blit(src, dest);
        }
    }
}

修改完代码别忘记把blurMat材质球挂载上去
is_support 的作用是获取当前平台是否支持后处理效果,在Awake或者Start时获取都可以。
BLUR_HOR_PASS 和 BLUR_VER_PASS 这两个int字段代表我们在渲染RT时使用的目标材质球中Shader使用哪个Pass。可以看到,代码中的Graphics.Blit出现了使用blurMat材质球的重载,材质参数后面跟上的这个int值代表了使用哪个Pass(Shader中的Pass从0开始计数)

(PS:当然如果直接使用0和1赋值也是可以的,只不过我们在写代码的时候,还是尽量避免写一些难以理解的“魔法数字”,可以事先声明就声明,后面假设改了shader的pass也可以通过改一个地方就完成修改,而不会因为单纯写数字而出现修改疏漏。)
一次模糊的效果是有限的,我们可以进行一次模糊之后,对被模糊的图继续执行模糊。同时,扩大模糊的采样范围,也可以加强模糊的效果。当然,每一次模糊都会执行两次Pass,所以我们要掂量性能和效果之间的平衡,并不是重复模糊次数越多越好。我们可以通过自己调试不同的模糊次数和模糊范围来获得一个相对满意的效果。
此外,我们要尽量避免重复创建一次性临时RT。因此,我们在最开始的时候声明了一个临时RT temp_rt,在OnRenderImage中循环利用,而不是等到需要的时候才声明。在重新写入新的渲染数据前,也需要先释放掉temp_rt中的数据再重新渲染进去。
最后,我们获得了经过几次模糊后的模糊RT final_blur_rt,将其输出到dest。
运行游戏,在Inspector把ScreenBlurEffect的render_blur_effect置为true,就可以看到模糊效果了。


现在我们只是实现了实时模糊界面的效果,要实现模糊UI背景的效果还需要将模糊后的RT输出到某个界面的图片组件上。
我们需要修改原先的模糊逻辑,把模糊后的RT图单独保存,并且不要改变原先的输出画面。同时,假设我们对不同界面的模糊有不同的需求的话,需要预留控制模糊参数的逻辑。最后就是这个模糊效果只需要在模糊的时候才需要打开,其余的时间不让它运行,减少无谓的渲染次数。
首先是用了一个新的类BlurData来控制模糊的具体参数,并且将代码设计为调用EnableBlurRender接口激活脚本渲染模糊。修改后的ScreenBlurEffect类代码如下:
using System;
using UnityEngine;

public class BlurData{

    public float blur_size;
    public int blur_iteration;
    public int blur_down_sample;
    public float blur_spread;
}

[RequireComponent(typeof(Camera))]
public class ScreenBlurEffect : MonoBehaviour
{

    // 预先定义shader渲染用的pass
    const int BLUR_HOR_PASS = 0;
    const int BLUR_VER_PASS = 1;
    bool is_support; // 判断当前平台是否支持模糊

    RenderTexture final_blur_rt;
    RenderTexture temp_rt;
    [SerializeField]
    public Material blur_mat; // 模糊材质球

    // 外部参数
    [Range(0, 127)]
    float blur_size = 1.0f; // 模糊额外散步大小
    [Range(1, 10)]
    public int blur_iteration = 4; // 模糊采样迭代次数
    public float blur_spread = 1; // 模糊散值
    int cur_iterate_num = 1; // 当前迭代次数
    public int blur_down_sample = 4; // 模糊初始降采样比率
    public bool render_blur_screenShot = false; // 模糊截图执行开关
    private Action<RenderTexture> blur_callback;

    void Awake()
    {

        is_support = SystemInfo.supportsImageEffects;
    }

    // 模糊后处理的主要方法
    void OnRenderImage(RenderTexture src, RenderTexture dest)
    {

        if(is_support && blur_mat != null && render_blur_screenShot){

            // 首先对输出的结果做一次降采样,也就是降低分辨率,减小RT图的大小
            int width = src.width / blur_down_sample;
            int height = src.height / blur_down_sample;
            // 将当前摄像机画面渲染到被降采样的RT上
            final_blur_rt = RenderTexture.GetTemporary(width, height, 0);
            Graphics.Blit(src, final_blur_rt);

            cur_iterate_num = 1; // 初始化迭代
            while(cur_iterate_num <= blur_iteration)
            {

                blur_mat.SetFloat("_BlurSize", (1.0f + cur_iterate_num * blur_spread) * blur_size);  // 设置模糊扩散uv偏移
                temp_rt = RenderTexture.GetTemporary(width, height, 0);
                // 使用blit的其他重载,针对对应的材质球和pass进行渲染并输出结果
                Graphics.Blit(final_blur_rt, temp_rt, blur_mat, BLUR_HOR_PASS);
                Graphics.Blit(temp_rt, final_blur_rt, blur_mat, BLUR_VER_PASS);
                RenderTexture.ReleaseTemporary(temp_rt);   // 释放临时RT
                cur_iterate_num ++;
            }
            GetBlurScreenShot();
            Graphics.Blit(src, dest); // 不修改最终输出画面
            RenderTexture.ReleaseTemporary(final_blur_rt);  // final_blur_rt作用已经完成,可以回收了
            DisabledBlurRender(); // 截图逻辑执行完毕后就关闭脚本
        }
        else{

            Graphics.Blit(src, dest);
        }
    }

    public void EnableBlurRender(BlurData data = null, Action<RenderTexture> callback = null)
    {

        blur_size = data != null ? data.blur_size : 1.0f;
        blur_iteration = data != null ? data.blur_iteration : 4;
        blur_down_sample = data != null ? data.blur_down_sample : 4;
        blur_spread = data != null ? data.blur_spread : 1;
        render_blur_screenShot = true;

        blur_callback = callback;
        this.enabled = true;
    }
    // 禁用渲染
    public void DisabledBlurRender()
    {

        render_blur_screenShot = false;
        this.enabled = false;
    }
    void GetBlurScreenShot()
    {

        if(blur_callback != null)
        {

            RenderTexture temp_screen_shot = RenderTexture.GetTemporary(final_blur_rt.width, final_blur_rt.height, 0);
            Graphics.Blit(final_blur_rt, temp_screen_shot);
            // 调用传入的回调
            blur_callback(temp_screen_shot);
        }
        // 无论执行与否,都要清除一次回调引用
        blur_callback = null;
    }
}
修改后的ScreenBlurEffect,功能完成了从画面变成模糊效果直接输出到摄像机最终画面到通过渲染一张新的RT回传给调用截图的界面而不修改最终画面的转变。同时,由于我们只需要截屏,所以渲染出结果图之后就直接关闭脚本。
从代码中可以看出,EnableBlurRender是渲染逻辑的入口:它接受了外部传入的BlurData修改了模糊参数,并保存了截屏成功之后的回调,并允许了脚本开始处理模糊的逻辑。
GetBlurScreenShot方法用于将模糊后的图生成新的拷贝并通过外部传入的回调返回回去。在处理完拷贝模糊图的逻辑之后,我们不想对最终输出的画面进行处理,因此我们在最后输出dest的时候将一开始的src作为参数传进了Blit方法,并在释放掉了final_blur_rt的数据,最终关闭了脚本的运行。
如何统一管理界面的模糊功能
截图的逻辑处理完了,接下来就是搭建可以查看效果的UI界面。我们不如做一套简单的UI界面统一管理的框架。这套简易框架需要做的事情有:事件派发控制界面创建;由一个管理器统一管理;同时这些界面使用统一的接口实现我们的背景模糊效果。
事件派发的管理类,我这边使用的是大佬已经写好了的类EventManager,在script/common路径下创建,代码如下:
/*
* UnityVersion: 2018.3.1f1
* FileName: EventManager.cs
* Author: TYQ
* CreateTime: 2019/04/04 15:49:53
* Description: 自定义的事件派发类
*/
using System;
using System.Collections;
using System.Collections.Generic;
using UnityEngine;
public class EventManager
{
/// (转自:https://www.cnblogs.com/imteach/p/10679239.html)
功能齐全,使用起来也很简单:在按钮或者可以打开界面的地方发送事件,然后在界面管理类里面监听即可。
然后,我们创建一个类EventName,这个类啥也不做,就注册事件名称,同样在script/common路径下创建,内容如下:
public static class EventName
{

    public const string OPEN_TEST_VIEW1 = "OPEN_TEST_VIEW1";
    public const string OPEN_TEST_VIEW2 = "OPEN_TEST_VIEW2";
}
紧接着我们给先前在主界面上做好的两个按钮分别添加一个脚本,注册对应的打开界面的事件,在script/testView路径下创建,代码分别如下:
using UnityEngine;
using UnityEngine.EventSystems;
public class TestBtn1 : MonoBehaviour, IPointerClickHandler
{

    public void OnPointerClick(PointerEventData eventData)
    {

        EventManager.DispatchEvent<bool>(EventName.OPEN_TEST_VIEW1, true);
    }
}
using UnityEngine;
using UnityEngine.EventSystems;
public class TestBtn2 : MonoBehaviour, IPointerClickHandler
{

    public void OnPointerClick(PointerEventData eventData)
    {

        EventManager.DispatchEvent<bool>(EventName.OPEN_TEST_VIEW2, true);
    }
}

然后就是需要测试用的界面了,不过在这之前我们需要写好一个界面父类BaseView,在这个父类中我们把调用模糊的逻辑处理好,后面测试界面直接继承这个类就可以不用再写代码实现效果了,同时,所有的弹出界面都有一个共同的父类也方便我们进行归类。
using UnityEngine;
using UnityEngine.UI;
using System;

public class BaseView : MonoBehaviour
{

    protected bool need_blur_bg = false;
    protected bool use_ui_blur = true;
    GameObject bg_obj;
    RawImage bg_raw;
    RenderTexture blur_bg_rt;
	GameObject ui_cam;
    protected void Awake()
    {

        if(need_blur_bg)
        {

            // 构造默认的模糊数据
            BlurData blur_data= new BlurData();
            blur_data.blur_spread = 1;
            blur_data.blur_iteration = 4;
            blur_data.blur_size = 1;
            blur_data.blur_down_sample = 4;
            // 截屏式的模糊
            // 隐藏界面本身,因为界面本身不需要被拍入画面
            gameObject.SetActive(false);
            // 创建挂载模糊图片的节点,使用的是RawImage
            bg_obj = new GameObject("blur_bg");
            bg_obj.transform.SetParent(this.transform);
            bg_obj.transform.localScale = Vector3.one;
            bg_obj.transform.SetAsFirstSibling();
            bg_obj.AddComponent<RectTransform>().sizeDelta = new Vector2(Screen.width, Screen.height);
            Vector3 local_pos = bg_obj.GetComponent<RectTransform>().localPosition;
            bg_obj.GetComponent<RectTransform>().localPosition = new Vector3(local_pos.x, local_pos.y, 0);
            bg_raw = bg_obj.AddComponent<RawImage>();
            bg_raw.color = new Color(1, 1, 1, 0); // 将图片的透明度改为0

            Action<RenderTexture> action = SetBlurImage;
            ui_cam = GameObject.Find("UICamera");
            if (ui_cam != null)
            {

            	ui_cam.GetComponent<ScreenBlurEffect>().EnableBlurRender(blur_data, action);
            }
            BlurEffectManager.Instance.EnableBlurScreenshot(use_ui_blur, blur_data, action);
        }
    }

    void SetBlurImage(RenderTexture rt)
    {

        if(this.gameObject != null)
        {

            blur_bg_rt = rt;
            bg_raw.texture = blur_bg_rt;
            gameObject.SetActive(true);
            bg_raw.color = new Color(1, 1, 1, 1);
        }
        else
        {

            RenderTexture.ReleaseTemporary(rt);
        }
    }

    void OnDestroy()
    {

        if (blur_bg_rt != null)
            RenderTexture.ReleaseTemporary(blur_bg_rt);
    }
}
这是一个简单的界面基类,简单解释一些写法的用意:
need_blur_bg作为参数控制界面是否使用模糊背景效果,毕竟并不是所有的界面都需要添加模糊。例如在正式的项目中,游戏中的玩家血条UI,最底层的按键界面UI等等,这些是不需要模糊的,因此添加一个参数控制。
接收模糊图片的图片节点并不会直接做在UI界面内,那样每次做界面都要创建一个有点麻烦,因此我们可以选择使用代码创建对象,并添加RawImage(RT一般挂在RawImage上)的挂载RT的方法来实现效果。由于渲染模糊图需要时间,因此渲染出模糊图之前我们先把界面隐藏,避免界面创建的时候闪一下白色的空白图画面,也同样避免新打开的界面被摄像机拍进去。
通过创建回调函数的方式可以稳定的处理好 截图-处理模糊-处理完成并返回RT-获取RT并显示界面 这个流程,规避了时序问题。
但在处理模糊这里就引申出了一个问题:虽然模糊的接口是UI摄像机上的ScreenBlurEffect类的EnableBlurRender方法,但是从设计上来看,我们并不希望每个BaseView都得先去获取UI摄像机再去调用模糊方法,而是希望有一个中间类或者管理类去直接调用UI摄像机处理模糊的接口。
于是,我们新建一个模糊效果管理类BlurEffectManager,挂载到GameManager节点上(没有的话新建一个空对象)。代码如下:
using System;
using UnityEngine;
public class BlurEffectManager : MonoBehaviour
{

    private static BlurEffectManager _instance;
    public static BlurEffectManager Instance{

        get{

            if (_instance == null)
            {

                _instance = FindObjectOfType(typeof(BlurEffectManager)) as BlurEffectManager;
            }
            return _instance;
        }
    }
    // 获取模糊脚本
    public ScreenBlurEffect ui_blur_effect;
    void Awake()
    {

        if(ui_blur_effect == null)
        {

            ui_blur_effect = GameObject.Find("UICamera").GetComponent<ScreenBlurEffect>();
        }
    }

    // 提供模糊截屏
    public void EnableBlurScreenshot(BlurData data = null, Action<RenderTexture> callback = null)
    {

        ui_blur_effect.EnableBlurRender(data, callback);
    }

    public void DisabledBlurCameraEffect()
    {

        ui_blur_effect.DisabledBlurRender();
    }
}
回到BaseView类,去掉获取UI摄像机调用模糊方法的逻辑,改为调用BlurEffectManager的:
	...
	RawImage bg_raw;
    RenderTexture blur_bg_rt;
	// GameObject ui_cam;
    ...
            Action<RenderTexture> action = SetBlurImage;
            // ui_cam = GameObject.Find("UICamera");
            // if (ui_cam != null)
            // {

            // 	ui_cam.GetComponent().EnableBlurRender(blur_data, action);
            // }
            BlurEffectManager.Instance.EnableBlurScreenshot(blur_data, action);
        }
    }
    ...
然后就是创建按钮1对应的界面TestView1,结构如下:
其对应的类与之同名,并继承BaseView,挂载到界面上,代码如下:
using UnityEngine;
using UnityEngine.UI;

public class TestView1 : BaseView
{

    new void Awake()
    {

        need_blur_bg = true;
        base.Awake();
    }

    GameObject close_btn_obj;
    void Start()
    {

        close_btn_obj = transform.Find("close_btn").gameObject;
        close_btn_obj.GetComponent<Button>().onClick.AddListener(OnCloseBtnClick);
    }
    public void OnCloseBtnClick()
    {

        EventManager.DispatchEvent<bool>(EventName.OPEN_TEST_VIEW1, false);
    }
}
可以看到测试界面加入了一个关闭按钮,同样通过发事件来控制界面关闭。我们之前创建了两个按钮,第二个测试界面跟第一个完全一样,界面类也是,只是都将相关的1改成2即可。这里不再赘述。
那监听事件并控制界面的管理类呢?同样,我们新增一个类BaseController,作为界面控制类的基类,用来管理一个模块下的所有界面,代码如下:
using System.Collections;
using System.Collections.Generic;
using UnityEngine;

public class BaseController : MonoBehaviour
{

    public GameObject[] ui_list_data;
    Dictionary<string, GameObject> view_dic = new Dictionary<string, GameObject>();
    Transform temp_parent_node;
    void Awake()
    {

        for(int i = 0; i < ui_list_data.Length; i++)
        {

            view_dic.Add(ui_list_data[i].name, ui_list_data[i]);
        }
        temp_parent_node = GameObject.Find("Canvas").transform;
        InitEvents();
    }
    void OnDestroy(){

        RemoveAllEvent();
    }

    protected void OpenView(string view_name, out GameObject target_go)
    {

        Debug.Log(view_name);
        if(view_dic.ContainsKey(view_name))
        {

            target_go = GameObject.Instantiate(view_dic[view_name], temp_parent_node);
            target_go.GetComponent<RectTransform>().anchoredPosition = Vector3.zero;
        }
        else
        {

            target_go = null;
        }
    }
    protected virtual void InitEvents(){
     }
    protected virtual void RemoveAllEvent(){
     }
}
其中,创建界面的逻辑要特别说明一波:我们的UI界面要在Canvas中创建才会是正确的大小和位置,因此我们需要事前确定好界面Prefab的父节点,创建成功后将坐标归零。
接着创建主要的测试界面控制类TestController,继承BaseController,代码如下:
using System.Collections;
using System.Collections.Generic;
using UnityEngine;

public class TestController : BaseController
{

	// 界面缓存
    GameObject test_view1;
    GameObject test_view2;

    protected override void InitEvents()
    {

        EventManager.AddEvent<bool>(EventName.OPEN_TEST_VIEW1, OpenTestView1);
        EventManager.AddEvent<bool>(EventName.OPEN_TEST_VIEW2, OpenTestView2);
    }

    void OpenTestView1(bool show)
    {

        if(show)
        {

            if(test_view1 == null)
            {

                OpenView("TestView1", out test_view1);
            }
        }
        else
        {

            if(test_view1 != null)
            {

                Destroy(test_view1);
                test_view1 = null;
            }
        }
    }

    void OpenTestView2(bool show)
    {

        if(show)
        {

            if(test_view2 == null)
            {

                OpenView("TestView2", out test_view2);
            }
        }
        else
        {

            if(test_view2 != null)
            {

                Destroy(test_view2);
                test_view2 = null;
            }
        }
    }

    protected override void RemoveAllEvent()
    {

        EventManager.RemoveEvent<bool>(EventName.OPEN_TEST_VIEW1, OpenTestView1);
        EventManager.RemoveEvent<bool>(EventName.OPEN_TEST_VIEW2, OpenTestView2);
    }
}
最后,我们同样把TestController挂在GameManager上,并把我们现有的两个界面挂载上去:
相信有一部分读者发现了,我们实际上构造了一个非常简单的MVC界面框架。你问我M(Model)在哪里,emmmm因为我们的界面不涉及数据处理,这里就不搞了(笔者你不讲武德)。
冗长的准备终于完成了,现在我们运行游戏,点击任意一个打开界面的按钮,就可以看到效果了:
功能拓展和坑点小汇总
我们完成了UI截屏模糊背景的逻辑,那肯定会有读者会问:如果我不单单只想要截屏模糊的效果,我还要根据需求做动态的背景模糊效果要怎么处理?
确实,在一些项目中,单一的UI背景模糊是不能满足需求的。举个例子:像逃离塔科夫这款游戏,相信有不少读者看过这款游戏的相关视频。不知道读者们有没有发现,当玩家打开背包的时候,UI下层的游戏场景画面会模糊作为背景,但是这个模糊效果是动态的。毕竟作为一款硬核即时的联网游戏,打开界面就把背景“暂停”了也不合理。同时,我们还可以看到,打开UI后被模糊的是游戏画面,而UI画面没有模糊。而我们的主摄像机(场景摄像机)跟UI摄像机本身就应该是分开的,因此我们可以理解为:主摄像机上也挂载ScreenBlurEffect,某些情景下启用的是主摄像机的模糊而不是UI摄像机的模糊,而主摄像机上的这个模糊毫无疑问就是实时模糊。
不过,退一步讲,主摄像机上挂载模糊脚本ScreenBlurEffect也并不能兼顾到所有情况,例如有些项目需要的效果就是在一层UI界面上再套一层UI界面后还需要动态模糊呢(即一层静态模糊的上层界面使用动态模糊)?别急,笔者接下来会分析这种需求,并给出笔者自己的方案。而主摄像机上挂载模糊的方法笔者也会包括进去,而具体的调用实现就让读者自己去尝试吧~
为了拓展这一功能,我们需要修改一部分代码。首先是渲染模糊的脚本ScreenBlurEffect,修改后的代码如下:
using System;
using UnityEngine;
// 新增模糊类型枚举
public enum BlurType{

    Normal = 0,
    ScreenShot = 1,
}
public class BlurData{

    public float blur_size;
    public int blur_iteration;
    public int blur_down_sample;
    public float blur_spread;
}

[RequireComponent(typeof(Camera))]
public class ScreenBlurEffect : MonoBehaviour
{

    // 预先定义shader渲染用的pass
    const int BLUR_HOR_PASS = 0;
    const int BLUR_VER_PASS = 1;
    bool is_support; // 判断当前平台是否支持模糊

    RenderTexture final_blur_rt;
    RenderTexture temp_rt;
    [SerializeField]
    public Material blur_mat; // 模糊材质球

    // 外部参数
    [Range(0, 127)]
    float blur_size = 1.0f; // 模糊额外散步大小
    [Range(1, 10)]
    public int blur_iteration = 4; // 模糊采样迭代次数
    public float blur_spread = 1; // 模糊散值
    int cur_iterate_num = 1; // 当前迭代次数
    public int blur_down_sample = 4; // 模糊初始降采样比率
    public bool render_blur_effect = false; // 是否开始渲染模糊效果
    public bool render_blur_screenShot = false; // 模糊截图执行开关
    private Action<RenderTexture> blur_callback;

    void Awake()
    {

        is_support = SystemInfo.supportsImageEffects;
    }

    // 模糊后处理的主要方法
    void OnRenderImage(RenderTexture src, RenderTexture dest)
    {

        if(is_support && blur_mat != null && (render_blur_effect || render_blur_screenShot)){

            // 首先对输出的结果做一次降采样,也就是降低分辨率,减小RT图的大小
            int width = src.width / blur_down_sample;
            int height = src.height / blur_down_sample;
            // 将当前摄像机画面渲染到被降采样的RT上
            final_blur_rt = RenderTexture.GetTemporary(width, height, 0);
            Graphics.Blit(src, final_blur_rt);

            cur_iterate_num = 1; // 初始化迭代
            while(cur_iterate_num <= blur_iteration)
            {

                blur_mat.SetFloat("_BlurSize", (1.0f + cur_iterate_num * blur_spread) * blur_size);  // 设置模糊扩散uv偏移
                temp_rt = RenderTexture.GetTemporary(width, height, 0);
                // 使用blit的其他重载,针对对应的材质球和pass进行渲染并输出结果
                Graphics.Blit(final_blur_rt, temp_rt, blur_mat, BLUR_HOR_PASS);
                Graphics.Blit(temp_rt, final_blur_rt, blur_mat, BLUR_VER_PASS);
                RenderTexture.ReleaseTemporary(temp_rt);   // 释放临时RT
                cur_iterate_num ++;
            }
            // 如果只是渲染截图
            if(render_blur_screenShot && !render_blur_effect){

                GetBlurScreenShot();
                Graphics.Blit(src, dest); // 不修改最终输出画面
                RenderTexture.ReleaseTemporary(final_blur_rt);  // final_blur_rt作用已经完成,可以回收了
                DisabledBlurRender(); // 截图逻辑执行完毕后就关闭脚本
            }else	// 其他情况一律处理为动态模糊背景
            {

                Graphics.Blit(final_blur_rt, dest);
                RenderTexture.ReleaseTemporary(final_blur_rt);  // final_blur_rt作用已经完成,可以回收了
            }
        }
        else{

            Graphics.Blit(src, dest);
        }
    }

    public void EnableBlurRender(BlurType blur_type, BlurData data = null, Action<RenderTexture> callback = null)
    {

        blur_size = data != null ? data.blur_size : 1.0f;
        blur_iteration = data != null ? data.blur_iteration : 4;
        blur_down_sample = data != null ? data.blur_down_sample : 4;
        blur_spread = data != null ? data.blur_spread : 1;

        if(blur_type == BlurType.Normal)
        {

            render_blur_effect = true;
        }
        else if (blur_type == BlurType.ScreenShot)
        {

            render_blur_screenShot = true;
        }

        blur_callback = callback;
        this.enabled = true;
    }
    // 禁用渲染
    public void DisabledBlurRender()
    {

        render_blur_effect = false;
        render_blur_screenShot = false;
        this.enabled = false;
    }
    void GetBlurScreenShot()
    {

        if(blur_callback != null)
        {

            RenderTexture temp_screen_shot = RenderTexture.GetTemporary(final_blur_rt.width, final_blur_rt.height, 0);
            Graphics.Blit(final_blur_rt, temp_screen_shot);
            // 调用传入的回调
            blur_callback(temp_screen_shot);
        }
        // 无论执行与否,都要清除一次回调引用
        blur_callback = null;
    }
}
- 新增了render_blur_effect字段,作为动态模糊背景的标志。
- 修改了OnRenderImage的处理判断和最终输出的逻辑,分别判断了各种情况下要怎么输出模糊效果。
- 修改了EnableBlurRender接口的参数,新增的第一个参数结合最顶部的枚举BlurType代表使用什么模式进行模糊处理。
既然改到了模糊脚本的启用接口,那我们需要处理BlurEffectManager中的公开接口。修改后的代码如下:
using System;
using UnityEngine;
public class BlurEffectManager : MonoBehaviour
{

    private static BlurEffectManager _instance;
    public static BlurEffectManager Instance{

        get{

            if (_instance == null)
            {

                _instance = FindObjectOfType(typeof(BlurEffectManager)) as BlurEffectManager;
            }
            return _instance;
        }
    }
    // 获取模糊脚本
    public ScreenBlurEffect main_blur_effect;
    public ScreenBlurEffect ui_blur_effect;
    void Awake()
    {

        if(main_blur_effect == null)
        {

            main_blur_effect = GameObject.Find("MainCamera").GetComponent<ScreenBlurEffect>();
        }
        if(ui_blur_effect == null)
        {

            ui_blur_effect = GameObject.Find("UICamera").GetComponent<ScreenBlurEffect>();
        }
    }

    // 提供模糊截屏
    public void EnableBlurScreenshot(bool use_ui_camera, BlurData data = null, Action<RenderTexture> callback = null)
    {

        if (use_ui_camera)
        {

            ui_blur_effect.EnableBlurRender(BlurType.ScreenShot, data, callback);
        }
        else
        {

            main_blur_effect.EnableBlurRender(BlurType.ScreenShot, data, callback);
        }
    }

    // 提供摄像机模糊
    public void EnableBlurCameraEffect(bool use_ui_camera, BlurData data = null)
    {

        if (use_ui_camera)
        {

            ui_blur_effect.EnableBlurRender(BlurType.Normal, data);
        }
        else
        {

            main_blur_effect.EnableBlurRender(BlurType.Normal, data);
        }
    }

    public void DisabledBlurCameraEffect(bool use_ui_camera)
    {

        if (use_ui_camera)
        {

            ui_blur_effect.DisabledBlurRender();
        }
        else
        {

            main_blur_effect.DisabledBlurRender();
        }
    }
}
- 我们给主摄像机上挂载ScreenBlurEffect脚本,并在代码中追加对主摄像机脚本的获取逻辑。
- 修改BaseView中调用的EnableBlurScreenshot接口,新增的字段用来判断是否使用的UI摄像机的模糊。DisabledBlurCameraEffect同理。
- 追加EnableBlurCameraEffect接口,这个接口代表使用的是动态模糊背景效果。
接下来是界面的改动。一般正式的项目中,UI框架不止一个Canvas,而是有多个Canvas组合:有的用来做场景最底层的UI界面,有的用来显示一些弹出界面,有的用来放更新频繁的节点,也有的用来做最顶层的UI容器。而如果我们要实现动态模糊背景的话,我们需要追加一个新的Canvas层级,这个层级用专属的UI摄像机来渲染,让这个摄像机渲染的内容不会被模糊。
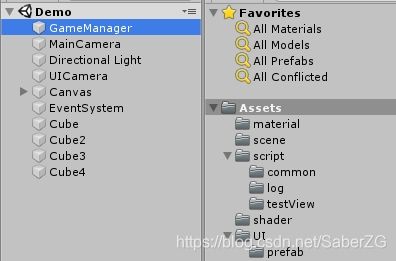
我们新建一个空节点,命名为Canvas,并将原先的Canvas改名为“UI”。同时,复制UI这个Canvas,删掉里面的按钮并重命名为"Top"。

复制UICamera,重命名为NoBlurCamera,并删除上面挂载的ScreenBlurEffect脚本。新增一个Layer NoBlur,并修改摄像机Depth。整体改动如下图:

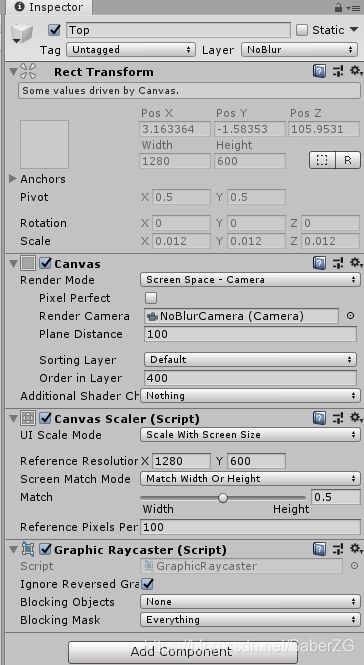
修改Top的Order In Layer渲染层级为400,Layer改为NoBlur,渲染摄像机改为NoBlurCamera。如图:

回到代码。修改了EnableBlurScreenshot这个接口的话,BaseView中也要做相关的改动。同时,BaseView还要追加支持动态模糊背景的逻辑,包括了在不同模糊渲染模式下要把界面放在UI还是Top父节点下。修改后的代码如下:
using System.Collections;
using System.Collections.Generic;
using UnityEngine;
using UnityEngine.UI;
using System;

public class BaseView : MonoBehaviour
{

    protected bool need_blur_bg = false;
    protected bool use_ui_blur = true;
    protected BlurType blur_type = BlurType.ScreenShot;
    GameObject bg_obj;
    RawImage bg_raw;
    RenderTexture blur_bg_rt;

    protected void Awake()
    {

        if(need_blur_bg)
        {

            // 构造默认的模糊数据
            BlurData blur_data= new BlurData();
            blur_data.blur_spread = 1;
            blur_data.blur_iteration = 4;
            blur_data.blur_size = 1;
            blur_data.blur_down_sample = 4;
            // 截屏式的模糊
            if(blur_type == BlurType.ScreenShot)
            {

                // 隐藏界面本身,因为界面本身不需要被拍入画面
                gameObject.SetActive(false);
                // 创建挂载模糊图片的节点,使用的是RawImage
                bg_obj = new GameObject("blur_bg");
                bg_obj.transform.SetParent(this.transform);
                bg_obj.transform.localScale = Vector3.one;
                bg_obj.transform.SetAsFirstSibling();
                bg_obj.AddComponent<RectTransform>().sizeDelta = new Vector2(Screen.width, Screen.height);
                Vector3 local_pos = bg_obj.GetComponent<RectTransform>().localPosition;
                bg_obj.GetComponent<RectTransform>().localPosition = new Vector3(local_pos.x, local_pos.y, 0);
                bg_raw = bg_obj.AddComponent<RawImage>();

                Action<RenderTexture> action = SetBlurImage;
                BlurEffectManager.Instance.EnableBlurScreenshot(use_ui_blur, blur_data, action);
            }
            // 实时模糊效果
            else if (blur_type == BlurType.Normal)
            {

                BlurEffectManager.Instance.EnableBlurCameraEffect(use_ui_blur, blur_data);
            }
        }
    }

    void SetBlurImage(RenderTexture rt)
    {

        if(this.gameObject != null)
        {

            blur_bg_rt = rt;
            bg_raw.texture = blur_bg_rt;
            gameObject.SetActive(true);
        }
        else
        {

            RenderTexture.ReleaseTemporary(rt);
        }
    }

    void OnDestroy()
    {

        if (blur_bg_rt != null)
            RenderTexture.ReleaseTemporary(blur_bg_rt);
        else if (blur_type == BlurType.Normal)
            BlurEffectManager.Instance.DisabledBlurCameraEffect(use_ui_blur);
    }
}
- 新增了use_ui_blur字段和blur_type字段,分别用来控制是否使用UI摄像机的模糊和控制模糊类型
- 对于不同的模糊类型,模糊逻辑做了相应的处理
我们对于动态模糊背景的界面,需要在创建的时候放到Top层Canvas中,因此,需要对BaseController类做相应处理。在这之前,由于我们使用了多个Canvas,我们创建一个Canvas的管理类PanelMgr,用这个类来持有和返回Canvas节点。代码如下:
using UnityEngine;

public enum UILayer
{

    UI = 1,
    Top = 2,
}
public class PanelMgr : MonoBehaviour
{

    private static PanelMgr _instance;
    public static PanelMgr Instance{

        get{

            if (_instance == null)
            {

                _instance = FindObjectOfType(typeof(PanelMgr)) as PanelMgr;
            }
            return _instance;
        }
    }

    private BaseView temp_baseview;
    private Transform UI;
    private Transform Top;
    void Awake()
    {

        UI = GameObject.Find("Canvas/UI").transform;
        Top = GameObject.Find("Canvas/Top").transform;
    }

    public Transform GetBaseViewParentNode(UILayer ui_layer)
    {

        switch(ui_layer)
        {

            case UILayer.UI:
                return UI;
            case UILayer.Top:
                return Top;
        }
        // 默认返回UI层
        return UI;
    }
}
如代码所示,我们使用新的枚举UILayer来定义界面层级。
接着,修改BaseController类。我们在设置界面时就要确定界面使用的是什么层级,同时使用新增加的界面管理类获取相应层级的节点。修改后的代码如下:
using System.Collections.Generic;
using UnityEngine;

public class BaseController : MonoBehaviour
{

    public UINodeData[] ui_list_data;
    Dictionary<string, UINodeData> view_dic = new Dictionary<string, UINodeData>();
    Transform temp_parent_node;
    void Awake()
    {

        for(int i = 0; i < ui_list_data.Length; i++)
        {

            view_dic.Add(ui_list_data[i].prefab.name, ui_list_data[i]);
        }
        InitEvents();
    }
    void OnDestroy(){

        RemoveAllEvent();
    }

    protected void OpenView(string view_name, out GameObject target_go)
    {

        Debug.Log(view_name);
        if(view_dic.ContainsKey(view_name))
        {

            temp_parent_node = PanelMgr.Instance.GetBaseViewParentNode(view_dic[view_name].uiLayer);
            target_go = GameObject.Instantiate(view_dic[view_name].prefab, temp_parent_node);
            target_go.GetComponent<RectTransform>().anchoredPosition = Vector3.zero;
        }
        else
        {

            target_go = null;
        }
    }
    protected virtual void InitEvents(){
     }
    protected virtual void RemoveAllEvent(){
     }
}

[System.Serializable]
public class UINodeData{

    public GameObject prefab;
    public UILayer uiLayer;
}
新增了UINodeData类,用来包装之前的预制界面,改动后重新设置预制界面的属性:

最后的最后,我们为了能看到截屏模糊和动态模糊的区别,我们写一个主摄像机的运动脚本CameraAutoRotate。这个脚本让主摄像机以原点匀速旋转,代码如下:
using System.Collections;
using System.Collections.Generic;
using UnityEngine;

public class CameraAutoRotate : MonoBehaviour
{

    float speed = 1.0f;
    Vector2 cur_maincam_angel;
    Vector2 angel_delta;
    void Awake()
    {

        cur_maincam_angel = transform.eulerAngles;
        angel_delta = new Vector2(0, 1.0f) * speed;
    }
    // Update is called once per frame
    void Update()
    {

        cur_maincam_angel += angel_delta;
        transform.rotation = Quaternion.Euler(cur_maincam_angel);
    }
}
总结一下,虽然用了很大的篇幅来介绍这个功能的具体实现,实际上如果要将这个功能用在正式的项目上还需要根据实际项目进行磨合。例如:
- 当遇上同时打开多个界面都带模糊的情况。由于一次截屏模糊只能处理一次回调,所以要在调用模糊的地方做缓存,并在处理完当次模糊后检测缓存,判断是否还需要处理模糊。需要的话,还需要在下一帧再处理后面的模糊需求。
- 当我们需要使用截屏界面效果的淡入淡出动画时。实际上,这个截屏图的淡入淡出,就是这个被打开的界面本身的淡入淡出效果。因此,我们可以在需要淡入淡出的界面上挂上一个CanvasGroup组件,并在保存预制体的时候将其透明度改为0,并在开关界面的时候使用动画系统(如Dotween)控制CanvasGroup的透明度,就可以实现这样的效果。这一块逻辑可以写在BaseView中,就由读者去自行尝试啦。
- 当遇到低端机型,不支持使用屏幕后处理效果时。这种情况比较少见,一般的处理就是将模糊图效果改成深色的背景蒙板,一般是将不能被模糊的RawImage弄成纯黑,颜色的透明度在0.5~0.8之间为宜。
最后是关于模糊RT图的优化问题。读者可以发现我们的BaseView中有这么一段逻辑:
...
void OnDestroy()
    {

        if (blur_bg_rt != null)
            RenderTexture.ReleaseTemporary(blur_bg_rt);
	    ...
...
这一句代码的作用是回收掉这张模糊的RT。在处理RT的时候,RT的回收是非常有必要的。我们先注释掉这一段代码,看看会出现什么问题。我们先打开Profiler。

在左侧条目中选中内存Memory,在下方的弹窗中将Simple改为Detailed。

切换之后,会变成下图这样:

接着我们运行游戏,先不要打开界面,我们点击一下Detailed旁边的Take Sample Editor。这个时候,Unity会对当前的内存进行采样,我们可以在其中发现RenderTexture的内容。如图所示:

这个时候我们打开界面1,也就是截屏模糊的那个界面,但不要关闭它,然后我们再点击一次Take Sample Editor获取内存信息,如图:

可以发现,我们多出了一张RT,很明显,就是我们渲染出来的模糊背景RT。然后我们关闭界面在获取一次内存信息,相信读者已经猜到了,我们接下来的采样,RenderTexture上面的数量依旧是6。

图中已经将界面1关闭了,模糊的RT没有回收。如果我们再打开几次界面1,没有回收的RT会越来越多,对内存而言是个很大的问题。

而如果我们在ScreenBlurEffect这种直接处理后处理RT的类,尤其是实时渲染模糊的逻辑中,如果没有及时回收已经不需要的RT,按照每一帧一张的速度,不一会儿游戏就会爆内存直至崩溃。
因此,在后处理逻辑设计上要做到滴水不漏的处理无用的RT,而在使用RT相关以及其他一些类似的堆内存的时候,也要记得及时监控内存数据。
项目Github:https://github.com/SaberZG/UnityUIBlurSolution
参考:
- Unity3D中利用Action实现自己的消息管理(订阅/发布)类 https://www.cnblogs.com/imteach/p/10679239.html
- Unity Shader-后处理:高斯模糊 https://blog.csdn.net/puppet_master/article/details/52783179


