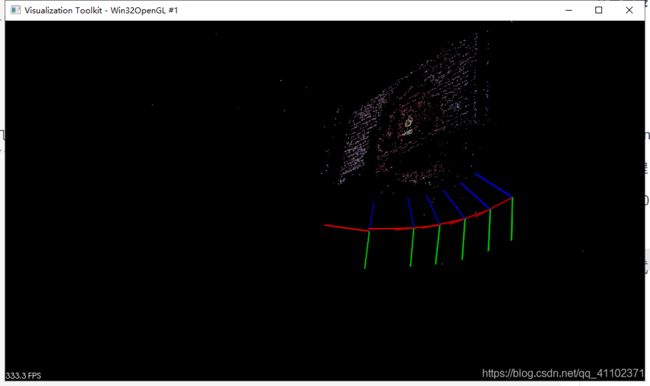
本文内容为vs2019配置opencv+contrib440以及PCL1.10.0,实现sift特征匹配以及sfm三维重建的详细步骤,并有如何单步调试源码的步骤,有助于对特征匹配以及sfm重建的理解
需要用到的资源:
1、vs2019安装+pcl1.10.0资源获取及配置:vs2019配置pcl1.10.0+点云可视化示例
2、opencv以及opencv_contrib
从GitHub获取:
opencv440下载source code(zip)
opencv_contrib下载source code(zip)
从GitHub下载有时候可能会特别慢,我网盘也有:
share_noel/OpenCV/OPENCV_440/opencv_contrib-4.4.0.zip
share_noel/OpenCV/OPENCV_440/opencv440.zip
https://pan.baidu.com/s/1IsN2Ze2FNts-3v4ZH1m-9A 提取码: mack
3、cmake
https://cmake.org/download/选择windows平台下的.msi文件
有时候官网进不去就在网盘下载:
share_noel/PCL/OPENCV_440/cmake-3.18.2-win64-x64.msi
https://pan.baidu.com/s/1IsN2Ze2FNts-3v4ZH1m-9A 提取码: mack
下载好以后安装,位置自己高兴就好
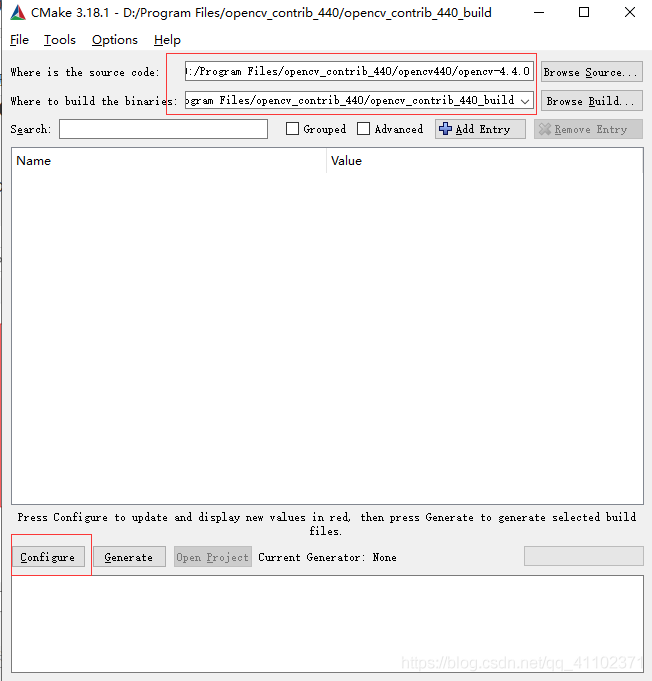
打开cmake
where is the source code,就是让选择opencv源码的位置,在解压后的文件夹里面
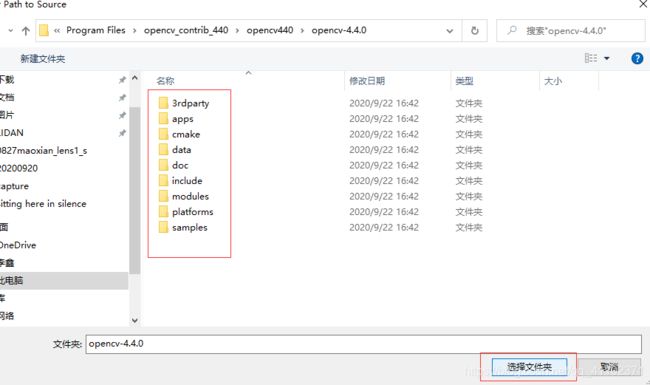
where to build the binaries选择新建那个空文件夹opencv_contrib_440_build
接着点击下方的configure
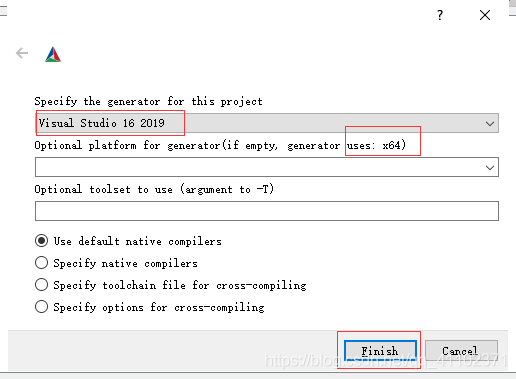
弹窗,点finish,开始编译
红了?没关系,再点一下configure
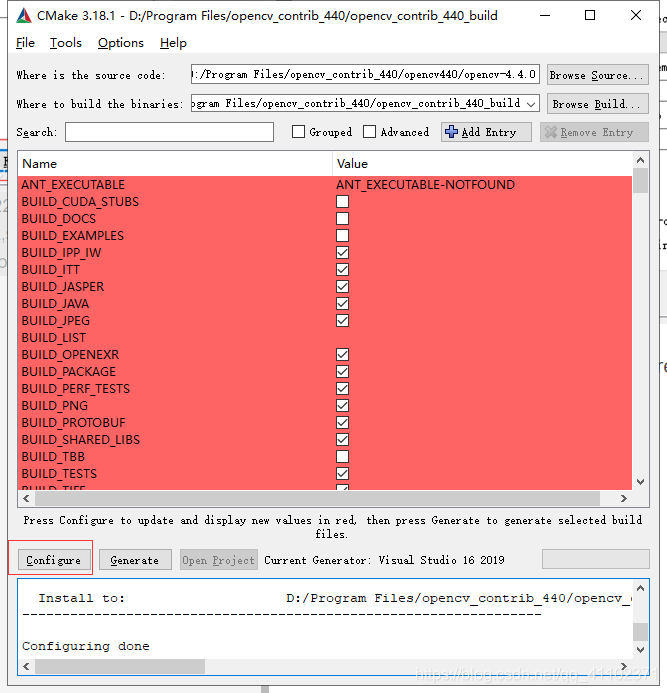
好了,白回来了
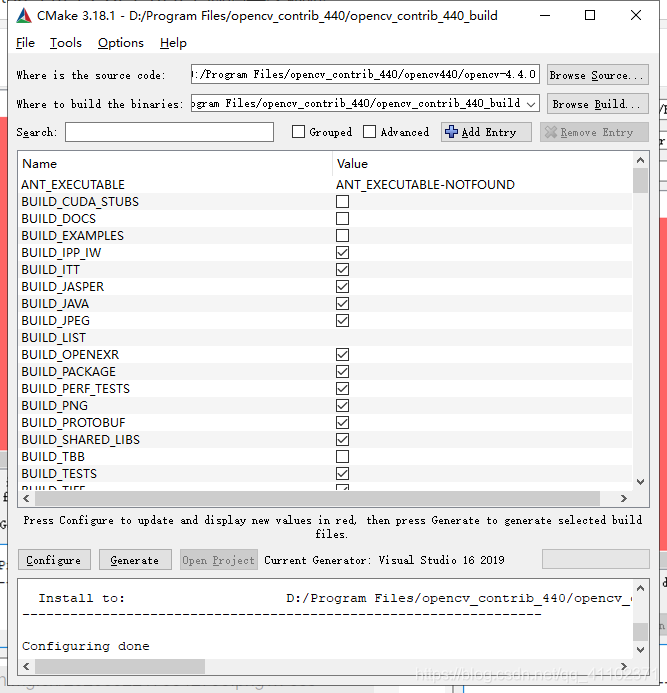
接着就是勾选build_opencv_world,这是为了生成一个整体的world.lib,配置了pcl的朋友肯定知道,在添加依赖项的时候,要加特别多的lib,而有了world.lib,只需要一个就行了。(一会在配置vs环境的时候就能体会到好处了)
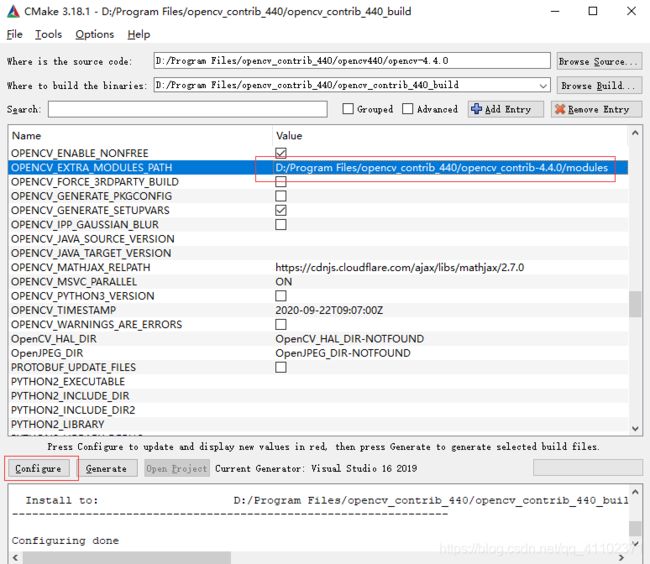
勾选OPENCV_ENABLE_NONFREE
在OPENCV_EXTRA_MODULES_PATH添加contrib与源码的位置,就是刚才contrib的解压位置里面的modules,并再次点击configure
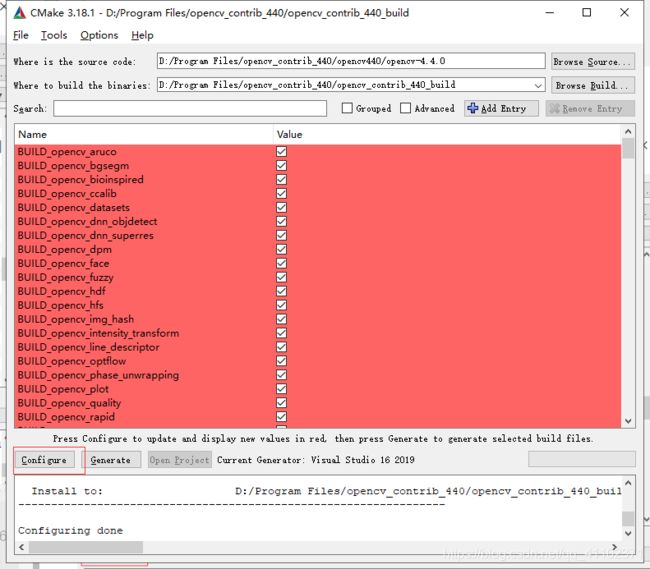
又红了,老规矩,configure
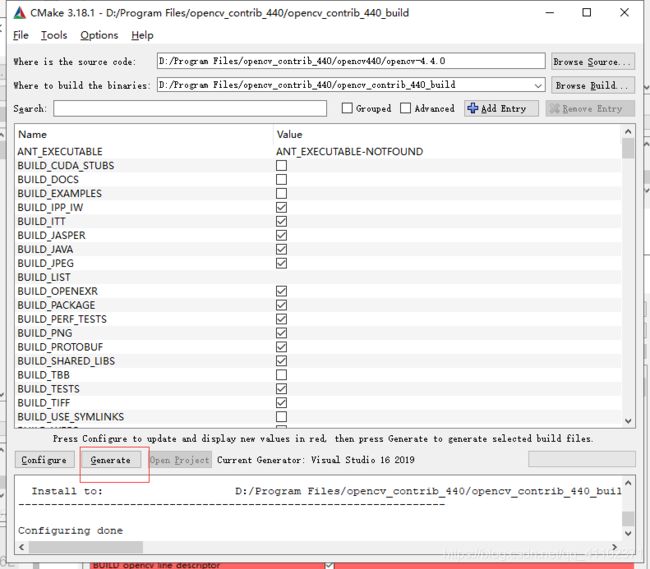
完成之后,点击generate
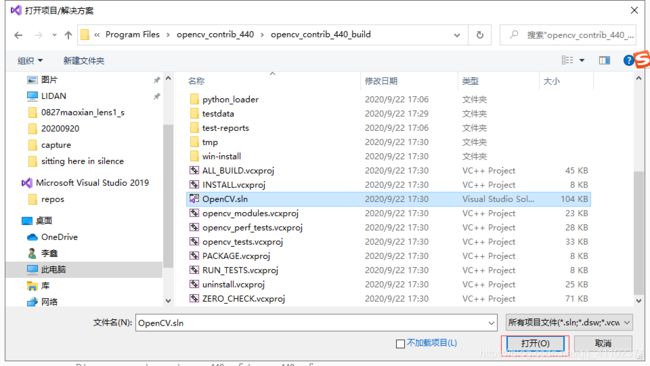
打开vs2019—打开项目或解决方案—选择opencv.sln,位置就在之前新建的文件夹去里面
在环境下debug x64下
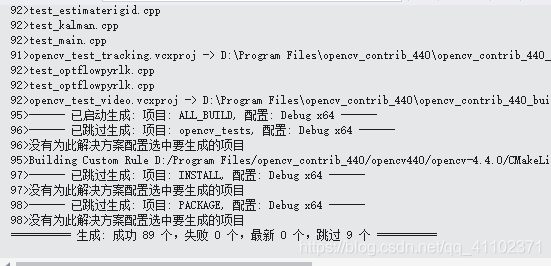
生成解决方案
成功
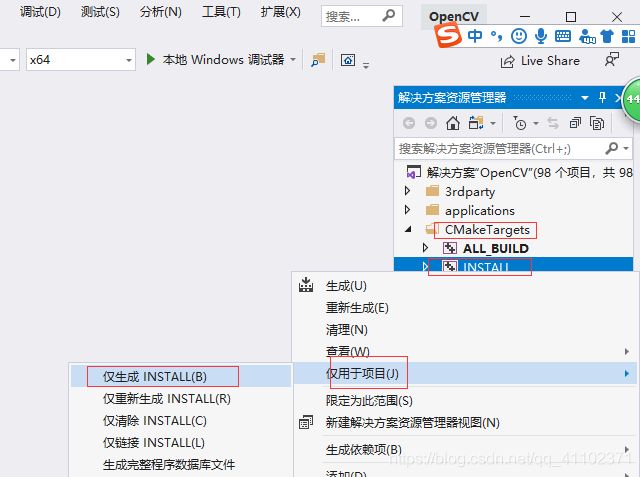
在解决方案里面,CMakeTargets–INSTALL–右键–仅用于项目–仅生成INSTALL
成功
先把pcl给配好,步骤在我前面的博客中,把里面的配置全都走一遍vs2019配置pcl1.10.0。
然后在这基础上添加新的属性表opencv_contrib_440
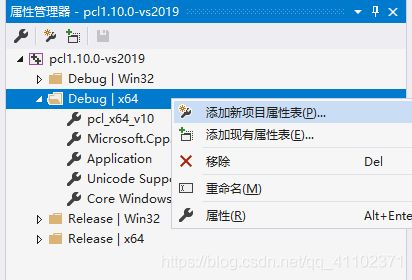
双击新建的属性表,修改
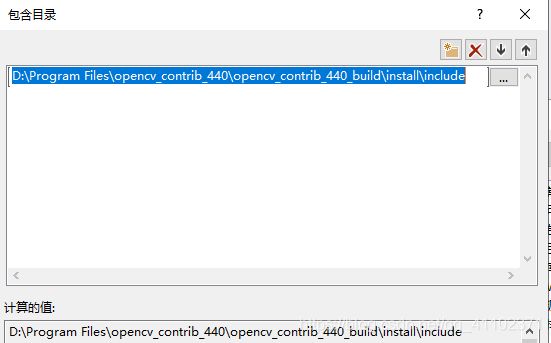
添加包含目录
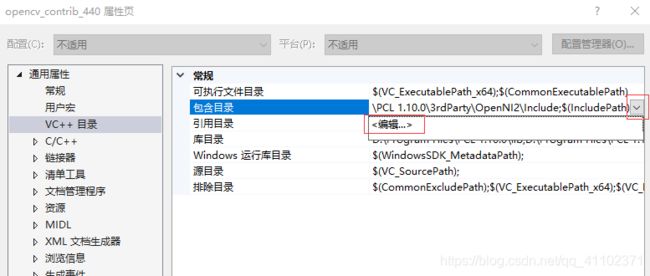
就在编译opencv时新建那个文件夹下:
D:\Program Files\opencv_contrib_440\opencv_contrib_440_build\install\include
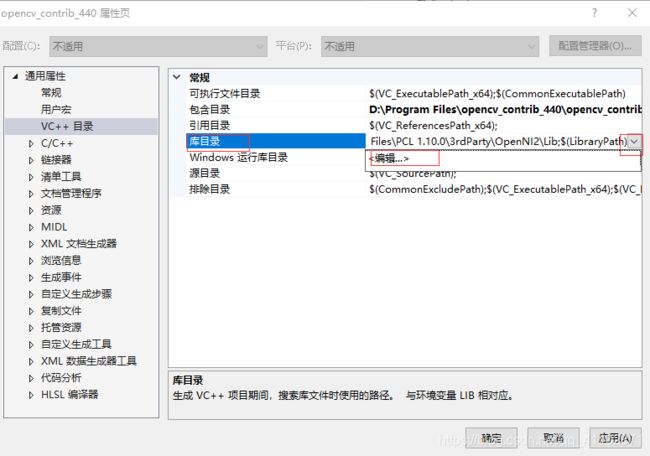
添加库目录:
D:\Program Files\opencv_contrib_440\opencv_contrib_440_build\install\x64\vc16\lib
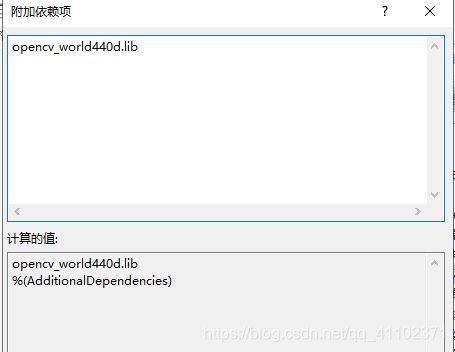
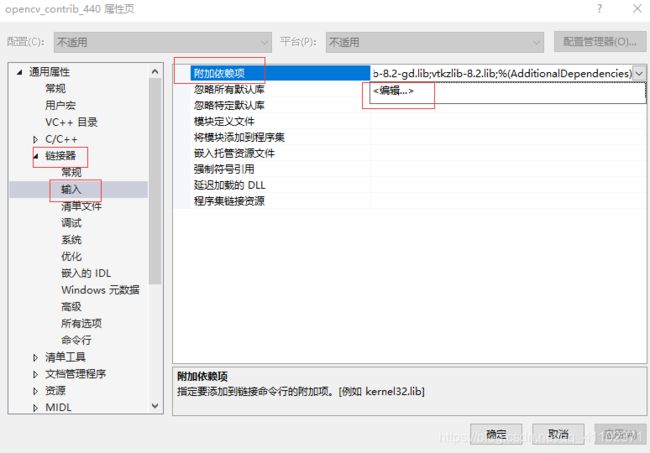
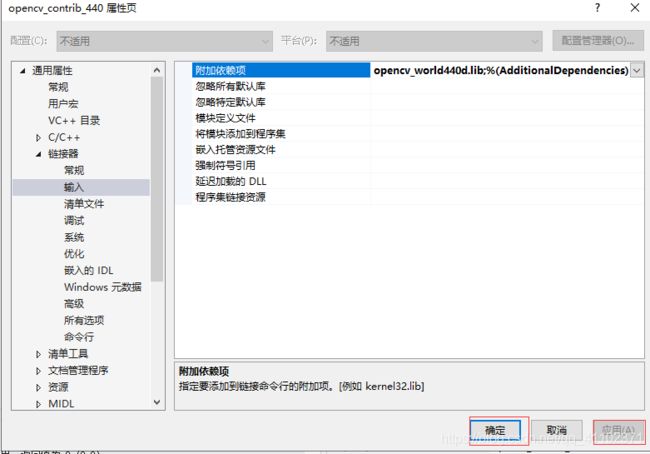
链接器–输入–附加依赖项:opencv_world440d.lib,这就是前面那里勾选的,生成一个lib来作为依赖项,就不会像pcl配置里面,要一大堆依赖项
最后一定记得点应用和确定,不要直接把窗口叉掉
回到解决方案管理器,打开项目属性–调试–环境
前面配置pcl的时候已经添加了:
PATH=$(PCL_ROOT_10)\bin;$(PCL_ROOT_10)\3rdParty\FLANN\bin;$(PCL_ROOT_10)\3rdParty\VTK\bin;$(PCL_ROOT_10)\Qhull\bin;$(PCL_ROOT_10)\3rdParty\OpenNI2\Tools;$(PATH)
现在再添加一个opencv的dll的路径:
D:\Program Files\opencv_contrib_440\opencv_contrib_440_build\bin\Debug
把下面整个替换原先pcl那个就好,这里这样做的目的是不用去配置系统环境变量,让程序运行时,直接在这个新增的目录下去寻找opencv所需要的dll
PATH=D:\Program Files\opencv_contrib_440\opencv_contrib_440_build\bin\Debug;$(PCL_ROOT_10)\bin;$(PCL_ROOT_10)\3rdParty\FLANN\bin;$(PCL_ROOT_10)\3rdParty\VTK\bin;$(PCL_ROOT_10)\Qhull\bin;$(PCL_ROOT_10)\3rdParty\OpenNI2\Tools;$(PATH)
下载images.zip并加压,images文件夹里是用来sfm重建的图片,将images文件夹放在工程文件同一目录下share_noel/PCL/OPENCV_440/images.zip
https://pan.baidu.com/s/1IsN2Ze2FNts-3v4ZH1m-9A 提取码: mack
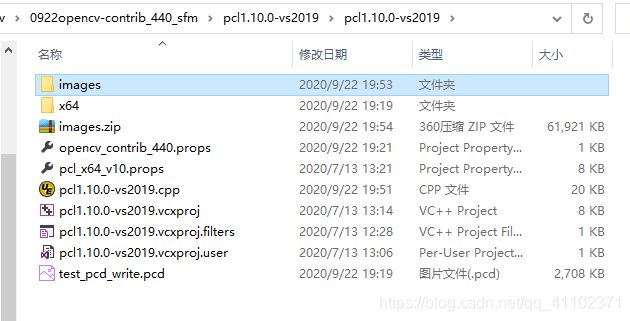
把下面的代码替换掉原来测试pcl的代码
(图片和测试代码来自SfM多视图三维点云重建)
#ifndef _CRT_SECURE_NO_WARNINGS
#define _CRT_SECURE_NO_WARNINGS
#endif
#include
#include
#include
#include
#include
//#include
#include
#include
#include
#include
using namespace std;
using namespace cv;
using namespace pcl;
//using namespace cv::xfeatures2d;
// 提取所有图像的特征点 及 特征点处的RGB
void extract_features(vector<string>& image_names, vector<vector<KeyPoint>>& keypoints_for_all, vector<Mat>& descriptor_for_all, vector<vector<Vec3b>>& colors_for_all);
// ratio & symmetry test
void ratioTest(vector<vector<DMatch>>& matches, vector<DMatch>& goodMatches);
void symmetryTest(const vector<DMatch>& matches1, const vector<DMatch>& matches2, vector<DMatch>& symMatches);
// 匹配所有特征点
void match_features(vector<Mat>& descriptor_for_all, vector<vector<DMatch>>& matches_for_all);
// 由匹配对提取特征点对
void get_matched_points(vector<KeyPoint> keypoints1, vector<KeyPoint> keypoints2, vector<DMatch> goodMatches, vector<Point2f>& points1, vector<Point2f>& points2);
// 获取匹配点的RGB
void get_matched_colors(vector<Vec3b>& color1, vector<Vec3b>& color2, vector<DMatch> matches, vector<Vec3b>& out_c1, vector<Vec3b>& out_c2);
// 剔除p1中mask值为0的元素
void maskout_points(vector<Point2f>& p1, Mat& mask);
void maskout_colors(vector<Vec3b>& p1, Mat& mask);
// 重建前2张图片
void reconstruct_first2imgs(Mat K, vector<vector<KeyPoint>>& key_points_for_all, vector<vector<Vec3b>>& colors_for_all, vector<vector<DMatch>>& matches_for_all, vector<Point3f>& structure, vector<vector<int>>& correspond_struct_idx, vector<Vec3b>& colors, vector<Mat>& rotations, vector<Mat>& translations);
// 三维重建
// 前两张图片重建
void reconstruct(Mat& K, vector<Point2f>& points1, vector<Point2f>& points2, Mat& R, Mat& t, Mat& mask, vector<Point3f>& points3D);
// 后续图片重建
void reconstruct(Mat& K, Mat& R1, Mat& T1, Mat& R2, Mat& T2, vector<Point2f>& points1, vector<Point2f>& points2, vector<Point3f>& points3D);
// 获得三维点与对应的像素点
void get_objpoints_and_imgpoints(vector<DMatch>& matches, vector<int>& struct_indices, vector<Point3f>& structure, vector<KeyPoint>& key_points, vector<Point3f>& object_points, vector<Point2f>& image_points);
// 点云融合
void fusion_pointscloud(vector<DMatch>& matches, vector<int>& struct_indices, vector<int>& next_struct_indices, vector<Point3f>& structure, vector<Point3f>& next_structure, vector<Vec3b>& colors, vector<Vec3b>& next_colors);
int main(int argc, char* argv[])
{
vector<string> img_names;
img_names.push_back(".\\images\\000.png");
img_names.push_back(".\\images\\001.png");
img_names.push_back(".\\images\\002.png");
//img_names.push_back(".\\images\\003.png");
//img_names.push_back(".\\images\\004.png");
//img_names.push_back(".\\images\\005.png");
img_names.push_back(".\\images\\006.png");
img_names.push_back(".\\images\\007.png");
img_names.push_back(".\\images\\008.png");
img_names.push_back(".\\images\\009.png");
Mat K = (Mat_<double>(3, 3) << 2759.48, 0, 1520.69, 0, 2764.16, 1006.81, 0, 0, 1); // Fountain的内参数矩阵
vector<vector<KeyPoint>> key_points_for_all;
vector<Mat> descriptor_for_all;
vector<vector<Vec3b>> colors_for_all; // 以图片为一个vector单元,存放所有特征点的RGB,防止混淆
vector<vector<DMatch>> matches_for_all;
// 提取所有图像的特征点
extract_features(img_names, key_points_for_all, descriptor_for_all, colors_for_all);
// 对所有图像进行顺次的特征匹配
match_features(descriptor_for_all, matches_for_all);
// 重建前两张图片
vector<Point3f> points3D; // 存放重建后所有三维点
vector<vector<int>> correspond_struct_idx; // 若第i副图像中第j特征点对应位置的值是N,则代表该特征点对应的是重建后的第N个三维点
vector<Vec3b> colors; // 存放重建后所有三维点的RGB(作为最终重建结果,不需要以图片为单元分隔,)
vector<Mat> rotations; // 所有相机相对第一个相机的旋转矩阵
vector<Mat> translations; // 所有相机相对第一个相机的平移矩阵
cout << "key_points_for_all.size() = " << key_points_for_all.size() << endl;
cout << "matches_for_all.size() = " << matches_for_all.size() << endl;
reconstruct_first2imgs(
K,
key_points_for_all,
colors_for_all,
matches_for_all,
points3D,
correspond_struct_idx,
colors,
rotations,
translations);
// 增量方式重建剩余的图像
for (int i = 1; i < matches_for_all.size(); ++i)
{
vector<Point3f> object_points;
vector<Point2f> image_points;
Mat r, R, T;
// 获取第i副图像中匹配点对应的三维点,以及在第i+1副图像中对应的像素点
get_objpoints_and_imgpoints(
matches_for_all[i],
correspond_struct_idx[i],
points3D,
key_points_for_all[i + 1],
object_points,
image_points
);
// 求解变换矩阵:空间中的点与图像中的点的对应关系,即可求解相机在空间中的位置
solvePnPRansac(object_points, image_points, K, noArray(), r, T);
// 将旋转向量转换为旋转矩阵
Rodrigues(r, R);
// 保存变换矩阵
rotations.push_back(R);
translations.push_back(T);
// 根据之前求得的R, T进行三维重建
vector<Point2f> p1, p2;
vector<Vec3b> c1, c2;
get_matched_points(key_points_for_all[i], key_points_for_all[i + 1], matches_for_all[i], p1, p2);
get_matched_colors(colors_for_all[i], colors_for_all[i + 1], matches_for_all[i], c1, c2);
vector<Point3f> next_points3D;
reconstruct(K, rotations[i], translations[i], R, T, p1, p2, next_points3D);
//将新的重建结果与之前的融合
fusion_pointscloud(
matches_for_all[i],
correspond_struct_idx[i],
correspond_struct_idx[i + 1],
points3D,
next_points3D,
colors,
c1
);
cout << "processing " << i - 1 << "-" << i << endl;
}
// PCL可视化
PointCloud<PointXYZRGB>::Ptr cloud(new PointCloud<PointXYZRGB>);
boost::shared_ptr<visualization::PCLVisualizer> viewer(new visualization::PCLVisualizer("3D viewer")); // 实例化PCLVisualizer对象,窗口命名为3D viewer
for (size_t i = 0; i < points3D.size(); i++)
{
PointXYZRGB p;
p.x = points3D[i].x;
p.y = points3D[i].y;
p.z = points3D[i].z;
p.b = colors[i][0];
p.g = colors[i][1];
p.r = colors[i][2];
cloud->points.push_back(p);
}
viewer->setBackgroundColor(0, 0, 0); // 设置背景颜色
// 在相机处添加坐标系
Eigen::Matrix4f transformationMatrix;
Eigen::Affine3f postion;
for (int i = 0; i < rotations.size(); i++)
{
transformationMatrix <<
rotations[i].at<double>(0, 0), rotations[i].at<double>(0, 1), rotations[i].at<double>(0, 2), translations[i].at<double>(0, 0),
rotations[i].at<double>(1, 0), rotations[i].at<double>(1, 1), rotations[i].at<double>(1, 2), translations[i].at<double>(1, 0),
rotations[i].at<double>(2, 0), rotations[i].at<double>(2, 1), rotations[i].at<double>(2, 2), translations[i].at<double>(2, 0),
0, 0, 0, 1;
postion.matrix() = transformationMatrix.inverse();
viewer->addCoordinateSystem(1, postion);//0.3
}
viewer->addPointCloud<PointXYZRGB>(cloud, "sample cloud");
viewer->setPointCloudRenderingProperties(visualization::PCL_VISUALIZER_OPACITY, 5, "sample cloud");// 设置点云显示属性,
while (!viewer->wasStopped()) {
viewer->spinOnce(100);
boost::this_thread::sleep(boost::posix_time::microseconds(1000));
// viewer->spinOnce (100);
// boost::this_thread::sleep (boost::posix_time::microseconds (100000));
}
return 0;
}
// 提取所有图像的特征点 及 特征点处的RGB
void extract_features(
vector<string>& image_names,
vector<vector<KeyPoint>>& keypoints_for_all,
vector<Mat>& descriptor_for_all,
vector<vector<Vec3b>>& colors_for_all)
{
keypoints_for_all.clear();
descriptor_for_all.clear();
Mat image;
Ptr<Feature2D> detector = cv::SIFT::create(0, 3, 0.04, 10);// SIFT提取特征点
for (vector<string>::const_iterator it = image_names.begin(); it != image_names.end(); ++it)
{
image = imread(*it);
if (image.empty())
{
cout << "ERROR! NO IMAGE LOADED!" << endl;
continue;
}
cout << "Extracting features: " << *it << endl;
vector<KeyPoint> keypoints; // 关键点
Mat descriptors; // 描述符
detector->detectAndCompute(image, noArray(), keypoints, descriptors);
// 特征点过少,则排除该图像
if (keypoints.size() <= 10)
continue;
keypoints_for_all.push_back(keypoints);
descriptor_for_all.push_back(descriptors);
// 提取特征点处RGB值
vector<Vec3b> colors(keypoints.size());
for (size_t i = 0; i < keypoints.size(); i++)
{
Point2f& p = keypoints[i].pt;
if (p.x <= image.cols && p.y <= image.rows)
colors[i] = image.at<Vec3b>(p.y, p.x);
}
colors_for_all.push_back(colors);
}
}
// 消除误匹配:比率检测
void ratioTest(vector<vector<DMatch>>& matches, vector<DMatch>& goodMatches)
{
for (vector<vector<DMatch>>::iterator matchIterator = matches.begin(); matchIterator != matches.end(); ++matchIterator)
if (matchIterator->size() > 1)
if ((*matchIterator)[0].distance < (*matchIterator)[1].distance * 0.8)
goodMatches.push_back((*matchIterator)[0]);
}
// 消除误匹配:对称性检测
void symmetryTest(const vector<DMatch>& matches1, const vector<DMatch>& matches2, vector<DMatch>& symMatches)
{
symMatches.clear();
for (vector<DMatch>::const_iterator matchIterator1 = matches1.begin(); matchIterator1 != matches1.end(); ++matchIterator1)
for (vector<DMatch>::const_iterator matchIterator2 = matches2.begin(); matchIterator2 != matches2.end(); ++matchIterator2)
if ((*matchIterator1).queryIdx == (*matchIterator2).trainIdx && (*matchIterator1).trainIdx == (*matchIterator2).queryIdx)
symMatches.push_back(*matchIterator1);
//symMatches.push_back(DMatch((*matchIterator1).queryIdx, (*matchIterator1).trainIdx, (*matchIterator1).distance));
}
// 匹配所有特征点
void match_features(vector<Mat>& descriptor_for_all, vector<vector<DMatch>>& matches_for_all)
{
matches_for_all.clear();
FlannBasedMatcher matcher;
for (size_t i = 0; i < descriptor_for_all.size() - 1; i++) // 两两匹配
{
vector<vector<DMatch>> matches1, matches2;
vector<DMatch> goodMatches1, goodMatches2, goodMatches;
matcher.knnMatch(descriptor_for_all[i], descriptor_for_all[i + 1], matches1, 2);// find 2 nearest neighbours, match.size() = query.rowsize()
matcher.knnMatch(descriptor_for_all[i + 1], descriptor_for_all[i], matches2, 2);// find 2 nearest neighbours, match.size() = query.rowsize()
ratioTest(matches1, goodMatches1);
ratioTest(matches2, goodMatches2);
symmetryTest(goodMatches1, goodMatches2, goodMatches);// Symmetry Test
matches_for_all.push_back(goodMatches);
}
}
// 由匹配对提取特征点对
void get_matched_points(
vector<KeyPoint> keypoints1,
vector<KeyPoint> keypoints2,
vector<DMatch> goodMatches,
vector<Point2f>& points1,
vector<Point2f>& points2)
{
points1.clear();
points2.clear();
for (vector<DMatch>::const_iterator it = goodMatches.begin(); it != goodMatches.end(); ++it)
{
points1.push_back(keypoints1[it->queryIdx].pt); // Get the position of left keypoints
points2.push_back(keypoints2[it->trainIdx].pt); // Get the position of right keypoints
}
}
// 获取匹配点的RGB
void get_matched_colors(
vector<Vec3b>& color1,
vector<Vec3b>& color2,
vector<DMatch> matches,
vector<Vec3b>& out_c1,
vector<Vec3b>& out_c2)
{
out_c1.clear();
out_c2.clear();
for (int i = 0; i < matches.size(); ++i)
{
out_c1.push_back(color1[matches[i].queryIdx]);
out_c2.push_back(color2[matches[i].trainIdx]);
}
}
// 剔除p1中mask值为0的特征点(无效点)
void maskout_points(vector<Point2f>& p1, Mat& mask)
{
vector<Point2f> p1_copy = p1;
p1.clear();
for (int i = 0; i < mask.rows; ++i)
{
if (mask.at<uchar>(i) > 0)
{
p1.push_back(p1_copy[i]);
}
}
}
void maskout_colors(vector<Vec3b>& p1, Mat& mask)
{
vector<Vec3b> p1_copy = p1;
p1.clear();
for (int i = 0; i < mask.rows; ++i)
{
if (mask.at<uchar>(i) > 0)
{
p1.push_back(p1_copy[i]);
}
}
}
// 三维重建
// 前两张图片重建
void reconstruct(Mat& K, vector<Point2f>& points1, vector<Point2f>& points2, Mat& R, Mat& t, Mat& mask, vector<Point3f>& points3D)
{
// 根据内参数矩阵获取相机的焦距和光心坐标(主点坐标)
double focal_length = 0.5 * (K.at<double>(0, 0) + K.at<double>(1, 1));
Point2d principle_point(K.at<double>(0, 2), K.at<double>(1, 2));
// 根据匹配点求取本征矩阵,使用RANSAC,进一步排除失配点(mask ==1 为内点, 0为外点)
Mat E = findEssentialMat(points1, points2, focal_length, principle_point, RANSAC, 0.999, 1.0, mask);
if (E.empty())
{
cout << "E is empty, please check it!" << endl;
return;
}
// 根据内参数矩阵获取相机的焦距和光心坐标(主点坐标)
int pass_count = recoverPose(E, points1, points2, R, t, focal_length, principle_point, mask);
// 更新p1、p2、colors(保留mask中为1的点,值为1代表着有效点)
maskout_points(points1, mask);
maskout_points(points2, mask);
// P、P1为外参数矩阵,即相机坐标系到世界坐标系的转换关系
Mat P = (Mat_<double>(3, 4) << 1, 0, 0, 0, 0, 1, 0, 0, 0, 0, 1, 0); // 视为世界坐标系,投影矩阵为标准型矩阵:[I 0]
Mat P1 = (Mat_<double>(3, 4) <<
R.at<double>(0, 0), R.at<double>(0, 1), R.at<double>(0, 2), t.at<double>(0, 0),
R.at<double>(1, 0), R.at<double>(1, 1), R.at<double>(1, 2), t.at<double>(1, 0),
R.at<double>(2, 0), R.at<double>(2, 1), R.at<double>(2, 2), t.at<double>(2, 0));
// 归一化,将像素坐标转换到相机坐标
/*
方式1:归一化变换矩阵,triangulatePoints()中P为:内参*外参矩阵,points为像素坐标:
P = K * P
方式2:归一化坐标,triangulatePoints()中P为外参数矩阵,points为相机坐标
X = K.inv() * x;
*/
P = K * P;
P1 = K * P1;
Mat points4D; // 齐次坐标形式:4*N:[x y z w].t(),此时w != 1
triangulatePoints(P, P1, points1, points2, points4D);
// 转成非齐次坐标
for (size_t i = 0; i < points4D.cols; i++)
{
Mat_<float> c = points4D.col(i);
c /= c(3);
Point3f p(c(0), c(1), c(2));
points3D.push_back(p);
}
}
void reconstruct(Mat& K, Mat& R1, Mat& T1, Mat& R2, Mat& T2, vector<Point2f>& points1, vector<Point2f>& points2, vector<Point3f>& points3D)
{
// P1、P2为外参数矩阵,即相机坐标系到世界坐标系的转换关系
Mat_<double> r1 = R1;
Mat_<double> t1 = T1;
Mat_<double> r2 = R2;
Mat_<double> t2 = T2;
Mat P1 = (Mat_<double>(3, 4) << r1(0, 0), r1(0, 1), r1(0, 2), t1(0), r1(1, 0), r1(1, 1), r1(1, 2), t1(1), r1(2, 0), r1(2, 1), r1(2, 2), t1(2));
Mat P2 = (Mat_<double>(3, 4) << r2(0, 0), r2(0, 1), r2(0, 2), t2(0), r2(1, 0), r2(1, 1), r2(1, 2), t2(1), r2(2, 0), r2(2, 1), r2(2, 2), t2(2));
// 归一化
P1 = K * P1;
P2 = K * P2;
Mat points4D; // 齐次坐标形式
triangulatePoints(P1, P2, points1, points2, points4D);
points3D.clear();
points3D.reserve(points4D.cols);
// 转成非齐次坐标
for (size_t i = 0; i < points4D.cols; i++)
{
Mat_<float> c = points4D.col(i);
c /= c(3);
Point3f p(c(0), c(1), c(2));
points3D.push_back(p);
}
}
// 三维点与像素点对应起来
void get_objpoints_and_imgpoints(
vector<DMatch>& matches,
vector<int>& struct_indices,
vector<Point3f>& structure,
vector<KeyPoint>& key_points,
vector<Point3f>& object_points, // 三维空间点的(x,y,z)值
vector<Point2f>& image_points) // 对应的二维特征点
{
object_points.clear();
image_points.clear();
// 从第m张与第m+1张图片的匹配点中,挑选上一次重建使用的特征点
for (int i = 0; i < matches.size(); ++i)
{
int query_idx = matches[i].queryIdx;
int train_idx = matches[i].trainIdx;
// 若struct_idx = N (N>=0),则表示该特征点是:上一次重建得到的第N个三维点对应的像素点
int struct_idx = struct_indices[query_idx];
if (struct_idx < 0) // 表明该特征点并未用来进行前一次重建
{
continue;
}
object_points.push_back(structure[struct_idx]);
image_points.push_back(key_points[train_idx].pt); // train中对应关键点的坐标 二维
}
}
// 重建前2张图片
void reconstruct_first2imgs(
Mat K,
vector<vector<KeyPoint>>& key_points_for_all,
vector<vector<Vec3b>>& colors_for_all,
vector<vector<DMatch>>& matches_for_all,
vector<Point3f>& structure,
vector<vector<int>>& correspond_struct_idx,
vector<Vec3b>& colors,
vector<Mat>& rotations,
vector<Mat>& translations)
{
// 计算头两幅图像之间的变换矩阵
vector<Point2f> p1, p2;
vector<Vec3b> c2;
Mat R, T; // 旋转矩阵和平移向量
Mat mask; // mask中大于零的点代表匹配点,等于零的点代表失配点
get_matched_points(key_points_for_all[0], key_points_for_all[1], matches_for_all[0], p1, p2);
get_matched_colors(colors_for_all[0], colors_for_all[1], matches_for_all[0], colors, c2);
reconstruct(K, p1, p2, R, T, mask, structure);
maskout_colors(colors, mask); // mask == 1,则为有效特征点
cout << "First 2 images had been reconstructed." << endl;
// 以第一个相机位置为世界坐标系
Mat R0 = Mat::eye(3, 3, CV_64FC1);
Mat T0 = Mat::zeros(3, 1, CV_64FC1);
// 保存变换矩阵
rotations = {
R0, R };
translations = {
T0, T };
// 将correspond_struct_idx的大小初始化为与key_points_for_all完全一致
correspond_struct_idx.clear();
correspond_struct_idx.resize(key_points_for_all.size());
for (int i = 0; i < key_points_for_all.size(); ++i)
{
correspond_struct_idx[i].resize(key_points_for_all[i].size(), -1); // 初始化为-1
}
// 填写前两幅图像的三维点索引
int idx = 0;
vector<DMatch>& matches = matches_for_all[0];
for (int i = 0; i < matches.size(); ++i)
{
if (mask.at<uchar>(i) == 0)
continue;
correspond_struct_idx[0][matches[i].queryIdx] = idx; // 如果两个点对应的idx 相等 表明它们是同一特征点 idx 就是structure中对应的空间点坐标索引
correspond_struct_idx[1][matches[i].trainIdx] = idx;
++idx;
}
}
// 点云融合
void fusion_pointscloud(
vector<DMatch>& matches,
vector<int>& struct_indices,
vector<int>& next_struct_indices,
vector<Point3f>& structure,
vector<Point3f>& next_structure,
vector<Vec3b>& colors,
vector<Vec3b>& next_colors)
{
for (int i = 0; i < matches.size(); ++i) // matches中所有点对都被用来进行重建
{
int query_idx = matches[i].queryIdx;
int train_idx = matches[i].trainIdx;
int struct_idx = struct_indices[query_idx];
if (struct_idx >= 0) // 若该点在空间中已经存在,则这对匹配点对应的空间点应该是同一个,索引要相同
{
next_struct_indices[train_idx] = struct_idx;
continue;
}
// 若该点在空间中未存在,将该点加入到结构中,且这对匹配点的空间索引都为新加入的点的索引
structure.push_back(next_structure[i]); // structure.size()已经更新
colors.push_back(next_colors[i]);
struct_indices[query_idx] = next_struct_indices[train_idx] = structure.size() - 1;
}
}
其实按照上述步骤配置,已经可以单步调试opencv的源码了,这里也只是简单讲一下这几个文件的关系。
关于dll,lib我已经在win10+vs2013配置pcl 1.8.0这篇博客讲过,那么现在按我所知道的来讲讲pdb文件的作用,不对的地方感谢指正
首先,上个实例。
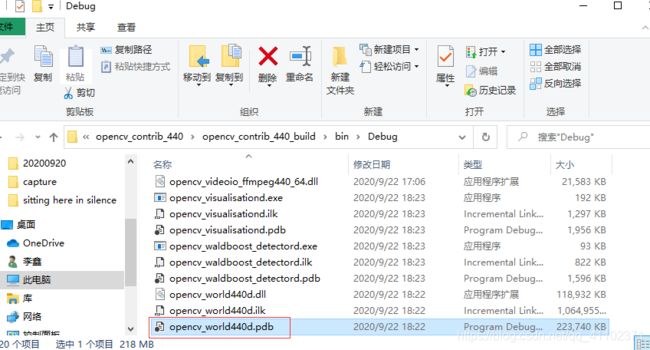
请把D:\Program Files\opencv_contrib_440\opencv_contrib_440_build\bin\Debug里面的opencv_world440d.pdb文件剪切到它的上一级目录,为的是不让程序找到它
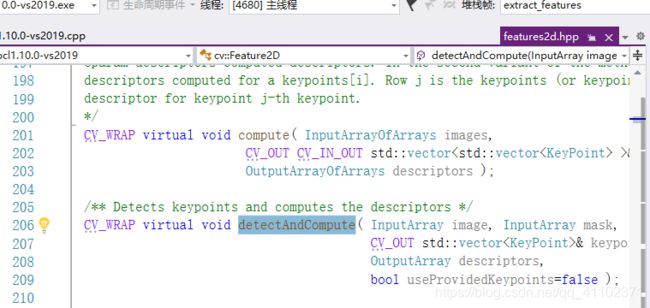
回到vs项目中,找到这句代码,加个断点,这是sift特征检测算法的函数
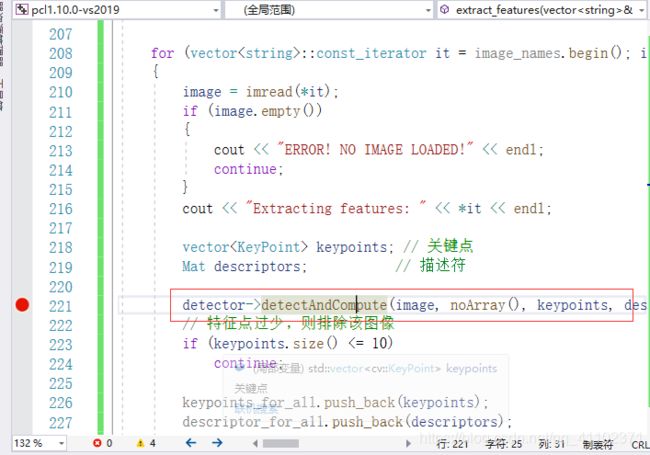
F5运行,执行到这句代码会停下
现在按F11逐语句执行,再按,再按,,,,,单步很多次之后,会发现始终没进入detectAndCompute的函数实体,一直单步的结果就是回到了调用这里的下一语句了,那么对于需要看到源码的人来说,是及其不开心的。
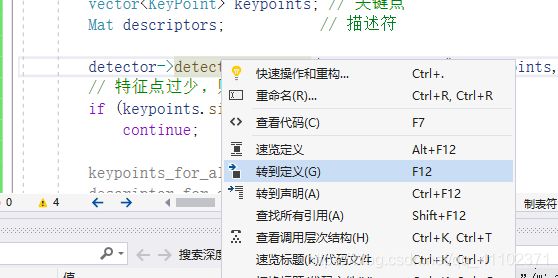
这时候,可能会想着我手动查看还不行吗,于是在detectAndCompute上点击右键,转到定义,也只能出现它的声明,看不到函数的内部代码。
接着,停止调试。回到文件资源管理器,把刚刚的额pdb文件给放回原来的位置,再回到项目,F5再来一遍,到断点处,F11逐语句,多按几次。我点了21下F11,源码出来了喂。于是终于可以看到心心念念的sift源码,迫不及待地投入知识的海洋。
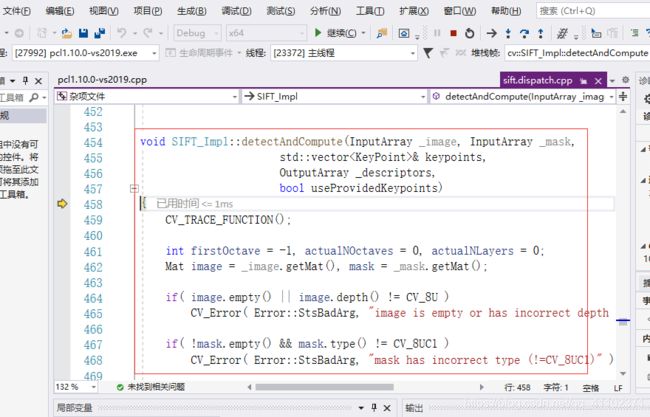
这时候,在detectAndCompute上右键转到定义,也是可以定位到源码,而不是只能看到声明。
我们再通过打开的源码定位它所在的文件夹
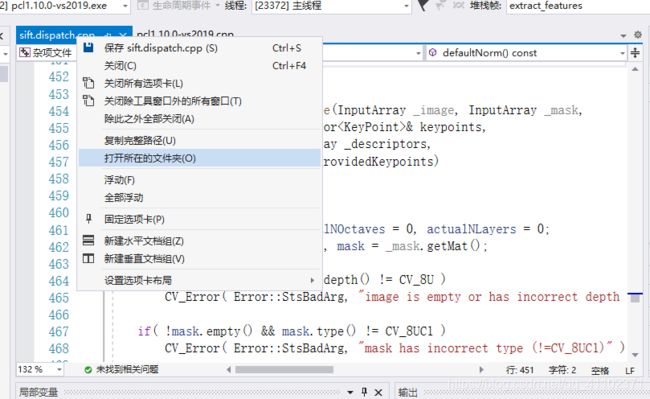
那么,现在对pdb的作用应该有一个认识了。
像opencv这种大型的库,我们在使用时,不可能每次都把所有源码都放进自己的工程编译,那显示一张图片不都得半年?那么我们实际用的是编译好的dll,而pdb就是记录了使用者调用dll时用的函数的位置,相当于是个桥梁。如果去看文件属性里的时间,会发现pdb是与dll,lib文件同时生成的。如果没有pdb,程序运行是不受影响的,但是你只能使用函数的接口,不知道函数的具体代码。而你又不能在opencv那么多源码文件中挨个打开看自己想要的源码在不在里面不是?
Windows下编译OpenCV+OpenCV_Contrib
opencv_contrib安装笔记
vs2019配置pcl1.10.0+点云可视化示例
SfM多视图三维点云重建–【VS2015+OpenCV3.4+PCL1.8】
visual studio里的几个输出的设置及一些文件的作用
PDB文件:每个开发人员都必须知道的
PDB文件概说
边学边用,如有错漏,敬请指正
--------------------------------------------------------------------------------------------诺有缸的高飞鸟202009