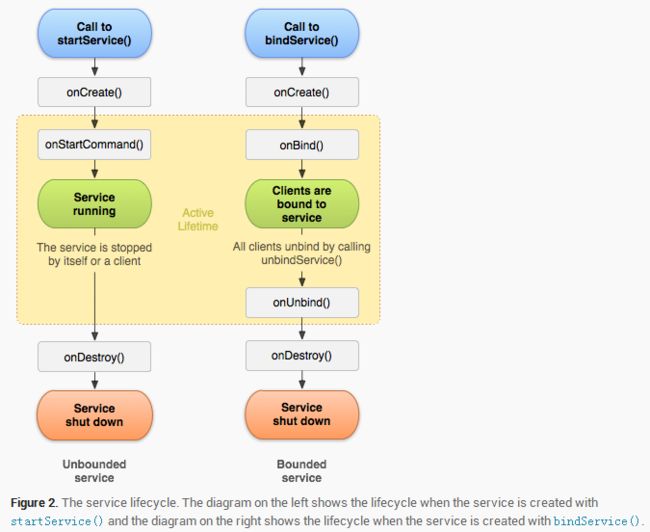
一、什么是Service?
Service是Android的四大组件之一,它可以在后台运行一些用户不可见的任务(比如播放音乐、下载)。它还可以在应用退出以后继续保持运行。
二、怎么使用Service?
1.首先要继承Service类得到一个子类。
2.跟Activity一样,需要在AndroidManifest.xml文件中注册
3.与启动Activity类似,我们可以使用Intent来启动Service,启动方法为startService();
Intent startIntent = new Intent(this, MyService.class);
startService(startIntent);
Service与Activity不一样,如果不主动结束它的运行,它会一直保持运行。所以我们使用stopService()停止Service的运行。
Intent stopIntent = new Intent(this, MyService.class);
stopService(stopIntent);
三、Activity怎么与Service通信?
可以使用bindService()方法将Activity与Service绑定,使用unbindService()解除绑定。也可以使用bindService()方法来启动Service,而这种绑定方式启动的Service,只有解除所有绑定,Service才会销毁。
Intent bindIntent = new Intent(this, MyService.class);
bindService(bindIntent, connection, BIND_AUTO_CREATE);
其中connection声明如下,其中onServiceConnected方法会在Service与Activity建立关联的时候调用,可以在该方法里启动需要Service执行的任务并得到返回值。onServiceDisconnected方法会在Service与Activity解除关联的时候调用。
private ServiceConnection connection = new ServiceConnection() {

        @Override
        public void onServiceDisconnected(ComponentName name) {
        }

        @Override
        public void onServiceConnected(ComponentName name, IBinder service) {
            myBinder = (MyService.MyBinder) service;
            myBinder.startDownload();
        }
};
四、Service生命周期
五、前台Service
一般情况下,Service都是在后台运行,但是也可以让它运行在前台。
由于Service的系统优先级比较低,后台Service容易在系统内存不足的时候被杀死,而前台Service则可以解决这一问题。
创建前台service比较简单,在我们继承自Service类的子类的onCreate()方法中新建一个Notification
public  void showNotification(Context context) {
        Notification notification = new NotificationCompat.Builder(context)
                /**设置通知左边的大图标**/
                .setLargeIcon(BitmapFactory.decodeResource(context.getResources(), R.mipmap.ic_launcher))
                /**设置通知右边的小图标**/
                .setSmallIcon(R.mipmap.ic_launcher)
                /**通知首次出现在通知栏,带上升动画效果的**/
                .setTicker("通知来了")
                /**设置通知的标题**/
                .setContentTitle("这是一个通知的标题")
                /**设置通知的内容**/
                .setContentText("这是一个通知的内容这是一个通知的内容")
                /**通知产生的时间,会在通知信息里显示**/
                .setWhen(System.currentTimeMillis())
                /**设置该通知优先级**/
                .setPriority(Notification.PRIORITY_DEFAULT)
                /**设置这个标志当用户单击面板就可以让通知将自动取消**/
                .setAutoCancel(true)
                /**设置他为一个正在进行的通知。他们通常是用来表示一个后台任务,用户积极参与(如播放音乐)或以某种方式正在等待,因此占用设备(如一个文件下载,同步操作,主动网络连接)**/
                .setOngoing(false)
                /**向通知添加声音、闪灯和振动效果的最简单、最一致的方式是使用当前的用户默认设置,使用defaults属性,可以组合:**/
                .setDefaults(Notification.DEFAULT_VIBRATE | Notification.DEFAULT_SOUND | Notification.DEFAULT_LIGHTS)
                .setContentIntent(PendingIntent.getActivity(context, 1, new Intent(context, MainActivity.class), PendingIntent.FLAG_CANCEL_CURRENT))
                .build();
        notification.flags = Notification.FLAG_SHOW_LIGHTS;
        NotificationManager notificationManager = (NotificationManager) context.getSystemService(context.NOTIFICATION_SERVICE);
        /**发起通知**/
        notificationManager.notify(0, notification);
    }
通过初始化Notification和调用它的展示方法,这样该Service就变成了前台service。
Notification的setContentIntent方法的参数是一个PendingIntent,它可以让用户点击通知时去执行预设的任务,这里是打开MainActivity。
运行该Service,可以看到系统通知栏出现了一个通知,点击它会打开MainActivity。
六、什么是PendingIntent?
PendingIntent是一种特殊的Intent。它跟intent的立即执行不一样;它的执行不是立即的,是需要满足某些条件后才执行。
通过PendingIntent典型的三个静态方法可以得到其对象:
- 打开到一个activity组件
public static PendingIntent getActivity(Context context, int requestCode,
            Intent intent, @Flags int flags)
- 打开一个广播组件
 public static PendingIntent getBroadcast(Context context, int requestCode,
            Intent intent, @Flags int flags)
- 打开一个服务组件
public static PendingIntent getService(Context context, int requestCode,
            @NonNull Intent intent, @Flags int flags)
因为PendingIntent自己携带了Context,所以即使Intent所在的程序结束了,PendingIntent依然有效,可以在别的程序中被使用。
七、远程Service
待续
