自编码器模型详解与实现(采用tensorflow2.x实现)
自编码器模型详解与实现(采用tensorflow2.x实现)
- 使用自编码器学习潜变量
-
- 编码器
- 解码器
- 构建自编码器
- 从潜变量生成图像
- 完整代码
使用自编码器学习潜变量
由于高维输入空间中有很多冗余,可以压缩成一些低维变量,自编码器于1980年代Geoffrey Hinton等人首次推出。在传统的机器学习技术中用于减少输入维度的技术,包括主成分分析(Principal Component Analysis, PCA)。
但是,在图像生成中,我们还将希望将低维空间还原为高维空间。可以将其视为图像压缩,其中将原始图像压缩为JPEG之类的文件格式,该文件格式较小且易于存储和传输。然后,计算机可以将JPEG恢复为原始像素。换句话说,原始像素被压缩为低维JPEG格式,并恢复为高维原始像素以进行显示。
自编码器是一种无监督的机器学习技术,不需要训练标签就可以对模型进行训练。但是,由于我们确实需要使用图像本身作为标签,因此有人将其称为自监督机器学习(auto在拉丁语中是self)。
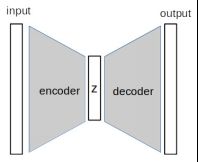
自编码器的基本构建块是编码器和解码器。编码器负责将高维输入减少为一些低维潜(隐)变量。解码器是将隐变量转换回高维空间的模块。编码器-解码器体系结构还用于其他机器学习任务中,例如语义分割,其中神经网络首先了解图像表示,然后生成像素级标签。下图显示了自编码器的一般体系结构:

输入和输出是相同维度的图像,z是低维度的潜矢量。编码器将输入压缩为z,解码器将处理反向以生成输出图像。
编码器
编码器由多个神经网络层组成,我们将使用MNIST数据集构建编码器,该编码器接受的输入尺寸为28x28x1。我们需要设置潜变量的维数,这里使用一维向量。潜变量的大小应小于输入尺寸。它是一个超参数,首先尝试使用10,它具有28 * 28 / 10 = 78.4的压缩率。
这种网络拓使模型学习重要的知识,并逐层丢弃次要的特征,最终得到10个最重要的特征。它看起来与CNN分类非常相似,在CNN分类中,特征图的大小自上到下逐渐减小。
使用卷积层构建编码器,前期的CNN(例如VGG)使用最大池化进行特征图下采样,但是较新的网络倾向于通过在卷积层中使用步幅为2的卷积来实现此目的。
我们将遵循约定并将潜在变量命名为z:
def Encoder(z_dim):
    inputs  = layers.Input(shape=[28,28,1])
    x = inputs
    x = Conv2D(filters=8, kernel_size=(3,3), strides=2, padding='same', activation='relu')(x)
    x = Conv2D(filters=8, kernel_size=(3,3), strides=1, padding='same', activation='relu')(x)
    x = Conv2D(filters=8, kernel_size=(3,3), strides=2, padding='same', activation='relu')(x)
    x = Conv2D(filters=8, kernel_size=(3,3), strides=1, padding='same', activation='relu')(x)
    x = Flatten()(x)
    out = Dense(z_dim, activation='relu')(x)
    return Model(inputs=inputs, outputs=out, name='encoder')
在典型的CNN架构中,滤波器的数量增加,而特征图的大小减小。但是,我们的目标是减小特征尺寸,因此滤波器的数量保持不变,这对于诸如MNIST之类的简单数据就足够了。最后,我们将最后一个卷积层的输出展平,并将其馈送到密集层以输出潜变量。
解码器
解码器的工作本质上与编码器相反,其将低维潜变量转换为高维输出以近似输入图像。此处,在解码器中使用卷积层将特征图从7x7上采样到28x28:
def Decoder(z_dim):
    inputs = layers.Input(shape=[z_dim])
    x = inputs
    x = Dense(7*7*64, activation='relu')(x)
    x = Reshape((7,7,64))(x)
    x = Conv2D(filters=64, kernel_size=(3,3), strides=1, padding='same', activation='relu')(x)
    x = UpSampling2D((2,2))(x)
    x = Conv2D(filters=32, kernel_size=(3,3), strides=1, padding='same', activation='relu')(x)
    x = UpSampling2D((2,2))(x)
    x = Conv2D(filters=32, kernel_size=(3,3), strides=2, padding='same', activation='relu')(x)
    out = Conv2(filters=1, kernel_size=(3,3), strides=1, padding='same', activation='sigmoid')(x)
    return Model(inputs=inputs, outputs=out, name='decoder')
与编码器不同,解码器的目的不是降低尺寸,因此我们应该使用更多的滤波器来赋予其更强大的生成能力。
UpSampling2D对像素进行插值以提高分辨率。这是一个仿射变换(线性乘法和加法),因此可以反向传播,但是它使用固定权重,因此是不可训练的。另一种流行的上采样方法是使用转置卷积层(transpose convolutional layer),该层是可训练的,但是它可能在生成的图像中创建类似于棋盘方格的伪像。
因此,最近的图像生成模型倾向于不使用转置卷积。:

构建自编码器
将编码器和解码器放在一起以创建自编码器。首先,我们分别实例化编码器和解码器。然后,我们将编码器的输出馈送到解码器的输入中,并使用编码器的输入和解码器的输出实例化一个Model:
z_dim = 10
encoder = Encoder(z_dim)
decoder = Decoder(z_dim)
model_input = encoder.input
model_output = decoder(encoder.output)
autoencoder = Model(model_input, model_output)
为了进行训练,使用L2损失,这是通过均方误差(MSE)来比较输出和预期结果之间的每个像素而实现的。在此示例中,添加了一些回调函数,它们将在训练每个epoch之后进行调用:
- ModelCheckpoint(monitor=‘val_loss’)用于在当前验证损失低于先前epoch情况下保存模型。
- 如果验证损失在10个epoch内没有得到改善,则EarlyStopping(monitor=‘val_loss’, patience = 10)可以更早地停止训练。
从潜变量生成图像
那么,自动编码器有什么用途呢?自编码器的应用之一是图像去噪,即在输入图像中添加一些噪声并训练模型以生成清晰图像。
如果对使用自编码器生成图像感兴趣,则可以忽略编码器,而仅使用解码器从潜变量中采样以生成图像。我们面临的第一个挑战是确定如何从潜在变量中采样。
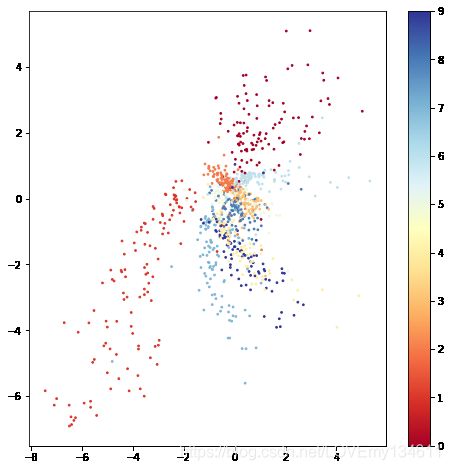
为了进行说明,使用z_dim = 2训练另一个自动编码器,以便我们可以在两个维度上探索潜在空间:

通过将1,000个样本传递到经过训练的编码器中并在散点图上绘制两个潜在变量来生成该图。右侧的颜色栏指示数字标签的强度。我们可以从图中观察到:
潜在变量的类别不是均匀分布的。可以在左上方和右上方看到与其他类别完全分开的群集。但是,位于图中心的类别趋于更密集地排列,并且彼此重叠。
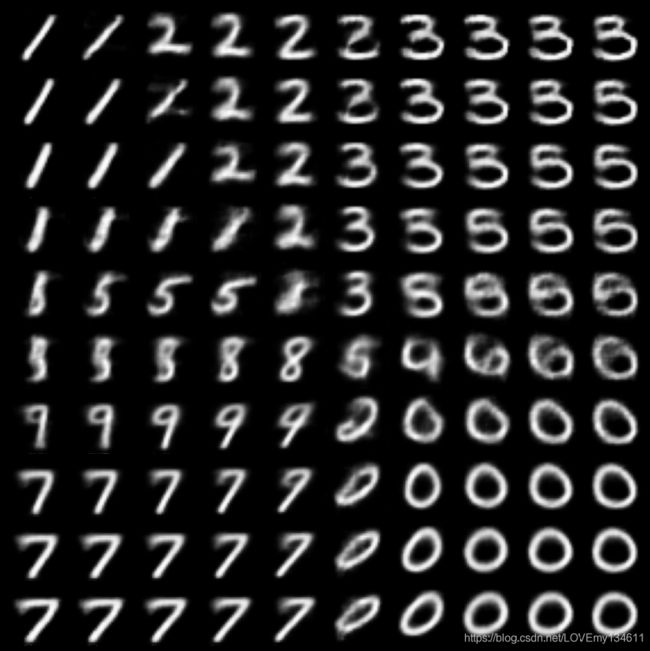
下图中,这些图像是通过以1.0为间隔在潜变量[-5, +5]范围中生成的:

我们可以看到数字0和1在样本分布中得到了很好的表示,被很好地绘制。但中间的数字是模糊的,甚至样本中也缺少一些数字。
在ipynb代码中有一个小部件,允许滑动改变潜变量以交互方式生成图像。

完整代码
# autoencoder.ipynb
import tensorflow as tf
from tensorflow.keras import layers, Model
from tensorflow.keras.layers import Input, Conv2D, Dense,\
    Flatten, Reshape, Conv2DTranspose, MaxPooling2D, UpSampling2D, \
        LeakyReLU
from tensorflow.keras.activations import relu
from tensorflow.keras.models import Sequential, load_model
from tensorflow.keras.callbacks import ModelCheckpoint, EarlyStopping

import tensorflow_datasets as tfds

import numpy as np
import matplotlib.pyplot as plt

import warnings
warnings.filterwarnings('ignore')
print(tf.__version__)

(ds_train, ds_test_), ds_info = tfds.load(
    'mnist',
    split=['train','test'],
    shuffle_files=True,
    as_supervised=True,
    with_info=True
)
fig = tfds.show_examples(ds_train,ds_info)

batch_size = 64
def preprocess(image, label):
    image = tf.cast(image, tf.float32)
    image = image/255.
    return image, image

ds_train = ds_train.map(preprocess)
ds_train = ds_train.cache() #put dataset input memory
ds_train = ds_train.shuffle(ds_info.splits['train'].num_examples)
ds_train = ds_train.batch(batch_size,drop_remainder=True)

ds_test = ds_test_.map(preprocess).batch(batch_size,drop_remainder=True).cache().prefetch(batch_size)

# return label for testing
def preprocess_with_label(image, label):
    image = tf.cast(image, tf.float32)
    image = tf.math.round(image/255.)
    return image, label

ds_test_label = ds_test_.map(preprocess_with_label).batch(1000, drop_remainder=True)

def Encoder(z_dim):
    inputs  = layers.Input(shape=[28,28,1])

    x = inputs
    x = Conv2D(filters=8,  kernel_size=(3,3), strides=2, padding='same', activation='relu')(x)
    x = Conv2D(filters=8,  kernel_size=(3,3), strides=1, padding='same', activation='relu')(x)
    x = Conv2D(filters=8,  kernel_size=(3,3), strides=2, padding='same', activation='relu')(x)
    x = Conv2D(filters=8,  kernel_size=(3,3), strides=1, padding='same', activation='relu')(x)
    x = Flatten()(x)
    out = Dense(z_dim)(x)

    return Model(inputs=inputs, outputs=out, name='encoder')

def Decoder(z_dim):
    inputs  = layers.Input(shape=[z_dim])
    x = inputs
    x = Dense(7*7*64, activation='relu')(x)
    x = Reshape((7,7,64))(x)

    x = Conv2D(filters=64, kernel_size=(3,3), strides=1, padding='same', activation='relu')(x)
    x = UpSampling2D((2,2))(x)

    x = Conv2D(filters=32, kernel_size=(3,3), strides=1, padding='same', activation='relu')(x)
    x = UpSampling2D((2,2))(x)

    out = Conv2D(filters=1, kernel_size=(3,3), strides=1, padding='same', activation='sigmoid')(x)

    #return out
    return Model(inputs=inputs, outputs=out, name='decoder')

class Autoencoder:
    def __init__(self, z_dim):
        self.encoder = Encoder(z_dim)
        self.decoder = Decoder(z_dim)

        model_input = self.encoder.input
        model_output = self.decoder(self.encoder.output)
        self.model = Model(model_input, model_output)

autoencoder = Autoencoder(z_dim=10)
model_path = 'autoencoder.h5'
checkpoint = ModelCheckpoint(model_path,
                             monitor= "val_loss",
                             verbose=1,
                             save_best_only=True,
                             mode= "auto",
                             save_weights_only = False)

early = EarlyStopping(monitor= "val_loss",
                      mode= "auto",
                      patience = 5)

callbacks_list = [checkpoint, early]

autoencoder.model.compile(
    loss='mse',
    optimizer=tf.keras.optimizers.RMSprop(learning_rate=3e-4),
    # metrics=[tf.keras.losses.BinaryCrossentropy()]
)
autoencoder.model.fit(ds_train, validation_data=ds_test,
                epochs = 100, callbacks = callbacks_list)

images, labels = next(iter(ds_test))
autoencoder.model = load_model(model_path)
outputs = autoencoder.model.predict(images)

# Display
grid_col = 10
grid_row = 2

f, axarr = plt.subplots(grid_row, grid_col, figsize=(grid_col*1.1, grid_row))

i = 0
for row in range(0, grid_row, 2):
    for col in range(grid_col):
        axarr[row,col].imshow(images[i,:,:,0], cmap='gray')
        axarr[row,col].axis('off')
        axarr[row+1,col].imshow(outputs[i,:,:,0], cmap='gray')
        axarr[row+1,col].axis('off')
        i += 1
f.tight_layout(0.1, h_pad=0.2, w_pad=0.1)
plt.show()

autoencoder_2 = Autoencoder(z_dim=2)
model_path = 'autoencoder_2.h5'
checkpoint = ModelCheckpoint(model_path,
                             monitor= "val_loss",
                             verbose=1,
                             save_best_only=True,
                             mode= "auto",
                             save_weights_only = False)
early = EarlyStopping(monitor= "val_loss",
                      mode= "auto",
                      patience = 5)

callbacks_list = [checkpoint, early]

autoencoder_2.model.compile(loss = "mse", optimizer=tf.keras.optimizers.RMSprop(learning_rate=1e-3))

autoencoder_2.model.fit(ds_train, validation_data=ds_test, epochs = 50, callbacks = callbacks_list)

images, labels = next(iter(ds_test_label))
outputs = autoencoder_2.encoder.predict(images)
plt.figure(figsize=(8,8))
plt.scatter(outputs[:,0], outputs[:,1], c=labels, cmap='RdYlBu', s=3)
plt.colorbar()

z_samples = np.array([[z1, z2] for z2 in np.arange(-5, 5, 1.) for z1 in np.arange(-5, 5, 1.)])
images = autoencoder_2.decoder.predict(z_samples)
grid_col = 10
grid_row = 10

f, axarr = plt.subplots(grid_row, grid_col, figsize=(grid_col, grid_row))

i = 0
for row in range(grid_row):
    for col in range(grid_col):
        axarr[row, col].imshow(images[i,:,:,0],cmap='gray')
        axarr[row, col].axis('off')
        i += 1

f.tight_layout(0.1, h_pad=0.2, w_pad=0.1)
plt.show()

import ipywidgets as widgets
from ipywidgets import interact, interact_manual

@ interact
def explore_latent_variable(z1 = (-5,5,0.1),z2 = (-5,5,0.1)):
    z_samples = [[z1, z2]]
    images = autoencoder_2.decoder.predict(z_samples)
    plt.figure(figsize=(2,2))
    plt.imshow(images[0,:,:,0],cmap='gray')
