pytorch DataLoader(2): Dataset,DataLoader自定义训练数据_opencv,skimage,PIL接口
本文主要简单讲解一下opencv,skimage,PIL读取数据并加载到dataset。
一些前置知识可以参考前一篇文章pytorch DataLoader(1): opencv,skimage,PIL,Tensor转换以及transforms,这篇文章主要讲了一些opencv,skimage,PIL的格式,读取方式,相互转换等,有助于帮助大家理解本文本文的一些操作等。
import os
import numpy as np
import cv2
import torch
from torch.utils.data import Dataset, DataLoader
from torchvision import transforms, utils
import matplotlib.pyplot as plt
# import albumentations as A
1. 读取文件路径
从保存image路径的txt文件中读取path,并保存到list中。
tra_img_name_list = []
fg_list_name = 'image.txt'
with open(fg_list_name, 'r') as reader:
    path_list = reader.readlines()
    for line in path_list:
        line = line.replace('\n', '').replace('\\', '/')
        tra_img_name_list.append(line)

tra_lbl_name_list = []
for img_path in tra_img_name_list: # 获取所有mask文件地址
    img_name = img_path.split(os.sep)[-1]
    aaa = img_name.split(".")[0]
    tra_lbl_name_list.append('data/' + aaa + '.png')
2. 数据增强
对image,alpha图片进行缩放,裁剪,转tensor操作,详情见注释。
class ToTensor(object):
    '''
    transforms.ToTensor()
    HWC-->CHW,
    [0,255]-->[0,1]
    numpy.adarray-->tensor
    '''
    def __call__(self, sample):
        imidx, image, label =sample['imidx'], sample['image'], sample['label']

        return {
     'imidx':torch.from_numpy(imidx), 'image': transforms.ToTensor()(image), 'label': transforms.ToTensor()(label)}

class RescaleT(object):
    """将图片调整为给定的大小.

    Args:
        output_size (tuple or int): 期望输出的图片大小. 如果是 tuple 类型,输出图片大小就是给定的 output_size;
                                    如果是 int 类型,则图片最短边将匹配给的大小,然后调整最大边以保持相同的比例。
    """
    def __init__(self, output_size):
        assert isinstance(output_size, (int, tuple))
        self.output_size = output_size

    def __call__(self, sample):
        imidx, image, label = sample['imidx'], sample['image'],sample['label']

        h, w = image.shape[:2]
        # 判断给定大小的形式,tuple 还是 int 类型
        if isinstance(self.output_size, int):
            # int 类型,给定大小作为最短边,最大边长根据原来尺寸比例进行调整
            if h > w:
                new_h, new_w = self.output_size * h / w, self.output_size
            else:
                new_h, new_w = self.output_size, self.output_size * w / h
        else:
            new_h, new_w = self.output_size

        new_h, new_w = int(new_h), int(new_w)

        # 插值方式的选择见 reference[3]
        # 这里基本是要缩小,所以选用 INTER_AREA
        # method 1: openCV
        img = cv2.resize(src=image, dsize=(new_h, new_w), interpolation=cv2.INTER_AREA)
        lbl = cv2.resize(src=label, dsize=(new_h, new_w), interpolation=cv2.INTER_AREA)

        # method 2: skimage
        #img = transform.resize(image,(self.output_size,self.output_size),mode='constant')
        #lbl = transform.resize(label,(self.output_size,self.output_size),mode='constant', order=0, preserve_range=True)

        # method 3: transforms.resize()
        # method 4: PIL

        return {
     'imidx':imidx, 'image': img, 'label': lbl}


class RandomCrop(object):
    """给定图片,随机裁剪其任意一个和给定大小一样大的区域.

    Args:
        output_size (tuple or int): 期望裁剪的图片大小。如果是 int,将得到一个正方形大小的图片.
    """
    def __init__(self, output_size):
        assert isinstance(output_size, (int, tuple))
        if isinstance(output_size, int):
            self.output_size = (output_size, output_size)
        else:
            assert len(output_size) == 2
            self.output_size = output_size

    def __call__(self, sample):
        imidx, image, label = sample['imidx'], sample['image'], sample['label']

        h, w = image.shape[:2]
        new_h, new_w = self.output_size
        # 随机选择裁剪区域的左上角,即起点,(left, top),范围是由原始大小-输出大小
        top = np.random.randint(0, h - new_h)
        left = np.random.randint(0, w - new_w)

        # 调整关键点坐标,平移选择的裁剪起点
        image = image[top: top + new_h, left: left + new_w]
        label = label[top: top + new_h, left: left + new_w]

        return {
     'imidx':imidx,'image':image, 'label':label}
3. 制作datasets
class SalObjDataset(Dataset):
    def __init__(self,img_name_list,lbl_name_list,transform=None):
        self.image_name_list = img_name_list
        self.label_name_list = lbl_name_list
        self.transform = transform

    def __len__(self):
        return len(self.image_name_list)

    def __getitem__(self, idx):
        image = cv2.imread(self.image_name_list[idx])
        imname = self.image_name_list[idx]
        imidx = np.array([idx])  # [idx]

        if (len(self.label_name_list) == 0): # inference: label_name_list = []/None
            label_3 = np.zeros(image.shape)
        else: # train
            label_3 = cv2.imread(self.label_name_list[idx])  ###

        # 正确读取单通道label
        label = np.zeros(label_3.shape[0:2]) # copy zeros shape | just get HW
        if (len(label_3.shape) == 3):
            label = label_3[:, :, 0]  # H*W 1 channel or 到最后再转
        elif (len(label_3.shape) == 2):
            label = label_3

        # make sure label(...,...,1)
        if (len(image.shape) == 3) and (len(label.shape) == 2):
            label = label[:,:,np.newaxis]
            ### image BGR2RGB
            #image = image[:, :, ::-1] ###
            image = cv2.cvtColor(image, cv2.COLOR_BGR2RGB)  # opencv的通道转换不要忘记
        elif (len(image.shape) == 2) and (len(label.shape == 2)): #
            image = image[:,:, np.newaxis]
            label = label[:, :, np.newaxis]

        sample = {
     'imidx': imidx, 'image': image, 'label': label}

        if self.transform:
            sample = self.transform(sample)

        return sample
4. DataLoader
salobj_dataset = SalObjDataset(
    img_name_list=tra_img_name_list,
    lbl_name_list=tra_lbl_name_list,
    transform=transforms.Compose([
                            RescaleT(320),
                            RandomCrop(288),
                            ToTensor()]))

salobj_dataloader = DataLoader(salobj_dataset,
                               batch_size=2,
                               shuffle=True,
                               num_workers=4,
                               drop_last=True)
以上主要是以opencv为例子来读取数据并加载的。
关于skimage怎么读取数据加载,数据增强等,可以直接参考U2Net的代码[1]。上面的代码就是改写自u2net训练和dataloader的代码。
后续PIL的有机会再补充,搞清楚了各种接口之间的关系和相互转换,其本质都是一样的。
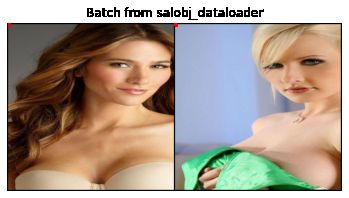
5. 测试并显示
# 辅助函数,用于展示一个 batch 的数据
def show_landmarks_batch(sample_batched):
    """Show image with landmarks for a batch of samples."""
    images_batch, landmarks_batch = \
            sample_batched['image'], sample_batched['label']
    batch_size = len(images_batch)
    im_size = images_batch.size(2)
    grid_border_size = 2

    grid = utils.make_grid(images_batch)
    plt.imshow(grid.numpy().transpose((1, 2, 0)))

    for i in range(batch_size):
        plt.scatter(landmarks_batch[i, :, 0].numpy() + i * im_size + (i + 1) * grid_border_size,
                    landmarks_batch[i, :, 1].numpy() + grid_border_size,
                    s=10, marker='.', c='r')

        plt.title('Batch from salobj_dataloader')

for i_batch, sample_batched in enumerate(salobj_dataloader):
    print(i_batch, sample_batched['image'].size(),
          sample_batched['label'].size())

    # observe 4th batch and stop.
    if i_batch == 1:
        plt.figure()
        show_landmarks_batch(sample_batched)
        plt.axis('off')
        plt.ioff()
        plt.show()
        break
0 torch.Size([2, 3, 288, 288]) torch.Size([2, 1, 288, 288])
1 torch.Size([2, 3, 288, 288]) torch.Size([2, 1, 288, 288])
Reference:
[1] U2-Net: Going Deeper with Nested U-Structure for Salient Object Detection GitHub
[2] PyTorch 系列 | 数据加载和预处理教程 || 官方原文
[3] OpenCV图像缩放resize各种插值方式的比较
[4] 数据来源:爱分割 github