前后端分离实战 后端篇 RESTful-API设计
我计划使用node后端+vue前端的方式构建一个模仿卡片日记UI的PWA应用,并在博客中记录一下。
RESTful 架构
2000年 HTTP 规范的主要编写者之一Roy Fielding, 在他的博士论文中提出了 RESTful 的概念。
REST(Representational State Transfer),中文名叫表述性状态转移。它有以下的几种特征:
-
资源是一个具体的信息,可以使用一个URI去定位它。
-
资源不规定形式,同一个资源可以请求到它的HTML、XML、JSON等等不同格式。
-
URI中不包括动词,只包括名词。
-
动词由四个标准的HTTP方法:
GET(获取资源)、POST(创建资源)、PUT(更新资源)、DELETE(删除资源)提供。虽然是HTTP的标准方法,但是一些老的浏览器可能并不都支持。
使用 restify
安装
npm i restify -S
构建server
创建一个server.js的文件。
导入restify。
var restify = require("restify");
创建server。
const server = restify.createServer({
      name: "restify-app", version: "1.0.0" });
使用组件。
server.use(restify.plugins.acceptParser(server.acceptable));
server.use(restify.plugins.queryParser());
server.use(restify.plugins.bodyParser());
创建一个post请求的handler。
server.post("/api/users", function (req, res, next) {

	console.log(`username: ${
       req.body.username}`);
	console.log(`password: ${
       req.body.password}`);
	res.send(200, {
      msg: "注册成功" });
	return next();
});
监听端口。
server.listen(8080, "127.0.0.1", function () {

  console.log("%s listening at %s", server.name, server.url);
});
运行node server.js命令启动服务器。
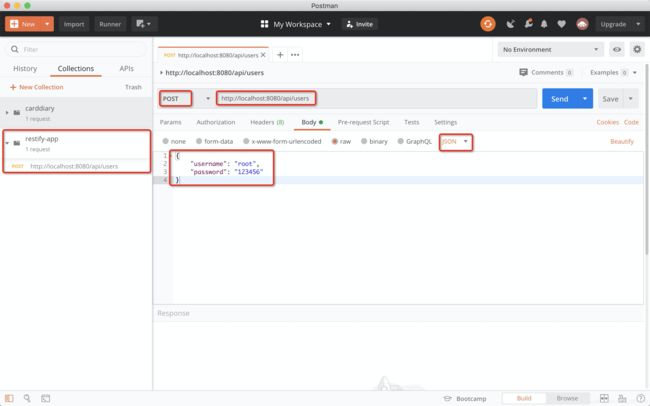
使用 postman 测试
按照图上的参数配置一下,然后点击 send 。
使用logger组件
我们可能会希望我们的命令行中也能输出一些信息。
安装 restify-logger。
npm i restify-logger -S
导入restify-logger。
var logger = require("restify-logger");
注册到restify的响应处理链中。
logger.format("request-format", ":method :url :status");
server.use(logger("request-format"));
再次执行server.js和postman。
这次我们看到我们的命令行中多了一些信息。(这里发了三次POST请求)
restify-app listening at http://127.0.0.1:8080
POST /api/users 200
POST /api/users 200
POST /api/users 200
连接 MongoDB
我们肯定还希望能把数据保存下来,所以要使用数据库。
SQL还是NoSQL
关于使用关系型数据库还是非关系型数据库,在这样的小项目下,还是建议使用非关系型的数据库,主要是为了简化一些前期的设计工作,后期更改数据库也很容易。这里选择MongoDB。
进入mongo shell,创建一个名为restify的数据库。
use restify
使用mongoose
非关系型数据库虽然方便,但是如果使用的过程中不注意,可能会让数据库的字段变得非常混乱。
使用 mongoose 可以有效防止这种情况的发生。 mongoose可以有效约束mongodb的类型和提供安全可靠的数据库操作接口。
安装 mongoose。
var mongoose = require("mongoose");
连接数据库。
var uri = `mongodb://localhost:27017/restify`;
var options = {

  useCreateIndex: true,
  useNewUrlParser: true,
  useUnifiedTopology: true,
};
var db = mongoose.connect(uri, options);
创建 models/UserModel.js文件。
schema是一种类型的约束,可以防止mongodb因混乱的类型管理失去控制。我在注释里解释了部分约束的意思。
model对应了mongodb的一个集合(collection)。值得一提的是,mongoose会把你定义的model名转换成小写,然后加上一个s,比如你定义了一个User的model,在mongodb的数据库里,它会变成users集合。
var mongoose = require("mongoose");

var UserSchema = mongoose.Schema({

  username: {

    type: String, //类型为String
    index: true, //该字段作为index
    unique: true, //值必须是唯一的
    lowercase: true, //自动全部转换成小写字母
    trim: true, //自动去除两边的空格
  },
  password: String,
  userType: {

    type: String,
    enum: ["user", "vip"], //值只能在两者之间选择一个
    default: "user", //默认值(无需声明就会自动添加)
  },
  avatarPath: String,
});

module.exports = mongoose.model("User", UserSchema);
重写server.js中POST请求的内容。
新建一个model实例,其实就是新建了一个mongodb的文档(document)。
使用model实例的save方法,可以保存一条记录。
server.post("/api/users", function (req, res, next) {

  db.then(
    () => {

      var UserModel = require("./models/UserModel");
      var newUser = new UserModel({

        username: req.body.username,
        password: req.body.password,
      });
      newUser.save().then(
        () => {

          res.send(201, {
      msg: "注册成功" });
          console.log(`新用户注册: ${
       req.body.username}`);
        },
        (err) => {

          console.error(err.toString());
          res.send(409, {
      msg: "注册失败" });
          console.log(`用户 ${
       req.body.username} 注册失败`);
        }
      );
    },
    (err) => {

      console.error(err.toString());
      res.send(500, {
      msg: "数据库连接错误" });
    }
  );
  return next();
});
重新运行server.js和postman。
restify-app listening at http://127.0.0.1:8080
新用户注册: root
POST /api/users 201
MongoError: E11000 duplicate key error collection: carddaily.users index: username_1 dup key: { username: "root" }
用户 root 注册失败
POST /api/users 409
可以看到第一次注册的时候,数据库中还没数据,所以可以注册成功,而第二次注册因为被用户已经被注册过了,所以注册失败了。
样例完整源码
目录结构
tree -L 2
.
├── server.js
├── models
│   └── UserModel.js
├── node_modules
	  └── //此处省略
├── package-lock.json
├── package.json
package.json
{

  "name": "restify-demo",
  "version": "1.0.0",
  "description": "",
  "main": "server.js",
  "scripts": {

    "test": "echo \"Error: no test specified\" && exit 1"
  },
  "author": "Jaycee Chow",
  "license": "MIT",
  "dependencies": {

    "mongoose": "^5.9.15",
    "restify": "^8.5.1",
    "restify-logger": "^2.0.1"
  }
}
server.js
var mongoose = require("mongoose");
var restify = require("restify");
var logger = require("restify-logger");

//创建一个 restify server
const server = restify.createServer({
      name: "restify-app", version: "1.0.0" });

//使用组件
server.use(restify.plugins.acceptParser(server.acceptable));
server.use(restify.plugins.queryParser());
server.use(restify.plugins.bodyParser());
logger.format("request-format", ":method :url :status");
server.use(logger("request-format"));

//连接 mongodb 数据库
var uri = `mongodb://localhost:27017/restify`;
var options = {

  useCreateIndex: true,
  useNewUrlParser: true,
  useUnifiedTopology: true,
};
var db = mongoose.connect(uri, options);

//用户注册
server.post("/api/users", function (req, res, next) {

  db.then(
    () => {

      var UserModel = require("./models/UserModel");
      var newUser = new UserModel({

        username: req.body.username,
        password: req.body.password,
      });
      newUser.save().then(
        () => {

          res.send(201, {
      msg: "注册成功" });
          console.log(`新用户注册: ${
       req.body.username}`);
        },
        (err) => {

          console.error(err.toString());
          res.send(409, {
      msg: "注册失败" });
          console.log(`用户 ${
       req.body.username} 注册失败`);
        }
      );
    },
    (err) => {

      console.error(err.toString());
      res.send(500, {
      msg: "数据库连接错误" });
    }
  );
  return next();
});

server.listen(8080, "127.0.0.1", function () {

  console.log("%s listening at %s", server.name, server.url);
});
models/UserModel.js
var mongoose = require("mongoose");

var UserSchema = mongoose.Schema({

  username: {

    type: String,
    index: true,
    unique: true,
    lowercase: true,
    trim: true,
  },
  password: String,
  userType: {

    type: String,
    enum: ["user", "vip"],
    default: "user",
  },
  avatarPath: String,
});

module.exports = mongoose.model("User", UserSchema);
参考文献
| 网站 | 地址 |
|---|---|
| restify官方文档 | http://restify.com/docs/home/ |
| IBM restify教程 | https://www.ibm.com/developerworks/cn/web/wa-lo-use-restify-develop-rest-api/index.html |
| mongoose中文网 | http://mongoosejs.net/docs/guide.html |

