SpringBoot基础
SpringBoot基础
1.SpringBoot概述
1.1 概念
Spring Boot是由Pivotal团队提供的全新框架,其设计目的是用来简化新Spring应用的初始搭建以及开发过程。该框架使用了特定的方式来进行配置,从而使开发人员不再需要定义样板化的配置。通过这种方式,Spring Boot致力于在蓬勃发展的快速应用开发领域(rapid application development)成为领导者。
SpringBoot是由Pivotal团队在2013年开始研发、2014年4月发布第一个版本的全新开源的轻量级框架。它基于Spring4.0设计,不仅继承了Spring框架原有的优秀特性,而且还通过简化配置来进一步简化了Spring应用的整个搭建和开发过程。另外SpringBoot通过集成大量的框架使得依赖包的版本冲突,以及引用的不稳定性等问题得到了很好的解决。
简单说就是SpringBoot基于优化配置而简化Spring的使用。是Spring顶级项目之一(https://spring.io/)
1.2 Spring缺点
1.配置繁琐
虽然Spring的组件代码是轻量级的,但它的配置确却是重量级的。一开始,Spring用xml配置,而且是很多xml配置。Spring2.5引入了基于注解的组件扫描,这消除了大量针对应用程序自身组件的显示xml配置。Spring3.0引入了基于Java的配置,这是一种类型安全的可重构配置方式,可以代替xml。
所有这些配置都代表了开发时的损耗。因为在思考Spring特性配置和解决业务问题之间需要进行思维切换,所以编写配置挤占了编写应用程序逻辑的时间。和所有框架一样,Spring实用,但它要求的回报也不少。
2.依赖繁琐
项目的依赖管理也是一件耗时耗力的事情。在环境搭建时,需要分析要导入哪些库的坐标,而且还需要分析导入与之有依赖关系的其他库的坐标,一旦选错了依赖的版本,随之而来的不兼容问题就会严重阻碍项目的开发进度。
1.3 SpringBoot功能
1.自动配置
SpringBoot的自动配置是一个运行时(更准确地说,是应用程序启动时)的过程,考虑了众多因素,才决定Spring配置应该选用哪个,不该用哪个。该过程是SpringBoot自动完成的。
2.起步依赖
起步依赖本质上是一个Maven项目对象模型(Project Object Model,POM),定义了其他库的传递依赖,这些东西加在一起支持某项功能。
简单的说,起步依赖就是将具备某种功能的坐标打包到一起,并提供一些默认的功能。
3.辅助功能
提供了一些大型项目中常见的非功能性特性,入嵌入式服务器、安全、指标,健康检测、外部配置等。
SpringBoot并不是对Spring功能上的增强,而是提供了一种快速使用Spring的方式。
2.SpringBoot快速入门
2.1 案例1
-
需求:搭建SpringBoot工程,定义HelloController.hello()方法,返回"Hello SpringBoot"。
-
实现步骤:
① 创建Maven项目
② 导入SpringBoot起步依赖
③ 定义Controller
④ 编写引导类
⑤ 启动测试
2.2 实现代码
maven坐标导入pom.xml
-
<parent>
    <groupId>org.springframework.bootgroupId>
    <artifactId>spring-boot-starter-parentartifactId>
    <version>2.4.4version>
parent>

<dependencies>

    <dependency>
        <groupId>org.springframework.bootgroupId>
        <artifactId>spring-boot-starter-webartifactId>
    dependency>
dependencies>
定义Controller类
-
package com.itheima.controller;

import org.springframework.web.bind.annotation.RequestMapping;
import org.springframework.web.bind.annotation.RestController;

@RestController
public class HelloController {

    @RequestMapping("/hello")
    public String hello() {

        return "hello Spring Boot !";
    }
}
引导类:
-
package com.itheima;

import org.springframework.boot.SpringApplication;
import org.springframework.boot.autoconfigure.SpringBootApplication;

/**
 * 引导类:SpringBoot项目启动入口
 */
@SpringBootApplication
public class HelloApplication {

    public static void main(String[] args) {

        SpringApplication.run(HelloApplication.class,args);
    }
}
运行main方法测试:
- 日志信息有一栏显示:Tomcat started on port(s): 8080 (http) with context path ‘’
- 即可在浏览器地址栏输入URL访问:http://localhost:8080/hello
- 浏览器正常显示:hello Spring Boot !
2.3 小结
- SpringBoot在创建项目时,使用jar的打包方式
- SpringBoot的引导类,是项目入口,运行main方法就可以启动项目
- 使用SpringBoot和Spring构建的项目,业务代码编写方式完全一样
2.4 案例2
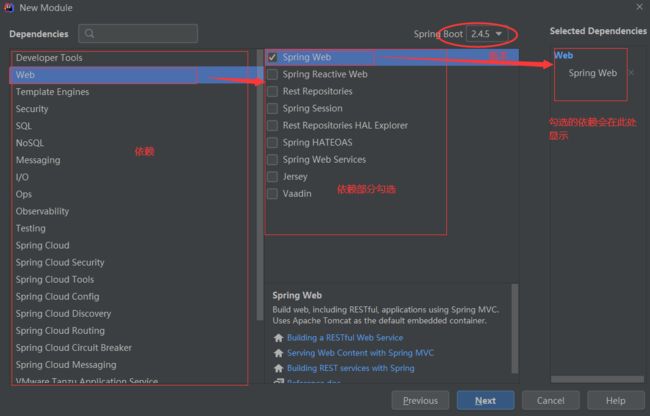
- 需求:使用IEDA快速构建SpringBoot工程。定义HelloController.hello()方法,返回“Hello SpringBoot!”。
2.5 操作过程
3.SpringBoot起步依赖
3.1 起步依赖原理分析
spring-boot-starter-parent
-
选中,ctrl+左键查看详细信息
<project xmlns="http://maven.apache.org/POM/4.0.0" xsi:schemaLocation="http://maven.apache.org/POM/4.0.0 http://maven.apache.org/xsd/maven-4.0.0.xsd" xmlns:xsi="http://www.w3.org/2001/XMLSchema-instance"> <modelVersion>4.0.0modelVersion> <parent> <groupId>org.springframework.bootgroupId> <artifactId>spring-boot-dependenciesartifactId> <version>2.4.5version> parent> <artifactId>spring-boot-starter-parentartifactId> <packaging>pompackaging> <name>spring-boot-starter-parentname> <description>Parent pom providing dependency and plugin management for applications built with Mavendescription> -
可以看出,spring-boot-starter-parent还引入了父工程,再次跟进
<project xmlns="http://maven.apache.org/POM/4.0.0" xsi:schemaLocation="http://maven.apache.org/POM/4.0.0 http://maven.apache.org/xsd/maven-4.0.0.xsd" xmlns:xsi="http://www.w3.org/2001/XMLSchema-instance">
  <modelVersion>4.0.0modelVersion>
  <groupId>org.springframework.bootgroupId>
  <artifactId>spring-boot-dependenciesartifactId>
  <version>2.4.5version>
  <packaging>pompackaging>
  <name>spring-boot-dependenciesname>
  <description>Spring Boot Dependenciesdescription>
  <url>https://spring.io/projects/spring-booturl>

  <properties>
    <activemq.version>5.16.1activemq.version>

  properties>
  <dependencyManagement>
    <dependencies>
      <dependency>
        <groupId>org.apache.activemqgroupId>
        <artifactId>activemq-amqpartifactId>
        <version>${activemq.version}version>
      dependency>
可以看出,该配置文件主要用于集合依赖版本,及版本整合,并且该文件没有父工程
spring-boot-starter-web
-
跟进查看
<project xsi:schemaLocation="http://maven.apache.org/POM/4.0.0 http://maven.apache.org/xsd/maven-4.0.0.xsd" xmlns="http://maven.apache.org/POM/4.0.0"
    xmlns:xsi="http://www.w3.org/2001/XMLSchema-instance">
  <modelVersion>4.0.0modelVersion>
  <groupId>org.springframework.bootgroupId>
  <artifactId>spring-boot-starter-webartifactId>
  <version>2.4.5version>
  <name>spring-boot-starter-webname>
  <description>Starter for building web, including RESTful, applications using Spring MVC. Uses Tomcat as the default embedded containerdescription>
  <url>https://spring.io/projects/spring-booturl>
  <organization>
    <name>Pivotal Software, Inc.name>
    <url>https://spring.iourl>
  organization>
  <licenses>
    <license>
      <name>Apache License, Version 2.0name>
      <url>https://www.apache.org/licenses/LICENSE-2.0url>
    license>
  licenses>
  <developers>
    <developer>
      <name>Pivotalname>
      <email>[email protected]email>
      <organization>Pivotal Software, Inc.organization>
      <organizationUrl>https://www.spring.ioorganizationUrl>
    developer>
  developers>
  <scm>
    <connection>scm:git:git://github.com/spring-projects/spring-boot.gitconnection>
    <developerConnection>scm:git:ssh://[email protected]/spring-projects/spring-boot.gitdeveloperConnection>
    <url>https://github.com/spring-projects/spring-booturl>
  scm>
  <issueManagement>
    <system>GitHubsystem>
    <url>https://github.com/spring-projects/spring-boot/issuesurl>
  issueManagement>
  <dependencies>
    <dependency>
      <groupId>org.springframework.bootgroupId>
      <artifactId>spring-boot-starterartifactId>
      <version>2.4.5version>
      <scope>compilescope>
    dependency>
    <dependency>
      <groupId>org.springframework.bootgroupId>
      <artifactId>spring-boot-starter-jsonartifactId>
      <version>2.4.5version>
      <scope>compilescope>
    dependency>
    <dependency>
      <groupId>org.springframework.bootgroupId>
      <artifactId>spring-boot-starter-tomcatartifactId>
      <version>2.4.5version>
      <scope>compilescope>
    dependency>
    <dependency>
      <groupId>org.springframeworkgroupId>
      <artifactId>spring-webartifactId>
      <version>5.3.6version>
      <scope>compilescope>
    dependency>
    <dependency>
      <groupId>org.springframeworkgroupId>
      <artifactId>spring-webmvcartifactId>
      <version>5.3.6version>
      <scope>compilescope>
    dependency>
  dependencies>
project>
该配置文件没有继承。主要用于相关坐标导入
3.2 小结
- 在spring-boot-starter-parent中定义了各种技术的版本信息,组合了一套最优搭配的技术版本
- 在各种starter中,定义了完成该功能需要的坐标合集,其中大部分版本信息来自于父工程
- 我们的工程继承parent,引入starter后,通过依赖传递,可以简单方便获取需要的jar包,并且不会存在版本冲突等问题
4.SpringBoot配置
4.1 配置文件分类
SpringBoot是基于约定的,所以很多配置都有默认值,但如果象使用自己的配置替换默认配置的话,就可以使用applictaion.properties或者application.yml(application.yaml)进行配置。
-
properties:
server.port=8080 -
yml:
server:
	port: 8080
小结:
- SpringBoot提供了2中配置文件类型:properties和yml/yaml
- 默认配置文件名称:application
- 在同一级目录下优先级为:properties>yml>yaml
4.2 yaml
YAML全称是YAML Ain’t a Markup Language。YAML是一种直观的能够被电脑识别的数据序列化格式,并且容易被人类阅读,容易和脚本语言交互,可以被支持YAML库的不同的编程语言程序导入,比如:C/C++,Ruby,Python,Java,Perl,C#,PHP等。YAML文件是以数据为核心的,比传统的xml方式更加简洁。
YAML文件的扩展名可以使用.yml或者.yaml
YAML(/ˈjæməl/,尾音类似camel骆驼)是一个可读性高,用来表达数据序列化的格式。YAML参考了其他多种语言,包括:C语言、Python、Perl,并从XML、电子邮件的数据格式(RFC 2822)中获得灵感。Clark Evans在2001年首次发表了这种语言,另外Ingy döt Net与Oren Ben-Kiki也是这语言的共同设计者。当前已经有数种编程语言或脚本语言支持(或者说解析)这种语言。
YAML是"YAML Ain’t a Markup Language"(YAML不是一种标记语言)的递归缩写。在开发的这种语言时,YAML 的意思其实是:“Yet Another Markup Language”(仍是一种标记语言),但为了强调这种语言以数据做为中心,而不是以标记语言为重点,而用反向缩略语重命名。
书写格式比较:
-
properties:
server.port=8080 server.address=127.0.0.1 -
xml:
<server> <port>8080port> <address>127.0.0.1address> server> -
yml:
server: port: 8080 adderss: 127.0.0.1 -
简洁,以数据为核心
YAML:基本语法
-
大小写敏感
-
数据值前边必须有空格,作为分隔符
-
使用缩进表示层级关系
-
缩进时不允许使用tab键,只允许使用空格(各个系统tab对应的空格数目可能不同,导致层次混乱)
-
缩进的空格数目不重要,只要相同层次的元素左侧对齐即可
-
# 表示注释,从这个字符一直到行尾,都会被解析器忽略
-
例:
server:
	port: 8080
	adderss: 127.0.0.1
name: abc
#password: 123456
YAML:数据格式
-
对象(map):键值对的集合
person: name: zhangsan # 行内写法 person: { name: zhangsan} -
数组:一组按次序排列的值
address: - beijing - shanghai # 行内写法 address: [beijing,shanghai] -
纯量:单个的、不可再分的值
msg1: 'hello \n world'  # 单引忽略转义字符,会原样输出
msg2: "hello \n world"  # 双引识别转义字符,会分两行输出
YAML:参数引用
-
name: lisi
person:
	name: ${
       name}  # 引用上面定义的name
4.3 读取配置文件
读取配置内容:
-
@Value
-
Environment
-
@ConfigurationProperties
-
配置文件内容application.yml
name: abc # 对象 person: name: ${ name} # zhangsan age: 20 # 对象行内写法 person2: { name: zhangsan,age: 20} # 数组 address: - bejing - shanghai # 数组行内写法 address2: [beijing,shanghai] # 纯量 msg1: 'hello \n world' # 单引忽略转义字符,会原样输出 msg2: "hello \n world" # 双引识别转义字符,会分两行输出 -
@Value
@RestController public class HelloController { @Value("${person.name}") public String name; @Value("${person.age}") public Integer age; @Value("${address[0]}") public String address; @Value("${msg1}") public String msg1; @Value("${msg2}") public String msg2; @RequestMapping("/hello2") public String hello2() { System.out.println(name); System.out.println(age); System.out.println(address); System.out.println(msg1); System.out.println(msg2); return "hello yaml!!!"; } } -
Environment
@Autowired
private Environment env;

@RequestMapping("/hello2")
public String hello2() {

    System.out.println(name);
    System.out.println(age);
    System.out.println(address);
    System.out.println(msg1);
    System.out.println(msg2);

    System.out.println("==========================");

    System.out.println(env.getProperty("person.name"));
    System.out.println(env.getProperty("address[1]"));

    return "hello yaml!!!";
}
打印结果:
abc 20 bejing hello \n world hello world ========================== abc shanghai -
@ConfigurationProperties
@ConfigurationProperties(prefix = "person")//对象属性绑定,指定对象前缀 public class Person { private String name; private Integer age; private String[] address;name: abc # Person中@ConfigurationProperties注解未设置浅醉,获取的name是此处name # 对象 person: name: zhangsan # 设置prefix = "person"后获取的name是此处的name age: 20 address: - bejing - shanghai # 对象行内写法 person2: { name: zhangsan,age: 20}@Autowired private Person person; @RequestMapping("/hello2") public String hello2() { System.out.println(name); System.out.println(age); System.out.println(address); System.out.println(msg1); System.out.println(msg2); System.out.println("=========================="); System.out.println(env.getProperty("person.name")); System.out.println(env.getProperty("address[1]")); System.out.println("---------------------------"); System.out.println(person.getName()); System.out.println(person.getAge()); System.out.println(person.getAddress()[0]); return "hello yaml!!!"; }
4.4 profile
我们在开发SpringBoot应用时,通常同一套程序会被安装到不同环境中,比如:开发、测试、生产等。其中数据库地址、服务器端口等等配置都不相同,如果每次打包时,都要修改配置文件,那么非常麻烦。profile功能就是来进行动态配置切换的。
- profile配置方式
- 多profile文件方式
- yml多文档方式
- profile激活方式
- 配置文件
- 虚拟机参数
- 命令行参数
-
多profile文件方式:
创建 开发阶段 配置文件application-dev.properties
server.port=8081创建 测试阶段 配置文件application-test.properties
server.port=8082创建 生产阶段 配置文件application-pro.properties
server.port=8083激活配置文件application.properties:dev(开发阶段配置文件名后缀)
spring.profiles.active=dev运行日志信息:
2021-05-05 16:29:22.137 INFO 13484 — [ main] c.i.s.SpringbootProfilesApplication : The following profiles are active: dev
2021-05-05 16:29:25.840 INFO 13484 — [ main] o.s.b.w.embedded.tomcat.TomcatWebServer : Tomcat initialized with port(s): 8081 (http) -
yml多文档方式
未设置配置时,启动日志信息:未激活
No active profile set, falling back to default profiles: default
设置application.yml
---
server:
  port: 8081

spring:
  profiles:dev
---

server:
  port: 8082

spring:
  profiles:test
---

server:
  port: 8083

spring:
  profiles:pro
---

spring:
  profiles:
    active: pro  # 设置启用pro方式配置
启动日志信息:
2021-05-05 16:52:32.418 INFO 2820 — [ main] c.i.s.SpringbootProfilesApplication : The following profiles are active: pro
2021-05-05 16:52:34.937 INFO 2820 — [ main] o.s.b.w.embedded.tomcat.TomcatWebServer : Tomcat initialized with port(s): 8083 (http)2021-05-05 16:52:35.848 INFO 2820 — [ main] o.s.b.w.embedded.tomcat.TomcatWebServer : Tomcat started on port(s): 8083 (http) with context path ‘’
-
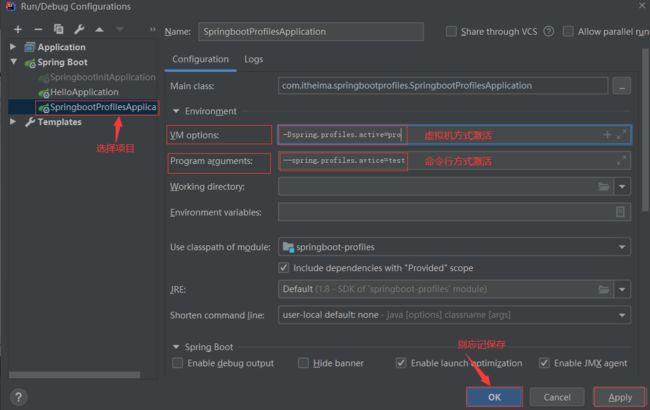
虚拟机方式激活:-Dspring.profiles.active=pro
-
命令行方式激活:–spring.profiles.avtice=test
-
激活操作:
进入IEDA编辑配置界面,通过输出虚拟机或命令行参数进行激活配置
小结:
-
profile是用来完成不同环境下,配置动态切换功能的
-
profile配置方式
多profile文件方式:提供多个配置文件,每个代表一种环境
- application-dev.properties/yml 开发环境
- application-test.properties/yml 测试环境
- application-pro.properties/yml 生产环境
yml多文档方式
- 在yml中使用“—”分隔不同配置
-
profile激活方式
- 配置文件:在配置文件中配置:spring.profiles.active=dev
- 虚拟机参数:在VM options指定:-Dspring.profiles.active=pro
- 命令行参数:java-jar xxx.jar --spring.profiles.avtice=test
4.5 内部配置加载顺序
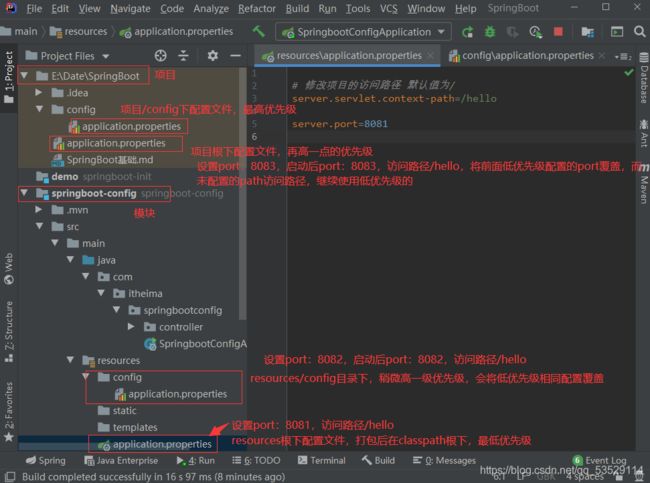
SpringBoot程序启动时,会从以下位置加载配置文件:
- file:/config/:当前项目下的/config目录下
- file:./ :当前项目的根目录下
- classpath:/config/:classpath的/config目录
- classpath:./ :classpath的根目录
加载顺序为上面的排列顺序,高优先级配置的属性会生效
此处记录一个问题:
问题现象:浏览器显示:This application has no explicit mapping for /error, so you are seeing this as a fallback.
问题原因:引导类不在Controller类同包或父包中,分别放在了同级目录springbootapplication和controller包中
解决方案:将controller包放入springbootapplication包中
4.6 外部配置文件加载顺序
官网查看:Spring Boot Features
Spring Boot uses a very particular PropertySource order that is designed to allow sensible overriding of values. Properties are considered in the following order (with values from lower items overriding earlier ones):
- Default properties (specified by setting
SpringApplication.setDefaultProperties). @PropertySourceannotations on your@Configurationclasses. Please note that such property sources are not added to theEnvironmentuntil the application context is being refreshed. This is too late to configure certain properties such aslogging.*andspring.main.*which are read before refresh begins.- Config data (such as
application.propertiesfiles) - A
RandomValuePropertySourcethat has properties only inrandom.*. - OS environment variables.
- Java System properties (
System.getProperties()). - JNDI attributes from
java:comp/env. ServletContextinit parameters.ServletConfiginit parameters.- Properties from
SPRING_APPLICATION_JSON(inline JSON embedded in an environment variable or system property). - Command line arguments.
propertiesattribute on your tests. Available on@SpringBootTestand the test annotations for testing a particular slice of your application.@TestPropertySourceannotations on your tests.- Devtools global settings properties in the
$HOME/.config/spring-bootdirectory when devtools is active.
Config data files are considered in the following order:
- Application properties packaged inside your jar (
application.propertiesand YAML variants). - Profile-specific application properties packaged inside your jar (
application-{profile}.propertiesand YAML variants). - Application properties outside of your packaged jar (
application.propertiesand YAML variants). - Profile-specific application properties outside of your packaged jar (
application-{profile}.propertiesand YAML variants).
It is recommended to stick with one format for your entire application. If you have configuration files with both .properties and .yml format in the same location, .properties takes precedence. |
|
|---|---|
启用外部配置:
- 将模块打jar包,进入cmd命令行运行:java -jar .\springboot-config-0.0.1-SNAPSHOT.jar。项目下的application配置文件不会被打入jar包,resources/config下application已删除,因此启动端口是8081。若想修改启动端口cmd:java -jar .\springboot-config-0.0.1-SNAPSHOT.jar --server.port=8082运行即可
- 由于在命令行传参不方便,可以使用配置文件,在外部新建一个配置文件,例如:E:\springboot\application.properties。运行cdm:java -jar .\springboot-config-0.0.1-SNAPSHOT.jar --spring.config.location=E:\springboot\application.properties
- 可以在jar包同目录(target)下新建一个配置文件,即可不使用参数也能读取配置运行:java -jar .\springboot-config-0.0.1-SNAPSHOT.jar
- 在target/config目录下新建一个配置,也可不传参直接运行
5.SpringBoot整合其他框架
5.1 整合Junit
需求:整合Junit
实现步骤:
- 搭建SpringBoot工程
- 引入starter-test起步依赖
- 编写测试类
- @RunWith(SpringRunner.class)
- @SpringBootTest(classes=启动类.class)
- 编写测试方法
实现操作:
-
使用spring boot快速创建模块
-
创建被测试类:
package com.itheima.springboottest; import org.springframework.stereotype.Service; @Service public class UserService { public void add() { System.out.println("add..."); } } -
创建测试类:
/**
 * UserService的测试类
 */
@RunWith(SpringRunner.class)
@SpringBootTest(classes = SpringbootTestApplication.class)
public class UserServiceTest {


    @Autowired
    private UserService userService;

    @Test
    public void testAdd() {

        userService.add();
    }
}
注意:若测试类在启动类/引导类所在包同名的测试包下,则可以不设置classes属性

5.2 整合Mybatis
需求:SpringBoot整合Mybatis
实现步骤:
- 搭建SpringBoot工程
- 引入mybtis起步依赖,添加mysql驱动
- 编写DataSource和Mybatis相关配置
- 定义表和实体类
- 编写dao和mapper文件/纯注解开发
- 测试
实现代码:
-
数据准备(创建数据库、表,添加数据)
-
配置文件application.yml
# datasource spring: datasource: url: jdbc:mysql://localhost:3306/db1?characterEncoding=utf8&useUnicode=true&userSSL=false&serverTimezone=UTC username: root password: 123456 driver-class-name: com.mysql.cj.jdbc.Driver -
实体类
package com.itheima.springbootmybatis.domain; public class Student { private Integer id; private String name; private Integer age; //省略getter、setter和toString方法 } -
Mapper映射接口(纯注解方式)
package com.itheima.springbootmybatis.mapper; import com.itheima.springbootmybatis.domain.Student; import org.apache.ibatis.annotations.Mapper; import org.apache.ibatis.annotations.Select; import org.springframework.stereotype.Repository; import java.util.List; @Mapper @Repository public interface StudentMapper { @Select("select * from student") public List<Student> findAll(); } -
自动生成的引导类
package com.itheima.springbootmybatis; import org.springframework.boot.SpringApplication; import org.springframework.boot.autoconfigure.SpringBootApplication; @SpringBootApplication public class SpringbootMybatisApplication { public static void main(String[] args) { SpringApplication.run(SpringbootMybatisApplication.class, args); } } -
测试类
package com.itheima.springbootmybatis; import com.itheima.springbootmybatis.domain.Student; import com.itheima.springbootmybatis.mapper.StudentMapper; import org.junit.jupiter.api.Test; import org.junit.runner.RunWith; import org.springframework.beans.factory.annotation.Autowired; import org.springframework.boot.test.context.SpringBootTest; import org.springframework.test.context.junit4.SpringRunner; import java.util.List; @RunWith(SpringRunner.class) @SpringBootTest class SpringbootMybatisApplicationTests { @Autowired private StudentMapper studentMapper; @Test void testFindAll() { List<Student> list = studentMapper.findAll(); for (Student student : list) { System.out.println(student); } } } -
xml方式
-
StudentXmlMapper接口
package com.itheima.springbootmybatis.mapper; import com.itheima.springbootmybatis.domain.Student; import org.apache.ibatis.annotations.Mapper; import org.springframework.stereotype.Repository; import java.util.List; @Mapper @Repository public interface StudentXmlMapper { public List<Student> findAll(); } -
StudentXmlMapper.xml配置文件
<mapper namespace="com.itheima.springbootmybatis.mapper.StudentXmlMapper"> <select id="findAll" resultType="student"> select * from student select> mapper> -
yml配置文件
# datasource spring: datasource: url: jdbc:mysql://localhost:3306/db1?characterEncoding=utf8&useUnicode=true&userSSL=false&serverTimezone=UTC username: root password: 123456 driver-class-name: com.mysql.cj.jdbc.Driver # mybatis mybatis: mapper-locations: classpath:mapper/*Mapper.xml # mapper映射文件路径 type-aliases-package: com.itheima.springbootmybatis.domain # config-lication: # 指定mybatis的核心配置文件 -
测试类
@RunWith(SpringRunner.class)
@SpringBootTest
class SpringbootMybatisApplicationTests {


    @Autowired
    private StudentMapper studentMapper;

    @Autowired
    private StudentXmlMapper studentXmlMapper;

    @Test
    void testFindAll() {

        List<Student> list = studentMapper.findAll();
        for (Student student : list) {

            System.out.println(student);
        }
    }

    @Test
    void testFindAll2() {

        List<Student> list = studentXmlMapper.findAll();
        for (Student student : list) {

            System.out.println(student);
        }
    }
}
5.3 整合Redis
需求:SpringBoot整合Redis
实现步骤:
- 搭建SpringBoot工程
- redis起步依赖
- 配置redis相关属性
- 注入RedisTemplate模板
- 编写测试方法
实现代码:
-
测试类
package com.itheima.springbootredis;

import org.junit.jupiter.api.Test;
import org.springframework.beans.factory.annotation.Autowired;
import org.springframework.beans.factory.annotation.Qualifier;
import org.springframework.boot.test.context.SpringBootTest;
import org.springframework.data.redis.core.RedisTemplate;

@SpringBootTest
class SpringbootRedisApplicationTests {


    @Qualifier("redisTemplate")
    @Autowired
    private RedisTemplate template;

    @Test
    void testSet() {

        //存入数据
        template.boundValueOps("name").set("zhangsan");
    }

    @Test
    void testGet() {

        //获取数据
        Object name = template.boundValueOps("name").get();
        System.out.println(name);
    }
}
由于本机redis,可以自动读取默认设置,无需添加配置文件
-
配置文件方式application.yml
spring:
  redis:
    host: 127.0.0.1  # redis本机IP地址
    port: 6379
按照指定配置执行redis
下一篇:SpringBoot高级
相关文章:SpringBoot基础、SpringBoot高级


