Python3爬虫、数据清洗与可视化实战之写一个简单的爬虫
文章目录
- 关于爬虫的合法性
- 了解网页
-
- 认识网页结构
- 写一个简单的HTML
- 使用requests库请求网站
-
- 安装requests库
- 爬虫的基本原理
- 使用GET方式抓取数据
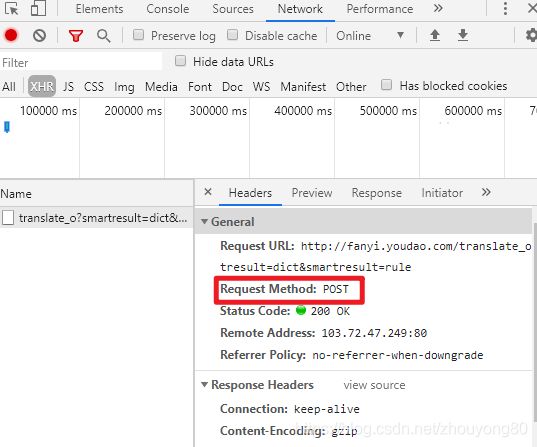
- 使用POST方式抓取数据
- 使用Beautiful Soup解析网页
- 清洗和组织数据
- 爬虫攻防战
关于爬虫的合法性
几乎每一个网站都有一个名为robots.txt的文档,也有部分网站没有设定robots.txt。对于灭有设定robots.txt的网站可以通过网络爬虫获取没有口令加密的数据,该网站的所有页面数据都可以爬取。如果网站有robots.txt文档,就要判断是否有禁止访客获取的数据。
以淘宝网为例,在浏览器中访问https://www.taobao.com/robots.txt得到如图所示结果。

其中:
User-Agent: *
Disallow: /
代表除了前面指定的爬虫外,不允许其他爬虫爬取任何数据
了解网页
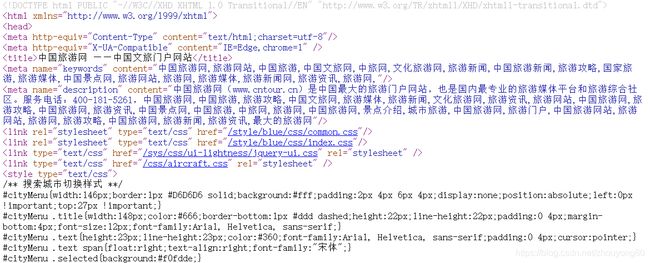
以中国旅游网首页(http://www.cntour.cn)为例,抓取中国旅游网首页首条信息(标题和链接),数据以明文的形式出现在源码中。

该网页源码如图所示:
认识网页结构
网页一般由三部分组成,分别是HTML(超文本标记语言)、CSS(层叠样式表)和JScript(活动脚本语言)
- HTML
常见标签
| 标签 | 描述 |
|---|---|
| … | 表示标记中间的元素是网页 |
| … | 表示用户可见的内容 |
|
…
|
表示框架 |
… |
表示段落 |
|
表示列表 |
| … | 表示图片 |
… |
表示标题 |
| … | 表示超链接 |
- CSS
CSS表示样式,如上图中
3.JScript
JScript表示功能。交互的内容和各种特效都在JScript中,JScript描述了网站中的各种功能。
写一个简单的HTML
<html>
<head>
    <title>Python3爬虫与数据清洗入门与实践title>
head>
<body>
    <div>
        <p>Python3爬虫与数据清洗入门与实践p>
    div>
    <div>
        <ul>
            <li><a href="http://www.baidu.com">爬虫a>li>
            <li>数据清洗li>
        ul>
    div>
body>
html>
使用requests库请求网站
安装requests库
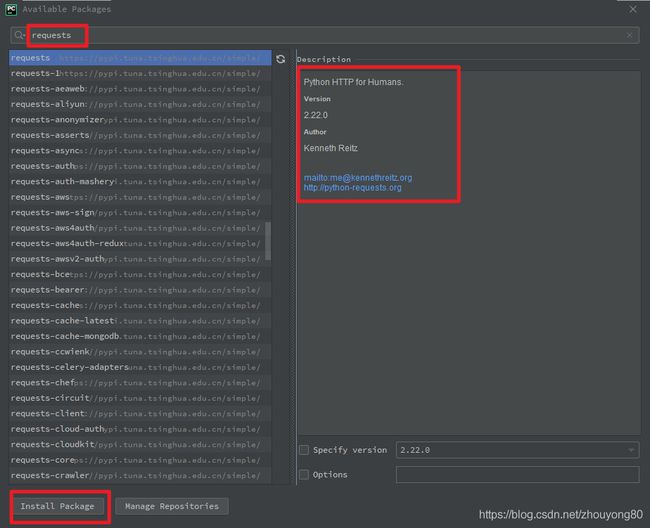
pycharm中安装方法:
选择"Project Interpreter"(项目编译器)命令,确认当前选择的编译器,然后单击右上角的加号。

在搜索框输入:requests(注意,一定要输入完整,不然容易出错),然后单击左下角的"Install Package"按钮。
爬虫的基本原理
(1)网页请求的过程
(2)网页请求的方式
GET:最常见的方式,一般用于获取或查询资源信息,响应速度快。
POST:多了以表单形式上传参数的功能,除查询信息外,还可以修改信息。
使用GET方式抓取数据
import requests    # 导入request包


url='http://www.cntour.cn/'
strhtml = requests.get(url)    # GET方式,获取网页数据
print(strhtml.text)
使用POST方式抓取数据
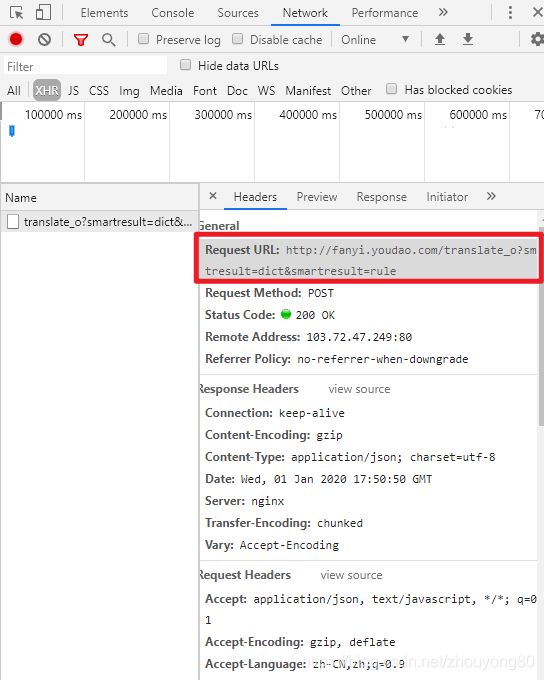
以有道翻译为例:
打开主页:http://fanyi.youdao.com/
进入开发者模式,单击Network
在有道翻译中输入“我爱中国”
单击Network中的XHR按钮,找到翻译数据
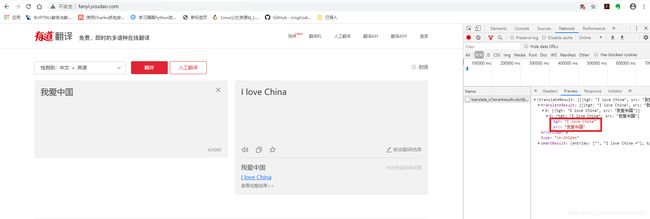
POST请求获取数据的方式不同于GET,POST请求熟女必须构建请求头才可以。Form Data中的请求参数如图:
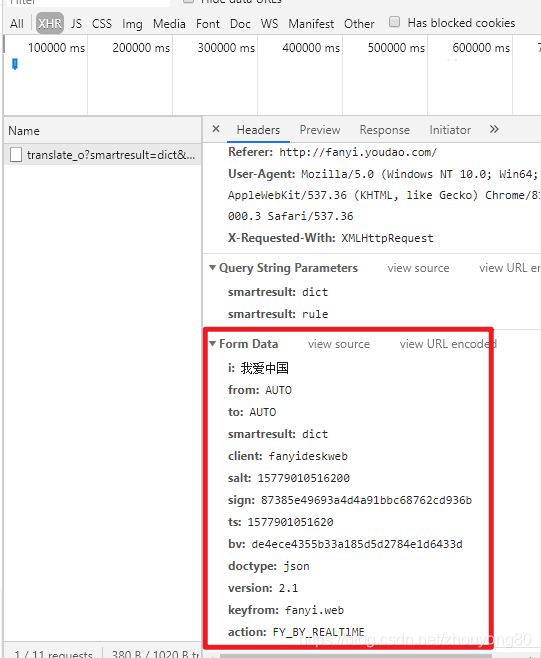
将其复制并构建一个新字典
from_data = {
         'i': '我爱中国',    'from': 'AUTO',    'to': 'AUTO',    'smartresult': 'dict',    'client': 'fanyideskweb',    'salt': '15779010516200',    'sign': '87385e49693a4d4a91bbc68762cd936b',    'ts': '1577901051620',    'bv': 'de4ece4355b33a185d5d2784e1d6433d',    'doctype': 'json',    'version': '2.1',    'keyfrom': 'fanyi.web',    'action': 'FY_BY_REALTlME'}
使用request.post方法请求表单数据,代码如下:
def get_translate_date(word=None):
    url = "http://fanyi.youdao.com/translate_o?smartresult=dict&smartresult=rule"
    payload = {

        'i': word,
        'from': 'zh_CHS',
        'to': 'ko',
        'smartresult': 'dict',
        'client': 'fanyideskweb',
        'salt': '15786672189492',
        'sign': '604751fb490db884c12de9850975fe8c',
        'ts': '1578667218949',
        'bv': '42160534cfa82a6884077598362bbc9d',
        'doctype': 'json',
        'version': '2.1',
        'keyfrom': 'fanyi.web',
        'action': 'FY_BY_CLICKBUTTION'
    }
    # 请求表单数据
    response = requests.post(url, data=payload)
    # 将JSON格式字符串转换为字典
    content = json.loads(response.text)
    print(content)
    # 打印翻译后的数据
    print(content['translateResult'][0][0]['tgt'])


if __name__ == '__main__':
    get_translate_date('我爱数据')
运行结果:
{'errorCode': 50}
Traceback (most recent call last):
  File "G:/code/python/chapter2/test_get.py", line 57, in
    get_translate_date('我爱数据')
  File "G:/code/python/chapter2/test_get.py", line 53, in get_translate_date
    print(content['translateResult'][0][0]['tgt'])
KeyError: 'translateResult'
出错了,分析错误原因,发现每次fromdata中有几个值是变化的,分别是 “salt”,“sign”,“ts”,经过寻找,发现它们的生存规律在 “http://shared.ydstatic.com/fanyi/newweb/v1.0.17/scripts/newweb/fanyi.min.js” 这个 js 文件中。
t.recordUpdate = function (e) {

            var t = e.i,
                i = r(t);
            n.ajax({

                type: "POST",
                contentType: "application/x-www-form-urlencoded; charset=UTF-8",
                url: "/bettertranslation",
                data: {

                    i: e.i,
                    client: "fanyideskweb",
                    salt: i.salt,
                    sign: i.sign,
                    ts: i.ts,
                    bv: i.bv,
                    tgt: e.tgt,
                    modifiedTgt: e.modifiedTgt,
                    from: e.from,
                    to: e.to
                },
                success: function (e) {
     },
                error: function (e) {
     }
            })
从上述代码中,我们可以得出四个参数的信息: ts,bv,salt,sign,他们分别为
ts: "" + (new Date).getTime(),
bv: n.md5(navigator.appVersion),
salt: ts + parseInt(10 * Math.random(), 10),
// e为所需要翻译的字符串, i 即salt
sign: n.md5("fanyideskweb" + e + salt + "n%A-rKaT5fb[Gy?;N5@Tj")
bv 是对 navigator.appVersion(这是个浏览器参数,不是字符串"navigator.appVersion")进行 md5 加密,在相同的浏览器下,这个值是固定的(没测试过),所以直接拿F12调试出来的来用就好了。
ts 是时间戳
salt 是 ts 加上一个 0 到 10 的随机数(包括0,不包括10)
sign 是对 “fanyideskweb” + e + salt + “n%A-rKaT5fb[Gy?;N5@Tj” (这个字符串是会更新的,在js文件里可以找到)这个字符串进行 md5 加密
好了,知道以上信息,我们可以进一步完善我们的代码了
import hashlib
import json
import random
import time

from faker import Faker
import requests


def get_translate_date(word=None):
    ua = Faker().user_agent()
    url = "http://fanyi.youdao.com/translate_o?smartresult=dict&smartresult=rule"
    ts = str(time.time() * 1000)
    salt = ts + str(random.randint(0, 10))
    the_str = "fanyideskweb" + word + salt + "n%A-rKaT5fb[Gy?;N5@Tj"

    md5 = hashlib.md5()
    md5.update(the_str.encode('utf-8'))
    sign = md5.hexdigest()

    headers = {

        'User-Agent': ua,
        'Host': 'fanyi.youdao.com',
        'Orign': 'http://fanyi.youdao.com',
        'Referer': 'http://fanyi.youdao.com'
    }
    payload = {

        'i': word,
        'from': 'zh_CHS',
        'to': 'ko',
        'smartresult': 'dict',
        'client': 'fanyideskweb',
        'salt': salt,
        'sign': sign,
        'ts': ts,
        'bv': '42160534cfa82a6884077598362bbc9d',
        'doctype': 'json',
        'version': '2.1',
        'keyfrom': 'fanyi.web',
        'action': 'FY_BY_REALTIME'
    }
    # 请求表单数据
    response = requests.post(url, headers=headers, data=payload)
    # 将JSON格式字符串转换为字典
    content = json.loads(response.text)
    print(content)
    # 打印翻译后的数据
    print(content['translateResult'][0][0]['tgt'])


if __name__ == '__main__':
    get_translate_date('我爱数据')
完成之后再次爬取,发现还是报一样的错误。 再三检查代码,没有发现有写错任何地方,既然 from_data 没有写错,那么问题可能是出现在了 headers 上了,经过调试,发现每次 headers 都会携带 cookie ,而且 cookie 的值每次都不一样’Cookie’: ‘[email protected]; OUTFOX_SEARCH_USER_ID_NCOO=2061523511.1027195; _ga=GA1.2.1151109878.1551536968; _ntes_nnid=24fe647fc20f952c4040b25650f75604,1553001083850; JSESSIONID=aaaJIa27BLmlI96aStZRw; ___rl__test__cookies=1558881656766’
不一样的地方在于最后的那个 “__rl__test__cookies=” 后面的字符串不一样,然后去找到它是怎么生成的,最后终于在
“http://shared.ydstatic.com/js/rlog/v1.js” 这个js文件中找到了它
function t() {
        var    a        = (new Date).getTime(),
               c        = [];
        return b.cookie = "___rl__test__cookies=" + a, G = r("OUTFOX_SEARCH_USER_ID_NCOO"), -1 == G && r("___rl__test__cookies") == a && (G = 2147483647 * Math.random(), q("OUTFOX_SEARCH_USER_ID_NCOO", G)), F = r("P_INFO"), F = -1 == F ? "NULL" : F.substr(0, F.indexOf("|")), c = ["_ncoo=" + G, "_nssn=" + F, "_nver=" + z, "_ntms=" + a], L.autouid && c.push("_rl_nuid=" + __rl_nuid), c.join("&")
    }
继续完善代码
import hashlib
import json
import random
import time

from faker import Faker
import requests


def get_translate_date(word=None):
    ua = Faker().user_agent()
    url = "http://fanyi.youdao.com/translate_o?smartresult=dict&smartresult=rule"
    ts = str(time.time() * 1000)
    salt = ts + str(random.randint(0, 10))
    the_str = "fanyideskweb" + word + salt + "n%A-rKaT5fb[Gy?;N5@Tj"

    md5 = hashlib.md5()
    md5.update(the_str.encode('utf-8'))
    sign = md5.hexdigest()

    headers = {

        'User-Agent': ua,
        'Host': 'fanyi.youdao.com',
        'Orign': 'http://fanyi.youdao.com',
        'Referer': 'http://fanyi.youdao.com',
        'Cookie': '[email protected];OUTFOX_SEARCH_USER_ID_NCOO=1983825018.143159;ga=GA1.2.1151109878.1551536968;ntes_nnid=24fe647fc20f952c4040b25650f75604,1553001083850;JSESSIONID=aaaJIa27BLmlI96aStZRw;rl_test_cookies=' + ts
    }
    payload = {

        'i': word,
        'from': 'zh_CHS',
        'to': 'ko',
        'smartresult': 'dict',
        'client': 'fanyideskweb',
        'salt': salt,
        'sign': sign,
        'ts': ts,
        'bv': '42160534cfa82a6884077598362bbc9d',
        'doctype': 'json',
        'version': '2.1',
        'keyfrom': 'fanyi.web',
        'action': 'FY_BY_REALTIME'
    }
    # 请求表单数据
    response = requests.post(url, headers=headers, data=payload)
    # 将JSON格式字符串转换为字典
    content = json.loads(response.text)
    print(content)
    # 打印翻译后的数据
    print(content['translateResult'][0][0]['tgt'])


if __name__ == '__main__':
    get_translate_date('我爱数据')
至此,成功爬取到有道翻译的数据。
使用Beautiful Soup解析网页
Beautiful Soup是Python的一个库,其最主要的功能是从网页中抓取数据。
Beautiful Soup已经被移植到bs4库中,导入Beautiful Soup时需要先安装bs4库。
安装好bs4库后,还需安装lxml库,如果不安装lxml库,就会使用Python默认的解析器。
Beautiful Soup库能够轻松解析网页信息,它被继承在bs4库中,需要时可以从bs4库中调用。
from bs4 import BeautifulSoup
示例
import requests
from bs4 import BeautifulSoup

url = 'http://www.cntour.cn'
strhtml = requests.get(url)
soup = BeautifulSoup(strhtml.text, 'lxml')
data = soup.select(
    '#main > div > div.mtop.firstMod.clearfix > div.centerBox > ul.newsList > li:nth-child(1) > a'
)
print(data)
首先,HTML文档被转换成Unicode编码格式,然后Beautiful Soup选择最合适的解析器来解析这段文档,此处指定lxml解析器进行解析。解析后便将复杂的HTML文档转换成树形结构,并且每个节点都是Python对象。
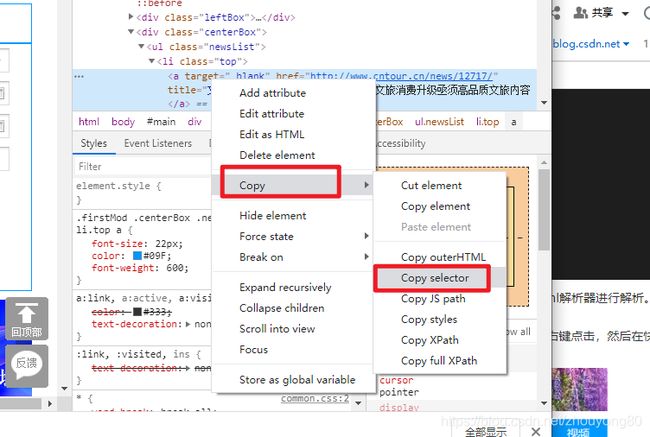
接下来用select(选择器)定位数据,定位数据时需要使用浏览器的开发者模式,将鼠标光标停留在对应的数据位置并右键点击,然后在快捷菜单中选择“检查”命令:

随后在浏览器右侧会弹出开发者界面,右侧高亮的代码对应左侧高亮的数据文本。右击右侧高亮数据,在弹出的快捷菜单中选择"Copy"->"Copy Selector"命令,便可以自动复制路径。
清洗和组织数据
之前获得了所有头条新闻的数据,但还灭有把数据提取出来,继续扩展之前的程序。
import requests
from bs4 import BeautifulSoup

url = 'http://www.cntour.cn'
strhtml = requests.get(url)
soup = BeautifulSoup(strhtml.text, 'lxml')
data = soup.select(
    '#main > div > div.mtop.firstMod.clearfix > div.centerBox > ul.newsList > li > a'
)
for item in data:
    result = {

        'title': item.get_text(),
        'link': item.get('href')
    }
    print(result)
运行结果:
{'title': '文旅消费升级亟须高品质文旅内容', 'link': 'http://www.cntour.cn/news/12717/'}
{'title': '2019年旅游业的“快进”与“降速”', 'link': 'http://www.cntour.cn/news/12715/'}
{'title': '新文创,让文化更“年轻”', 'link': 'http://www.cntour.cn/news/10695/'}
{'title': '2020,中国旅游会更好', 'link': 'http://www.cntour.cn/news/10694/'}
{'title': '[发展旅游产业要有大格局]', 'link': 'http://www.cntour.cn/news/12718/'}
{'title': '[科技改变旅游]', 'link': 'http://www.cntour.cn/news/12716/'}
{'title': '[落实带薪休假关键看企业]', 'link': 'http://www.cntour.cn/news/9690/'}
{'title': '[2019中国旅游八大亮点]', 'link': 'http://www.cntour.cn/news/9688/'}
{'title': '[2019中国文旅地产综合实]', 'link': 'http://www.cntour.cn/news/8680/'}
{'title': '[2019中国旅游集团20强]', 'link': 'http://www.cntour.cn/news/8675/'}
{'title': '[沉浸式旅游带来新体验]', 'link': 'http://www.cntour.cn/news/7644/'}
{'title': '[合力推进旅游景区高质量]', 'link': 'http://www.cntour.cn/news/7642/'}
首先明确要提取的数据是标题和链接,标题在标签中,提取标签的正文用get_text()方法。链接在标签的href属性中,提取标签中的href属性用get()方法,在括号中指定要提取的属性数据即get(‘href’)。
从结果中可以发现每一篇文章的连接中都有一个数字ID。下面用正则表达式提取这个ID。
需要使用的正则符号如下:
\d 匹配数字
+ 匹配前一个字符1次或多次
完善后的代码如下:
import requests
import re
from bs4 import BeautifulSoup

url = 'http://www.cntour.cn'
strhtml = requests.get(url)
soup = BeautifulSoup(strhtml.text, 'lxml')
data = soup.select(
   '#main > div > div.mtop.firstMod.clearfix > div.centerBox > ul.newsList > li > a'
)
for item in data:
   result = {

       'title': item.get_text(),
       'link': item.get('href'),
       'ID': re.findall('\d+', item.get('href'))
   }
   print(result)
运行结果:
{'title': '文旅消费升级亟须高品质文旅内容', 'link': 'http://www.cntour.cn/news/12717/', 'ID': ['12717']}
{'title': '2019年旅游业的“快进”与“降速”', 'link': 'http://www.cntour.cn/news/12715/', 'ID': ['12715']}
{'title': '新文创,让文化更“年轻”', 'link': 'http://www.cntour.cn/news/10695/', 'ID': ['10695']}
{'title': '2020,中国旅游会更好', 'link': 'http://www.cntour.cn/news/10694/', 'ID': ['10694']}
{'title': '[发展旅游产业要有大格局]', 'link': 'http://www.cntour.cn/news/12718/', 'ID': ['12718']}
{'title': '[科技改变旅游]', 'link': 'http://www.cntour.cn/news/12716/', 'ID': ['12716']}
{'title': '[落实带薪休假关键看企业]', 'link': 'http://www.cntour.cn/news/9690/', 'ID': ['9690']}
{'title': '[2019中国旅游八大亮点]', 'link': 'http://www.cntour.cn/news/9688/', 'ID': ['9688']}
{'title': '[2019中国文旅地产综合实]', 'link': 'http://www.cntour.cn/news/8680/', 'ID': ['8680']}
{'title': '[2019中国旅游集团20强]', 'link': 'http://www.cntour.cn/news/8675/', 'ID': ['8675']}
{'title': '[沉浸式旅游带来新体验]', 'link': 'http://www.cntour.cn/news/7644/', 'ID': ['7644']}
{'title': '[合力推进旅游景区高质量]', 'link': 'http://www.cntour.cn/news/7642/', 'ID': ['7642']}
爬虫攻防战
爬虫是模拟人的浏览访问行为,进行数据的批量抓取。当抓取的数据量逐渐增大时,会给被访问的服务器造成很大的压力,甚至有可能崩溃。因此,网站会针对这些爬虫者,采取一些反爬策略。
① 通过检查连接的useragent来识别到底是浏览器访问,还是代码访问。如果是代码访问的话,访问量增大时,服务器会直接封掉来访IP。
针对此种情况,我们可以在Request headers中构造浏览器的请求头,代码如下:
headers = {'User-Agent': 'Mozilla/5.0 (Windows NT 6.1; WOW64) AppleWebKit/537.36 (KHTML, like Gecko) Chrome/43.0.2357.124 Safari/537.36'}
response = requests.get(url, headers=headers)
② 统计每个IP的访问频率,该频率超过阈值,就会返回一个验证码,如果真的是用户访问的话,用户就会填写,然后继续访问,如果是代码访问的话,就封锁IP。
解决方案有两个:一个是常用的增设延时,每3秒钟抓取一次。
import time
time.sleep(3)
第二个就是在数据采集时使用代理。首先,构建自己的代理IP池,将其以字典的形式赋值给requests的proxies属性。
proxies = {
    "http": "http://10.10.1.10:3128",
    "https": "http://10.10.1.10:1080",
}
response = requests.get(url, proxies=proxies)


