cocos2d-x 2.0 拖尾效果分析
转自:http://game.dapps.net/gamedev/game-engine/7281.html
在Cocos2d-x中,拖尾效果有一个专门的类CCMotionStreak来实现。下面我们打开CCMotionStreak.h来看一下:
#ifndef __CCMOTION_STREAK_H__

#define __CCMOTION_STREAK_H__


#include "CCProtocols.h"

#include "textures/CCTexture2D.h"

#include "ccTypes.h"

#include "base_nodes/CCNode.h"

//使用Cocos2d命名空间

NS_CC_BEGIN


//条带由三个基类共同派生

class CC_DLL CCMotionStreak : public CCNode, public CCTextureProtocol, public CCRGBAProtocol

{

public:

    //构造

    CCMotionStreak();

    //析构

    virtual ~CCMotionStreak();

    //静态函数,创建一个拖尾效果,内部调用create实现,参一为消隐动画时长,参二为拖尾条带相邻顶点间的最小距离,参三为拖尾条带的宽度,参四为顶点颜色值,参五为所使用的纹理图片。

    CC_DEPRECATED_ATTRIBUTE static CCMotionStreak* streakWithFade(float fade, float minSeg, float stroke, ccColor3B color, const char* path);

    //静态函数,创建一个拖尾效果,内部调用create实现,参一为消隐动画时长,参二为拖尾条带相邻顶点间的最小距离,参三为拖尾条带的宽度,参四为顶点颜色值,参五为所使用的纹理对象指针。

    CC_DEPRECATED_ATTRIBUTE static CCMotionStreak* streakWithFade(float fade, float minSeg, float stroke, ccColor3B color, CCTexture2D* texture);


    //上面第一个创建函数的create实现。

    static CCMotionStreak* create(float fade, float minSeg, float stroke, ccColor3B color, const char* path);

    //上面第二个创建函数的create实现。

    static CCMotionStreak* create(float fade, float minSeg, float stroke, ccColor3B color, CCTexture2D* texture);


    //初始化拖尾效果

    bool initWithFade(float fade, float minSeg, float stroke, ccColor3B color, const char* path);

    //初始化拖尾效果

    bool initWithFade(float fade, float minSeg, float stroke, ccColor3B color, CCTexture2D* texture);


    //

    void tintWithColor(ccColor3B colors);


    //重置,删除所有的条带段

    void reset();


    //设置位置

    virtual void setPosition(const CCPoint& position);

    //绘制

    virtual void draw();

    //更新

    virtual void update(float delta);


    //取得纹理。

    virtual CCTexture2D* getTexture(void);

    //设置纹理。

    virtual void setTexture(CCTexture2D *texture);

    //设置

    virtual void setBlendFunc(ccBlendFunc blendFunc);

    virtual ccBlendFunc getBlendFunc(void);

    //设置颜色

    virtual void setColor(const ccColor3B& color);

    virtual const ccColor3B& getColor(void);

    //设置透明度

    virtual GLubyte getOpacity(void);

    virtual void setOpacity(GLubyte opacity);

    //设置修改A同时影响RGB

    virtual void setOpacityModifyRGB(bool bValue);

    virtual bool isOpacityModifyRGB(void);


    //是否是快速模式

    inline bool isFastMode() { return m_bFastMode; }

    inline void setFastMode(bool bFastMode) { m_bFastMode = bFastMode; }

    //起点是否初始化

    inline bool isStartingPositionInitialized() { return m_bStartingPositionInitialized; }

    inline void setStartingPositionInitialized(bool bStartingPositionInitialized)

    {

        m_bStartingPositionInitialized = bStartingPositionInitialized;

    }

protected:

    //是否是快速模式

    bool m_bFastMode;

    //起点是否初始化

    bool m_bStartingPositionInitialized;

private:

    //所用的纹理对象指针

    CCTexture2D* m_pTexture;

    //ALPHA混合方案

    ccBlendFunc m_tBlendFunc;

    //当前拖尾起点位置

    CCPoint m_tPositionR;

    //颜色值

    ccColor3B m_tColor;

    //拖尾线条的宽度,越大当前越粗

    float m_fStroke;

    //每秒条带渐隐的alpha值减少量

    float m_fFadeDelta;

    //拖尾中用于划分条带的顶点的最小距离。

    float m_fMinSeg;

    //顶点最大数量

    unsigned int m_uMaxPoints;

    //当前的顶点数量

    unsigned int m_uNuPoints;

    //上次的顶点数量

    unsigned int m_uPreviousNuPoints;


    //顶点位置数组

    CCPoint* m_pPointVertexes;

    //顶点的状态值数组,这个状态值取值为0~1.0间,代表了消隐程度,其实就是alpha值。

    float* m_pPointState;


    // OPENGL所用的顶点各类数据绘冲

    //位置

    ccVertex2F* m_pVertices;

    //颜色

    GLubyte* m_pColorPointer;

    //纹理UV

    ccTex2F* m_pTexCoords;

};


// end of misc_nodes group

/// @}


NS_CC_END


#endif //__CCMOTION_STREAK_H__
对应的CPP:
#include "CCMotionStreak.h"

#include "textures/CCTextureCache.h"

#include "shaders/ccGLStateCache.h"

#include "shaders/CCGLProgram.h"

#include "shaders/CCShaderCache.h"

#include "ccMacros.h"


#include "support/CCVertex.h"

#include "support/CCPointExtension.h"

//使用Cocos2d命名空间

NS_CC_BEGIN

//构造

CCMotionStreak::CCMotionStreak()

: m_bFastMode(false)

, m_pTexture(NULL)

, m_tPositionR(CCPointZero)

, m_tColor(ccc3(0,0,0))

, m_fStroke(0.0f)

, m_fFadeDelta(0.0f)

, m_fMinSeg(0.0f)

, m_uMaxPoints(0)

, m_uNuPoints(0)

, m_uPreviousNuPoints(0)

, m_pPointVertexes(NULL)

, m_pPointState(NULL)

, m_pVertices(NULL)

, m_pColorPointer(NULL)

, m_pTexCoords(NULL)

, m_bStartingPositionInitialized(false)

{

    m_tBlendFunc.src = GL_SRC_ALPHA;

    m_tBlendFunc.dst = GL_ONE_MINUS_SRC_ALPHA;

}

//析构

CCMotionStreak::~CCMotionStreak()

{

    //释放纹理对象和申请的内存缓冲区

    CC_SAFE_RELEASE(m_pTexture);

    CC_SAFE_FREE(m_pPointState);

    CC_SAFE_FREE(m_pPointVertexes);

    CC_SAFE_FREE(m_pVertices);

    CC_SAFE_FREE(m_pColorPointer);

    CC_SAFE_FREE(m_pTexCoords);

}

//静态函数,创建一个拖尾效果,内部调用create实现,参一为消隐动画时长,参二为拖尾条带相邻顶点间的最小距离,参三为拖尾条带的宽度,参四为顶点颜色值,参五为所使用的纹理图片。

CCMotionStreak* CCMotionStreak::streakWithFade(float fade, float minSeg, float stroke, ccColor3B color, const char* path)

{

    return CCMotionStreak::create(fade, minSeg, stroke, color, path);

}

//上面的create实现。

CCMotionStreak* CCMotionStreak::create(float fade, float minSeg, float stroke, ccColor3B color, const char* path)

{

    //创建一个CCMotionStreak的实例对象并初始化,如果成功交由内存管理器进行引用计数器的管理。

    CCMotionStreak *pRet = new CCMotionStreak();

    if (pRet && pRet->initWithFade(fade, minSeg, stroke, color, path))

    {

        pRet->autorelease();

        return pRet;

    }

    //如果创建或初始化失败,删除实例对象指针并置空,返回NULL。

    CC_SAFE_DELETE(pRet);

    return NULL;

}

//静态函数,创建一个拖尾效果,内部调用create实现,参一为消隐动画时长,参二为拖尾条带相邻顶点间的最小距离,参三为拖尾条带的宽度,参四为顶点颜色值,参五为所使用的纹理对象。

CCMotionStreak* CCMotionStreak::streakWithFade(float fade, float minSeg, float stroke, ccColor3B color, CCTexture2D* texture)

{

    return CCMotionStreak::create(fade, minSeg, stroke, color, texture);

}

//上面创建函数的create实现。

CCMotionStreak* CCMotionStreak::create(float fade, float minSeg, float stroke, ccColor3B color, CCTexture2D* texture)

{

    //创建一个CCMotionStreak的实例对象并初始化,如果成功交由内存管理器进行引用计数器的管理。

    CCMotionStreak *pRet = new CCMotionStreak();

    if (pRet && pRet->initWithFade(fade, minSeg, stroke, color, texture))

    {

        pRet->autorelease();

        return pRet;

    }

    //如果创建或初始化失败,删除实例对象指针并置空,返回NULL。

    CC_SAFE_DELETE(pRet);

    return NULL;

}

//初始化条带

bool CCMotionStreak::initWithFade(float fade, float minSeg, float stroke, ccColor3B color, const char* path)

{

    //有效性判断。

    CCAssert(path != NULL, "Invalid filename");

    //加载图片生成纹理,使用纹理指针调用相应的初始化函数。

    CCTexture2D *texture = CCTextureCache::sharedTextureCache()->addImage(path);

    return initWithFade(fade, minSeg, stroke, color, texture);

}

//初始化条带

bool CCMotionStreak::initWithFade(float fade, float minSeg, float stroke, ccColor3B color, CCTexture2D* texture)

{

    //将结点位置为零零点。

    CCNode::setPosition(CCPointZero);

    //设置锚点位置为零零点。

    setAnchorPoint(CCPointZero);

    //

    ignoreAnchorPointForPosition(true);

    //

    m_bStartingPositionInitialized = false;

    //初始化起点为零零点。

    m_tPositionR = CCPointZero;

    //使用快速模式

    m_bFastMode = true;

    //如果minSeg值设-1,则成员变量m_fMinSeg取默认值为宽度/5.0f,否则按照参数取值。

    m_fMinSeg = (minSeg == -1.0f) ? stroke/5.0f : minSeg;

    //为什么要乘积呢?因为后面判断距离时提高效率,两点间距离公式不是要开平方嘛?这样做就省掉开平方了。

    m_fMinSeg *= m_fMinSeg;

    //保存拖尾效果条带的宽度。

    m_fStroke = stroke;

    //计算出每秒条带渐隐的alpha值减少量

    m_fFadeDelta = 1.0f/fade;

    //顶点最大数量这里是按消隐动画时长来计算的,每秒60个顶点,再加上首尾两个顶点。

    m_uMaxPoints = (int)(fade*60.0f)+2;

    //当前顶点数量为0。

    m_uNuPoints = 0;

    //创建相应顶点数量的状态值数组和顶点位置数组。

    m_pPointState = (float *)malloc(sizeof(float) * m_uMaxPoints);

    m_pPointVertexes = (CCPoint*)malloc(sizeof(CCPoint) * m_uMaxPoints);

    //创建相应顶点缓冲所用的内存。

    m_pVertices = (ccVertex2F*)malloc(sizeof(ccVertex2F) * m_uMaxPoints * 2);

    m_pTexCoords = (ccTex2F*)malloc(sizeof(ccTex2F) * m_uMaxPoints * 2);

    m_pColorPointer =  (GLubyte*)malloc(sizeof(GLubyte) * m_uMaxPoints * 2 * 4);


    // 设置ALPHA混合方案

    m_tBlendFunc.src = GL_SRC_ALPHA;

    m_tBlendFunc.dst = GL_ONE_MINUS_SRC_ALPHA;


    // 设置所用的Shader代码片段

setShaderProgram(CCShaderCache::sharedShaderCache()->programForKey(kCCShader_PositionTextureColor));


    //设置所用的纹理

    setTexture(texture);

    //设置所用的颜色

    setColor(color);

    //

    scheduleUpdate();


    return true;

}

//设置位置

void CCMotionStreak::setPosition(const CCPoint& position)

{

    m_bStartingPositionInitialized = true;

    m_tPositionR = position;

}

//设置颜色

void CCMotionStreak::tintWithColor(ccColor3B colors)

{

    //

    setColor(colors);


    // Fast assignation

    for(unsigned int i = 0; i<m_uNuPoints*2; i++)

    {

        *((ccColor3B*) (m_pColorPointer+i*4)) = colors;

    }

}

//取得纹理

CCTexture2D* CCMotionStreak::getTexture(void)

{

    return m_pTexture;

}

//设置纹理

void CCMotionStreak::setTexture(CCTexture2D *texture)

{

    if (m_pTexture != texture)

    {

        CC_SAFE_RETAIN(texture);

        CC_SAFE_RELEASE(m_pTexture);

        m_pTexture = texture;

    }

}

//设置ALPHA混合方案

void CCMotionStreak::setBlendFunc(ccBlendFunc blendFunc)

{

    m_tBlendFunc = blendFunc;

}

//取得ALPHA混合方案。

ccBlendFunc CCMotionStreak::getBlendFunc(void)

{

    return m_tBlendFunc;

}

//设置颜色

void CCMotionStreak::setColor(const ccColor3B& color)

{

    m_tColor = color;

}

//取得颜色

const ccColor3B& CCMotionStreak::getColor(void)

{

    return m_tColor;

}

//设置透明度

void CCMotionStreak::setOpacity(GLubyte opacity)

{

    CCAssert(false, "Set opacity no supported");

}

//取得透明度

GLubyte CCMotionStreak::getOpacity(void)

{

    CCAssert(false, "Opacity no supported");

    return 0;

}

//设置修改透明度是否影响RGB值。

void CCMotionStreak::setOpacityModifyRGB(bool bValue)

{

    CC_UNUSED_PARAM(bValue);

}


bool CCMotionStreak::isOpacityModifyRGB(void)

{

    return false;

}

//更新处理

void CCMotionStreak::update(float delta)

{

    //如果未初始化直接返回。

    if (!m_bStartingPositionInitialized)

    {

        return;

    }

    //通过时间音隔x每秒消隐值,取得当前时间片内要消隐的值。

    delta *= m_fFadeDelta;

    //定义临时变量

    unsigned int newIdx, newIdx2, i, i2;

    //定义临时变量保存消隐的顶点个数。

    unsigned int mov = 0;


    // 遍历更新当前所有的顶点。

    for(i = 0; i<m_uNuPoints; i++)

    {

        //状态数组对应值减去消隐值。

        m_pPointState[i]-=delta;

        //如果小于0,即完全消隐,mov++。

        if(m_pPointState[i] <= 0)

            mov++;

        else

        {

            //这里是通过mov计算出当前顶点数组在更新后移除完全消隐的顶点之后的当前顶点实际位置保存到变量newIdx。

            newIdx = i-mov;

            //如果mov大于0,即有完全消隐的顶点。

            if(mov>0)

            {

                // 将当前顶点原来的状态值保存到数组新位置中,这是一个前移操作。

                m_pPointState[newIdx] = m_pPointState[i];


                //将当前顶点原来的位置值保存到数组新位置中。

                m_pPointVertexes[newIdx] = m_pPointVertexes[i];


                //将当前顶点原来的位置顶点缓冲值保存到顶点缓冲新位置中。

                i2 = i*2;

                newIdx2 = newIdx*2;

                m_pVertices[newIdx2] = m_pVertices[i2];

                m_pVertices[newIdx2+1] = m_pVertices[i2+1];


                //将当前顶点原来的颜色顶点缓冲值保存到顶点缓冲新位置中。这里要注意,因为是GLubyte格式,所以A,R,G,B分别占一个数组元素。

                i2 *= 4;

                newIdx2 *= 4;

                m_pColorPointer[newIdx2+0] = m_pColorPointer[i2+0];

                m_pColorPointer[newIdx2+1] = m_pColorPointer[i2+1];

                m_pColorPointer[newIdx2+2] = m_pColorPointer[i2+2];

                m_pColorPointer[newIdx2+4] = m_pColorPointer[i2+4];

                m_pColorPointer[newIdx2+5] = m_pColorPointer[i2+5];

                m_pColorPointer[newIdx2+6] = m_pColorPointer[i2+6];

            }else

                newIdx2 = newIdx*8;//如果mov等于0,则R,G,B值不用变,只修改A值即可。

            //将当前顶点原来的颜色顶点缓冲中Alpha值保存到顶点缓冲新位置Alpha值中。

            const GLubyte op = (GLubyte)(m_pPointState[newIdx] * 255.0f);

            m_pColorPointer[newIdx2+3] = op;

            m_pColorPointer[newIdx2+7] = op;

        }

    }

    //当前的顶点数量减去完全消隐的顶点数量。

    m_uNuPoints-=mov;


    // 定义临时变量判断是否需要增加顶点。

    bool appendNewPoint = true;

    //如果当前顶点数量大于最大顶点数量,不能再新增顶点了。

    if(m_uNuPoints >= m_uMaxPoints)

    {

        appendNewPoint = false;

    }

    //如果当前顶点数量大于0,需要做一些计算来判断是否增加新顶点。

    else if(m_uNuPoints>0)

    {

        //取当前拖尾起点位置顶点与后面一个顶点的距离的平方,看是否小于m_fMinSeg。

        bool a1 = ccpDistanceSQ(m_pPointVertexes[m_uNuPoints-1], m_tPositionR) < m_fMinSeg;

        //取当前拖尾起点位置顶点与后面第二个顶点的距离的平方,看是否小于m_fMinSeg*2。

        bool a2 = (m_uNuPoints == 1) ? false : (ccpDistanceSQ(m_pPointVertexes[m_uNuPoints-2], m_tPositionR) < (m_fMinSeg * 2.0f));

        //如果在距离范围内,就不再增加顶点,这一段代码是为了避免拖尾间顶点过密过多,约定只有相邻顶点间距离达到一定范围以外才增加新的顶点。

        if(a1 || a2)

        {

            appendNewPoint = false;

        }

    }

    //如果需要增加新的顶点。

    if(appendNewPoint)

    {

        //将当前起点位置保存到相应数组元素中。

        m_pPointVertexes[m_uNuPoints] = m_tPositionR;

        //将相应状态数组元素值初始化为1.0。

        m_pPointState[m_uNuPoints] = 1.0f;


        // 颜色赋值

        const unsigned int offset = m_uNuPoints*8;

        *((ccColor3B*)(m_pColorPointer + offset)) = m_tColor;

        *((ccColor3B*)(m_pColorPointer + offset+4)) = m_tColor;


        // 透明度赋值

        m_pColorPointer[offset+3] = 255;

        m_pColorPointer[offset+7] = 255;


        //生成相应的四边形条带

        if(m_uNuPoints > 0 && m_bFastMode )

        {

            if(m_uNuPoints > 1)

            {//如果当前顶点数量大于1,则由上一个顶点到当前顶点位置生成相四边形存入到m_pVertices。

                ccVertexLineToPolygon(m_pPointVertexes, m_fStroke, m_pVertices, m_uNuPoints, 1);

            }

            else

            {//否则由起始位置到当前顶点位置生成相四边形存入到m_pVertices。

                ccVertexLineToPolygon(m_pPointVertexes, m_fStroke, m_pVertices, 0, 2);

            }

        }

        //顶点数量加一。

        m_uNuPoints ++;

    }

    //如果不是快速模式,则从起始位置到当前顶点位置生成相应四边形条带存入到m_pVertices。可见,快速模式比非快速模式要生成更少的次数。

    if( ! m_bFastMode )

    {

        ccVertexLineToPolygon(m_pPointVertexes, m_fStroke, m_pVertices, 0, m_uNuPoints);

    }


    // 更新纹理坐标

    if( m_uNuPoints  && m_uPreviousNuPoints != m_uNuPoints ) {

        float texDelta = 1.0f / m_uNuPoints;

        for( i=0; i < m_uNuPoints; i++ ) {

            //左右两边各一个顶点,故纹理U值分别为¬0,1

            m_pTexCoords[i*2] = tex2(0, texDelta*i);

            m_pTexCoords[i*2+1] = tex2(1, texDelta*i);

        }

        //记录当前粒子数量。

        m_uPreviousNuPoints = m_uNuPoints;

    }

}

//重置

void CCMotionStreak::reset()

{

    m_uNuPoints = 0;

}

//绘制

void CCMotionStreak::draw()

{

    //如果粒子数量<=1,不能形成条带,就不需要显示。

    if(m_uNuPoints <= 1)

        return;

    //设置使用shader,并设置相关矩阵。

    CC_NODE_DRAW_SETUP();

    //设置使用的顶点格式和ALPHA混合方案。

    ccGLEnableVertexAttribs(kCCVertexAttribFlag_PosColorTex );

    ccGLBlendFunc( m_tBlendFunc.src, m_tBlendFunc.dst );

    //设置使用的纹理。

    ccGLBindTexture2D( m_pTexture->getName() );

    //设置顶点缓冲区。

    glVertexAttribPointer(kCCVertexAttrib_Position, 2, GL_FLOAT, GL_FALSE, 0, m_pVertices);

    glVertexAttribPointer(kCCVertexAttrib_TexCoords, 2, GL_FLOAT, GL_FALSE, 0, m_pTexCoords);

    glVertexAttribPointer(kCCVertexAttrib_Color, 4, GL_UNSIGNED_BYTE, GL_TRUE, 0, m_pColorPointer);

    //渲染三角形条带

    glDrawArrays(GL_TRIANGLE_STRIP, 0, (GLsizei)m_uNuPoints*2);

    //更新渲染调用次数统计

    CC_INCREMENT_GL_DRAWS(1);

}


NS_CC_END
拖尾效果类的实现原理了解了,现在我们看一下Cocos2d-x中的相关演示。
MotionStreakTest.h:
#ifndef _MOTION_STREAK_TEST_H_

#define _MOTION_STREAK_TEST_H_


#include "../testBasic.h"

//使用Cocos2d命名空间

//USING_NS_CC;

//用于演示的基类。

class MotionStreakTest : public CCLayer

{

public:

    //构造

    MotionStreakTest(void);

    //析构

    ~MotionStreakTest(void);

    //取得标题。

    virtual std::string title();

    //取得副标题。

    virtual std::string subtitle();

    //当前层被加载时的处理。

    virtual void onEnter();

    //响应菜单按钮项重启当前演示。

    void restartCallback(CCObject* pSender);

    //响应菜单按钮项进行下一个演示。

    void nextCallback(CCObject* pSender);

    //响应菜单按钮项进行上一个演示。

    void backCallback(CCObject* pSender);

    //响应菜单文字项进行模式切换。

    void modeCallback(CCObject* pSender);

protected:

    //拖尾对象指针。

    CCMotionStreak *streak;

};
对应CPP:
//枚举所用到的精灵的TAG值

enum {

    kTagLabel = 1,

    kTagSprite1 = 2,

    kTagSprite2 = 3,

};


//下一个效果演示

CCLayer* nextMotionAction();

//上一个效果演示

CCLayer* backMotionAction();

//重新演示当前的效果

CCLayer* restartMotionAction();

//场景索引

static int sceneIdx = -1;

//最大层数

#define MAX_LAYER    3

//根据效果创建不同的拖尾效果

CCLayer* createMotionLayer(int nIndex)

{

    switch(nIndex)

    {

        case 0: return new MotionStreakTest1();

        case 1: return new MotionStreakTest2();

        case 2: return new Issue1358();

    }


    return NULL;

}

//下一个效果

CCLayer* nextMotionAction()

{

    sceneIdx++;

    sceneIdx = sceneIdx % MAX_LAYER;


    CCLayer* pLayer = createMotionLayer(sceneIdx);

    pLayer->autorelease();


    return pLayer;

}

//上一个效果演示

CCLayer* backMotionAction()

{

    sceneIdx--;

    int total = MAX_LAYER;

    if( sceneIdx < 0 )

        sceneIdx += total;


    CCLayer* pLayer = createMotionLayer(sceneIdx);

    pLayer->autorelease();


    return pLayer;

}

//重新演示当前的效果

CCLayer* restartMotionAction()

{

    CCLayer* pLayer = createMotionLayer(sceneIdx);

    pLayer->autorelease();


    return pLayer;

}


//构造

MotionStreakTest::MotionStreakTest(void)

{

}

//析构

MotionStreakTest::~MotionStreakTest(void)

{

}


//标题

std::string MotionStreakTest::title()

{

    return "No title";

}


//副标题。

std::string MotionStreakTest::subtitle()

{

    return "";

}


//当前层加载时的处理

void MotionStreakTest::onEnter()

{

    //调用基类的相应处理。

    CCLayer::onEnter();

    //获取屏幕大小

    CCSize s = CCDirector::sharedDirector()->getWinSize();

    //创建标题文字标签

    CCLabelTTF* label = CCLabelTTF::create(title().c_str(), "Arial", 32);

    //将文字标签加入当前层中

    addChild(label, 0, kTagLabel);

    //设置文字标签的位置

    label->setPosition(CCPointMake(s.width/2, s.height-50));

    //取得副标题

    string subTitle = this->subtitle();

    //创建副标题文字标签

    if (subTitle.size() > 0)

    {

        CCLabelTTF *l = CCLabelTTF::create(subTitle.c_str(), "Thonburi", 16);

        addChild(l, 1);

        l->setPosition(ccp(s.width/2, s.height-80));

    }

    //创建菜单项

    CCMenuItemImage *item1 = CCMenuItemImage::create(s_pPathB1, s_pPathB2, this, menu_selector(MotionStreakTest::backCallback) );

    CCMenuItemImage *item2 = CCMenuItemImage::create(s_pPathR1, s_pPathR2, this, menu_selector(MotionStreakTest::restartCallback) );

    CCMenuItemImage *item3 = CCMenuItemImage::create(s_pPathF1, s_pPathF2, this, menu_selector(MotionStreakTest::nextCallback) );

    //创建菜单

    CCMenu *menu = CCMenu::create(item1, item2, item3, NULL);

    //设置菜单与各菜单项的位置

    menu->setPosition(CCPointZero);

    item1->setPosition(CCPointMake(s.width/2 - item2->getContentSize().width*2, item2->getContentSize().height/2));

    item2->setPosition(CCPointMake(s.width/2, item2->getContentSize().height/2));

    item3->setPosition(CCPointMake(s.width/2 + item2->getContentSize().width*2, item2->getContentSize().height/2));

    //将菜单加入当前层

    addChild(menu, 1);

    //创建一个菜单切换文字项,其实就是有复选框效果的文字标签。这里创建的切换项为“质量优先模式”和“效率优先模式”,响应函数为modeCallback。

    CCMenuItemToggle *itemMode = CCMenuItemToggle::createWithTarget(this, menu_selector(MotionStreakTest::modeCallback),

        CCMenuItemFont::create("Use High Quality Mode"),

        CCMenuItemFont::create("Use Fast Mode"),

        NULL);

    //创建第二个菜单并加入当前层

    CCMenu *menuMode = CCMenu::create(itemMode, NULL);

    addChild(menuMode);

    //设置菜单位置

    menuMode->setPosition(ccp(s.width/2, s.height/4));

}

//切换文字项的响应函数。

void MotionStreakTest::modeCallback(CCObject *pSender)

{

    //来回切换模式

    bool fastMode = streak->isFastMode();

    streak->setFastMode(! fastMode);

}

//重新演示当前效果。

void MotionStreakTest::restartCallback(CCObject* pSender)

{

    //创建一个演示场景。

    CCScene* s = new MotionStreakTestScene();//CCScene::create();

    s->addChild(restartMotionAction());

    //使用当前场景。

    CCDirector::sharedDirector()->replaceScene(s);

    s->release();

}


//下一个效果的演示

void MotionStreakTest::nextCallback(CCObject* pSender)

{

    //创建一个演示场景。

    CCScene* s = new MotionStreakTestScene();//CCScene::create();

    //将下一个演示层加入场景,并运行这个场景

    s->addChild( nextMotionAction() );

    CCDirector::sharedDirector()->replaceScene(s);

    s->release();

}


//上一个效果的演示

void MotionStreakTest::backCallback(CCObject* pSender)

{   //创建一个演示场景。

    CCScene* s = new MotionStreakTestScene;//CCScene::create();

    //将上一个演示层加入场景,并运行这个场景

    s->addChild( backMotionAction() );

    CCDirector::sharedDirector()->replaceScene(s);

    s->release();

}
然后是派生的第一个拖尾效果演示类:
class MotionStreakTest1 : public MotionStreakTest

{

protected:

    //根结点

    CCNode*        m_root;

    //带拖尾的目标结点

    CCNode*        m_target;


public:

    //加载当前层时的处理

    virtual void onEnter();

    //更新函数

    void onUpdate(float delta);

    //取得标题

    virtual std::string title();

};
对应CPP:
//加载当前层时的处理

void MotionStreakTest1::onEnter()

{

    //调用基类的相应函数。

    MotionStreakTest::onEnter();

    //取和屏幕大小

    CCSize s = CCDirector::sharedDirector()->getWinSize();


    // 创建根精灵结点,放入当前层中的屏幕中心位置。

    m_root = CCSprite::create(s_pPathR1);

    addChild(m_root, 1);

    m_root->setPosition(ccp(s.width/2, s.height/2));


    //创建目标精灵结点,放入根结点下的右边1/4屏幕宽度位置。

    m_target = CCSprite::create(s_pPathR1);

    m_root->addChild(m_target);

    m_target->setPosition(ccp(s.width/4, 0));


    // 创建拖尾效果并放入到当前层下。

    streak = CCMotionStreak::create(2, 3, 32, ccGREEN, s_streak);

    addChild(streak);

    //每帧调用onUpdate函数。

    schedule(schedule_selector(MotionStreakTest1::onUpdate));

    //创建一个旋转动画,2秒内自转360度。

    CCActionInterval* a1 = CCRotateBy::create(2, 360);

    //创建一个al1的无限循环动画。

    CCAction* action1 = CCRepeatForever::create(a1);

    //创建一个平移动画,2秒内向右移动100像素。

    CCActionInterval* motion = CCMoveBy::create(2, CCPointMake(100,0) );

//根结点运行一个无限循环的动画序列,动画序列为平移动画及其反向动画。   m_root->runAction( CCRepeatForever::create((CCActionInterval*)(CCSequence::create(motion, motion->reverse(), NULL)) ) );

//同时也运行无限循环的自转动画。

    m_root->runAction( action1 );

    //创建一个无限循环的动画序列,动画序列为7个变色动画,哪个结点使用它就会不断的变色。

    CCActionInterval *colorAction = CCRepeatForever::create((CCActionInterval *)CCSequence::create(

        CCTintTo::create(0.2f, 255, 0, 0),

        CCTintTo::create(0.2f, 0, 255, 0),

        CCTintTo::create(0.2f, 0, 0, 255),

        CCTintTo::create(0.2f, 0, 255, 255),

        CCTintTo::create(0.2f, 255, 255, 0),

        CCTintTo::create(0.2f, 255, 0, 255),

        CCTintTo::create(0.2f, 255, 255, 255),

        NULL));

    //让拖尾运行这个变色动画序列。

    streak->runAction(colorAction);

}

//实时更新函数。

void MotionStreakTest1::onUpdate(float delta)

{

    //更新拖尾的位置,设置为目标精灵结点的位置。

    streak->setPosition( m_target->convertToWorldSpace(CCPointZero) );

}

//取得标题。

std::string MotionStreakTest1::title()

{

    return "MotionStreak test 1";

}
演示如图:

派生的第二个拖尾效果演示类:
class MotionStreakTest2 : public MotionStreakTest

{

    //根结点

    CCNode*        m_root;

    //带拖尾的目标结点

    CCNode*        m_target;

public:

    //加载当前层时的处理

    virtual void onEnter();

    //触屏并移动时响应处理

    void ccTouchesMoved(CCSet* touches, CCEvent* event);

    //取得标题

    virtual std::string title();

};
对应的CPP:
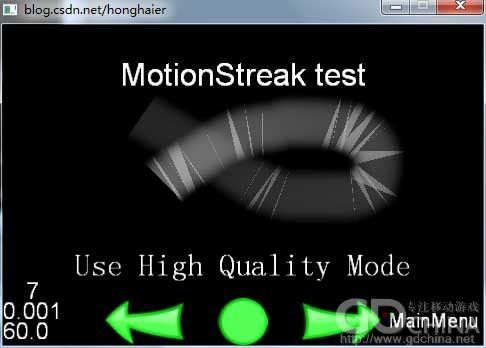
//加载当前层时的处理

void MotionStreakTest2::onEnter()

{

    //调用基类的相应函数。

    MotionStreakTest::onEnter();

    //这里设置打开触屏响应

    setTouchEnabled(true);

    //取得屏幕大小

    CCSize s = CCDirector::sharedDirector()->getWinSize();


    // 创建拖尾效果并放入到当前层下。

    streak = CCMotionStreak::create(3, 3, 64, ccWHITE, s_streak );

    addChild(streak);

    //设置拖尾的初始位置为屏幕中小。

    streak->setPosition( CCPointMake(s.width/2, s.height/2) );

}

//触屏并移动时响应处理

void MotionStreakTest2::ccTouchesMoved(CCSet* touches, CCEvent* event)

{

    //取得触点位置。

    CCSetIterator it = touches->begin();

    CCTouch* touch = (CCTouch*)(*it);


    CCPoint touchLocation = touch->getLocation();

    //设置为拖层的位置。

    streak->setPosition( touchLocation );

}

//取得标题

std::string MotionStreakTest2::title()

{

    return "MotionStreak test";

}
效果如图:
派生的第三个拖尾效果演示类:
class Issue1358 : public MotionStreakTest

{

public:

    //取得标题

    virtual std::string title();

    //取得副标题

    virtual std::string subtitle();

    //加载当前层时的处理

    virtual void onEnter();

    //更新函数

    virtual void update(float dt);

private:

    //中心位置

    CCPoint m_center;

    //半径

    float m_fRadius;

    //角度

    float m_fAngle;

};
对应CPP:
//加载当前层时的处理

void Issue1358::onEnter()

{

    //调用基类的相应函数。

    MotionStreakTest::onEnter();


    //取得屏幕位置

    CCSize size = CCDirector::sharedDirector()->getWinSize();

    // 创建拖尾效果并放入到当前层下。

    streak = CCMotionStreak::create(2.0f, 1.0f, 50.0f, ccc3(255, 255, 0), "Images/Icon.png");

    addChild(streak);

    //初始化中心位置,半径和角度。

    m_center  = ccp(size.width/2, size.height/2);

    m_fRadius = size.width/3;

    m_fAngle = 0.0f;

    //设置每帧的回调更新函数。

    schedule(schedule_selector(Issue1358::update), 0);

}

//每帧的回调更新函数。

void Issue1358::update(float dt)

{

    //角度增加1.0f

    m_fAngle += 1.0f;

    //计算拖尾的位置

    streak->setPosition(ccp(m_center.x + cosf(m_fAngle/180 * M_PI)*m_fRadius,

                            m_center.y + sinf(m_fAngle/ 180 * M_PI)*m_fRadius));

}

//取得标题。

std::string Issue1358::title()

{

    return "Issue 1358";

}

//取得副标题。

std::string Issue1358::subtitle()

{

    return "The tail should use the texture";

}
效果如图:

然后是演示用的场景:
class MotionStreakTestScene : public TestScene

{

public:

    //运行场景的处理

    virtual void runThisTest();

};


//运行场景的处理

void MotionStreakTestScene::runThisTest()

{

    //创建下一个要演示的效果并放入当前场景中。

    CCLayer* pLayer = nextMotionAction();

    addChild(pLayer);

    //使用当前场景。

    CCDirector::sharedDirector()->replaceScene(this);

}
总结一下:
拖尾效果的原理就是在相应距离内动态生成条带,然后逐渐消隐,在Cocos2d-x中可以指定这个最小距离,以及消隐的速度,还有条带的粗细,相应的纹理对象,都是通过CCMotionStreak 类来实现的。