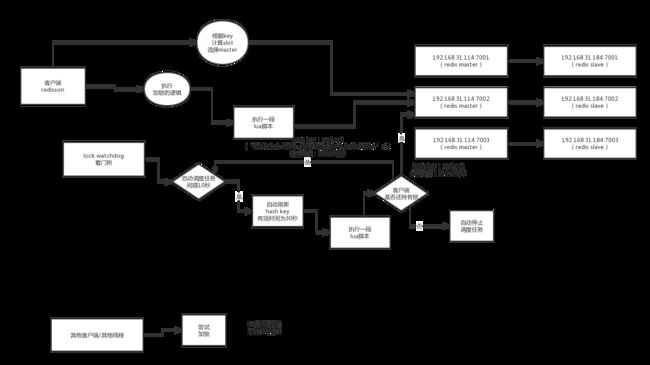
前言
主流的分布式锁一般有三种实现方式:
数据库乐观锁
基于Redis的分布式锁
基于ZooKeeper的分布式锁
之前我在博客上写过关于mysql和redis实现分布式锁的具体方案: https://www.cnblogs.com/wang-meng/p/10226618.html 里面主要是从实现原理出发。
这次【分布式锁】系列文章主要是深入redis客户端reddision源码和zk 这两种分布式锁的实现原理。
可靠性
首先,为了确保分布式锁可用,我们至少要确保锁的实现同时满足以下四个条件:
互斥性。在任意时刻,只有一个客户端能持有锁。
不会发生死锁。即使有一个客户端在持有锁的期间崩溃而没有主动解锁,也能保证后续其他客户端能加锁。
具有容错性。只要大部分的Redis节点正常运行,客户端就可以加锁和解锁。
解铃还须系铃人。加锁和解锁必须是同一个客户端,客户端自己不能把别人加的锁给解了。
Redisson加锁原理
redisson是一个非常强大的开源的redis客户端框架, 官方地址: https://redisson.org/
使用起来很简单,配置好maven和连接信息,这里直接看代码实现:
RLock lock = redisson.getLock("anyLock");

lock.lock();
lock.unlock();
redisson具体的执行加锁逻辑都是通过lua脚本来完成的,lua脚本能够保证原子性。
先看下RLock初始化的代码:
public class Redisson implements RedissonClient {

    @Override
    public RLock getLock(String name) {
        return new RedissonLock(connectionManager.getCommandExecutor(), name);
    }
}

public class RedissonLock extends RedissonExpirable implements RLock {
    public RedissonLock(CommandAsyncExecutor commandExecutor, String name) {
    super(commandExecutor, name);
    this.commandExecutor = commandExecutor;
    this.id = commandExecutor.getConnectionManager().getId();
    this.internalLockLeaseTime = commandExecutor.getConnectionManager().getCfg().getLockWatchdogTimeout();
    this.entryName = id + ":" + name;
}
首先看下RedissonLock 的id返回的是一个UUID对象,每个机器都对应一个自己的id属性,id 值就类似于:"8743c9c0-0795-4907-87fd-6c719a6b4586"
接着往后看lock()的代码实现:
public class RedissonLock extends RedissonExpirable implements RLock {
@Override
public void lock() {
try {
lockInterruptibly();
} catch (InterruptedException e) {
Thread.currentThread().interrupt();
}
}
@Override
public void lockInterruptibly() throws InterruptedException {
lockInterruptibly(-1, null);
}
@Override
public void lockInterruptibly(long leaseTime, TimeUnit unit) throws InterruptedException {
// 获取当前线程id
long threadId = Thread.currentThread().getId();
Long ttl = tryAcquire(leaseTime, unit, threadId);
// lock acquired
if (ttl == null) {
return;
}
RFuture future = subscribe(threadId);
commandExecutor.syncSubscription(future);
try {
while (true) {
ttl = tryAcquire(leaseTime, unit, threadId);
// lock acquired
if (ttl == null) {
break;
}
// waiting for message
if (ttl >= 0) {
getEntry(threadId).getLatch().tryAcquire(ttl, TimeUnit.MILLISECONDS);
} else {
getEntry(threadId).getLatch().acquire();
}
}
} finally {
unsubscribe(future, threadId);
}
}
RFuture tryLockInnerAsync(long leaseTime, TimeUnit unit, long threadId, RedisStrictCommand command) {
internalLockLeaseTime = unit.toMillis(leaseTime);
return commandExecutor.evalWriteAsync(getName(), LongCodec.INSTANCE, command,
"if (redis.call('exists', KEYS[1]) == 0) then " +
  "redis.call('hset', KEYS[1], ARGV[2], 1); " +
  "redis.call('pexpire', KEYS[1], ARGV[1]); " +
  "return nil; " +
"end; " +
"if (redis.call('hexists', KEYS[1], ARGV[2]) == 1) then " +
"redis.call('hincrby', KEYS[1], ARGV[2], 1); " +
"redis.call('pexpire', KEYS[1], ARGV[1]); " +
"return nil; " +
"end; " +
"return redis.call('pttl', KEYS[1]);",
Collections. 这里省略了一些中间代码,这里主要看tryAcquire() 方法,这里传递的过期时间为-1,然后就是当前的线程id,接着就是核心的lua脚本执行流程,我们来一步步看看是如何执行的:
"if (redis.call('exists', KEYS[1]) == 0) then " +
"redis.call('hset', KEYS[1], ARGV[2], 1); " +
"redis.call('pexpire', KEYS[1], ARGV[1]); " +
"return nil; " +
"end; " +
KEYS[1] 参数是:“anyLock”
ARGV[2] 是:“id + ":" + threadId”
首先用的exists 判断redis中是否存在当前key,如果不存在就等于0,然后执行hset指令,将“anyLock id:threadId 1”存储到redis中,最终redis存储的数据类似于:
{
  "8743c9c0-0795-4907-87fd-6c719a6b4586:1":1
}
偷偷说一句,最后面的一个1 是为了后面可重入做的计数统计,后面会有讲解到。
接着往下看,然后使用pexpire设置过期时间,默认使用internalLockLeaseTime为30s。最后返回为null,即时加锁成功。
Redisson 可重入原理
我们看下锁key存在的情况下,同一个机器同一个线程如何加锁的?
"if (redis.call('hexists', KEYS[1], ARGV[2]) == 1) then " +
  "redis.call('hincrby', KEYS[1], ARGV[2], 1); " +
  "redis.call('pexpire', KEYS[1], ARGV[1]); " +
  "return nil; " +
"end; " +
"return redis.call('pttl', KEYS[1]);",
ARGV[2] 是:“id + ":" + threadId”
如果同一个机器同一个线程再次来请求,这里就会是1,然后执行hincrby, hset设置的value+1 变成了2,然后继续设置过期时间。
同理,一个线程重入后,解锁时value - 1
Redisson watchDog原理
如果一个场景:现在有A,B在执行业务,A加了分布式锁,但是生产环境是各种变化的,如果万一A锁超时了,但是A的业务还在跑。而这时由于A锁超时释放,B拿到锁,B执行业务逻辑。这样分布式锁就失去了意义?
所以Redisson 引入了watch dog的概念,当A获取到锁执行后,如果锁没过期,有个后台线程会自动延长锁的过期时间,防止因为业务没有执行完而锁过期的情况。
我们接着来看看具体实现:
private  RFuture tryAcquireAsync(long leaseTime, TimeUnit unit, final long threadId) {
    if (leaseTime != -1) {
        return tryLockInnerAsync(leaseTime, unit, threadId, RedisCommands.EVAL_LONG);
    }
    RFuture ttlRemainingFuture = tryLockInnerAsync(commandExecutor.getConnectionManager().getCfg().getLockWatchdogTimeout(), TimeUnit.MILLISECONDS, threadId, RedisCommands.EVAL_LONG);
    ttlRemainingFuture.addListener(new FutureListener() {
        @Override
        public void operationComplete(Future future) throws Exception {
            if (!future.isSuccess()) {
                return;
            }

            Long ttlRemaining = future.getNow();
            // lock acquired
            if (ttlRemaining == null) {
                scheduleExpirationRenewal(threadId);
            }
        }
    });
    return ttlRemainingFuture;
}
当我们tryLockInnerAsync执行完之后,会添加一个监听器,看看监听器中的具体实现:
protected RFuture renewExpirationAsync(long threadId) {
return commandExecutor.evalWriteAsync(getName(), LongCodec.INSTANCE, RedisCommands.EVAL_BOOLEAN,
"if (redis.call('hexists', KEYS[1], ARGV[2]) == 1) then " +
"redis.call('pexpire', KEYS[1], ARGV[1]); " +
"return 1; " +
"end; " +
"return 0;",
Collections. 这里面调度任务每隔10s钟执行一次,lua脚本中是续约过期时间,使得当前线程持有的锁不会因为过期时间到了而失效
Redisson 互斥性原理
还是看上面执行加锁的lua脚本,最后会执行到:
"return redis.call('pttl', KEYS[1]);",
返回锁还有多久时间过期,我们继续接着看代码:
@Override
public void lockInterruptibly(long leaseTime, TimeUnit unit) throws InterruptedException {
    long threadId = Thread.currentThread().getId();
    Long ttl = tryAcquire(leaseTime, unit, threadId);
    // 返回ttl说明加锁成功,不为空则是加锁失败
    if (ttl == null) {
        return;
    }

    RFuture future = subscribe(threadId);
    commandExecutor.syncSubscription(future);

    try {
        // 死循环去尝试获取锁
        while (true) {
            // 再次尝试加锁
            ttl = tryAcquire(leaseTime, unit, threadId);
            // 如果ttl=null说明抢占锁成功
            if (ttl == null) {
                break;
            }

            // ttl 大于0,抢占锁失败,这个里面涉及到Semaphore,后续会讲解
            if (ttl >= 0) {
                getEntry(threadId).getLatch().tryAcquire(ttl, TimeUnit.MILLISECONDS);
            } else {
                getEntry(threadId).getLatch().acquire();
            }
        }
    } finally {
        unsubscribe(future, threadId);
    }
}
Redisson锁释放原理
直接看lua代码:
protected RFuture unlockInnerAsync(long threadId) {
return commandExecutor.evalWriteAsync(getName(), LongCodec.INSTANCE, RedisCommands.EVAL_BOOLEAN,
// 判断锁key值是否存在
"if (redis.call('exists', KEYS[1]) == 0) then " +
"redis.call('publish', KEYS[2], ARGV[1]); " +
"return 1; " +
"end;" +
// 判断当前机器、当前线程id对应的key是否存在
"if (redis.call('hexists', KEYS[1], ARGV[3]) == 0) then " +
"return nil;" +
"end; " +
// 计数器数量-1 可重入锁
"local counter = redis.call('hincrby', KEYS[1], ARGV[3], -1); " +
// 如果计数器大于0,说明还在持有锁
"if (counter > 0) then " +
"redis.call('pexpire', KEYS[1], ARGV[2]); " +
"return 0; " +
"else " +
// 使用del指令删除key
"redis.call('del', KEYS[1]); " +
"redis.call('publish', KEYS[2], ARGV[1]); " +
"return 1; "+
"end; " +
"return nil;",
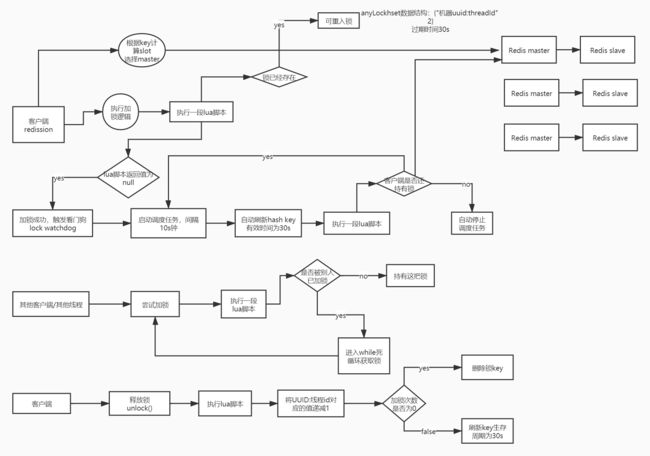
Arrays. 总结
一图总结:
转载地址:https://www.cnblogs.com/wang-meng/p/12525029.html

