【网盘项目日志】20210528:Seafile 搜索系统开发日志(3)
终于弄完了,以下内容是补档了。如果后续又发现了 BUG 的话,也会在这里直接写出来的。
文章目录
-
- 运行 Elastic Search
- The Ohhhhhhhhh Moment
- 自动索引文件的问题
运行 Elastic Search
既然当时我们在 Pro 那个文件夹里发现了 Elastic Search 2017 版,那我们就直接把它运行起来好了。
运行之前,先安装 JDK。在这里,我选择 JDK 11,在 Ubuntu 上用以下命令安装:
apt install openjdk-11-jdk
然后开起来。
不过由于是在 Docker 环境里,默认是 root 用户,而 Elastic Search 似乎并不允许在 root 用户的模式下运行:
root@ad7699681c76:~/dev/source-code/pro/elasticsearch/bin# ./elasticsearch
OpenJDK 64-Bit Server VM warning: Option AssumeMP was deprecated in version 10.0 and will likely be removed in a future release.
OpenJDK 64-Bit Server VM warning: Option UseConcMarkSweepGC was deprecated in version 9.0 and will likely be removed in a future release.
[2021-05-27T22:15:36,196][WARN ][o.e.b.ElasticsearchUncaughtExceptionHandler] [] uncaught exception in thread [main]
org.elasticsearch.bootstrap.StartupException: java.lang.RuntimeException: can not run elasticsearch as root
	at org.elasticsearch.bootstrap.Elasticsearch.init(Elasticsearch.java:136) ~[elasticsearch-5.6.13.jar:5.6.13]
	at org.elasticsearch.bootstrap.Elasticsearch.execute(Elasticsearch.java:123) ~[elasticsearch-5.6.13.jar:5.6.13]
	at org.elasticsearch.cli.EnvironmentAwareCommand.execute(EnvironmentAwareCommand.java:70) ~[elasticsearch-5.6.13.jar:5.6.13]
	at org.elasticsearch.cli.Command.mainWithoutErrorHandling(Command.java:134) ~[elasticsearch-5.6.13.jar:5.6.13]
	at org.elasticsearch.cli.Command.main(Command.java:90) ~[elasticsearch-5.6.13.jar:5.6.13]
	at org.elasticsearch.bootstrap.Elasticsearch.main(Elasticsearch.java:91) ~[elasticsearch-5.6.13.jar:5.6.13]
	at org.elasticsearch.bootstrap.Elasticsearch.main(Elasticsearch.java:84) ~[elasticsearch-5.6.13.jar:5.6.13]
Caused by: java.lang.RuntimeException: can not run elasticsearch as root
	at org.elasticsearch.bootstrap.Bootstrap.initializeNatives(Bootstrap.java:106) ~[elasticsearch-5.6.13.jar:5.6.13]
	at org.elasticsearch.bootstrap.Bootstrap.setup(Bootstrap.java:195) ~[elasticsearch-5.6.13.jar:5.6.13]
	at org.elasticsearch.bootstrap.Bootstrap.init(Bootstrap.java:342) ~[elasticsearch-5.6.13.jar:5.6.13]
	at org.elasticsearch.bootstrap.Elasticsearch.init(Elasticsearch.java:132) ~[elasticsearch-5.6.13.jar:5.6.13]
	... 6 more
那好办,先创建一个专属用户,并创建好用户个人目录:
groupadd es
useradd es -g es
passwd es
mkdir /home/es
cp /root/dev/source-code/pro/elasticsearch /home/es/
chown -R es /home/es
然后通过 su 命令切换用户。
su es
然后启动 Elastic search:
cd /home/es/elasticsearch/bin
./elasticsearch
运行起来以后出现一些问题,每次都是运行起来一段时间后,爆 Killed 错误:
......

[2021-05-27T22:23:56,353][INFO ][o.e.p.PluginsService     ] [iySZVYx] loaded module [transport-netty4]
[2021-05-27T22:23:56,355][INFO ][o.e.p.PluginsService     ] [iySZVYx] loaded plugin [analysis-ik]
[2021-05-27T22:24:02,654][INFO ][o.e.d.DiscoveryModule    ] [iySZVYx] using discovery type [zen]
[2021-05-27T22:24:10,658][INFO ][o.e.n.Node               ] initialized
[2021-05-27T22:24:10,663][INFO ][o.e.n.Node               ] [iySZVYx] starting ...
[2021-05-27T22:24:22,143][INFO ][o.e.t.TransportService   ] [iySZVYx] publish_address {
     127.0.0.1:9300}, bound_addresses {
     127.0.0.1:9300}
[2021-05-27T22:24:30,368][INFO ][o.e.c.s.ClusterService   ] [iySZVYx] new_master {
     iySZVYx}{
     iySZVYxTSRaOOR9WciRWKQ}{
     tOz6CdphTnedm25XqPPiCg}{
     127.0.0.1}{
     127.0.0.1:9300}, reason: zen-disco-elected-as-master ([0] nodes joined)
[2021-05-27T22:24:31,898][INFO ][o.e.h.n.Netty4HttpServerTransport] [iySZVYx] publish_address {
     127.0.0.1:9200}, bound_addresses {
     127.0.0.1:9200}
[2021-05-27T22:24:31,942][INFO ][o.e.n.Node               ] [iySZVYx] started
[2021-05-27T22:24:35,322][INFO ][o.e.g.GatewayService     ] [iySZVYx] recovered [0] indices into cluster_state
Killed
很奇怪。而且就算是在没有被 Kill 的期间内,服务也无法访问到。从网上找到材料以后,发现可能是 JVM 的内存设置过大,而电脑并没有这么高的配置,导致了一些错误。
根据网上找到的资料,打开 /home/es/elasticsearch/config/jvm.options 文件,并找到其中的字段:
-Xms1g
-Xmx1g
-XX:-AssumeMP
将其改成
-Xms512m
-Xmx512m
-XX:-AssumeMP
然后再启动,速度变快了,不会被自动 Kill 了,而且也能正常被外网访问了。
The Ohhhhhhhhh Moment
按照所给的文档,我们先手动进行一次文件索引。
首先前往 pro/python/seafes 文件夹。按照提示把复制一份 run.sh.template 命名为 run.sh,根据文档配置完毕:
export PYTHONPATH=/usr/local/lib/python3.6/site-packages/:/root/dev/source-code/seahub/thirdpart:$PYTHONPATH
export PYTHONPATH=/root/dev/source-code:/root/dev/source-code/pro/python:$PYTHONPATH

export SEAHUB_DIR=/root/dev/source-code/seahub
export CCNET_CONF_DIR=/root/dev/conf
export SEAFILE_CONF_DIR=/root/dev/seafile-data
export EVENTS_CONFIG_FILE=/root/dev/conf/seafevents.conf

if [[ $# == 1 && $1 == "clear" ]]; then
    python -m seafes.index_local --loglevel debug clear
else
    python -m seafes.index_local --loglevel debug update
fi
然后运行 run.sh,也可以看到文件索引正常进行了:
05/27/2021 23:07:53 [INFO] seafes:208 main: storage: using filesystem storage backend
05/27/2021 23:07:53 [INFO] seafes:210 main: index office pdf: True
05/27/2021 23:07:56 [INFO] seafes:161 start_index_local: Index process initialized.
05/27/2021 23:07:56 [INFO] seafes:46 run: starting worker0 worker threads for indexing
05/27/2021 23:07:56 [INFO] seafes:46 run: starting worker1 worker threads for indexing
05/27/2021 23:07:58 [INFO] seafes:84 update_repo: Updating repo e0ebda1f-0fc2-4ed9-872b-f9a7d0b75ed6
05/27/2021 23:07:58 [DEBUG] seafes:86 update_repo: latest_commit_id: bc66a19bf2d8733afaac037d3ed00e17b752ffac, status.from_commit: None
05/27/2021 23:07:58 [INFO] seafes:84 update_repo: Updating repo 459c0c12-a7bd-42bd-880f-672e3ed3c8af
05/27/2021 23:07:58 [DEBUG] seafes:86 update_repo: latest_commit_id: ebceecf817371abfd08cc119cc1d05538c0b00ac, status.from_commit: None

......

05/27/2021 23:08:00 [INFO] seafes:131 clear_deleted_repo: start to clear deleted repo
05/27/2021 23:08:00 [INFO] seafes:135 clear_deleted_repo: 0 repos need to be deleted.
05/27/2021 23:08:00 [INFO] seafes:139 clear_deleted_repo: deleted repo has been cleared
05/27/2021 23:08:00 [INFO] seafes:164 start_index_local:

Index updated, statistic report:

05/27/2021 23:08:00 [INFO] seafes:165 start_index_local: [commit read] 7
05/27/2021 23:08:00 [INFO] seafes:166 start_index_local: [dir read]    6
05/27/2021 23:08:00 [INFO] seafes:167 start_index_local: [file read]   9
05/27/2021 23:08:00 [INFO] seafes:168 start_index_local: [block read]  9
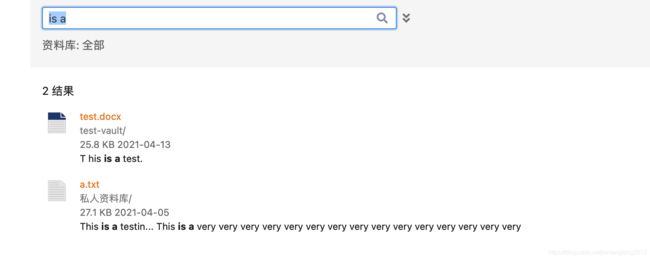
弄完以后,再打开搜索界面,我们事先准备了两个文件,里面包含 is a 关键字。激动的心,颤抖的手,然后——
Ohhhhhhhhhhhhhhhhhhhhhhhhhhhhhhhhhh!
成功了!!!
自动索引文件的问题
完成上面的测试以后,我又测试了一下当文件改动后,搜索系统的变化,结果发现新增的内容并没有被展现出来。
根据网上资料,我发现 Seafile 的搜索索引是周期更新的,默认设置是 10 分钟更新一次。
于是我就傻傻等了 10 分钟,发现什么也没发生,这时我意识到事情有些不对劲。
我回想起了当时从 Pro 里面白嫖到的 seafevents,我当时猜测它与后端数据库有关。不过我今天又进行了一些研究,发现它其实是与周期任务有关的。因为在它的代码里,我找到这些片段:
def start(self):
        logging.info('Starting background tasks.')

        self._file_updates_sender.start()

        if self._work_weixin_notice_sender.is_enabled():
            self._work_weixin_notice_sender.start()
        else:
            logging.info('work weixin notice sender is disabled')

        if self._index_updater.is_enabled():
            self._index_updater.start()
        else:
            logging.info('search indexer is disabled')
            ......
还有更多片段就不放出来了。种种迹象表明,seafevents 应该是一个周期任务执行器,根据这些代码我发现它不仅与文件的索引相关,而且还和邮件发送、数据审计、病毒扫描等功能相关。
幸运的是,我又在 seafevents 的目录中发现了文档。根据文档,我们先配置好 run.sh。不过我发现一个小问题,这是 seafevents 的目录:
打开以后,发现里面有个 events.conf.template 文件。打开一看,正是先前坑害了我的 seafevents.conf 旧版。而打开了 run.sh.template 以后,我们还发现了通过进程检测 ccnet 是否启动的语句。但是根据文档,ccnet 早就在 5.0 版本以后被整合到了 seafile-server 中,那么这条语句注定也是无用的了。可见,这一小部分的版本管理和文档管理确实有点乱。
不过,完成了配置,运行起来以后,一切正常了。10 分钟后,文件索引被自动更新,搜索那里也能够找到最新的内容了。
就这样,整合 Elastic Search 的任务圆满完成了。

