Android项目使用Protobuf教程(结合Retrofit+RxJava及HttpURLConnection使用)
最近项目中使用到了protobuf,但是网上的关于protobuf在android中的使用教程是非常的少,Protobuf结合Retrofit+RxJava使用的教程几乎也没有,即使有相关介绍写得也不够全面,于是才有了这篇相对比较完整的文章(包括服务端和App端代码),希望可以帮助更多的人在android中使用protobuf。
请尊重原创,转载需要注明出处,大力哥的博客:https://blog.csdn.net/qq137722697
什么是Protobuf
Protobuf (全称 Protocol Buffers),是Google公司开发的一种数据描述语言,类似于XML能够将结构化数据序列化,可用于数据存储、通信协议等方面【Protobuf百度百科介绍】。简单点来说就是类似于Json、Xml,最主要的优点是比Json、Xml速度快,相信不久的将来应用会更加广泛。
以上只是简单的介绍,为了方便快速进入使用教程,本文默认你已经知道protobuf是什么、优缺点、应用场景、定义消息类型等,如未了解这些可参考以下文档:
- 中文版:Protobuf3语言指南(https://blog.csdn.net/u011518120/article/details/54604615)
- 英文版:Language Guide (proto3) (https://developers.google.com/protocol-buffers/docs/proto3?hl=zh-cn#generating)
Demo介绍
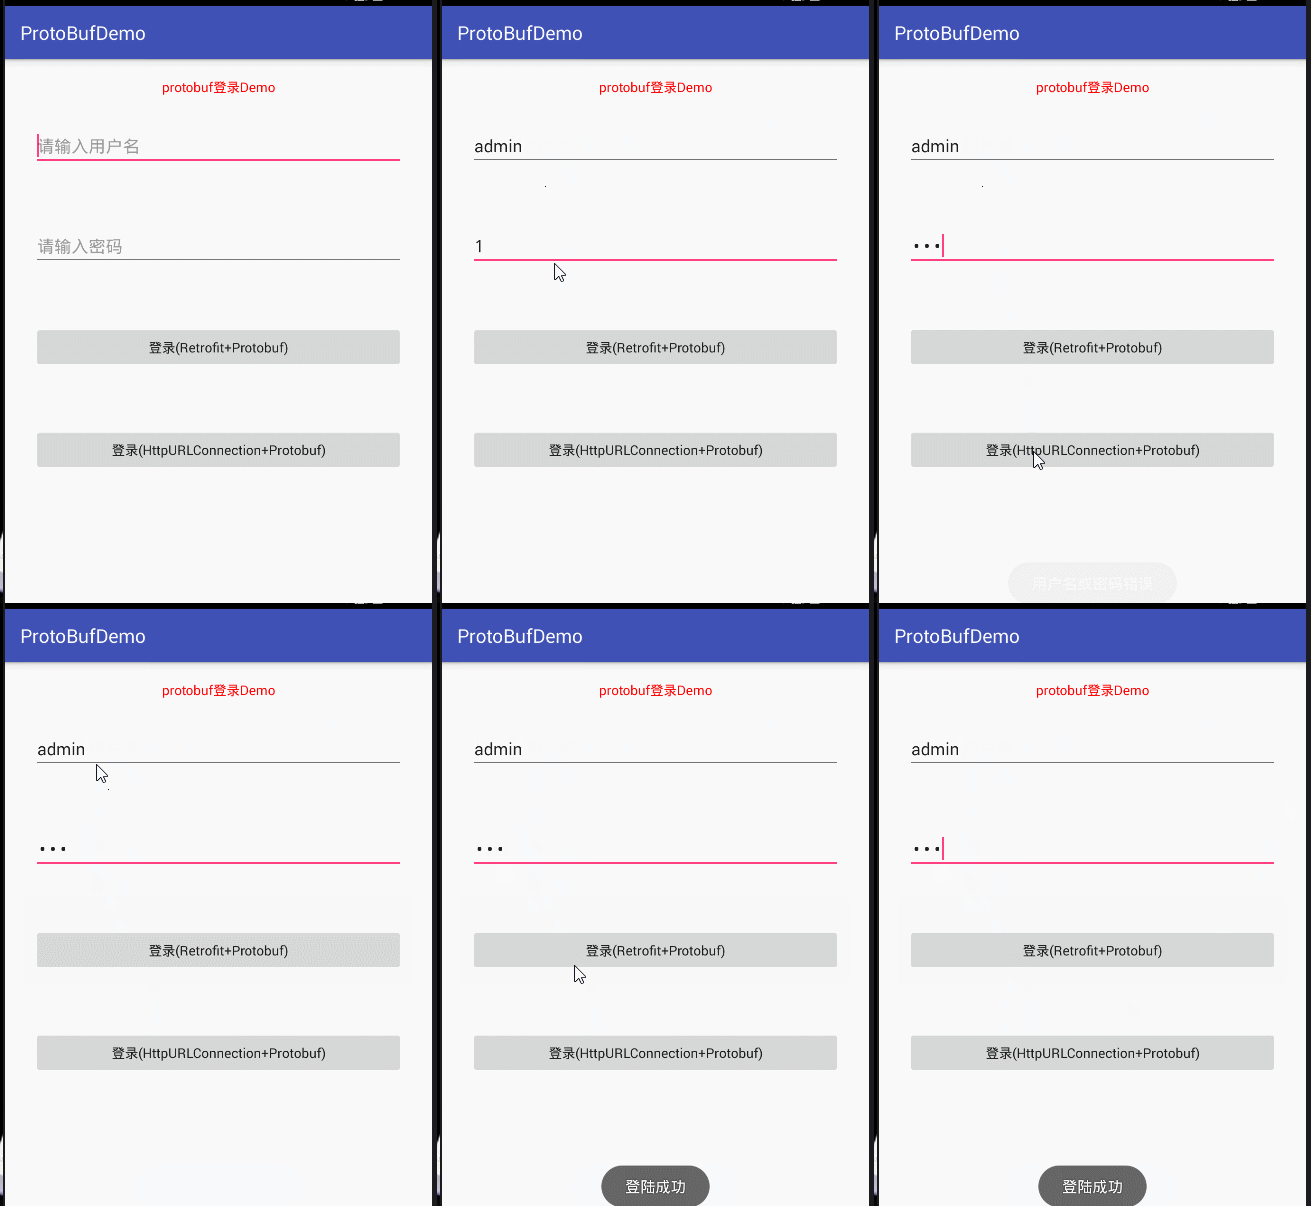
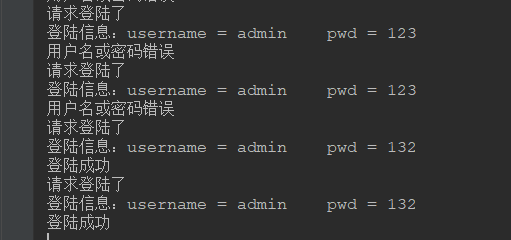
本文以用户登录为例(为啥又是登录?因为简单,容易理解呀),下面是demo的效果图:
app端:
服务端:
下面开始介绍如何实现
搭建.proto文件生成java类的环境
android中使用protobuf,过程是这样的:
- 1、定义proto文件;
- 2、使用该文件生成对应的java类;
- 3、利用该java类实现数据传输;
从以上过程中就可以看出,我们并不是直接使用proto文件,而是对应的java类,如何根据proto文件生成java类呢?官方推荐的是命令行的方式生成,但是Android Studio生成方式更加简单,这里直接介绍as生成方式(同样适用服务端开发工具intellij idea)
第一步
AS创建protobuf生成项目(用于专门生成对应的类),这里叫ProtobufGenerator
第二步
在根Project/build.gradle中加入protobuf插件
buildscript {
    repositories {
        google()
        jcenter()
    }
    dependencies {
        classpath 'com.android.tools.build:gradle:3.0.1'
        classpath 'com.google.protobuf:protobuf-gradle-plugin:0.8.2' //as3.0以下的要0.8.0版本
    }
}
第三步
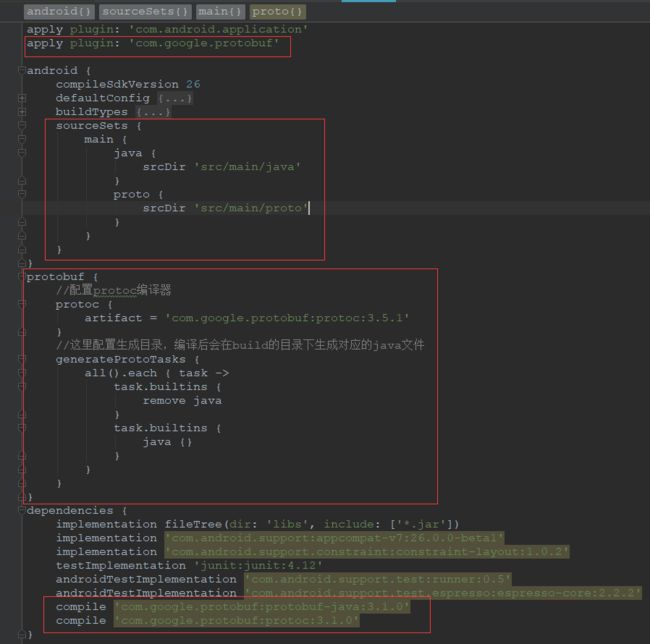
在app/build.gradle中加入如下配置,底部加上
apply plugin: 'com.google.protobuf'
android{}中加入
sourceSets {
        main {
            java {
                srcDir 'src/main/java'
            }
            proto {
                srcDir 'src/main/proto'
            }
        }
    }
android{}同级加入:
protobuf {
    //配置protoc编译器
    protoc {
        artifact = 'com.google.protobuf:protoc:3.5.1'
    }
    //这里配置生成目录,编译后会在build的目录下生成对应的java文件
    generateProtoTasks {
        all().each { task ->
            task.builtins {
                remove java
            }
            task.builtins {
                java {}
            }
        }
    }
}
dependencies中加入protobuf相关依赖
    compile 'com.google.protobuf:protobuf-java:3.1.0'
    compile 'com.google.protobuf:protoc:3.1.0'
大致结构如下:
第四步
同步项目
第五步
安装proto支持插件,Settings-->Plugins-->搜索protobuf-->找到Protobuf Support点击安装,重启as即可,此时porto文件会有一个彩环,并且编写proto文件时也会有相应的提示
第六步
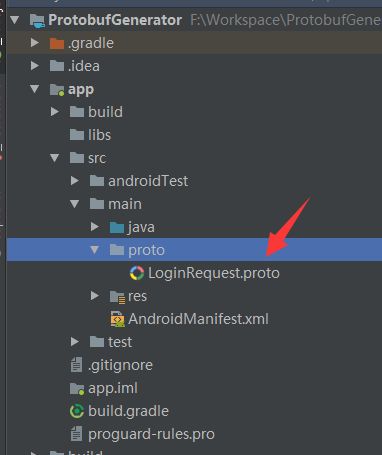
在app\src\main目录中新建proto文件夹,并新建对应的proto文件,这里以LoginRequest.proto为例
LoginRequest.proto文件内容为:
syntax = "proto3";
//生成的java类所在的包名
package com.zhys.protobufdemo;

//登录请求结构体
message LoginRequest {
    string username = 1;
    string pwd = 2;
}
//登录响应结构体
message LoginResponse {
    int32 code = 1;
    string msg = 2;
}
第七步
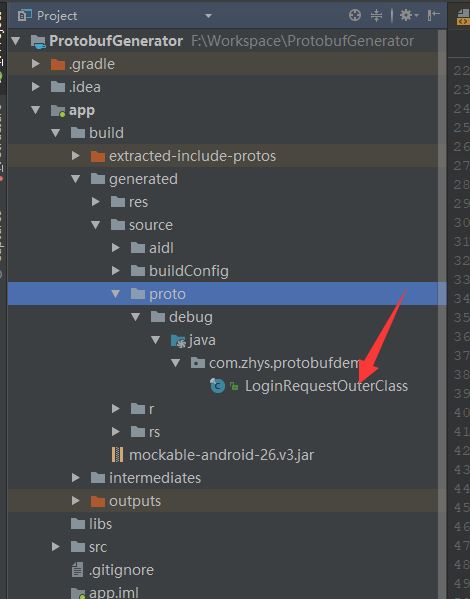
Build/Clean Project跑完即可,此时会在\app\build\generated\source\proto中生成对应的java文件,拷出来备用。
搭建服务端环境【可选,次步骤为服务端人员开发】
添加protobuf的jar包
本例使用intellij idea创建web项目(Eclipse类似),需要添加proto的jar包
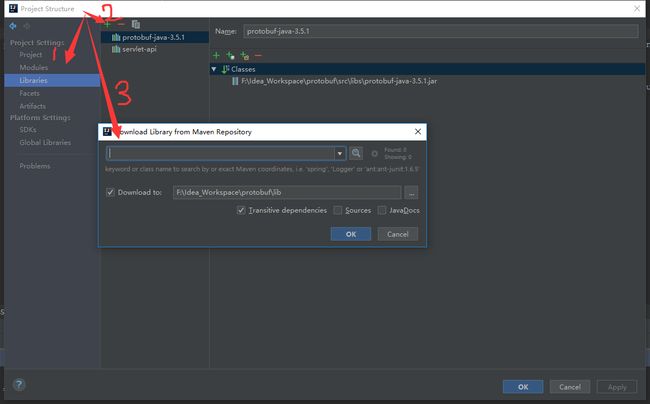
方式一:maven添加protobuf,搜索protobuf即可
方式二:直接添加jar包,下载地址-->github的demo中有相关jar包
对外提供登录接口
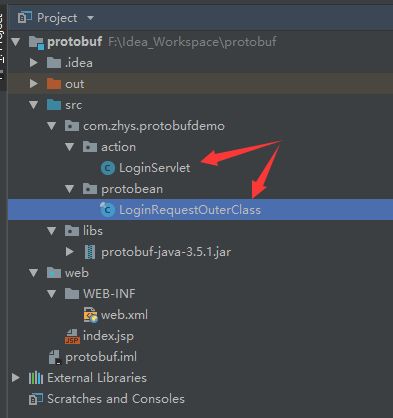
将上一步骤中生成的LoginRequestOuterClas.java拷贝到本项目中,创建LoginServlet.java
LoginServlet.java的代码为:
//次注解需要tomcat7及以上不能才可以运行
@WebServlet("/login.action")
public class LoginServlet extends HttpServlet {
    @Override
    protected void doGet(HttpServletRequest request, HttpServletResponse response) throws ServletException, IOException {
        doPost(request, response);
    }

    @Override
    protected void doPost(HttpServletRequest request, HttpServletResponse response) throws ServletException, IOException {
        System.out.println("请求登陆了");
        request.setCharacterEncoding("utf-8");
        response.setCharacterEncoding("utf-8");
        LoginRequestOuterClass.LoginRequest loginRequest = LoginRequestOuterClass.LoginRequest.parseFrom(request.getInputStream());
        System.out.println("登陆信息:username = " + loginRequest.getUsername() + "\tpwd = " + loginRequest.getPwd());
        LoginRequestOuterClass.LoginResponse.Builder builder = LoginRequestOuterClass.LoginResponse.newBuilder();
        if ("admin".equals(loginRequest.getUsername()) && "132".equals(loginRequest.getPwd())) {
            builder.setCode(0);
            builder.setMsg("登陆成功");
            System.out.println("登陆成功");
        } else {
            builder.setCode(1001);
            builder.setMsg("用户名或密码错误");
            System.out.println("用户名或密码错误");
        }
       builder.build().writeTo(response.getOutputStream());
    }
}
此类的逻辑也非常简单,接收客户端请求的数据,将其转换为loginRequest对象,这里使用parseFrom(inputsteam)方法;简单的判断一下用户名是否为admin,密码是否为132【实际项目肯定没有这么简单】,最后将LoginResponse对象返回给客户端即可。
Android端Protobuf结合HttpURLConnection使用
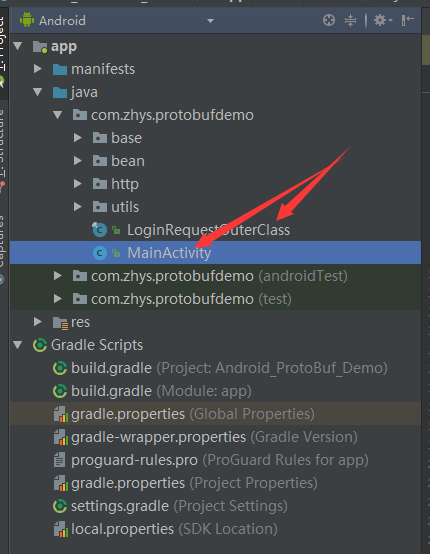
创建一个Android Studio项目(本项目叫Android_Protobuf_Demo),同样的需要将LoginRequestOuterClas.java拷贝到本项目中,大致目录结构如下:
在app/build.gradle中添加本demo需要使用到的依赖:
compile 'com.google.protobuf:protobuf-java:3.5.1'
compile 'com.google.protobuf:protoc:3.1.0'
布局文件activity_main.xml(效果图见文章开始的效果演示)
Protobuf结合HttpURLConnection的写法,网络请求的实质还是将数据放到body中进行请求,只需要将LoginRquest对象.toByteArray()作为body即可,此处抽取一个登陆的方法:
/**
     * 开始登录(基于HttpURLConnection)
     *
     * @param data
     */
    public void login(final byte[] data) {
        new Thread() {
            @Override
            public void run() {
                OutputStream os = null;
                try {
                    URL url = new URL("http://192.168.0.162:8080/protobuf//login.action");
                    HttpURLConnection conn = (HttpURLConnection) url.openConnection();
                    conn.setRequestMethod("POST");
                    os = conn.getOutputStream();
                    os.write(data);
                    if (conn.getResponseCode() == 200) {
                        //解析结果
                        final LoginRequestOuterClass.LoginResponse loginResponse = LoginRequestOuterClass.LoginResponse.parseFrom(conn.getInputStream());
                        ELog.e("登陆结果:code = " + loginResponse.getCode() + "\tmsg = " + loginResponse.getMsg());
                        runOnUiThread(new Runnable() {
                            @Override
                            public void run() {
                                Toast.makeText(MainActivity.this, loginResponse.getMsg(), Toast.LENGTH_SHORT).show();
                            }
                        });
                    }
                } catch (MalformedURLException e) {
                    e.printStackTrace();
                } catch (IOException e) {
                    e.printStackTrace();
                } finally {
                    try {
                        if (os != null) {
                            os.close();
                        }
                    } catch (IOException e) {
                        e.printStackTrace();
                    }
                }
                runOnUiThread(new Runnable() {
                    @Override
                    public void run() {
                        progressDialog.dismiss();
                    }
                });
            }
        }.start();
    }
本方法接收一个byte数组,将该数组作为body请求指定的接口,并解析服务器回复的结果,提示相应的信息。
那如何将LoginRequest作为byte数组呢?其实该类已经自动生成该方法了
 public void onLogin1(View view) {
        progressDialog.show();//显示加载框
        //获取用户输入的用户名和密码
        String username = etUsername.getText().toString().trim();
        String pwd = etPwd.getText().toString().trim();
        //构造LoginRequest对象
        LoginRequestOuterClass.LoginRequest loginRequest = LoginRequestOuterClass.LoginRequest.newBuilder().setUsername(username).setPwd(pwd).build();
       //登陆
        login(loginRequest.toByteArray());
    }
运行点击登录按钮即可,再看一次效果图
Android端Protobuf结合Retrofit+RxJava使用
继续上面的项目中编写此逻辑代码,还需要在app/build.gradle中添加retrofit相关的依赖
   compile 'com.squareup.okhttp3:logging-interceptor:3.4.1'
    compile 'com.squareup.retrofit2:converter-protobuf:2.4.0'
    compile 'io.reactivex.rxjava2:rxjava:2.0.1'
    compile 'io.reactivex.rxjava2:rxandroid:2.0.1'
    compile 'com.squareup.retrofit2:retrofit:2.0.0'
    compile 'com.squareup.retrofit2:converter-gson:2.0.0'
    compile 'com.jakewharton.retrofit:retrofit2-rxjava2-adapter:1.0.0'
    compile 'com.google.code.gson:gson:2.7'
我们先来看看最终调用的形式:
/**
     * 登录
     *
     * @param view
     */
    public void onLogin(View view) {
        progressDialog.show();
        String username = etUsername.getText().toString().trim();
        String pwd = etPwd.getText().toString().trim();
        //开始请求
        HttpSend.getInstance().login(username,pwd, new ResultCallbackListener() {
            @Override
            public void onSubscribe(Disposable d) {
            }

            @Override
            public void onNext(LoginRequestOuterClass.LoginResponse value) {
                ELog.e("登陆结果:code = " + value.getCode() + "\tmsg = " + value.getMsg());
                Toast.makeText(MainActivity.this, value.getMsg(), Toast.LENGTH_SHORT).show();
            }

            @Override
            public void onError(Throwable e) {
                e.printStackTrace();
                ELog.e("e-->"+e.getMessage());
            }

            @Override
            public void onComplete() {
                progressDialog.dismiss();
            }
        });
    }
可以看到这里做了一层封装(可不用封装,根据自己的编码习惯来),封装的好处就是:调用者只需要传入指定的参数,得到调用结果即可。下面我们来看看是如何封装的,先来看看HttpSend是怎么写的
/**
 * 网络发送器
 * Created by HDL on 2018/8/13.
 *
 * @author HDL
 */

public class HttpSend {
    private static HttpSend mHttpSend;
    private ApiService apiService;

    private HttpSend() {
    }

    public static HttpSend getInstance() {
        if (mHttpSend == null) {
            synchronized (HttpSend.class) {
                if (mHttpSend == null) {
                    mHttpSend = new HttpSend();
                }
            }
        }
        return mHttpSend;
    }

    /**
     * 初始化上下文对象
     *
     * @param context
     */
    public void initContext(Context context) {
        HttpConfiger.getInstance().initContext(context.getApplicationContext());
        apiService = HttpConfiger.getInstance().getRetrofit().create(ApiService.class);
    }

    /**
     * 用户登陆
     *
     * @param username 用户名
     * @param pwd 密码
     * @param subscriber
     */
    public void login(String username, String pwd, ResultCallbackListener subscriber) {
        //构建请求信息
        LoginRequestOuterClass.LoginRequest loginRequest = LoginRequestOuterClass.LoginRequest.newBuilder().setUsername(username).setPwd(pwd).build();
        //将loginrequest作为流(body)的形式
        RequestBody parms = RequestBody.create(MediaType.parse("application/octet-stream"), loginRequest.toByteArray());
        Observable login = apiService.login(parms);
        HttpConfiger.getInstance().toSubscribe(login).subscribe(subscriber);
    }
}
可以看到该类就是一个单列模式,对外提供了一个初始化和登录的方法(还有其他接口在此处添加即可),登录接口也只需要传入用户名、密码已经请求过程回调ResultCallbackListener类,充分减少了使用者的工作量。
再来看看Retrofit都会有的接口类(此处叫ApiService):
/**
 * 所有的web接口都在此
 * @author HDL
 */
public interface ApiService {
    /**
     * 登录
     * @return
     */
    @POST("login.action")
    Observable login(@Body RequestBody bytes);
}
可以看到使用到了@Body注解,也就是将参数作为body来请求。
再来看看最主要的HttpConfiger如何编写
/**
 * http请求配置项
 *
 * @author HDL
 */
public class HttpConfiger {
    /**
     * 读取超时时间
     */
    private static final int DEFAULT_READ_TIMEOUT = 60;
    /**
     * 链接超时时间
     */
    private static final int DEFAULT_CONN_TIMEOUT = 10;
    /**
     * 上传超时时间
     */
    private static final int DEFAULT_WRITE_TIMEOUT = 5 * 60;
    /**
     * 请求地址
     */
    private String url = "http://192.168.0.162:8080/protobuf/";
    /**
     * 上下文对象,用来对sp做存取管理
     */
    private Context context;
    /**
     * retrofit对象
     */
    private Retrofit retrofit;
    private Retrofit.Builder retrofitBuilder;

    private static HttpConfiger mHttpConfiger;

    private HttpConfiger() {
    }
    public static HttpConfiger getInstance() {
        if (mHttpConfiger == null) {
            synchronized (HttpConfiger.class) {
                if (mHttpConfiger == null) {
                    mHttpConfiger = new HttpConfiger();
                }
            }
        }
        return mHttpConfiger;
    }
    /**
     * 注册 OkHttp和Retrofit
     *
     * @param context
     */
    public void initContext(Context context) {
        this.context = context.getApplicationContext();
        initHttp();
    }
    private void initHttp() {
        OkHttpClient.Builder httpBuilder = new OkHttpClient.Builder()
                .connectTimeout(DEFAULT_CONN_TIMEOUT, TimeUnit.SECONDS)//连接超时时间
                .readTimeout(DEFAULT_READ_TIMEOUT, TimeUnit.SECONDS)//读取超时时间设置
                .writeTimeout(DEFAULT_WRITE_TIMEOUT, TimeUnit.SECONDS)//写入超时时间设置
                .addInterceptor(httpInterceptor)//添加拦截器
                .retryOnConnectionFailure(true)//错误重连
                .hostnameVerifier(new HostnameVerifier() {//无条件信任所有证书
                    @Override
                    public boolean verify(String s, SSLSession sslSession) {
                        return true;
                    }
                });
        //只有debug版本打印网络请求日志
        if (HUtils.isDebug(context)) {
            httpBuilder.addInterceptor(new HttpLoggingInterceptor().setLevel(HttpLoggingInterceptor.Level.BODY));
        }
        ExtensionRegistry registry = ExtensionRegistry.newInstance();
        retrofitBuilder = new Retrofit.Builder()
                .client(httpBuilder.build())
                .baseUrl(url)//设置域名
                .addConverterFactory(ProtoConverterFactory.createWithRegistry(registry))//一定要在gsonconvert的前面
                .addConverterFactory(GsonConverterFactory.create())//设置Json数据的转换器为Gson
                .addCallAdapterFactory(RxJava2CallAdapterFactory.create());//添加RxJava适配器
        retrofit = retrofitBuilder.build();
    }

    /**
     * 切换域名
     *
     * @param url
     */
    public void convertServiceHub(String url) {
        this.url = url;
        retrofitBuilder.baseUrl(url);
    }
    /**
     * 获取域名
     *
     * @return
     */
    public String getUrl() {
        return url;
    }
    public Retrofit getRetrofit() {
        return retrofit;
    }

    /**
     * 统一线程处理 HTTP 请求
     *
     * @param
     * @param observable
     */
    public  Observable toSubscribe(Observable observable) {
        return observable.subscribeOn(Schedulers.io())
                .unsubscribeOn(Schedulers.io())
                .observeOn(AndroidSchedulers.mainThread());
    }

    /**
     * 创建拦截器
     */
    private Interceptor httpInterceptor = new Interceptor() {
        @Override
        public Response intercept(Chain chain) throws IOException {
            Request request = addPublicParameter(chain.request());
            Response response = chain.proceed(request);
            return response;
        }
    };

    /**
     * 给拦截器request路径添加公共参数
     *
     * @param request
     * @return
     */
    private Request addPublicParameter(Request request) {
        String timestamp = String.valueOf(System.currentTimeMillis());
        HttpUrl.Builder builder = request
                .url()
                .newBuilder()
                .addQueryParameter("timestamp",timestamp);//添加公共参数(每个接口都携带的参数,还可以继续add)
        ELog.e("url = " + builder.build());
        Request newRequest = request
                .newBuilder()
                .method(request.method(), request.body())
                .url(builder.build())
                .build();
        return newRequest;
    }
}
本类主要就是对外提供一个配置了各种参数的Retrofit对象,注释相对详细可自行理解,需要注意的地方就是添加转换器的时候protobuf转换器要在gson转换器之前,并且需要传入一个proto的Registry对象,即:
   .addConverterFactory(ProtoConverterFactory.createWithRegistry(registry))//一定要在gsonconvert的前面
   .addConverterFactory(GsonConverterFactory.create())//设置Json数据的转换器为Gson
ResultCallbackListener类就更简单了,是一个继承自Observer,没有什么自己的方法,纯粹是为了可读性而创建的类
public interface ResultCallbackListener extends Observer {
}
本文的教程基本结束了,你会了吗?
下面贴出demo地址,如有疑问可在本文评论中提出,也可以到github中提issue
https://github.com/huangdali/Android_ProtoBuf_Demo
如果此教程帮助到你,请到上面的地址来个star,更欢迎你的fork
