注意HBase查询结果的排列顺序:All data model operations HBase return data in sorted order. First by row, then by ColumnFamily, followed by column qualifier, and finally timestamp (sorted in reverse, so newest records are returned first,即Timestamp列是由大到小的顺序,而rowkey、列簇和列限定名是升序的)
一、非交互模式(non-interactive mode)
HBase Shell -n
1. 使用echo 和 |
1.1 例1
yay@yay-ThinkPad-T470-W10DG:~$ echo "describe 'tabletest1'" | hbase shell -n
Table tabletest1 is ENABLED
tabletest1
COLUMN FAMILIES DESCRIPTION
{NAME => 'cf1', BLOOMFILTER => 'ROW', VERSIONS => '1', IN_MEMORY => 'false', KEE
P_DELETED_CELLS => 'FALSE', DATA_BLOCK_ENCODING => 'NONE', TTL => 'FOREVER', COM
PRESSION => 'NONE', MIN_VERSIONS => '0', BLOCKCACHE => 'true', BLOCKSIZE => '655
36', REPLICATION_SCOPE => '0'}
1 row(s) in 0.3410 seconds

nil
yay@yay-ThinkPad-T470-W10DG:~$
例2 屏蔽输出(包括错误日志)
说明:
shell上:
0表示标准输入
1表示标准输出
2表示标准错误输出
> 默认为标准输出重定向,与 1> 相同
2>&1 意思是把 标准错误输出 重定向到 标准输出.
&>file 意思是把 标准输出 和 标准错误输出 都重定向到文件file中
yay@yay-ThinkPad-T470-W10DG:~$ echo "describe 'tabletest1'" | hbase shell -n > /dev/null 2>&1
yay@yay-ThinkPad-T470-W10DG:~$
解释:
1。dev/null是一个文件,这个文件比较特殊,所有传给它的东西它都丢弃掉(To suppress all output)
2。>/dev/null 表示标准输出会重定向到/dev/null,那么>/dev/null 2>&1则表示:标准错误重定向到标准输出,标准输出又重定向到/dev/null,即所有输出都屏蔽掉
例3 用shell script
Bash 把一command的执行结果存储在一个特别的环境变量里面:$?
nhbaseshell.sh:
#!/bin/bash
echo "describe 'tabletest1'" | ./hbase shell -n > /dev/null 2>&1
status=$?
echo "The status was " $status
if ($status == 0); then
echo "The command succeeded"
else
echo "The command may have failed."
fi
return $status
当然,有时候单纯的非0表示失败粒度有点粗,并不一定真的是命令失败,比如命令是成功的,但是client失去了connectivity, 或者 some other event obscured its success. 这是由于 RPC commands 是无状态的. 此时唯一确定操作状态的方法是去check. 比如, 你的脚本是创建一个table, 但是返回了非0值,则在再次创建这个表之前,你需要检查这个表是否真的已经创建
二、从一个Command File读取HBase Shell 命令
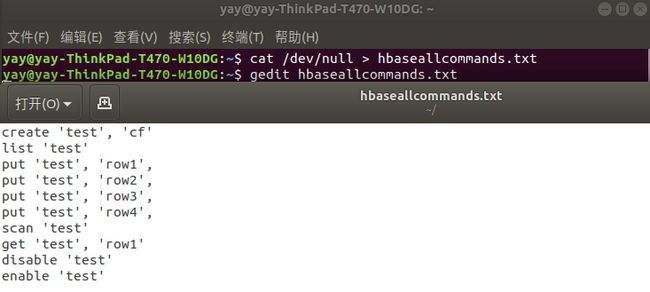
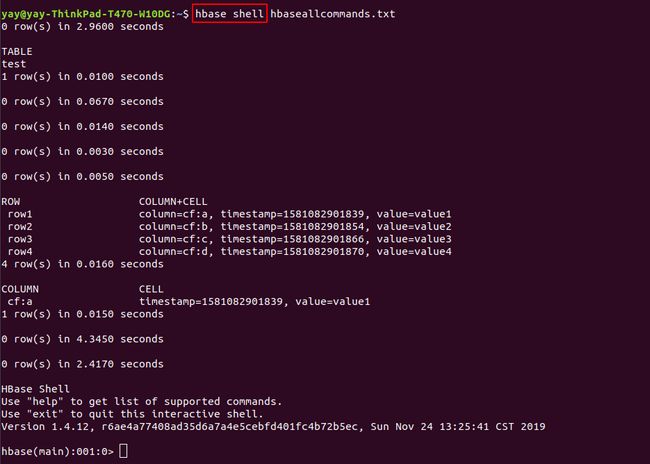
创建一个hbaseallcommands.txt:create 'test', 'cf'
list 'test'
put 'test', 'row1','cf:a','value1'
put 'test', 'row2','cf:b','value2'
put 'test', 'row3','cf:c','value3'
put 'test', 'row4','cf:d','value4'
scan 'test'
get 'test', 'row1'
disable 'test'
enable 'test'
三、批量Loading Data
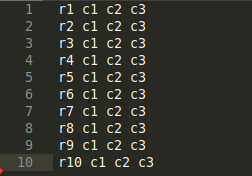
创建input.tsv:yay@yay-ThinkPad-T470-W10DG:~$ hdfs dfs -mkdir /tmp
yay@yay-ThinkPad-T470-W10DG:~$ hdfs dfs -copyFromLocal input.tsv /tmp/input.tsv
yay@yay-ThinkPad-T470-W10DG:~$ HADOOP_CLASSPATH=`${HBASE_HOME}/bin/hbase classpath` ${HADOOP_HOME}/bin/hadoop jar ${HBASE_HOME}/lib/hbase-server-1.4.12.jar importtsv -Dimporttsv.columns=HBASE_ROW_KEY,cf1:c1,cf1:c2,cf1:c3 -Dimporttsv.bulk.output=hdfs://localhost:9000/output tw hdfs://localhost:9000/tmp/input.tsv
...
//接下来:use the completebulkload utility to bulk upload the HFiles into an HBase table
yay@yay-ThinkPad-T470-W10DG:~$ hbase org.apache.hadoop.hbase.mapreduce.LoadIncrementalHFiles hdfs://localhost:9000/output tw
当然还有下面一种方法:
yay@yay-ThinkPad-T470-W10DG:~$ hdfs dfs -copyFromLocal sample1.csv /tmp/sample1.csv

yay@yay-ThinkPad-T470-W10DG:~$ hbase org.apache.hadoop.hbase.mapreduce.ImportTsv -Dimporttsv.separator="," -Dimporttsv.columns=HBASE_ROW_KEY,cf testImport1 hdfs://localhost:9000/tmp/sample1.csv

hbase(main):001:0> scan 'testImport1'
ROW                                  COLUMN+CELL
 1                                   column=cf:, timestamp=1581607840201, value="tom"
 2                                   column=cf:, timestamp=1581607840201, value="sam"
 3                                   column=cf:, timestamp=1581607840201, value="jerry"
 4                                   column=cf:, timestamp=1581607840201, value="marry"
 5                                   column=cf:, timestamp=1581607840201, value="john
5 row(s) in 0.2240 seconds

hbase(main):002:0>
四、hbase shell技巧
4.1 表变量
一般写法:
hbase(main):001:0> create 't','f'
hbase(main):002:0> put 't','r','f','v'
hbase(main):003:0> describe 't'
hbase(main):004:0> disable 't'
hbase(main):005:0> enable 't'
hbase(main):006:0>
使用表变量,更像是面向对象风格了:
hbase(main):009:0> t=create 't','f'
hbase(main):010:0> t.put 'r','f','v'
0 row(s) in 0.0130 seconds
hbase(main):011:0> t.scan
hbase(main):013:0> t.disable
hbase(main):014:0> t.enable
可以把已经存在的表赋给一个变量:
hbase(main):003:0> t1 = get_table('t')
hbase(main):008:0> t1.describe
4.2 时间戳
hbase(main):001:0> import java.text.SimpleDateFormat
=> Java::JavaText::SimpleDateFormat
hbase(main):002:0> import java.text.ParsePosition
=> Java::JavaText::ParsePosition
hbase(main):003:0> SimpleDateFormat.new("yy/MM/dd HH:mm:ss").parse("08/08/16 20:56:29",ParsePosition.new(0)).getTime()
=> 1218891389000
hbase(main):004:0>
反向转换:
hbase(main):004:0> import java.util.Date
file:/home/yay/software/hbase-1.4.12/lib/jruby-complete-1.6.8.jar!/builtin/javasupport/core_ext/object.rb:99 warning: already initialized constant Date
=> Java::JavaUtil::Date
hbase(main):005:0> Date.new(1218920189000).toString()
=> "Sun Aug 17 04:56:29 CST 2008"
hbase(main):006:0>
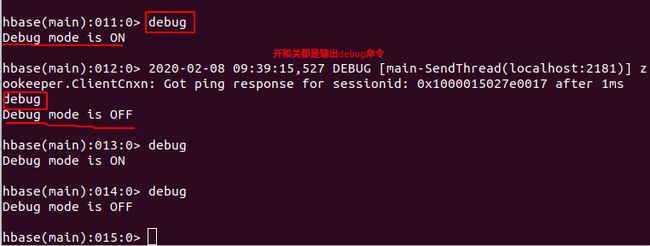
4.3 Debug
4.4 Count
计算一个表里面有多少行
hbase(main):017:0> count 'test'
4 row(s) in 0.0860 seconds

=> 4
五、Data Model
Row
A row in HBase consists of a row key and one or more columns with values associated with them. Rows are sorted alphabetically by the row key as they are stored. For this reason, the design of the row key is very important. The goal is to store data in such a way that related rows are near each other. A common row key pattern is a website domain. If your row keys are domains, you should probably store them in reverse (org.apache.www, org.apache.mail,org.apache.jira). This way, all of the Apache domains are near each other in the table, rather than being spread out based on the first letter of the subdomain.
Column
A column in HBase consists of a column family and a column qualifier, which are delimited by a : (colon) character.Columns in Apache HBase are grouped into column families. All column members of a column family have the same prefix.
Column Family
Column families physically colocate a set of columns and their values, often for performance reasons. Each column family has a set of storage properties, such as whether its values should be cached in memory, how its data is compressed or its row keys are encoded, and others. Each row in a table has the same column families(列簇集合), though a given row might not store anything in a given column family(列簇)(注意说辞).Physically, all column family members are stored together on the filesystem. Because tunings and storage specifications are done at the column family level, it is advised that all column family members have the same general access pattern and size characteristics.
Column Qualifier
A column qualifier is added to a column family to provide the index for a given piece of data. Given a column family content, a column qualifier might be content:html, and another might be content:pdf. Though column families are fixed at table creation, column qualifiers are mutable and may differ greatly between rows.
Cell
A cell is a combination of row, column family, and column qualifier, and contains a value and a timestamp, which represents the value’s version. 也可以这么说:A {row, column, version} tuple exactly specifies a cell in HBase.
表里面的空Cell不占据空间,或者说事实上它根本不存在。这就是通常称HBase是"sparse." 的原因。A tabular view is not the only possible way to look at data in HBase, or even the most accurate,实际上用json描述会更加准确
Timestamp
A timestamp is written alongside each value, and is the identifier for a given version of a value. By default, the timestamp represents the time on the RegionServer when the data was written, but you can specify a different timestamp value when you put data into the cell.
Namespace
A namespace is a logical grouping of tables analogous to a database in relation database systems.
This abstraction lays the groundwork for upcoming multi-tenancy(多租户) related features:
• Quota Management (HBASE-8410) - Restrict the amount of resources (ie regions, tables) a namespace can consume.
• Namespace Security Administration (HBASE-9206) - Provide another level of security administration for tenants.
• Region server groups (HBASE-6721) - A namespace/table can be pinned onto a subset of RegionServers thus guaranteeing a course level of isolation.
多租户定义:多租户技术或称多重租赁技术,简称SaaS,是一种软件架构技术,是实现如何在多用户环境下(此处的多用户一般是面向企业用户)共用相同的系统或程序组件,并且可确保各用户间数据的隔离性。简单讲:在一台服务器上运行单个应用实例,它为多个租户(客户)提供服务。从定义中我们可以理解:多租户是一种架构,目的是为了让多用户环境下使用同一套程序,且保证用户间数据隔离。那么重点就很浅显易懂了,多租户的重点就是同一套程序下实现多用户数据的隔离
hbase(main):026:0> create_namespace 'yayns'
0 row(s) in 1.6250 seconds

hbase(main):027:0> create 'yayns:yaytable','cf'
0 row(s) in 2.4050 seconds

=> Hbase::Table - yayns:yaytable
hbase(main):028:0> drop_namespace 'yayns'

ERROR: org.apache.hadoop.hbase.constraint.ConstraintException: Only empty namespaces can be removed. Namespace yayns has 1 tables
六、命令介绍
- Apache HBase shell中除去常量,所有的names都需要用引号包含起来, 比如 table name, row key和and column name。
- 成功的 HBase commands 返回码为 0,但是非0并不一定表示失败,比如有可能只是连接丢失
6.1 create命令
create 'student','info','address'
put 'student','1','info:age','20'
put 'student','1','info:name','wang'
put 'student','1','info:class','1'
put 'student','1','address:city','zhengzhou'
put 'student','1','address:area','High-tech zone'
put 'student','2','info:age','21'
put 'student','2','info:name','yang'
put 'student','2','info:class','1'
put 'student','2','address:city','beijing'
put 'student','2','address:area','CBD'
put 'student','3','info:age','22'
put 'student','3','info:name','zhao'
put 'student','3','info:class','2'
put 'student','3','address:city','shanghai'
put 'student','3','address:area','pudong'
create 't1', {NAME => 'f1'}, {NAME => 'f2'}, {NAME => 'f3'}
可以简写为
create 't1', 'f1', 'f2', 'f3'
更完整的用法如下:
hbase(main):001:0> create 't1',{NAME => 'f1'},{NAME => 'f2'},{NAME => 'f3'}
0 row(s) in 2.7920 seconds

=> Hbase::Table - t1
hbase(main):002:0> create 't2',{NAME => 'f1', VERSIONS => 1},{NAME => 'f2',VERSIONS => 3},{NAME => 'f3',VERSIONS => 5}
0 row(s) in 4.4200 seconds

=> Hbase::Table - t2
hbase(main):003:0> create 't3',{NAME => 'f1', VERSIONS => 1},{NAME => 'f2',VERSIONS => 3},{NAME => 'f3',VERSIONS => 5, BLOCKCACHE => true}
0 row(s) in 4.4280 seconds

=> Hbase::Table - t3
hbase(main):004:0>
说明:偶尔会出现你在删除一个表后再次创建的时候提示表已经存在,但是list就是看不到的情况,这个时候可以这样删除掉表:
yay@yay-ThinkPad-T470-W10DG:~$ hbase zkcli
Connecting to localhost:2181
2020-02-13 19:43:37,786 INFO  [main] zookeeper.ZooKeeper: Client environment:zookeeper.version=3.4.10-39d3a4f269333c922ed3db283be479f9deacaa0f, built on 03/23/2017 10:13 GMT
...
WATCHER::

WatchedEvent state:SyncConnected type:None path:null
ls /hbase/table
[hbase:meta, hbase:namespace, tabletest1, test, student, yayns:yaytable, test1, t, hello]
[zk: localhost:2181(CONNECTED) 1] rmr /hbase/table/student
[zk: localhost:2181(CONNECTED) 2] rmr /hbase/table/tabletest1
[zk: localhost:2181(CONNECTED) 3] rmr /hbase/table/yayns:yaytable
[zk: localhost:2181(CONNECTED) 4] rmr /hbase/table/test1
[zk: localhost:2181(CONNECTED) 5] rmr /hbase/table/t
[zk: localhost:2181(CONNECTED) 6] rmr /hbase/table/hello
[zk: localhost:2181(CONNECTED) 7] quit
Quitting...
2020-02-13 19:48:42,943 INFO  [main] zookeeper.ZooKeeper: Session: 0x1703dd2c4710017 closed
2020-02-13 19:48:42,951 INFO  [main-EventThread] zookeeper.ClientCnxn: EventThread shut down for session: 0x1703dd2c4710017
yay@yay-ThinkPad-T470-W10DG:~$
6.2 scan命令
这里简单展示一下,后面有更复杂的语法应用例子
hbase(main):002:0> scan 'student'
ROW                   COLUMN+CELL
 1                    column=address:area, timestamp=1581215264317, value=High-t
                      ech zone
 1                    column=address:city, timestamp=1581215264311, value=zhengz
                      hou
 1                    column=info:age, timestamp=1581215264275, value=20
 1                    column=info:class, timestamp=1581215264306, value=1
 1                    column=info:name, timestamp=1581215264296, value=wang
 2                    column=address:area, timestamp=1581215264353, value=CBD
 2                    column=address:city, timestamp=1581215264347, value=beijin
                      g
 2                    column=info:age, timestamp=1581215264329, value=21
 2                    column=info:class, timestamp=1581215264342, value=1
 2                    column=info:name, timestamp=1581215264335, value=yang
 3                    column=address:area, timestamp=1581215264382, value=pudong
 3                    column=address:city, timestamp=1581215264375, value=shangh
                      ai
 3                    column=info:age, timestamp=1581215264361, value=22
 3                    column=info:class, timestamp=1581215264370, value=2
 3                    column=info:name, timestamp=1581215264366, value=zhao
3 row(s) in 0.0480 seconds

hbase(main):003:0>
6.3 插入和更新数据
语法是: put '/path/tablename', 'rowkey', 'cfname:colname', 'value', 'timestamp'
修改操作 也是用put命令
hbase(main):003:0> put 'student','1','info:age','18'
0 row(s) in 0.0110 seconds

hbase(main):004:0> get 'student','1'
COLUMN                CELL
 address:area         timestamp=1581215264317, value=High-tech zone
 address:city         timestamp=1581215264311, value=zhengzhou
 info:age             timestamp=1581215639857, value=18
 info:class           timestamp=1581215264306, value=1
 info:name            timestamp=1581215264296, value=wang
1 row(s) in 0.0420 seconds
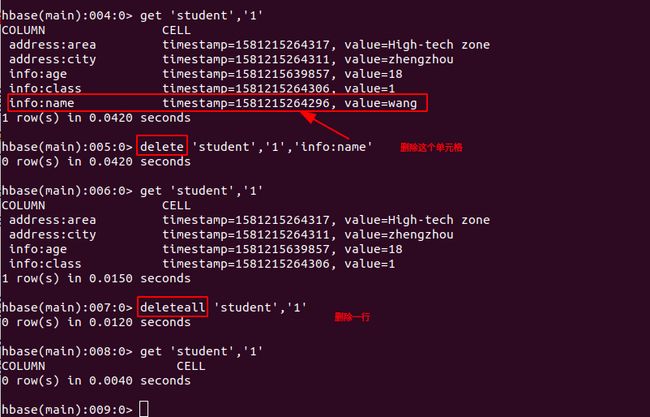
6.4 删除
6.4.1 删除单元格
hbase(main):005:0> delete 'student','1','info:name'
6.4.2 删除整行
hbase(main):007:0> deleteall 'student','1'
HBase never modifies data in place, so for example a delete will not immediately delete (or mark as deleted) the entries in the storage file that correspond to the delete condition. Rather, a so-called tombstone is written, which will mask the deleted values. When HBase does a major compaction, the tombstones are processed to actually remove the dead values, together with the tombstones themselves. If the version you specified when deleting a row is larger than the version of any value in the row, then you can consider the complete row to be deleted.
Suppose you do a delete of everything ⇐ T. After this you do a new put with a timestamp ⇐ T. This put, even if it happened after the delete, will be masked by the delete tombstone. Performing the put will not fail, but when you do a get you will notice the put did have no effect.
6.5 查询
6.5.1 单行查询
get操作实际上是基于Scans来实现的
6.5.1.1 指定rowkey查询
hbase(main):009:0> get 'student','2'
COLUMN                   CELL
 address:area            timestamp=1581215264353, value=CBD
 address:city            timestamp=1581215264347, value=beijing
 info:age                timestamp=1581215264329, value=21
 info:class              timestamp=1581215264342, value=1
 info:name               timestamp=1581215264335, value=yang
1 row(s) in 0.0180 seconds
6.5.1.2 指定列簇的单行查询
hbase(main):010:0> get 'student', '2', {COLUMN => 'info'}
COLUMN                   CELL
 info:age                timestamp=1581215264329, value=21
 info:class              timestamp=1581215264342, value=1
 info:name               timestamp=1581215264335, value=yang
1 row(s) in 0.0110 seconds
6.5.1.3 指定列名的查询
hbase(main):011:0> get 'student', '2', {COLUMN => 'info:age'}
COLUMN                   CELL
 info:age                timestamp=1581215264329, value=21
1 row(s) in 0.0110 seconds
6.5.2 scan
6.5.2.1 使用scan并指定startrow
hbase(main):012:0> scan 'student', {COLUMNS => ['info:age', 'address'], LIMIT => 10, STARTROW => '2'}
ROW                      COLUMN+CELL
 2                       column=address:area, timestamp=1581215264353, value=CBD
 2                       column=address:city, timestamp=1581215264347, value=beijing
 2                       column=info:age, timestamp=1581215264329, value=21
 3                       column=address:area, timestamp=1581215264382, value=pudong
 3                       column=address:city, timestamp=1581215264375, value=shanghai
 3                       column=info:age, timestamp=1581215264361, value=22
2 row(s) in 0.0210 seconds
可以指定列名或者簇名,也可以再加上限制扫描的行数
hbase(main):004:0> scan 'student', {COLUMNS => ['info'], LIMIT => 2}
ROW                                  COLUMN+CELL
 1                                   column=info:age, timestamp=1581594570381, value=20
 1                                   column=info:class, timestamp=1581594570402, value=1
 1                                   column=info:name, timestamp=1581594570396, value=wang
 2                                   column=info:age, timestamp=1581594570422, value=21
 2                                   column=info:class, timestamp=1581594570436, value=1
 2                                   column=info:name, timestamp=1581594570428, value=yang
2 row(s) in 0.0190 seconds

hbase(main):005:0> scan 'student', {COLUMNS => ['info'], LIMIT => 2, STARTROW => '2', STOPROW => 'row78910'}
ROW                                  COLUMN+CELL
 2                                   column=info:age, timestamp=1581594570422, value=21
 2                                   column=info:class, timestamp=1581594570436, value=1
 2                                   column=info:name, timestamp=1581594570428, value=yang
 3                                   column=info:age, timestamp=1581594570450, value=22
 3                                   column=info:class, timestamp=1581594570461, value=2
 3                                   column=info:name, timestamp=1581594570455, value=zhao
2 row(s) in 0.0200 seconds

hbase(main):006:0> scan 'student', {COLUMNS => 'info', LIMIT => 2, STARTROW => '2', STOPROW => 'row78910'}
ROW                                  COLUMN+CELL
 2                                   column=info:age, timestamp=1581594570422, value=21
 2                                   column=info:class, timestamp=1581594570436, value=1
 2                                   column=info:name, timestamp=1581594570428, value=yang
 3                                   column=info:age, timestamp=1581594570450, value=22
 3                                   column=info:class, timestamp=1581594570461, value=2
 3                                   column=info:name, timestamp=1581594570455, value=zhao
2 row(s) in 0.0180 seconds
6.5.2.2 使用scan+过滤条件
hbase(main):002:0> scan 'student', FILTER=>"ColumnPrefixFilter('city') AND ValueFilter(=,'substring:ng')"
ROW                             COLUMN+CELL
 2                              column=address:city, timestamp=1581215264347, value=beijing
 3                              column=address:city, timestamp=1581215264375, value=shanghai
2 row(s) in 0.0170 seconds

hbase(main):003:0> scan 'student', FILTER=>"ValueFilter(=,'substring:ng')"
ROW                             COLUMN+CELL
 2                              column=address:city, timestamp=1581215264347, value=beijing
 2                              column=info:name, timestamp=1581215264335, value=yang
 3                              column=address:area, timestamp=1581215264382, value=pudong
 3                              column=address:city, timestamp=1581215264375, value=shanghai
2 row(s) in 0.0180 seconds
6.6 Altering a Table
主要用来修改column family的模式
hbase(main):004:0> alter 't1', {NAME => 'f1', VERSIONS => 2}, {NAME => 'f2', VERSIONS => 3}
Updating all regions with the new schema...
1/1 regions updated.
Done.
0 row(s) in 3.2290 seconds
下面这个把column family f1和f2删除掉
hbase(main):005:0> alter 't1', {NAME => 'f1', METHOD => 'delete'}, {NAME => 'f2', METHOD => 'delete'}
Updating all regions with the new schema...
0/1 regions updated.
1/1 regions updated.
Done.
0 row(s) in 3.8310 seconds

hbase(main):007:0> describe 't1'
Table t1 is ENABLED
t1
COLUMN FAMILIES DESCRIPTION
{NAME => 'f3', BLOOMFILTER => 'ROW', VERSIONS => '1', IN_MEMORY => 'false', KEEP_DELETED_CELLS => 'FALSE', DATA_BLOCK_ENCODING => 'NONE', T
TL => 'FOREVER', COMPRESSION => 'NONE', MIN_VERSIONS => '0', BLOCKCACHE => 'true', BLOCKSIZE => '65536', REPLICATION_SCOPE => '0'}
1 row(s) in 0.0270 seconds

hbase(main):008:0>
下面这个设置最大文件大小为 256MB(命令行里面给的是数字单位是byte):
hbase(main):008:0> alter 't1', {METHOD => 'table_att', MAX_FILESIZE => '268435456'}
Updating all regions with the new schema...
0/1 regions updated.
1/1 regions updated.
Done.
0 row(s) in 4.1160 seconds

hbase(main):009:0>
6.7 判断table是否存在
hbase(main):009:0> exists 't1'
Table t1 does exist
0 row(s) in 0.0080 seconds
6.8 判断有多少行
hbase(main):012:0> count 'student'
3 row(s) in 0.0300 seconds
6.9 Truncating命令
truncate命令会disables、drops并recreates 一个表
hbase(main):017:0> truncate 't1'
Truncating 't1' table (it may take a while):
 - Disabling table...
 - Truncating table...
0 row(s) in 7.4330 seconds

