springclund+nginx+nacos+robbin+feign+sentinel+seata+gateway
本文主要是从零基础搭建一个高并发场景下spring cloud 微服务
- Nginx 反向代理和负载均衡
- nacos 服务管理,服务注册和发现
- robbin 客户端负载均衡
- fegin封装http调用
- sentinel 大流程,高并发控制
- seata 分布式事务,保证数据一致性
- gateway 服务路由,鉴权,协议转换
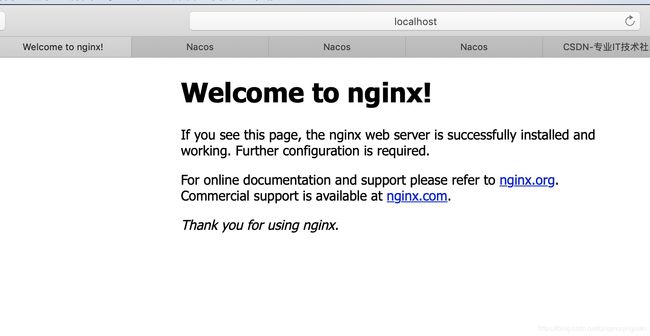
第一节Nginx 安装搭建
本地环境mac版本 已经安装了brewhome
执行命令:brew install nginx
修改nginx.conf配置文件,对nginx配置比较熟悉的可以跳过本节,
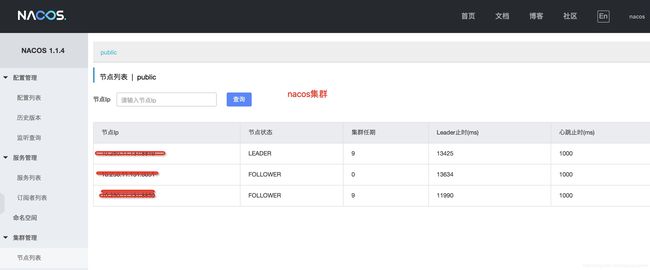
本次主要是引入nginx是为了保证nacos高可用,保证nacos进群架构的搭建
#Nginx的全局变量设置
#user是个主模块指令,指定Nginx Worker进程运行用户以及用户组,默认由nobody账号运行
#user nobody;
#worker_processses是个主模块指令,指定了Nginx开启的进程数.每个Nginx进程平均消耗10M-12M内存.建议指定和cpu的数量一致
worker_processes 4;
#主模块命令,用于定义全局错误日志文件。日志输出级别debug,info,notice,warn,error
#error_log logs/error.log;
#error_log logs/error.log notice;
error_log logs/error.log info;
#pid logs/nginx.pid;
#事件指令,是设定nginx的工作模式和连接数上限
events {
#accept_mutex on; #设置网路连接序列化,防止惊群现象发生,默认为on
#multi_accept on; #设置一个进程是否同时接受多个网络连接,默认为off
#use epoll; #事件驱动模型,select|poll|kqueue|epoll|resig|/dev/poll|eventport
worker_connections 1024; # 最大连接数 ngnix最大连接数=worker_processes*worker_connections
#client_header_buffer_size 4k;#客户端请求头部的缓冲区大小
#open_file_cache max=2000 inactive=60s;#为打开文件指定缓存
#open_file_cache_valid 60s;#设置多久检查一次缓存的有效信息
#open_file_cache_min_uses 1;#设置缓存文件最少使用次数
#keepalive_timeout 60;# 这里是指http层面的,而不是tcp的keepalive
}
#Nginx的http变量设置
http {
#include mime.types;#主模块指令,实现对配置文件所包含的文件的设定
#default_type application/octet-stream;#http模块的核心指令,默认设置定为二进制流
#日志文件的格式的设置
#log_format  main  '$remote_addr - $remote_user [$time_local] "$request" '
#                  '$status $body_bytes_sent "$http_referer" '
#                  '"$http_user_agent" "$http_x_forwarded_for"';

#access_log  logs/access.log  main;
#client_max_body_size 20m;# 用来设置运行客户端请求的最大的单个文件字节数
client_header_buffer_size 8k;#用来指定客户端请求的header_buffer大小
large_client_header_buffers 4 8k;#用来指定客户端中较大请求头的缓存最大数量和大小

sendfile on;#参与用于开启高效文件传输模式。将tcp_nopush和tcp_nodelay两个指令设置为on用于防止网络阻  塞.其实就是零拷贝的一种实现
tcp_nopush on;
#tcp_nodelay no;

#keepalive_timeout  0;#设置客户端连接保持活动的超时时间,在超过这个时间之后,客户端还么有发送数据,服务端会关闭该连接
keepalive_timeout  65;
#client_header_timeout 20;#设置客户端请求头读取超时时间,在超过这个时间之后,客户端还没有发生任何数据,Nginx将返回408错误
#client_body_timeout 20;#设置客户端主题请求超时时间,在超过这个时间之后,客户端还没有发生任何数据,Nginx将返回408错误
#send_timeout 20;#指定响应客户端的超时时间,设置两个连接活动之间的时间,超过这个时间,客户端没有任何活动,Nginx将关闭连接

#HttpGizp模块设置,支持实时在线压缩输出流数据
#gzip  on;#表示用于开启或者关闭压缩模块
#gzip_min_length 1k;#设置允许压缩页面最小字节数
#gzip_buffers 4 16k;#表示申请4个16k的内存作为压缩结果流缓存
#gzip_http_version 1.1;#设置识别http版本协议,默认是1.1
#gzip_comp_level 2;#用来指定压缩比,最小1 处理速度最快 最大9 传输速度快,单处理慢
#gizp_types text/plain application/x-javascript text/css application/xml;#用来表示压缩类型
#gizp_vary on;#可以让前端缓存服务器缓存经过zip压缩的页面


#负载均衡配置 nacos_cluster 负载均衡器名称
upstream nacoscluster{
  #ip_hash;#默认支持4种调度算法,1轮询(默认)按照请求时间顺序分配到不同的后端 2.weight:指定轮询权重,值越大访问几率越大
          #ip_hash 每个请求按照hash结果分配,fair 根据页面大小或者加载时间长短智能分配,根据后端响应时间长短来分配
          #此种算法需要额外模块upstream_fair模块支持.url_hash按访问的url的结果分配请求。nginx本身不支持需要额外的包
          #注意 当负载均衡算法为ip_hash时。后端服务器在负载均衡调度种的早状态不能是weight和backup
  server 192.168.1.xxx:8849;#设置负载均衡的服务器地址
  server 192.168.1.xxx:8850;
  server 192.168.1.xxx:8851;
  #server 10.250.11.131:8852 down;#设置服务器状态down表示server暂时不参与负载均衡back_up表示预留的备份机器,当其他机器故障也请求
  #server 10.250.11.131:8853 max_fail=3 fail_timeout=20s;#允许请求失败的次数默认值为1,
                            #当超过最大次数时,返回proxy_next_upstream模块定义的错误。fail_timeout表示经历了max_fail失败后
                            #暂停服务的时间。
}
#虚拟主机配置
server {
    listen       8847;#用于指定虚拟主机的服务端口
    server_name localhost;#用于指定ip或者域名多个域名使用空格分开
    #index index.html index.htm index.php;#用于设置访问的默认首页地址
    #root /wwwroot/www.cszhi.com;#用于指定虚拟主机的网页根目录

    #charset koi8-r;#设置网页的默认编码格式

    #access_log  logs/host.access.log  main;#用于指定访问日志的存放路径

    #location url匹配配置 支持正则表达和条件判断 对动静态页面进行过滤处理,可以实现反向代理
    #local后面 这个位置是对值的匹配 比如/ 表示所以路径都匹配
    location /nacos/ {
       # root   html;
      #  index  index.html index.htm;
      proxy_pass http://nacoscluster/nacos;
    }

    #error_page  404              /404.html;

    # redirect server error pages to the static page /50x.html
    #
    error_page   500 502 503 504  /50x.html;
    location = /50x.html {
        root   html;
    }

    # proxy the PHP scripts to Apache listening on 127.0.0.1:80
    #
    #location ~ \.php$ {
    #    proxy_pass   http://127.0.0.1;
    #}

    # pass the PHP scripts to FastCGI server listening on 127.0.0.1:9000
    #
    #location ~ \.php$ {
    #    root           html;
    #    fastcgi_pass   127.0.0.1:9000;
    #    fastcgi_index  index.php;
    #    fastcgi_param  SCRIPT_FILENAME  /scripts$fastcgi_script_name;
    #    include        fastcgi_params;
    #}

    # deny access to .htaccess files, if Apache's document root
    # concurs with nginx's one
    #
    #location ~ /\.ht {
    #    deny  all;
    #}
}


# another virtual host using mix of IP-, name-, and port-based configuration
#
#server {
#    listen       8000;
#    listen       somename:8080;
#    server_name  somename  alias  another.alias;

#    location / {
#        root   html;
#        index  index.html index.htm;
#    }
#}


# HTTPS server
#
#server {
#    listen       443 ssl;
#    server_name  localhost;

#    ssl_certificate      cert.pem;
#    ssl_certificate_key  cert.key;

#    ssl_session_cache    shared:SSL:1m;
#    ssl_session_timeout  5m;

#    ssl_ciphers  HIGH:!aNULL:!MD5;
#    ssl_prefer_server_ciphers  on;

#    location / {
#        root   html;
#        index  index.html index.htm;
#    }
#}
include servers/*;
}
第三节实战 使用robbin实现负载均衡
四个服务 分别是交易trade,订单order,库存stock,账户account
起初的调用是使用 ip+port,这种对于更换ip地址或者多台分布式部署就有问题了。
除了一些注册中心解决方案外,还可以使用nginx进行反向代理,但是是有弊端的,nginx需要更改配置,不能理解生效,有大量的运维工作。
        com.alibaba.cloud
        spring-cloud-alibaba-nacos-discovery
        2.1.0.RELEASE
application.yml文件修改
spring:
application:
name:XXXXX-service
cloud:
nacos:
discovery:
server-addr: localhost:8847
在消费者系统中修改RestTemplate
新增LoadBalanced注解

修改调用改为服务名调用
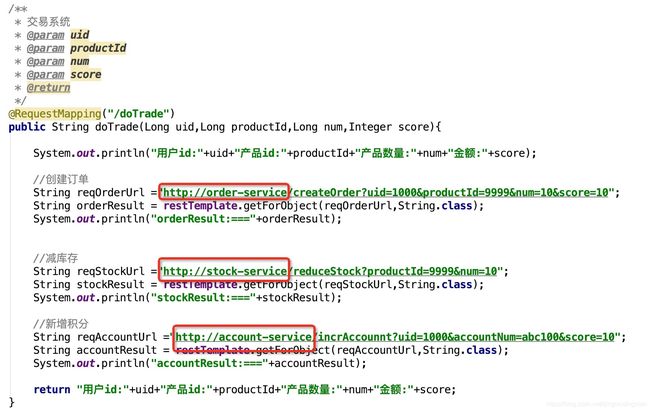
重新启动消费者项目
order提供者提供多个实例,多次调用可以看出是使用负载均衡策略
虽然改为服务名调用成功了,客户端也实现了调用负载均衡,但是还是不够优雅,比较还得写入这么参数,不能向本地调用一样那么简单,接下来foregin组件就登场了
第四节feign引入和使用
pom.xml文件修改
        org.springframework.cloud
        spring-cloud-starter-openfeign


                com.netflix.archaius
                archaius-core


        2.1.0.RELEASE
启动类新作注解
@SpringBootApplication
@EnableFeignClients//启动fegin声明式调用
public class TradeApplication {
public static void main(String[] args) {
    SpringApplication.run(TradeApplication.class, args);
}
}
新增service类

执行url
http://localhost:8080/doTrade?uid=1000&productId=9999&num=10&score=10&accountNum=12345
结果:
用户id:1000产品id:9999产品数量:10金额:10
orderResult:===创建订单成功,用户id:1000产品id:9999商品数量:10交易金额:10
stockResult:===减少库存成功,商品id9999减少数量:10
accountResult:===账户减金额accountNum:12345,减少金额为:score:10
第五节 sentinel
本地部署sentinel-dashboard
首先下载sentinel-dashboard-xxx.jar
地址:https://github.com/alibaba/Sentinel/releases/tag/1.7.2
操作下载

然后本地允许jar 进入jar包所在路径:控制台执行命令
java -Dserver.port=8888 -Dcsp.sentinel.dashboard.server=localhost:8888 -Dproject.name=sentinel-dashboard -jar sentinel-dashboard-1.7.2.jar
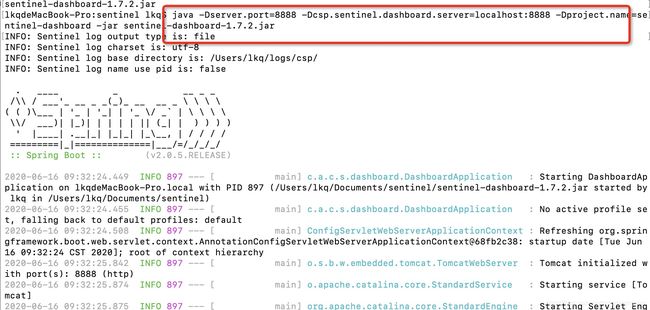
访问url:http://localhost:8888/#/login
用户名和密码:sentinel
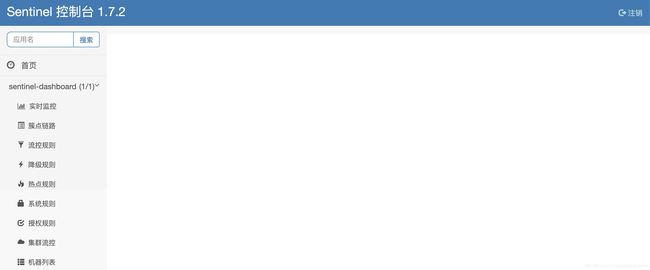
相关配置修改
pom.xml增加sentine依赖
        com.alibaba.cloud
        spring-cloud-starter-alibaba-sentinel
        2.1.0.RELEASE
application.yml 新增配置
spring:
sentinel:
transport:
dashboard: localhost:8888
开始使用:在sentinel-dashboard控制台进行操作
必须访问过一次之后控制台才会显示相关监控
http://localhost:8080/doTrade?uid=1000&productId=9999&num=10&score=10

现在来摸一个限流操作,设置接口qps 为1

超过设置的qps阀值之后会给出提示:
Blocked by Sentinel (flow limiting)
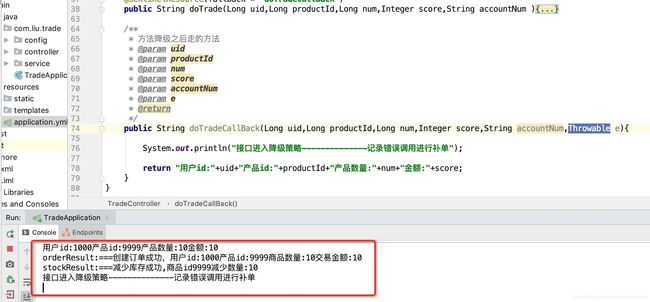
设置降级容错:每秒钟1次异常,则进行降级处理
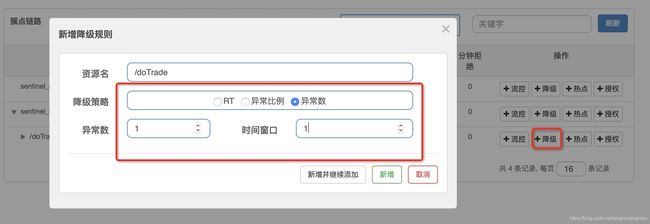
代码修改:需要在原接口上新增注解sentinelresource 参数
fallback=‘异常处理的接口’,异常处理接口和除了新增一个Throwable之外,其他都一样

模拟异常关闭一个服务如:account-service
sentinel还有很多相关的流量控制在这里就不过多介绍了。
第六节解决分布式一致性问题seata
不理解分布式事务可以查看一下本人自己写的一篇介绍
https://editor.csdn.net/md/?articleId=106221705
微服务跨越不过去的一道坎,数据一致性问题,alibaba的seata的分布式事务中间件给我们提供了很好的帮助。下面在集群中引入。希望大家对这个组件有一些基础的了解,这里注重实用实战,不在讲原理。
业务场景就是下单交易 保障创建订单,扣减库存和增加积分服务数据一致性。本事例实用seata的AT模式
seata-server 配置
首先下载jar包
https://github.com/seata/seata/releases/tag/v1.2.0
之后对jar进行解压,找到conf文件夹修改相关配置文件
registry.conf文件,注册中心配置文件修改,为了保证seata-server的高可用,比如可以注册到zk或者nacos上面。我本地使用nacos
file.conf 是一些全局事务的数据持久化配置,选择文件或者db模式,我本地选择db模式。

在对应的数据库上面执行创建全局事务数据库的语句(seata-server上面配置的存储事务相关的数据库)
– -------------------------------- The script used when storeMode is ‘db’ --------------------------------
– the table to store GlobalSession data
CREATE TABLE IF NOT EXISTS global_table
(
xid VARCHAR(128) NOT NULL,
transaction_id BIGINT,
status TINYINT NOT NULL,
application_id VARCHAR(32),
transaction_service_group VARCHAR(32),
transaction_name VARCHAR(128),
timeout INT,
begin_time BIGINT,
application_data VARCHAR(2000),
gmt_create DATETIME,
gmt_modified DATETIME,
PRIMARY KEY (xid),
KEY idx_gmt_modified_status (gmt_modified, status),
KEY idx_transaction_id (transaction_id)
) ENGINE = InnoDB
DEFAULT CHARSET = utf8;
– the table to store BranchSession data
CREATE TABLE IF NOT EXISTS branch_table
(
branch_id BIGINT NOT NULL,
xid VARCHAR(128) NOT NULL,
transaction_id BIGINT,
resource_group_id VARCHAR(32),
resource_id VARCHAR(256),
branch_type VARCHAR(8),
status TINYINT,
client_id VARCHAR(64),
application_data VARCHAR(2000),
gmt_create DATETIME(6),
gmt_modified DATETIME(6),
PRIMARY KEY (branch_id),
KEY idx_xid (xid)
) ENGINE = InnoDB
DEFAULT CHARSET = utf8;
– the table to store lock data
CREATE TABLE IF NOT EXISTS lock_table
(
row_key VARCHAR(128) NOT NULL,
xid VARCHAR(96),
transaction_id BIGINT,
branch_id BIGINT NOT NULL,
resource_id VARCHAR(256),
table_name VARCHAR(32),
pk VARCHAR(36),
gmt_create DATETIME,
gmt_modified DATETIME,
PRIMARY KEY (row_key),
KEY idx_branch_id (branch_id)
) ENGINE = InnoDB
DEFAULT CHARSET = utf8;
启动seata-sever(mac 版本)
在bin目录下执行./seata-server.sh -h 127.0.0.1 -p 8091 -m db
查看nacos已经有注册上去了

接下来是客户端的一些配置
发起者Tm的一些配置
1.mybatis和springcloud的配置
        io.seata
        seata-spring-boot-starter
        1.2.0


        org.mybatis.spring.boot
        mybatis-spring-boot-starter
        2.1.0


        mysql
        mysql-connector-java
        5.1.45


        org.springframework.boot
        spring-boot-starter-jdbc
2.applicatio.yml的配置
spring:
application:
name: trade-service
cloud:
nacos:
discovery:
server-addr: localhost:8847
sentinel:
transport:
dashboard: localhost:8888
alibaba:
seata:
tx-service-group: prex_tx_group
seata:
enabled: true
registry:
type: nacos
nacos:
application: seata-server
server-addr: localhost:8847
cluster: default
3.启动类的修改排除exclude = DataSourceAutoConfiguration.class
//将默认数据库配置排除
@SpringBootApplication(exclude = DataSourceAutoConfiguration.class)
@EnableFeignClients//启动fegin声明式调用
@EnableDiscoveryClient
public class TradeApplication {
public static void main(String[] args) {
SpringApplication.run(TradeApplication.class, args);
}
}
4.代理数据源配置,通过此配置才可以进行保存undo_log
@Configuration
public class MybatisConfig {
@Bean
public DruidDataSource druidDataSource(){
DruidDataSource druidDataSource = new DruidDataSource();
druidDataSource.setUrl(“jdbc:mysql://x x x.xxx.xx.x.x:3306/law_online?useUnicode=true&characterEncoding=UTF8&zeroDateTimeBehavior=convertToNull”);
druidDataSource.setUsername(“xxxx”);
druidDataSource.setPassword(“xxxxxxxx”);
druidDataSource.setInitialSize(1);
druidDataSource.setMinIdle(1);
druidDataSource.setMaxActive(20);
druidDataSource.setMaxWait(60000);
druidDataSource.setTimeBetweenEvictionRunsMillis(60000);
druidDataSource.setMinEvictableIdleTimeMillis(300000);
druidDataSource.setValidationQuery(“SELECT ‘x’”);
druidDataSource.setTestWhileIdle(true);
druidDataSource.setTestOnBorrow(false);
druidDataSource.setTestOnReturn(false);
druidDataSource.setPoolPreparedStatements(true);
druidDataSource.setMaxOpenPreparedStatements(20);
return druidDataSource;
}
@Bean
@Primary
public DataSourceProxy dataSourceProxy(DruidDataSource druidDataSource){
return new DataSourceProxy(druidDataSource);
}
}
5.tm和tc之间xid传递配置,根据实际实现进行配置,我这里是事feign进行封装http调用的所在新增调用的时候拦截器进行传递xid
@Component
public class FeignClientInteceptor implements RequestInterceptor {
@Override
public void apply(RequestTemplate requestTemplate) {
    requestTemplate.header(RootContext.KEY_XID,RootContext.getXID());
}
}
6.在resouce下面增加file.conf和registry.conf和seata-server配置一样
file.conf
transport {
tcp udt unix-domain-socket
type = “TCP”
#NIO NATIVE
server = “NIO”
#enable heartbeat
heartbeat = true
the client batch send request enable
enableClientBatchSendRequest = true
#thread factory for netty
threadFactory {
bossThreadPrefix = “NettyBoss”
workerThreadPrefix = “NettyServerNIOWorker”
serverExecutorThread-prefix = “NettyServerBizHandler”
shareBossWorker = false
clientSelectorThreadPrefix = “NettyClientSelector”
clientSelectorThreadSize = 1
clientWorkerThreadPrefix = “NettyClientWorkerThread”
# netty boss thread size,will not be used for UDT
bossThreadSize = 1
#auto default pin or 8
workerThreadSize = “default”
}
shutdown {
# when destroy server, wait seconds
wait = 3
}
serialization = “seata”
compressor = “none”
}
service {
#transaction service group mapping
vgroupMapping.prex_tx_group = “default”
#only support when registry.type=file, please don’t set multiple addresses
default.grouplist = “127.0.0.1:8091”
#degrade, current not support
enableDegrade = false
#disable seata
disableGlobalTransaction = false
}
client {
rm {
asyncCommitBufferLimit = 10000
lock {
retryInterval = 10
retryTimes = 30
retryPolicyBranchRollbackOnConflict = true
}
reportRetryCount = 5
tableMetaCheckEnable = false
reportSuccessEnable = false
sagaBranchRegisterEnable = false
}
tm {
commitRetryCount = 5
rollbackRetryCount = 5
}
undo {
dataValidation = true
logSerialization = “jackson”
logTable = “undo_log”
}
log {
exceptionRate = 100
}
}
registry.conf
registry {
file 、nacos 、eureka、redis、zk、consul、etcd3、sofa
type = “nacos”
nacos {
application = “seata-server”
serverAddr = “localhost:8847”
namespace = “public”
cluster = “default”
#username = “”
#password = “”
}
eureka {
serviceUrl = “http://localhost:8761/eureka”
application = “default”
weight = “1”
}
redis {
serverAddr = “localhost:6379”
db = 0
password = “”
cluster = “default”
timeout = 0
}
zk {
cluster = “default”
serverAddr = “127.0.0.1:2181”
sessionTimeout = 6000
connectTimeout = 2000
username = “”
password = “”
}
consul {
cluster = “default”
serverAddr = “127.0.0.1:8500”
}
etcd3 {
cluster = “default”
serverAddr = “http://localhost:2379”
}
sofa {
serverAddr = “127.0.0.1:9603”
application = “default”
region = “DEFAULT_ZONE”
datacenter = “DefaultDataCenter”
cluster = “default”
group = “SEATA_GROUP”
addressWaitTime = “3000”
}
file {
name = “file.conf”
}
}
config {
file、nacos 、apollo、zk、consul、etcd3
type = “nacos”
nacos {
serverAddr = “localhost:8847”
namespace = “”
group = “SEATA_GROUP”
#username = “”
#password = “”
}
consul {
serverAddr = “127.0.0.1:8500”
}
apollo {
appId = “seata-server”
apolloMeta = “http://192.168.1.204:8801”
namespace = “application”
}
zk {
serverAddr = “127.0.0.1:2181”
sessionTimeout = 6000
connectTimeout = 2000
username = “”
password = “”
}
etcd3 {
serverAddr = “http://localhost:2379”
}
file {
name = “file.conf”
}
}
发起者Tm配置完毕.下面配置一个RM
1.插入一段mybatis和springcloud的整合
pom.xml文件配置
        mysql
        mysql-connector-java
        5.1.45


        org.springframework.boot
        spring-boot-starter-jdbc


        org.mybatis.spring.boot
        mybatis-spring-boot-starter
        2.1.0
application.xml修改,新增seata配置
spring:
application:
name: order-service
cloud:
alibaba:
seata:
tx-service-group: prex_tx_group
3.启动类配置去除默认的spring数据源配置
@SpringBootApplication(exclude ={DataSourceAutoConfiguration.class} )
@MapperScan(“com.liu.order.mybatis.mapper”)//扫描接口
public class OrderApplication {
public static void main(String[] args) {
    SpringApplication.run(OrderApplication.class, args);
}
}
4.代理数据源配置
/**
-
数据源配置
*/
@Configuration
public class DatasourceConfig {
@Bean
public DruidDataSource druidDataSource(){
DruidDataSource druidDataSource = new DruidDataSource();
druidDataSource.setUrl(“jdbc:mysql://x x.xx.1xx.xx:3306/law_online?useUnicode=true&characterEncoding=UTF8&zeroDateTimeBehavior=convertToNull”);
druidDataSource.setUsername(“xxx”);
druidDataSource.setPassword(“xxx”);
druidDataSource.setInitialSize(1);
druidDataSource.setMinIdle(1);
druidDataSource.setMaxActive(20);
druidDataSource.setMaxWait(60000);
druidDataSource.setTimeBetweenEvictionRunsMillis(60000);
druidDataSource.setMinEvictableIdleTimeMillis(300000);
druidDataSource.setValidationQuery(“SELECT ‘x’”);
druidDataSource.setTestWhileIdle(true);
druidDataSource.setTestOnBorrow(false);
druidDataSource.setTestOnReturn(false);
druidDataSource.setPoolPreparedStatements(true);
druidDataSource.setMaxOpenPreparedStatements(20);
return druidDataSource;
}@Bean(“dataSource”)
@Primary
public DataSourceProxy dataSourceProxy(DruidDataSource druidDataSource){return new DataSourceProxy(druidDataSource);}
@Bean
public SqlSessionFactoryBean sqlSessionFactory(DataSourceProxy dataSourceProxy) throws Exception {
SqlSessionFactoryBean sqlSessionFactoryBean = new SqlSessionFactoryBean();
sqlSessionFactoryBean.setMapperLocations(new PathMatchingResourcePatternResolver()
.getResources(“classpath*:mybatis/*.xml”));
//sqlSessionFactoryBean.setConfigLocation(new PathMatchingResourcePatternResolver().getResource(“classpath:/mybatis/mybatis‐config.xml”));
sqlSessionFactoryBean.setTypeAliasesPackage(“com.liu.order.mybatis.bean”);
sqlSessionFactoryBean.setDataSource(dataSourceProxy);
return sqlSessionFactoryBean;
}
}
5.同样在recosurce下面新增file.conf和registry.conf文件
file.conf
transport {
tcp udt unix-domain-socket
type = “TCP”
#NIO NATIVE
server = “NIO”
#enable heartbeat
heartbeat = true
the client batch send request enable
enableClientBatchSendRequest = true
#thread factory for netty
threadFactory {
bossThreadPrefix = “NettyBoss”
workerThreadPrefix = “NettyServerNIOWorker”
serverExecutorThread-prefix = “NettyServerBizHandler”
shareBossWorker = false
clientSelectorThreadPrefix = “NettyClientSelector”
clientSelectorThreadSize = 1
clientWorkerThreadPrefix = “NettyClientWorkerThread”
# netty boss thread size,will not be used for UDT
bossThreadSize = 1
#auto default pin or 8
workerThreadSize = “default”
}
shutdown {
# when destroy server, wait seconds
wait = 3
}
serialization = “seata”
compressor = “none”
}
service {
#transaction service group mapping
vgroupMapping.prex_tx_group = “default”
#only support when registry.type=file, please don’t set multiple addresses
default.grouplist = “127.0.0.1:8091”
#degrade, current not support
enableDegrade = false
#disable seata
disableGlobalTransaction = false
}
client {
rm {
asyncCommitBufferLimit = 10000
lock {
retryInterval = 10
retryTimes = 30
retryPolicyBranchRollbackOnConflict = true
}
reportRetryCount = 5
tableMetaCheckEnable = false
reportSuccessEnable = false
sagaBranchRegisterEnable = false
}
tm {
commitRetryCount = 5
rollbackRetryCount = 5
}
undo {
dataValidation = true
logSerialization = “jackson”
logTable = “undo_log”
}
log {
exceptionRate = 100
}
}
registry.conf
registry {
file 、nacos 、eureka、redis、zk、consul、etcd3、sofa
type = “nacos”
nacos {
application = “seata-server”
serverAddr = “localhost:8847”
namespace = “public”
cluster = “default”
#username = “”
#password = “”
}
eureka {
serviceUrl = “http://localhost:8761/eureka”
application = “default”
weight = “1”
}
redis {
serverAddr = “localhost:6379”
db = 0
password = “”
cluster = “default”
timeout = 0
}
zk {
cluster = “default”
serverAddr = “127.0.0.1:2181”
sessionTimeout = 6000
connectTimeout = 2000
username = “”
password = “”
}
consul {
cluster = “default”
serverAddr = “127.0.0.1:8500”
}
etcd3 {
cluster = “default”
serverAddr = “http://localhost:2379”
}
sofa {
serverAddr = “127.0.0.1:9603”
application = “default”
region = “DEFAULT_ZONE”
datacenter = “DefaultDataCenter”
cluster = “default”
group = “SEATA_GROUP”
addressWaitTime = “3000”
}
file {
name = “file.conf”
}
}
config {
file、nacos 、apollo、zk、consul、etcd3
type = “nacos”
nacos {
serverAddr = “localhost:8847”
namespace = “”
group = “SEATA_GROUP”
#username = “”
#password = “”
}
consul {
serverAddr = “127.0.0.1:8500”
}
apollo {
appId = “seata-server”
apolloMeta = “http://192.168.1.204:8801”
namespace = “application”
}
zk {
serverAddr = “127.0.0.1:2181”
sessionTimeout = 6000
connectTimeout = 2000
username = “”
password = “”
}
etcd3 {
serverAddr = “http://localhost:2379”
}
file {
name = “file.conf”
}
}
6.新增filter用于拦截请求获取xid
public class ParamsFilter implements Filter {
@Override
public void doFilter(ServletRequest servletRequest, ServletResponse servletResponse,
                     FilterChain filterChain) throws IOException, ServletException {
    HttpServletRequest request = (HttpServletRequest)servletRequest;

    String xid = request.getHeader(RootContext.KEY_XID);
    boolean isBind = false;

    if (!StringUtils.isEmpty(xid)) {
        RootContext.bind(xid);
        isBind = true;
    }
    try {
        filterChain.doFilter(servletRequest,servletResponse);

    }finally {
        if(isBind){
            RootContext.unbind();
        }
    }
}

@Override
public void init(FilterConfig arg0) throws ServletException {

}

@Override
public void destroy() {

}
}
其他的Rm也可以这样配置,启动TM,RM进行调用
第七节引入网关
还在学习中
