基于MTCNN+SSR网络实现人脸(关键点)检测及年龄预测
基于MTCNN+SSR网络实现人脸(关键点)检测及年龄预测
- 实验内容
- 实验环境
- MTCNN简介及实现流程
-
- MTCNN简介
-
- 三种网络模型
- 网络模型结构图
- MTCNN实现
-
- 调用MTCNN类库
- 构建MTCNN模型实现
- SSR简介及实现流程
-
- SSRNET解读
- SSRNET实现流程
- 参考资料
实验内容
1、通过MTCNN网络将图片中人脸所在区域及其人脸的关键点部位检测出来。
2、通过SSR网络实现对人脸进行年龄判断。
实验环境
Notebook编译器 + Python3.6.9 (当然你也可以选择其他编译器)
TensorFlow-1.14
numpy-1.16.2
Keras-2.3.1
mtcnn-0.0.8(可选)
MTCNN简介及实现流程
MTCNN简介
三种网络模型
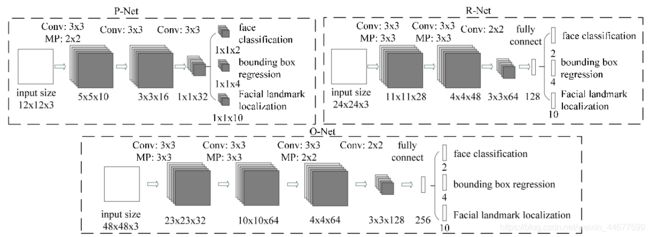
Multi-task convolutional neural network(多任务卷积神经网络),将人脸区域检测与人脸关键点检测放在了一起。它的主题框架类似于cascade。总体可分为P-Net、R-Net、和O-Net三层网络结构。
1、 P-Net
全称为Proposal Network,其基本的构造是一个全卷积网络。对上一步构建完成的图像金字塔,通过一个FCN进行初步特征提取与标定边框,并进行Bounding-Box Regression调整窗口与NMS进行大部分窗口的过滤。P-Net是一个人脸区域的区域建议网络,该网络的将特征输入结果三个卷积层之后,通过一个人脸分类器判断该区域是否是人脸,同时使用边框回归和一个面部关键点的定位器来进行人脸区域的初步提议,该部分最终将输出很多张可能存在人脸的人脸区域,并将这些区域输入R-Net进行进一步处理。
2、 R-Net
全称为Refine Network,其基本的构造是一个卷积神经网络,相对于第一层的P-Net来说,增加了一个全连接层,因此对于输入数据的筛选会更加严格。在图片经过P-Net后,会留下许多预测窗口,我们将所有的预测窗口送入R-Net,这个网络会滤除大量效果比较差的候选框,最后对选定的候选框进行Bounding-Box Regression和NMS进一步优化预测结果。
3、O-Net
全称为Output Network,基本结构是一个较为复杂的卷积神经网络,相对于R-Net来说多了一个卷积层。O-Net的效果与R-Net的区别在于这一层结构会通过更多的监督来识别面部的区域,而且会对人的面部特征点进行回归,最终输出五个人脸面部特征点。
网络模型结构图
MTCNN实现
调用MTCNN类库
1、在命令窗口下,安装mtcnn库
pip install mtcnn==0.0.8
2、调用方法检测人脸及其关键点
# 提前导入需要的库
import numpy as np
import cv2
import random
from PIL import Image
import matplotlib.pyplot as plt
from mtcnn.mtcnn import MTCNN as mtcnn

# 读取图像,转成矩阵
image_path = "./test.jpg"
img = Image.open(image_path)
img = np.array(img)

# 检测人脸及其关键点
detector = mtcnn()
detected = detector.detect_faces(img)

# 打印检测结果
print(detected)
[{ ‘box’: [210, 467, 357, 459],
‘confidence’: 0.9999998807907104,
‘keypoints’:
{‘left_eye’: (371, 638),
‘right_eye’: (516, 662),
‘nose’: (464, 745),
‘mouth_left’: (360, 805),
‘mouth_right’: (478, 825)}}]
box:人脸所在位置的矩形区域
confidence:置信度
keypoints:人脸关键点坐标(字典类型)
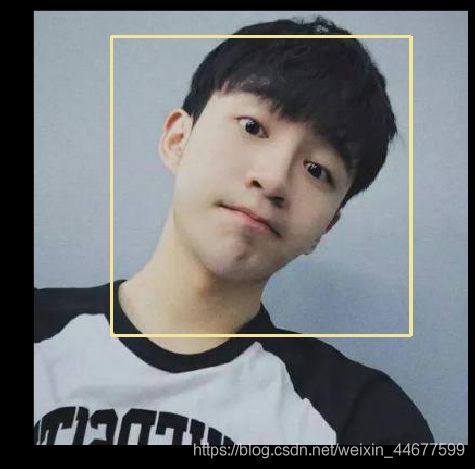
# 绘图观察
box = detected[0]["box"]
res_img = cv2.rectangle(img, (box[0],box[1]),(box[0]+box[2],box[1]+box[3]), 0, 1)
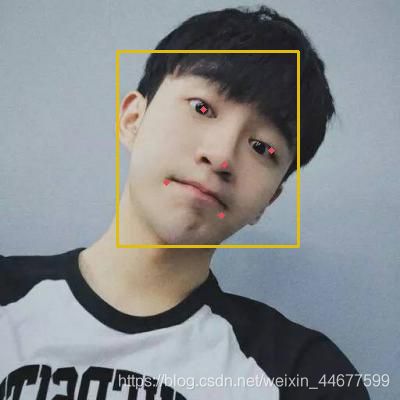
keypoints = detected[0]["keypoints"]
res_img = cv2.circle(res_img, keypoints['left_eye'], 1, 255, 4)
res_img = cv2.circle(res_img, keypoints['right_eye'], 1, 255, 4)
res_img = cv2.circle(res_img, keypoints['nose'], 1, 255, 4)
res_img = cv2.circle(res_img, keypoints['mouth_left'], 1, 255, 4)
res_img = cv2.circle(res_img, keypoints['mouth_right'], 1, 255, 4)
res_img = Image.fromarray(res_img)
plt.imshow(res_img)

这种使用方式比较简单,但是无法对mtcnn库自带的人脸检测模型进行调优,模型参数调节十分繁琐。
构建MTCNN模型实现
1、导入facenet相关方法,便于更好的定位检测人脸。
FaceNet模型下载: https://github.com/davidsandberg/facenet.
# 导入facenet相关方法,便于更好的定位检测人脸
from facenet_master.src.align.detect_face import Network
from facenet_master.src.align.detect_face import rerec, pad
from facenet_master.src.align.detect_face import nms
from facenet_master.src.align.detect_face import imresample
from facenet_master.src.align.detect_face import generateBoundingBox
2、搭建三种网络模型
# PNet网络构建,生成人脸区域备选框,然后备选框通过边界框回归进行校正。
class PNet(Network):
    def setup(self):
        (self.feed('data')
             .conv(3, 3, 10, 1, 1, padding='VALID', relu=False, name='conv1')
             .prelu(name='PReLU1')
             .max_pool(2, 2, 2, 2, name='pool1')
             .conv(3, 3, 16, 1, 1, padding='VALID', relu=False, name='conv2')
             .prelu(name='PReLU2')
             .conv(3, 3, 32, 1, 1, padding='VALID', relu=False, name='conv3')
             .prelu(name='PReLU3')
             .conv(1, 1, 2, 1, 1, relu=False, name='conv4-1')
             .softmax(3,name='prob1'))

        (self.feed('PReLU3')
             .conv(1, 1, 4, 1, 1, relu=False, name='conv4-2'))
# RNet将大量错误的人脸信息去掉,同样通过边界框回归进行校正,以及通过NMS进行筛选。
class RNet(Network):
    def setup(self):
        (self.feed('data') #pylint: disable=no-value-for-parameter, no-member
             .conv(3, 3, 28, 1, 1, padding='VALID', relu=False, name='conv1')
             .prelu(name='prelu1')
             .max_pool(3, 3, 2, 2, name='pool1')
             .conv(3, 3, 48, 1, 1, padding='VALID', relu=False, name='conv2')
             .prelu(name='prelu2')
             .max_pool(3, 3, 2, 2, padding='VALID', name='pool2')
             .conv(2, 2, 64, 1, 1, padding='VALID', relu=False, name='conv3')
             .prelu(name='prelu3')
             .fc(128, relu=False, name='conv4')
             .prelu(name='prelu4')
             .fc(2, relu=False, name='conv5-1')
             .softmax(1,name='prob1'))

        (self.feed('prelu4') #pylint: disable=no-value-for-parameter
             .fc(4, relu=False, name='conv5-2'))
# ONet与RNet相似,但是在ONet将输出5个人脸关键点位置,作为最后一层网络,将输出人脸区域坐标以及人脸关键点坐标。
class ONet(Network):
    def setup(self):
        (self.feed('data') #pylint: disable=no-value-for-parameter, no-member
             .conv(3, 3, 32, 1, 1, padding='VALID', relu=False, name='conv1')
             .prelu(name='prelu1')
             .max_pool(3, 3, 2, 2, name='pool1')
             .conv(3, 3, 64, 1, 1, padding='VALID', relu=False, name='conv2')
             .prelu(name='prelu2')
             .max_pool(3, 3, 2, 2, padding='VALID', name='pool2')
             .conv(3, 3, 64, 1, 1, padding='VALID', relu=False, name='conv3')
             .prelu(name='prelu3')
             .max_pool(2, 2, 2, 2, name='pool3')
             .conv(2, 2, 128, 1, 1, padding='VALID', relu=False, name='conv4')
             .prelu(name='prelu4')
             .fc(256, relu=False, name='conv5')
             .prelu(name='prelu5')
             .fc(2, relu=False, name='conv6-1')
             .softmax(1, name='prob1'))

        (self.feed('prelu5') #pylint: disable=no-value-for-parameter
             .fc(4, relu=False, name='conv6-2'))

        (self.feed('prelu5') #pylint: disable=no-value-for-parameter
             .fc(10, relu=False, name='conv6-3'))
3、图像预处理:首先将图像进行不同尺度的变换,构建图像金字塔,以适应不同大小的人脸的进行检测。
# 进行图片预处理
test_img = Image.open("3.jpg")
test_img = np.array(test_img)
img_size = np.asarray(test_img.shape)[0:2]
factor_count=0
minsize = 20
total_boxes=np.empty((0,9))
points=np.empty(0)
h=test_img.shape[0] # h=410
w=test_img.shape[1] # w=599

minl=np.amin([h, w]) # minl = [410,599] 中最小值 410
m=12.0/minsize # m=12/20
minl=minl*m # minl = 410*12/20 = 410* 0.6
factor = 0.709
scales=[]

while minl>=12:
    scales += [m*np.power(factor, factor_count)]
    minl = minl*factor
    factor_count += 1

# first stage
for scale in scales:
    hs=int(np.ceil(h*scale)) #大于等于该值的最小整数
    ws=int(np.ceil(w*scale))
    im_data = cv2.resize(test_img, (ws, hs), interpolation=cv2.INTER_AREA)
    im_data = (im_data-127.5)*0.0078125
    img_x = np.expand_dims(im_data, 0)
    img_y = np.transpose(img_x, (0,2,1,3))
4.运行PNet,并加载权重
import tensorflow as tf
with tf.Graph().as_default():
    with tf.Session() as sess:
        with tf.variable_scope('pnet'):
            data = tf.placeholder(tf.float32, shape=(None, None, None, 3), name="input")
            pnet = PNet({
     'data':data})
            pnet.load("facenet_master/src/align/det1.npy", sess)
            out = sess.run(('pnet/conv4-2/BiasAdd:0', 'pnet/prob1:0'), feed_dict={
     'pnet/input:0':img_y})

#  boundingbox regression 结果
out0 = np.transpose(out[0], (0,2,1,3))
#  face classification 结果
out1 = np.transpose(out[1], (0,2,1,3))

threshold = 0.5
boxes, reg = generateBoundingBox(out1[0,:,:,1].copy(), out0[0,:,:,:].copy(), scale, threshold)
print("PNet产生结果为:"+str(boxes.shape))

total_boxes = boxes.copy()
运行结果:PNet产生结果为:(1, 9)
image_path="3.jpg"
img = Image.open(image_path)
img = np.array(img)
Image.fromarray(draw_bboxes(img,total_boxes))
total_boxes=np.empty((0,9))
pick = nms(boxes.copy(), 0.7, 'Union')

if boxes.size>0 and pick.size>0:
    boxes = boxes[pick,:]
    total_boxes = np.append(total_boxes, boxes, axis=0)
print("筛选之后结果为:"+str(total_boxes.shape))
# 绘制筛选后的边界框
img = Image.open(image_path)
img = np.array(img)

# 进行nms计算 参数为0.7
pick = nms(total_boxes.copy(), 0.6, 'Union')
total_boxes = total_boxes[pick,:]
print(total_boxes.shape)

# 边界框回归
regw = total_boxes[:,2]-total_boxes[:,0]
regh = total_boxes[:,3]-total_boxes[:,1]
qq1 = total_boxes[:,0]+total_boxes[:,5]*regw
qq2 = total_boxes[:,1]+total_boxes[:,6]*regh
qq3 = total_boxes[:,2]+total_boxes[:,7]*regw
qq4 = total_boxes[:,3]+total_boxes[:,8]*regh
total_boxes = np.transpose(np.vstack([qq1, qq2, qq3, qq4, total_boxes[:,4]]))
print(total_boxes.shape)
img = Image.open(image_path)
img = np.array(img)

# 将边界框形状转为正方形
total_boxes = rerec(total_boxes.copy())
print(total_boxes)

# 将边界框坐标整理成整数
total_boxes[:,0:4] = np.fix(total_boxes[:,0:4]).astype(np.int32)
print(total_boxes)
dy, edy, dx, edx, y, ey, x, ex, tmpw, tmph = pad(total_boxes.copy(), w, h)

img = Image.open(image_path)
img = np.array(img)
Image.fromarray(draw_bboxes(img,total_boxes))
plt.imshow(img)
运行结果:筛选之后结果为:(3, 9)
(1, 9)
(1, 5)
[[ 72.56917826 24.44281903 347.13206585 299.00570662 0.71908188]] [[ 72. 24. 347. 299. 0.71908188]]
5.运行RNet,并加载权重
numbox = total_boxes.shape[0]
tempimg = np.zeros((24,24,3,numbox))
for k in range(0,numbox):
    tmp = np.zeros((int(tmph[k]),int(tmpw[k]),3))
    tmp[dy[k]-1:edy[k],dx[k]-1:edx[k],:] = img[y[k]-1:ey[k],x[k]-1:ex[k],:]
    if tmp.shape[0]>0 and tmp.shape[1]>0 or tmp.shape[0]==0 and tmp.shape[1]==0:
        tempimg[:,:,:,k] = imresample(tmp, (24, 24))
    else:
        print(0)
tempimg = (tempimg-127.5)*0.0078125
tempimg1 = np.transpose(tempimg, (3,1,0,2))
with tf.Graph().as_default():
    with tf.Session() as sess:
        with tf.variable_scope('rnet'):
            data = tf.placeholder(tf.float32, shape=(None, 24, 24, 3), name="input")
            rnet = RNet({
     'data':data})
            rnet.load("facenet_master/src/align/det2.npy", sess)
            out = sess.run(('rnet/conv5-2/conv5-2:0', 'rnet/prob1:0'), feed_dict={
     'rnet/input:0':tempimg1})

# 检测到的人脸坐标
out0 = np.transpose(out[0])
out1 = np.transpose(out[1])

score = out1[1,:]
print(score)
threshold = 0.7
ipass = np.where(score>0.2)
total_boxes = np.hstack([total_boxes[ipass[0],0:4].copy(), np.expand_dims(score[ipass].copy(),1)])
mv = out0[:,ipass[0]]
if total_boxes.shape[0]>0:
    pick = nms(total_boxes, threshold, 'Union')
    total_boxes = total_boxes[pick,:]
    print(total_boxes)

img = Image.open(image_path)
img = np.array(img)

from facenet_master.src.align.detect_face import bbreg
# 边界框回归
total_boxes = bbreg(total_boxes.copy(), np.transpose(mv[:,pick]))
print(total_boxes)
# 边界框整理成正方形
total_boxes = rerec(total_boxes.copy())
print(total_boxes)

img = Image.open(image_path)
img = np.array(img)
Image.fromarray(draw_bboxes(img,total_boxes))
运行结果:[0.9467315]
[[ 72. 24. 347. 299. 0.94673151]]
[[103.01653808 47.28686294 281.67960989 274.13450837 0.94673151]]
[[ 78.92425127 47.28686294 305.77189671 274.13450837 0.94673151]]

5.运行ONet,并加载权重
numbox = total_boxes.shape[0]
total_boxes = np.fix(total_boxes).astype(np.int32)
dy, edy, dx, edx, y, ey, x, ex, tmpw, tmph = pad(total_boxes.copy(), w, h)

tempimg = np.zeros((48,48,3,numbox))
for k in range(0,numbox):
    tmp = np.zeros((int(tmph[k]),int(tmpw[k]),3))
    tmp[dy[k]-1:edy[k],dx[k]-1:edx[k],:] = img[y[k]-1:ey[k],x[k]-1:ex[k],:]
    if tmp.shape[0]>0 and tmp.shape[1]>0 or tmp.shape[0]==0 and tmp.shape[1]==0:
        tempimg[:,:,:,k] = imresample(tmp, (48, 48))
    else:
        print(0)
tempimg = (tempimg-127.5)*0.0078125
tempimg1 = np.transpose(tempimg, (3,1,0,2))
with tf.Graph().as_default():
    with tf.Session() as sess:
        with tf.variable_scope('onet'):
            data = tf.placeholder(tf.float32, shape=(None, 48, 48, 3), name="input")
            onet = ONet({
     'data':data})
            rnet.load("facenet_master/src/align/det3.npy", sess)
            out = sess.run(('onet/conv6-2/conv6-2:0', 'onet/conv6-3/conv6-3:0', 'onet/prob1:0'), feed_dict={
     'onet/input:0':tempimg1})

# 人脸区域边界框预测结果
out0 = np.transpose(out[0])
# 人脸关键点预测结果
out1 = np.transpose(out[1])
# 人脸区域置信度
out2 = np.transpose(out[2])

score = out2[1,:]
points = out1
# threshold = 0.7
ipass = np.where(score>0.7)
points = points[:,ipass[0]]
total_boxes = np.hstack([total_boxes[ipass[0],0:4].copy(), np.expand_dims(score[ipass].copy(),1)])
mv = out0[:,ipass[0]]

w = total_boxes[:,2]-total_boxes[:,0]+1
h = total_boxes[:,3]-total_boxes[:,1]+1
points[0:5,:] = np.tile(w,(5, 1))*points[0:5,:] + np.tile(total_boxes[:,0],(5, 1))-1
points[5:10,:] = np.tile(h,(5, 1))*points[5:10,:] + np.tile(total_boxes[:,1],(5, 1))-1
if total_boxes.shape[0]>0:
    total_boxes = bbreg(total_boxes.copy(), np.transpose(mv))
    pick = nms(total_boxes.copy(), 0.7, 'Min')
    total_boxes = total_boxes[pick,:]
    points = points[:,pick]
img = Image.open(image_path)
img = np.array(img)

r = random.randint(0, 255)
g = random.randint(0, 255)
b = random.randint(0, 255)

point_color = (r, g, b)

for i in range(5):
    cv2.circle(img,(int(points[i]),int(points[i+5])),1, point_color, 4)

Image.fromarray(draw_bboxes(img,total_boxes))
运行结果:
SSR简介及实现流程
SSRNET解读
论文链接: https://www.ijcai.org/Proceedings/2018/0150.pdf.
keras版本代码:https://github.com/shamangary/SSR-Net.
pytorch版本代码:https://github.com/oukohou/SSR_Net_Pytorch.
SSRNET实现流程
1.加载模型结构和网络权重
from facenet_master.ssrnet.SSRNET_model import SSR_net
# 加载模型结构和网络权重
weight_file = "facenet_master/ssrnet/ssrnet_3_3_3_64_1.0_1.0.h5"
img_size = 64
stage_num = [3,3,3]
lambda_local = 1
lambda_d = 1
model = SSR_net(img_size,stage_num, lambda_local, lambda_d)()
model.load_weights(weight_file)
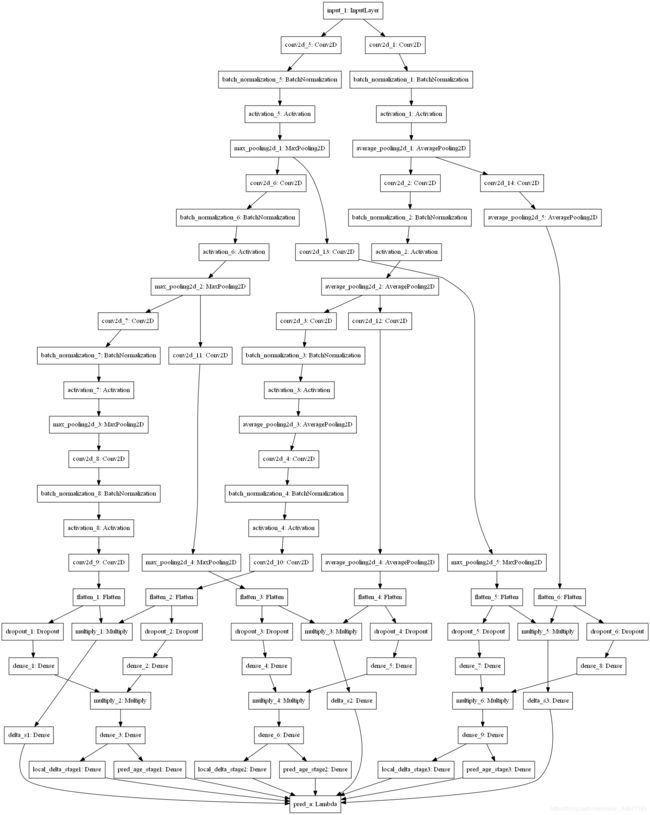
model.summary()
模型结构以树状图方式展开:
Total params: 40,915
Trainable params: 40,531
Non-trainable params: 384
2.基于SSR的年龄预测
faces = np.empty((len(detected), img_size, img_size, 3))
ad = 0.4
img_h, img_w, _ = np.shape(img)
for i,d in enumerate(detected):
    if d['confidence'] >=0.95 :
        x1,y1,w,h = d['box']
        x2 = x1 + w
        y2 = y1 + h
        xw1 = max(int(x1 - ad * w), 0)
        yw1 = max(int(y1 - ad * h), 0)
        xw2 = min(int(x2 + ad * w), img_w - 1)
        yw2 = min(int(y2 + ad * h), img_h - 1)
        img = cv2.resize(img[yw1:yw2+1, xw1:xw2+1, :], (img_size, img_size))
        faces[i,:,:,:] = img
res_img = Image.fromarray(img)
plt.imshow(img)

# 年龄预测
res = model.predict(faces)
print("预测年龄为:"+str(int(res[0])))
运行结果为:
预测年龄为:24

参考资料
MTCNN工作原理: MTCNN.
论文阅读-年龄估计_SSRNet: SSRNet.