
flutter
Flutter是Google从 I/O 2017开始着重推广的移动端跨平台开发框架。近年来出现了很多基于Javascript语言的优秀的移动端跨平台框架,它们各有千秋,其中Flutter越来越受到开发者的关注。它主要有以下几个突出的特点:
- Flutter从v0.2.4版本开始默认采用Dart 2。Dart 2是完整的静态强类型语言,它的语法对于Javascript和Java程序员来说比较好上手;
- Flutter引擎自带了大部分原生组件,大多数情况下不需要类似JS bridge的东西去跟原生组件通信;
- 配置开发环境的时候有一个
flutter doctor的命令行工具,它可以检测到开发Flutter app时所需要的工具中哪些已经在系统里安装,哪些还没有,会给出详细友好的操作提示,基本上把它给出的命令复制黏贴在命令行里运行就可以了。Flutter官方也提供了非常详细的文档; - Flutter自带的组件非常丰富,使你不需要依赖第三方组件库就可以开发移动端app了;
- Flutter在单元测试、部件测试(widget testing)和集成测试等方面提供了丰富的测试工具以及详细的文档和用例;
- Flutter有着强大而友好的命令行交互工具,是它对DevOps和CI/CD的支持非常友好;
看到Flutter这么多特性,我真的心动了。在mac本上配置了开发环境,启动了自己的第一个Flutter app。
下载Flutter SDK
由于众所周知的原因,我们需要用国内的下载源:
https://storage.flutter-io.cn/flutter_infra/releases/stable/macos/flutter_macos_v1.5.4-hotfix.2-stable.zip
下载完成后,将压缩包解压到方便你后续配置环境变量的目录下,我直接解压在了用户根目录下。然后修改.zshrc文件,加入一行:
export PATH=/Users/wubin1989/flutter/bin:$PATH
然后执行命令:
➜  ~ source ~/.zshrc
➜  ~ flutter --version
Flutter 1.5.4-hotfix.2 • channel stable • https://github.com/flutter/flutter.git
Framework • revision 7a4c33425d (6 weeks ago) • 2019-04-29 11:05:24 -0700
Engine • revision 52c7a1e849
Tools • Dart 2.3.0 (build 2.3.0-dev.0.5 a1668566e5)
如果出现版本信息,就说明环境变量配好了。
执行flutter doctor
执行命令:
➜  ~ flutter doctor -v
[✓] Flutter (Channel stable, v1.5.4-hotfix.2, on Mac OS X 10.14.3 18D109, locale zh-Hans-CN)
    • Flutter version 1.5.4-hotfix.2 at /Users/wubin1989/flutter
    • Framework revision 7a4c33425d (6 weeks ago), 2019-04-29 11:05:24 -0700
    • Engine revision 52c7a1e849
    • Dart version 2.3.0 (build 2.3.0-dev.0.5 a1668566e5)


[!] Android toolchain - develop for Android devices (Android SDK version 28.0.3)
    • Android SDK at /Users/wubin1989/Library/Android/sdk
    • Android NDK location not configured (optional; useful for native profiling support)
    • Platform android-28, build-tools 28.0.3
    • Java binary at: /Applications/Android Studio.app/Contents/jre/jdk/Contents/Home/bin/java
    • Java version OpenJDK Runtime Environment (build 1.8.0_152-release-1343-b01)
    ! Some Android licenses not accepted.  To resolve this, run: flutter doctor --android-licenses

[!] iOS toolchain - develop for iOS devices (Xcode 10.2)
    • Xcode at /Applications/Xcode.app/Contents/Developer
    • Xcode 10.2, Build version 10E125
    ✗ libimobiledevice and ideviceinstaller are not installed. To install with Brew, run:
        brew update
        brew install --HEAD usbmuxd
        brew link usbmuxd
        brew install --HEAD libimobiledevice
        brew install ideviceinstaller
    ✗ ios-deploy not installed. To install:
        brew install ios-deploy
    ✗ CocoaPods not installed.
        CocoaPods is used to retrieve the iOS platform side's plugin code that responds to your plugin usage on
        the Dart side.
        Without resolving iOS dependencies with CocoaPods, plugins will not work on iOS.
        For more info, see https://flutter.dev/platform-plugins
      To install:
        brew install cocoapods
        pod setup

[!] Android Studio (version 3.4)
    • Android Studio at /Applications/Android Studio.app/Contents
    ✗ Flutter plugin not installed; this adds Flutter specific functionality.
    ✗ Dart plugin not installed; this adds Dart specific functionality.
    • Java version OpenJDK Runtime Environment (build 1.8.0_152-release-1343-b01)

[!] IntelliJ IDEA Ultimate Edition (version 2018.3.5)
    • IntelliJ at /Applications/IntelliJ IDEA.app
    ✗ Flutter plugin not installed; this adds Flutter specific functionality.
    ✗ Dart plugin not installed; this adds Dart specific functionality.
    • For information about installing plugins, see
      https://flutter.dev/intellij-setup/#installing-the-plugins

[!] VS Code (version 1.35.0)
    • VS Code at /Applications/Visual Studio Code.app/Contents
    ✗ Flutter extension not installed; install from
      https://marketplace.visualstudio.com/items?itemName=Dart-Code.flutter

[!] Connected device
    ! No devices available

! Doctor found issues in 6 categories.
Doctor把检测到的问题和解决办法都提示出来了,一步步照着做即可。
配置IOS开发环境
首先是安装xcode,从apple store里就能下载安装,就不赘述了;
然后执行命令:
➜  ~ sudo xcode-select --switch /Applications/Xcode.app/Contents/Developer
➜  ~ sudo xcodebuild -license
打开模拟器:
➜ ~ open -a Simulator
创建和运行demo app:
➜  ~ flutter create newbie
Creating project newbie...
  newbie/ios/Runner.xcworkspace/contents.xcworkspacedata (created)
  newbie/ios/Runner/Info.plist (created)
  newbie/ios/Runner/Assets.xcassets/LaunchImage.imageset/[email protected] (created)
  newbie/ios/Runner/Assets.xcassets/LaunchImage.imageset/[email protected] (created)
  newbie/ios/Runner/Assets.xcassets/LaunchImage.imageset/README.md (created)
  newbie/ios/Runner/Assets.xcassets/LaunchImage.imageset/Contents.json (created)
  newbie/ios/Runner/Assets.xcassets/LaunchImage.imageset/LaunchImage.png (created)
  newbie/ios/Runner/Assets.xcassets/AppIcon.appiconset/[email protected] (created)
  newbie/ios/Runner/Assets.xcassets/AppIcon.appiconset/[email protected] (created)
  newbie/ios/Runner/Assets.xcassets/AppIcon.appiconset/[email protected] (created)
  newbie/ios/Runner/Assets.xcassets/AppIcon.appiconset/[email protected] (created)
  newbie/ios/Runner/Assets.xcassets/AppIcon.appiconset/[email protected] (created)
  newbie/ios/Runner/Assets.xcassets/AppIcon.appiconset/[email protected] (created)
  newbie/ios/Runner/Assets.xcassets/AppIcon.appiconset/[email protected] (created)
  newbie/ios/Runner/Assets.xcassets/AppIcon.appiconset/Contents.json (created)
  newbie/ios/Runner/Assets.xcassets/AppIcon.appiconset/[email protected] (created)
  newbie/ios/Runner/Assets.xcassets/AppIcon.appiconset/[email protected] (created)
  newbie/ios/Runner/Assets.xcassets/AppIcon.appiconset/[email protected] (created)
  newbie/ios/Runner/Assets.xcassets/AppIcon.appiconset/[email protected] (created)
  newbie/ios/Runner/Assets.xcassets/AppIcon.appiconset/[email protected] (created)
  newbie/ios/Runner/Assets.xcassets/AppIcon.appiconset/[email protected] (created)
  newbie/ios/Runner/Assets.xcassets/AppIcon.appiconset/[email protected] (created)
  newbie/ios/Runner/Assets.xcassets/AppIcon.appiconset/[email protected] (created)
  newbie/ios/Runner/Base.lproj/LaunchScreen.storyboard (created)
  newbie/ios/Runner/Base.lproj/Main.storyboard (created)
  newbie/ios/Runner.xcodeproj/project.xcworkspace/contents.xcworkspacedata (created)
  newbie/ios/Runner.xcodeproj/xcshareddata/xcschemes/Runner.xcscheme (created)
  newbie/ios/Flutter/Debug.xcconfig (created)
  newbie/ios/Flutter/Release.xcconfig (created)
  newbie/ios/Flutter/AppFrameworkInfo.plist (created)
  newbie/test/widget_test.dart (created)
  newbie/newbie.iml (created)
  newbie/.gitignore (created)
  newbie/.metadata (created)
  newbie/ios/Runner/AppDelegate.h (created)
  newbie/ios/Runner/main.m (created)
  newbie/ios/Runner/AppDelegate.m (created)
  newbie/ios/Runner.xcodeproj/project.pbxproj (created)
  newbie/android/app/src/profile/AndroidManifest.xml (created)
  newbie/android/app/src/main/res/mipmap-mdpi/ic_launcher.png (created)
  newbie/android/app/src/main/res/mipmap-hdpi/ic_launcher.png (created)
  newbie/android/app/src/main/res/drawable/launch_background.xml (created)
  newbie/android/app/src/main/res/mipmap-xxxhdpi/ic_launcher.png (created)
  newbie/android/app/src/main/res/mipmap-xxhdpi/ic_launcher.png (created)
  newbie/android/app/src/main/res/values/styles.xml (created)
  newbie/android/app/src/main/res/mipmap-xhdpi/ic_launcher.png (created)
  newbie/android/app/src/main/AndroidManifest.xml (created)
  newbie/android/app/src/debug/AndroidManifest.xml (created)
  newbie/android/gradle/wrapper/gradle-wrapper.properties (created)
  newbie/android/gradle.properties (created)
  newbie/android/settings.gradle (created)
  newbie/pubspec.yaml (created)
  newbie/README.md (created)
  newbie/lib/main.dart (created)
  newbie/android/app/build.gradle (created)
  newbie/android/app/src/main/java/com/example/newbie/MainActivity.java (created)
  newbie/android/build.gradle (created)
  newbie/android/newbie_android.iml (created)
  newbie/.idea/runConfigurations/main_dart.xml (created)
  newbie/.idea/libraries/Flutter_for_Android.xml (created)
  newbie/.idea/libraries/Dart_SDK.xml (created)
  newbie/.idea/libraries/KotlinJavaRuntime.xml (created)
  newbie/.idea/modules.xml (created)
  newbie/.idea/workspace.xml (created)
Running "flutter packages get" in newbie...                        20.6s
Wrote 66 files.

All done!
[✓] Flutter is fully installed. (Channel stable, v1.5.4-hotfix.2, on Mac OS X 10.14.3 18D109, locale
    zh-Hans-CN)
[✓] Android toolchain - develop for Android devices is fully installed. (Android SDK version 28.0.3)
[✓] iOS toolchain - develop for iOS devices is fully installed. (Xcode 10.2)
[!] Android Studio is partially installed; more components are available. (version 3.4)
[✓] IntelliJ IDEA Ultimate Edition is fully installed. (version 2018.3.5)
[!] VS Code is partially installed; more components are available. (version 1.35.0)
[✓] Connected device is fully installed. (1 available)

Run "flutter doctor" for information about installing additional components.

In order to run your application, type:

  $ cd newbie
  $ flutter run

Your application code is in newbie/lib/main.dart.
这里要提一下,下载依赖项的过程需要梯子,如果没有好用的梯子,建议配置mirror,修改.zshrc文件,添加下面两行:
 export PUB_HOSTED_URL=https://pub.flutter-io.cn
 export FLUTTER_STORAGE_BASE_URL=https://storage.flutter-io.cn
然后执行命令使修改生效:
➜ ~ source ~/.zshrc
再执行如下命令,app就在模拟器里启动了:
➜  ~ cd newbie
➜  newbie flutter run
Launching lib/main.dart on iPhone Xʀ in debug mode...
Running Xcode build...
 ├─Assembling Flutter resources...                           1.5s
 └─Compiling, linking and signing...                         1.9s
Xcode build done.                                            4.9s
Syncing files to device iPhone Xʀ...
 2,010ms (!)

  To hot reload changes while running, press "r". To hot restart (and rebuild state), press "R".
An Observatory debugger and profiler on iPhone Xʀ is available at:
http://127.0.0.1:50333/gAX4Ldz9lgA=/
For a more detailed help message, press "h". To detach, press "d"; to quit, press "q".
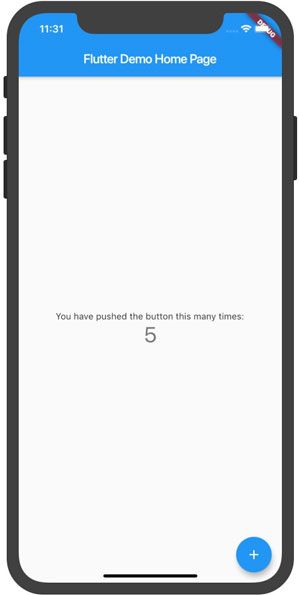
app截图
部署到IOS设备
- 如果已经根据Doctor的提示把IOS toolchain里的问题清除了,就可以跳过下面这段配置:
➜  ~ brew update
➜  ~ brew install --HEAD usbmuxd
➜  ~ brew link usbmuxd
➜  ~ brew install --HEAD libimobiledevice
➜  ~ brew install ideviceinstaller ios-deploy cocoapods
➜  ~ pod setup
在项目根目录执行,打开xcode:
➜ newbie open ios/Runner.xcworkspace
-
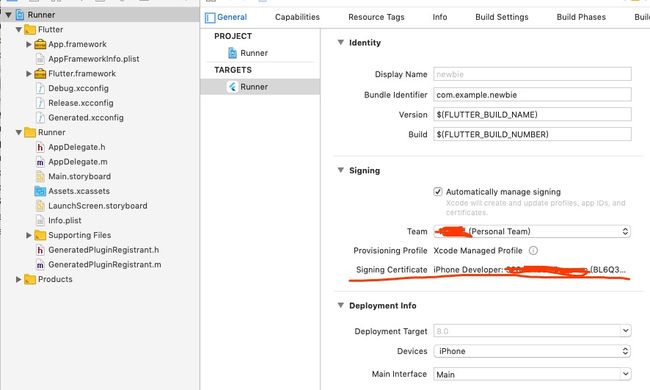
添加账号
 xcode截图
根据截图里的提示添加账号,需要登录apple id。
- 通过数据线连接你的iphone,并且在手机弹出的”是否信任这台电脑“的提示框里点击信任
-
生成签名(这一步可能会踩坑,有问题可以留言)
 xcode截图
 - 执行命令:
newbie flutter run
Launching lib/main.dart on iPhone in debug mode...
Automatically signing iOS for device deployment using specified development team in Xcode project:
FF3R5PWHLT
Running Xcode build...
 ├─Assembling Flutter resources...                           1.0s
 └─Compiling, linking and signing...                         1.8s
Xcode build done.                                            4.4s
Installing and launching...                                         7.9s
Could not install build/ios/iphoneos/Runner.app on 1d38803c5b7e94c956b36641ca99a80fa51e3e96.
Try launching Xcode and selecting "Product > Run" to fix the problem:
  open ios/Runner.xcworkspace

Error launching application on iPhone.
如果出现报错,别担心,你需要在手机上做几步操作:
打开设置 => 点击通用 => 点击描述文件与设备管理 => 点击最下面的”开发者应用" => 点击”信任XXXX“

手机截图
再次执行命令:
➜  newbie flutter run
Launching lib/main.dart on iPhone in debug mode...
Automatically signing iOS for device deployment using specified development team in Xcode project:
FF3R5PWHLT
Running Xcode build...
 ├─Assembling Flutter resources...                           1.3s
 └─Compiling, linking and signing...                         2.9s
Xcode build done.                                            5.6s
Installing and launching...                                        11.8s
Syncing files to device iPhone...                                1,883ms

  To hot reload changes while running, press "r". To hot restart (and rebuild state), press "R".
An Observatory debugger and profiler on iPhone is available at: http://127.0.0.1:1025/XklrNtNqj_o=/
For a more detailed help message, press "h". To detach, press "d"; to quit, press "q".
成功!
结论
亲自体验了一下Flutter的开发环境配置,app的创建和部署,感觉Flutter的命令行交互工具确实很棒,特别是flutter doctor,可以帮助开发者清除很多障碍,节省宝贵的时间。