摘要
微软的深度残差网络ResNet源于2016年CVPR最佳论文---图像识别中的深度残差学习(Deep Residual Learning for Image Recognition), 论文来源,翻译地址
这个152层ResNet架构深,除了在层数上面创纪录,ResNet 的错误率也低得惊人,达到了3.6%,人类都大约在5%~10%的水平。这是目前为止最好的深度学习框架。可以看作人工神经网络领域的又一里程碑。
2016年8月31日,Google团队宣布针对TensorFlow开源了最新发布的TF-slim资料库,它是一个可以定义、训练和评估模型的轻量级的软件包,也能对图像分类领域中几个主要有竞争力的网络进行检验和定义模型。这其中,就包括了ResNet网络结构。本文将结合TF-slim库中的ResNet模型的代码,介绍一下ResNet网络的结构和原理。
ResNet的原理
论文中提到,近几年的研究发现网络的深度是使网络性能更优化的一个关键因素,但是随着网络深度的加深,梯度消失&爆炸问题十分明显,网络甚至出现了退化。在论文中通过一个20层和一个56层的普通网络进行了对比,发现56层网络的性能远低于20层网络,如图1所示。
而在ResNet的这篇论文中,通过引入一个深度残差学习框架,解决了这个退化问题。它不期望每一层能直接吻合一个映射,而是明确的让这些层去吻合残差映射。形式上看,就是用H(X)来表示最优解映射,但我们让堆叠的非线性层去拟合另一个映射F(X):=H(X) - X, 此时原最优解映射H(X)就可以改写成F(X)+X,我们假设残差映射跟原映射相比更容易被优化。极端情况下,如果一个映射是可优化的,那也会很容易将残差推至0,把残差推至0和把此映射逼近另一个非线性层相比要容易的多。F(X)+X的公式可以通过在前馈网络中做一个“快捷连接”来实现(如图2) ,快捷连接跳过一个或多个层。在我们的用例中,快捷连接简单的执行自身映射,它们的输出被添加到叠加层的输出中。自身快捷连接既不会添加额外的参数也不会增加计算复杂度。整个网络依然可以用SGD+反向传播来做端到端的训练。
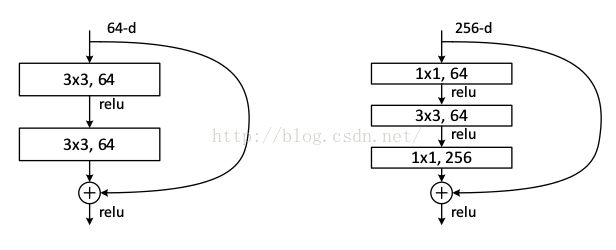
它有二层,如下表达式,其中σ代表非线性函数ReLU
然后通过一个shortcut,和第2个ReLU,获得输出y
而在论文的后续,又提出来深度瓶颈结构,如图3右侧.在文中是这样描述这个结构的:接下来我们描述我们为ImageNet准备的更深的网络。因为太过漫长的训练时间我们负担不起,所以修改了单元块,改为一种瓶颈设计。对于每个残差函数F,我们使用3层来描述,而不是2层。这三层分别是1×1、3×3,和1×1的卷积层,其中1×1层负责先减少后增加(恢复)尺寸的,使3×3层具有较小的输入/输出尺寸瓶颈。
这个深度瓶颈结构在TF-Slim库中的代码实现如下所示:
def bottleneck(inputs, depth, depth_bottleneck, stride, rate=1,
               outputs_collections=None, scope=None):

  with tf.variable_scope(scope, 'bottleneck_v1', [inputs]) as sc:
    depth_in = slim.utils.last_dimension(inputs.get_shape(), min_rank=4)
    if depth == depth_in:
      shortcut = resnet_utils.subsample(inputs, stride, 'shortcut')
    else:
      shortcut = slim.conv2d(inputs, depth, [1, 1], stride=stride,
                             activation_fn=None, scope='shortcut')

    residual = slim.conv2d(inputs, depth_bottleneck, [1, 1], stride=1,
                           scope='conv1')
    residual = resnet_utils.conv2d_same(residual, depth_bottleneck, 3, stride,
                                        rate=rate, scope='conv2')
    residual = slim.conv2d(residual, depth, [1, 1], stride=1,
                           activation_fn=None, scope='conv3')

    output = tf.nn.relu(shortcut + residual)

    return slim.utils.collect_named_outputs(outputs_collections,
                                            sc.original_name_scope,
                                            output)
需要注意的是,在论文中提到的当输入输出尺寸发生增加时(图4中的虚线的快捷连接),会考虑两个策略:(a)快捷连接仍然使用自身映射,对于维度的增加用零来填补空缺。此策略不会引入额外的参数;(b)投影捷径(公式2)被用来匹配尺寸(靠1×1的卷积完成)。对于这两种选项,当快捷连接在两个不同大小的特征图谱上出现时,用stride=2来处理。而在TF-Slim的代码实现中我们可以看到采用了第二种解决方式,即通过通过1X1的卷积核卷积来达成尺寸匹配。(虽然论文中说这样提高不多但需要更多参数所以最后没有使用。)
同时,在代码中对于下采样操作(subsample)是通过1x1的池化来完成的。
ResNet的结构
所以我们可以根据一个普通的神经网络来构造一个ResNet,如图4所示,论文中选择的基础网络是VGG-Net。
而它的具体网络结构如图5的表中所示。
在TF-Slim中的代码实现如下(以ResNet-50为例):
def resnet_v1_50(inputs,
                 num_classes=None,
                 is_training=True,
                 global_pool=True,
                 output_stride=None,
                 reuse=None,
                 scope='resnet_v1_50'):
  """ResNet-50 model of [1]. See resnet_v1() for arg and return description."""
  blocks = [
      resnet_utils.Block(
          'block1', bottleneck, [(256, 64, 1)] * 2 + [(256, 64, 2)]),
      resnet_utils.Block(
          'block2', bottleneck, [(512, 128, 1)] * 3 + [(512, 128, 2)]),
      resnet_utils.Block(
          'block3', bottleneck, [(1024, 256, 1)] * 5 + [(1024, 256, 2)]),
      resnet_utils.Block(
          'block4', bottleneck, [(2048, 512, 1)] * 3)
  ]
  return resnet_v1(inputs, blocks, num_classes, is_training,
                   global_pool=global_pool, output_stride=output_stride,
                   include_root_block=True, reuse=reuse, scope=scope)
在这段代码中,其实只是声明了一个通过Block组合成的List,Block的声明如下,其中的关键是collections.namedtuple这个函数,它把前面元组的值和后面的命名对应了起来。
class Block(collections.namedtuple('Block', ['scope', 'unit_fn', 'args'])):
  """A named tuple describing a ResNet block.

  Its parts are:
    scope: The scope of the `Block`.
    unit_fn: The ResNet unit function which takes as input a `Tensor` and
      returns another `Tensor` with the output of the ResNet unit.
    args: A list of length equal to the number of units in the `Block`. The list
      contains one (depth, depth_bottleneck, stride) tuple for each unit in the
      block to serve as argument to unit_fn.
  """
而将个元素为block的 LIst转换为一个网络的函数,则是resnet_v1,这个函数是ResNet的核心,而不同层数的ResNet只需要改变上述函数blocks中block的个数就可以了。
def resnet_v1(inputs,
              blocks,
              num_classes=None,
              is_training=True,
              global_pool=True,
              output_stride=None,
              include_root_block=True,
              reuse=None,
              scope=None):

  with tf.variable_scope(scope, 'resnet_v1', [inputs], reuse=reuse) as sc:
    end_points_collection = sc.name + '_end_points'
    with slim.arg_scope([slim.conv2d, bottleneck,
                         resnet_utils.stack_blocks_dense],
                        outputs_collections=end_points_collection):
      with slim.arg_scope([slim.batch_norm], is_training=is_training):
        net = inputs
        if include_root_block:
          if output_stride is not None:
            if output_stride % 4 != 0:
              raise ValueError('The output_stride needs to be a multiple of 4.')
            output_stride /= 4
          net = resnet_utils.conv2d_same(net, 64, 7, stride=2, scope='conv1')
          net = slim.max_pool2d(net, [3, 3], stride=2, scope='pool1')
        net = resnet_utils.stack_blocks_dense(net, blocks, output_stride)
        if global_pool:
          # Global average pooling.
          net = tf.reduce_mean(net, [1, 2], name='pool5', keep_dims=True)
        if num_classes is not None:
          net = slim.conv2d(net, num_classes, [1, 1], activation_fn=None,
                            normalizer_fn=None, scope='logits')
        # Convert end_points_collection into a dictionary of end_points.
        end_points = slim.utils.convert_collection_to_dict(end_points_collection)
        if num_classes is not None:
          end_points['predictions'] = slim.softmax(net, scope='predictions')
        return net, end_points
在这个函数中,将blocks转换为net的语句是
net = resnet_utils.stack_blocks_dense(net, blocks, output_stride)
这个函数的具体实现如下,它通过一个循环将list中的每个block读取出来,然后将block中相应的参数代入到前文提到的bottleneck这个函数中,这样就生成了相应的ResNet网络结构。
def stack_blocks_dense(net,
                       blocks,
                       output_stride=None,
                       outputs_collections=None):

  # The current_stride variable keeps track of the effective stride of the
  # activations. This allows us to invoke atrous convolution whenever applying
  # the next residual unit would result in the activations having stride larger
  # than the target output_stride.
  current_stride = 1

  # The atrous convolution rate parameter.
  rate = 1

  for block in blocks:
    with variable_scope.variable_scope(block.scope, 'block', [net]) as sc:
      for i, unit in enumerate(block.args):
        if output_stride is not None and current_stride > output_stride:
          raise ValueError('The target output_stride cannot be reached.')

        with variable_scope.variable_scope('unit_%d' % (i + 1), values=[net]):
          unit_depth, unit_depth_bottleneck, unit_stride = unit

          # If we have reached the target output_stride, then we need to employ
          # atrous convolution with stride=1 and multiply the atrous rate by the
          # current unit's stride for use in subsequent layers.
          if output_stride is not None and current_stride == output_stride:
            net = block.unit_fn(
                net,
                depth=unit_depth,
                depth_bottleneck=unit_depth_bottleneck,
                stride=1,
                rate=rate)
            rate *= unit_stride

          else:
            net = block.unit_fn(
                net,
                depth=unit_depth,
                depth_bottleneck=unit_depth_bottleneck,
                stride=unit_stride,
                rate=1)
            current_stride *= unit_stride
      net = utils.collect_named_outputs(outputs_collections, sc.name, net)

  if output_stride is not None and current_stride != output_stride:
    raise ValueError('The target output_stride cannot be reached.')

  return net
在这里,代码中提到了 atrous convolution这个结构,简单来说,它是如图6(b)所示的一个结构,可以起到在使用了步长为1的池化层后扔使得原结构保持相同的感受野。
参考文献
[1]Deep Residual Learning for Image Recognition
[2]http://blog.csdn.net/tiandijun/article/details/52526317
[3]http://blog.csdn.net/mao_feng/article/details/52734438
[4]http://blog.csdn.net/helei001/article/details/52692128
[5]http://blog.csdn.net/u012759136/article/details/52434826#t9


