Android Framework学习笔记(三)SystemServer进程启动过程
SystemServer进程的启动
在上一篇文章Frameworkbi学习(二)Zygote进程启动过程中,我们已经知道Zygote进程会启动SystemServer进程,但具体启动流程还没有涉及,本文我们就来看看SystemServer进程具体启动过程。
首先回顾下ZygoteInit#startSystemServer()函数:
frameworks/base/core/java/com/android/internal/os/ZygoteInit.java
ZygoteInit#startSystemServer()
private static boolean startSystemServer(String abiList, String socketName) throws MethodAndArgsCaller, RuntimeException {
       ...

        int pid;
        try {
            parsedArgs = new ZygoteConnection.Arguments(args);
            ZygoteConnection.applyDebuggerSystemProperty(parsedArgs);
            ZygoteConnection.applyInvokeWithSystemProperty(parsedArgs);

            /* 1 */
            // 请求fork SystemServer进程
            pid = Zygote.forkSystemServer(
                    parsedArgs.uid, parsedArgs.gid,
                    parsedArgs.gids,
                    parsedArgs.debugFlags,
                    null,
                    parsedArgs.permittedCapabilities,
                    parsedArgs.effectiveCapabilities);
        } catch (IllegalArgumentException ex) {
            throw new RuntimeException(ex);
        }

        // pid为0表示子进程,即SystemServer进程,从此SystemServer进程与Zygote进程分道扬镳
        if (pid == 0) {
            if (hasSecondZygote(abiList)) {
                waitForSecondaryZygote(socketName);
            }
            handleSystemServerProcess(parsedArgs); //2
        }

        return true;
   }
注释1处调用Zygote的forkSystemServer,主要通过fork函数在当前进程创建一个子进程(也就是SystemServer进程),如果返回的pid 为0,也就是表示在新创建的子进程中执行的,则执行注释2处的handleSystemServerProcess,来看看handleSystemServerProcess是如何启动SystemServer进程的。
ZygoteInit#handleSystemServerProcess()
private static void handleSystemServerProcess(
            ZygoteConnection.Arguments parsedArgs)
            throws ZygoteInit.MethodAndArgsCaller {

        closeServerSocket();  //1

        if (parsedArgs.niceName != null) {
            Process.setArgV0(parsedArgs.niceName);  //2
        }

        ...

        if (parsedArgs.invokeWith != null) {
            String[] args = parsedArgs.remainingArgs;
            // If we have a non-null system server class path, we'll have to duplicate the
            // existing arguments and append the classpath to it. ART will handle the classpath
            // correctly when we exec a new process.
            if (systemServerClasspath != null) {
                String[] amendedArgs = new String[args.length + 2];
                amendedArgs[0] = "-cp";
                amendedArgs[1] = systemServerClasspath;
                System.arraycopy(parsedArgs.remainingArgs, 0, amendedArgs, 2, parsedArgs.remainingArgs.length);
            }

            WrapperInit.execApplication(parsedArgs.invokeWith,
                    parsedArgs.niceName, parsedArgs.targetSdkVersion,
                    VMRuntime.getCurrentInstructionSet(), null, args);
        } else {
            ClassLoader cl = null;
            if (systemServerClasspath != null) {
                cl = createSystemServerClassLoader(systemServerClasspath,
                                                   parsedArgs.targetSdkVersion);

                Thread.currentThread().setContextClassLoader(cl);
            }

            /*
             * Pass the remaining arguments to SystemServer.
             */
            RuntimeInit.zygoteInit(parsedArgs.targetSdkVersion, parsedArgs.remainingArgs, cl); //3
        }

        /* should never reach here */
    }
注释1处SyetemServer进程是复制了Zygote进程的地址空间,因此也会得到Zygote进程创建的Socket,这个Socket对于SyetemServer进程没有用处,所以调用closeServerSocket()关闭它。
注释2如果你看Arguments封装函数,会发现parsedArgs.niceName=system_server,在这里调用Process.setArgV0()设置进程名为:system_server。
注释3由于parsedArgs.invokeWith属性默认为null,最后调用RuntimeInit.zygoteInit来进一步启动SystemServer。
frameworks/base/core/java/com/android/internal/os/RuntimeInit.java
RuntimeInit#zygoteInit()
 public static final void zygoteInit(int targetSdkVersion, String[] argv, ClassLoader classLoader)
            throws ZygoteInit.MethodAndArgsCaller {
        if (DEBUG) Slog.d(TAG, "RuntimeInit: Starting application from zygote");

        Trace.traceBegin(Trace.TRACE_TAG_ACTIVITY_MANAGER, "RuntimeInit");
        // 重定向Log输出
        redirectLogStreams();
        //初始化运行环境
        commonInit();
        //启动Binder线程池
        nativeZygoteInit(); //1
        //调用程序入口函数
        applicationInit(targetSdkVersion, argv, classLoader); //2
    }
注释1处调用nativeZygoteInit函数,一看函数的名称就知道调用Native层的代码,它是用来启动Binder线程池的。
注释2处调用了applicationInit函数启动应用程序。
Binder线程池启动过程
先看看启动Binder线程池。来查看nativeZygoteInit函数对应的JNI文件,如下所示。
frameworks/base/core/jni/AndroidRuntime.cpp
static const JNINativeMethod gMethods[] = {
    { "nativeFinishInit", "()V",
        (void*) com_android_internal_os_RuntimeInit_nativeFinishInit },
    { "nativeZygoteInit", "()V",
        (void*) com_android_internal_os_RuntimeInit_nativeZygoteInit },
    { "nativeSetExitWithoutCleanup", "(Z)V",
        (void*) com_android_internal_os_RuntimeInit_nativeSetExitWithoutCleanup },
};
通过JNI的gMethods数组,可以看出nativeZygoteInit函数对应的是JNI文件AndroidRuntime.cpp的com_android_internal_os_RuntimeInit_nativeZygoteInit函数:
AndroidRuntime#com_android_internal_os_RuntimeInit_nativeZygoteInit()
...
static AndroidRuntime* gCurRuntime = NULL;

AndroidRuntime::AndroidRuntime(char* argBlockStart, const size_t argBlockLength) :
        mExitWithoutCleanup(false),
        mArgBlockStart(argBlockStart),
        mArgBlockLength(argBlockLength)
{
   ...
    gCurRuntime = this;
}

...

static void com_android_internal_os_RuntimeInit_nativeZygoteInit(JNIEnv* env, jobject clazz)
{
    gCurRuntime->onZygoteInit();
}
这里gCurRuntime是AndroidRuntime类型的指针,AndroidRuntime的子类AppRuntime在app_main.cpp中定义,我们来查看AppRuntime的onZygoteInit函数
frameworks/base/cmds/app_process/app_main.cpp
AppRuntime#onZygoteInit()
virtual void onZygoteInit()
   {
       sp proc = ProcessState::self();
       ALOGV("App process: starting thread pool.\n");
       proc->startThreadPool();//1
   }
注释1处会调用ProcessState的startThreadPool函数。
frameworks/native/libs/binder/ProcessState.cpp
ProcessState#startThreadPool()
void ProcessState::startThreadPool()
{
    AutoMutex _l(mLock);
    //1
    if (!mThreadPoolStarted) {
        mThreadPoolStarted = true;
        spawnPooledThread(true);
    }
}
支持Binder通信的进程中都有一个ProcessState类,它里面有一个mThreadPoolStarted 变量,来表示Binder线程池是否已经被启动过,默认值为false。在每次调用这个函数时都会先去检查这个标记,从而确保Binder线程池只会被启动一次。
注释1如果Binder线程池未被启动则设置mThreadPoolStarted为true,最后调用spawnPooledThread函数来创建线程池中的第一个线程,也就是线程池的main线程。
ProcessState#spawnPooledThread()
void ProcessState::spawnPooledThread(bool isMain)
{
    if (mThreadPoolStarted) {
        String8 name = makeBinderThreadName();
        ALOGV("Spawning new pooled thread, name=%s\n", name.string());
        sp t = new PoolThread(isMain);
        t->run(name.string());//1
    }
}
可以看到Binder线程为一个PoolThread。注释1调用PoolThread的run函数来启动一个新的线程。
PoolThread
class PoolThread : public Thread
{
..
protected:
    virtual bool threadLoop()
    {
        IPCThreadState::self()->joinThreadPool(mIsMain);//1
        return false;
    }
    const bool mIsMain;
};
PoolThread类继承了Thread类。注释1处会将调用IPCThreadState的joinThreadPool函数,将当前线程注册到Binder驱动程序中,这样我们创建的线程就加入了Binder线程池中,这样新创建的SyetemServer进程就支持Binder进程间通信了。
回到RuntimeInit#zygoteInit()的注释2。
RuntimeInit#applicationInit()
 private static void applicationInit(int targetSdkVersion, String[] argv, ClassLoader classLoader)
            throws ZygoteInit.MethodAndArgsCaller {
        ...

        // 初始化虚拟机环境
        VMRuntime.getRuntime().setTargetHeapUtilization(0.75f);
        VMRuntime.getRuntime().setTargetSdkVersion(targetSdkVersion);

        final Arguments args;
        try {
            args = new Arguments(argv);
        } catch (IllegalArgumentException ex) {
            Slog.e(TAG, ex.getMessage());
            // let the process exit
            return;
        }

        // Remaining arguments are passed to the start class's static main
        invokeStaticMain(args.startClass, args.startArgs, classLoader); //1
    }
注释1处applicationInit函数中主要调用了invokeStaticMain函数。
RuntimeInit#invokeStaticMain()
private static void invokeStaticMain(String className, String[] argv, ClassLoader classLoader) throws ZygoteInit.MethodAndArgsCaller {
        Class cl;

        try {
            cl = Class.forName(className, true, classLoader); //1
        } catch (ClassNotFoundException ex) {
            throw new RuntimeException("Missing class when invoking static main " + className, ex);
        }

        Method m;
        try {
            // 获取main方法
            m = cl.getMethod("main", new Class[] { String[].class }); //2
        } catch (NoSuchMethodException ex) {
            throw new RuntimeException("Missing static main on " + className, ex);
        } catch (SecurityException ex) {
            throw new RuntimeException("Problem getting static main on " + className, ex);
        }
        // 判断修饰符
        int modifiers = m.getModifiers(); //3
        if (! (Modifier.isStatic(modifiers) && Modifier.isPublic(modifiers))) {
            throw new RuntimeException("Main method is not public and static on " + className);
        }

        /*
         * This throw gets caught in ZygoteInit.main(), which responds
         * by invoking the exception's run() method. This arrangement
         * clears up all the stack frames that were required in setting
         * up the process.
         */
        throw new ZygoteInit.MethodAndArgsCaller(m, argv); //4
    }
注释1处传入的className就是com.android.server.SystemServer ,因此通过反射返回的cl为SystemServer类。
注释2获取main方法 。
注释3判断修饰符,必须是static而且必须是public类型。
注释4有点意思,做完这一切之后,将找到的main函数传入到MethodAndArgsCaller异常中并抛出该异常。辛苦辛苦各种初始化,各种变着法的调用,最后你居然给我抛个异常!先别急,这个异常在ZygoteInit#main()方法中捕获。这么做的作用是清除应用程序进程创建过程的调用栈。
ZygoteInit#main()函数见上一篇文章,我们这里再看一下框架:
public static void main(String argv[]) {
    try {
        ...
        startSystemServer(abiList, socketName);
        ...
    } catch (MethodAndArgsCaller caller) {
        caller.run(); //1
    }
}
在注释1处调用了MethodAndArgsCaller的run函数。
MethodAndArgsCaller
public static class MethodAndArgsCaller extends Exception
            implements Runnable {
        /** method to call */
        private final Method mMethod;

        /** argument array */
        private final String[] mArgs;

        public MethodAndArgsCaller(Method method, String[] args) {
            mMethod = method;
            mArgs = args;
        }

        public void run() {
            try {
                mMethod.invoke(null, new Object[] { mArgs }); //1
            } catch (IllegalAccessException ex) {
                throw new RuntimeException(ex);
            } catch (InvocationTargetException ex) {
                Throwable cause = ex.getCause();
                if (cause instanceof RuntimeException) {
                    throw (RuntimeException) cause;
                } else if (cause instanceof Error) {
                    throw (Error) cause;
                }
                throw new RuntimeException(ex);
            }
        }
    }
注释1处通过反射调用了com.android.server.SystemServer#main(String[] args)。至此,Zygote进程fork出SystemServer进程,并成功调用SystemServer#main()。
解析SyetemServer进程
我们先来查看SystemServer的main函数:
frameworks/base/services/java/com/android/server/SystemServer.java
SystemServer#main()

    public static void main(String[] args) {
        new SystemServer().run(); //1
    }
注释1处main函数中只调用了SystemServer的run函数。
SystemServer#run()
private void run() {
       ...
           System.loadLibrary("android_servers");//1
       ...
           mSystemServiceManager = new SystemServiceManager(mSystemContext);//2
           LocalServices.addService(SystemServiceManager.class, mSystemServiceManager);
       ...
        try {
           Trace.traceBegin(Trace.TRACE_TAG_SYSTEM_SERVER, "StartServices");
           startBootstrapServices();//3
           startCoreServices();//4
           startOtherServices();//5
       } catch (Throwable ex) {
           Slog.e("System", "******************************************");
           Slog.e("System", "************ Failure starting system services", ex);
           throw ex;
       } finally {
           Trace.traceEnd(Trace.TRACE_TAG_SYSTEM_SERVER);
       }
       ...
   }
注释1处加载了libandroid_servers.so。
注释2处创建SystemServiceManager,它会对系统的服务进行创建、启动和生命周期管理。启动系统的各种服务。
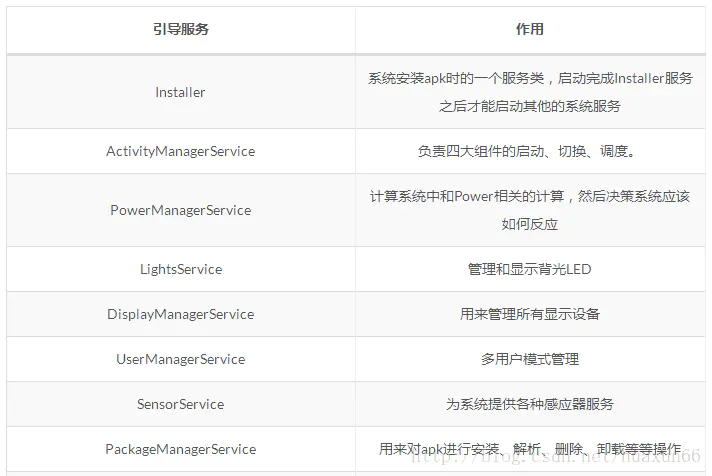
注释3中的startBootstrapServices函数中用SystemServiceManager启动了ActivityManagerService、PowerManagerService、PackageManagerService等服务。
注释4处的函数中则启动了BatteryService、UsageStatsService和WebViewUpdateService。
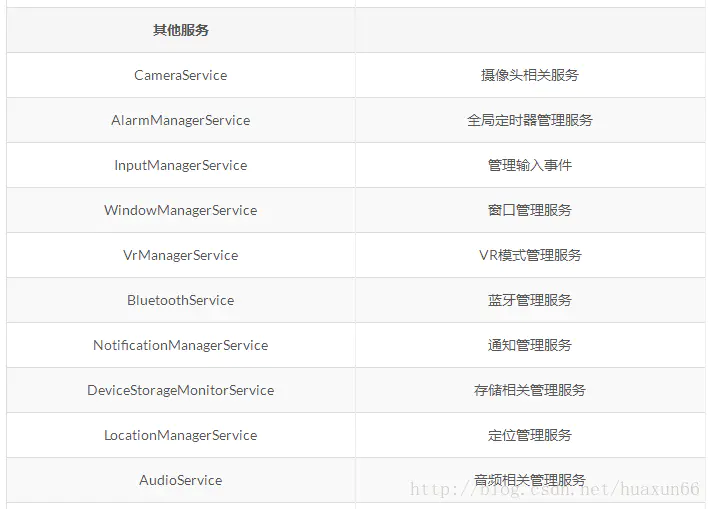
注释5处的startOtherServices函数中则启动了CameraService、AlarmManagerService、VrManagerService等服务,这些服务的父类为SystemService。
从注释3、4、5的函数可以看出,官方把系统服务分为了三种类型,分别是引导服务、核心服务和其他服务,其中其他服务为一些非紧要和一些不需要立即启动的服务。系统服务大约有80多个,这里列出部分系统服务以及它们的作用:
image
image
image
继续往下看,我们这里只看看注释3如何启动引导服务,注释4、5类似。
SystemServer#startBootstrapServices()
private void startBootstrapServices() {
        ...
        mPowerManagerService = mSystemServiceManager.startService(PowerManagerService.class);
        ...

       mPackageManagerService = PackageManagerService.main(mSystemContext, installer, mFactoryTestMode != FactoryTest.FACTORY_TEST_OFF, mOnlyCore);
       ...
}
这里面要启动的引导服务很多,我们来看看PowerManagerService和PackageManagerService吧。
首先是PowerManagerService,它是通过SystemServiceManager.startService()来启动的:
frameworks/base/services/core/java/com/android/server/SystemServiceManager.java
SystemServiceManager#startService()
    public  T startService(Class serviceClass) {
        try {
            final String name = serviceClass.getName();
            ...

            final T service;
            try {
                Constructor constructor = serviceClass.getConstructor(Context.class);
                service = constructor.newInstance(mContext);  //1
            } catch (InstantiationException ex) {
                throw new RuntimeException("Failed to create service " + name + ": service could not be instantiated", ex);
            } catch (IllegalAccessException ex) {
                throw new RuntimeException("Failed to create service " + name + ": service must have a public constructor with a Context argument", ex);
            } catch (NoSuchMethodException ex) {
                throw new RuntimeException("Failed to create service " + name + ": service must have a public constructor with a Context argument", ex);
            } catch (InvocationTargetException ex) {
                throw new RuntimeException("Failed to create service " + name + ": service constructor threw an exception", ex);
            }

            // Register it.
            mServices.add(service); //2

            // Start it.
            try {
                service.onStart();  //3
            } catch (RuntimeException ex) {
                throw new RuntimeException("Failed to start service " + name  + ": onStart threw an exception", ex);
            }
            return service;
        } finally {
            Trace.traceEnd(Trace.TRACE_TAG_SYSTEM_SERVER);
        }
    }
注释1处通过构造器创建SystemService,这里的SystemService就是PowerManagerService。
注释2处将PowerManagerService添加到mServices中,这里mServices是一个存储SystemService类型的ArrayList。
注释3处接着调用PowerManagerService的onStart函数启动PowerManagerService并返回,这样就完成了PowerManagerService启动的过程。
接下来再来看看PackageManagerService,它是通过另外一种方式启动的,直接调用了PackageManagerService的main函数:
frameworks/base/services/core/java/com/android/server/pm/PackageManagerService.java
PackageManagerService#main()
    public static PackageManagerService main(Context context, Installer installer, boolean factoryTest, boolean onlyCore) {
        // Self-check for initial settings.
        PackageManagerServiceCompilerMapping.checkProperties();

        PackageManagerService m = new PackageManagerService(context, installer, factoryTest, onlyCore);  //1
        m.enableSystemUserPackages();
        // Disable any carrier apps. We do this very early in boot to prevent the apps from being
        // disabled after already being started.
        CarrierAppUtils.disableCarrierAppsUntilPrivileged(context.getOpPackageName(), m, UserHandle.USER_SYSTEM);
        ServiceManager.addService("package", m); //2
        return m;
    }
注释1创建PackageManagerService实例。
注释2将PackageManagerService实例注册到ServiceManager中。ServiceManager用来管理系统中的各种Service,用系统C/S架构中的Binder机制通信,Client端要使用某个Service,则需要先到ServiceManager查询Service的相关信息,然后根据Service的相关信息与Service所在的Server进程建立通讯通路,这样Client端就可以使用Service了。
总结SyetemServer进程
SyetemServer在启动时做了如下工作:
1.启动Binder线程池,这样就可以与其他进程进行通信。
2.创建SystemServiceManager用于对系统的服务进行创建、启动和生命周期管理。
3.启动各种系统服务。
作者:码农小陈
链接:https://www.jianshu.com/p/e1d0ee1b8134
来源:简书
著作权归作者所有。商业转载请联系作者获得授权,非商业转载请注明出处。


