一、设计
1. 为什么需要Dark Mode:
- 让用户更好的Focus于App内展现的内容
- 在暗光环境下减少用户视觉疲劳,减少对周围他人影响
- OLED屏幕可以大幅降低屏幕耗电量
- 用户对深色UI的热衷
- 在不大刀阔斧的改动UI界面的前提下,为用户带来耳目一新的视觉体验
2. iOS的设计团队为Dark Mode设立了以下五点设计原则:
- 保持视觉风格的熟悉感
- 平台一致性
- 清晰的信息架构
- 辅助功能
- 易于开发者采用
3. Submit Your iPhone Apps to the App Store
iOS 13 is now running on 77% of all iOS devices introduced in the last four years, worldwide. Deliver great user experiences by seamlessly integrating with Dark Mode, Sign in with Apple, and the latest advances in ARKit 3, Core ML 3, and Siri. Starting April 30, 2020, all iPhone apps submitted to the App Store must be built with the iOS 13 SDK or later.
Take advantage of Xcode features such as storyboards (including launch storyboards), Auto Layout, and SwiftUI, to ensure your app’s interface elements and layouts automatically fit the display of all iPhone models, regardless of size or aspect ratio. Starting April 30, 2020, all apps submitted to the App Store must use an Xcode storyboard to provide the app’s launch screen and all iPhone apps must support all iPhone screens.
- 针对苹果官方3月4日的公告,分析如下:
- 从2020年4月30日起,所有提交给App Store的 iPhone应用程序都必须使用iOS 13 SDK或更高版本构建。(必须使用Xcode 11或更高版本打包上架。)
- 从2020年4月30日起,所有提交给App Store的应用程序都必须使用 storyboard 来提供应用程序的启动屏幕。
- 所有iPhone应用程序都必须支持所有iPhone屏幕。
4. 微信适配了暗黑模式(2020.03.09)

二、适配
1. 启动页:
从2020年4月30日起,所有提交给App Store的应用程序都必须使用 storyboard 来提供应用程序的启动屏幕。
方法一:
-
在 storyboard 中拖入UIImageView控件,设置好约束。
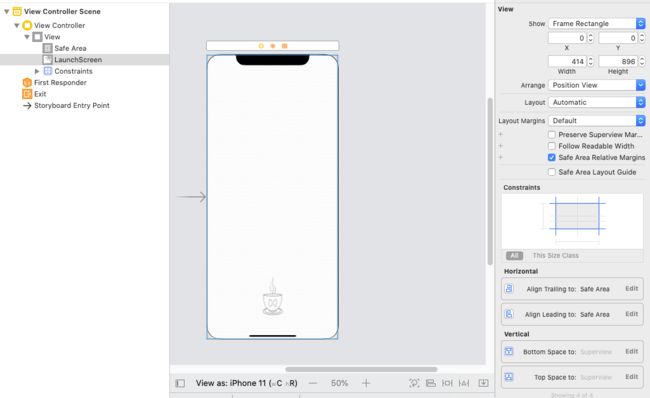
- 在
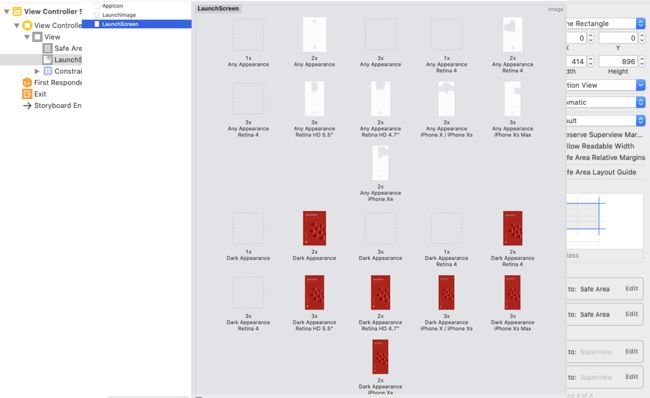
Assets.xcassets中新建New Image Set。默认新建的Image是不支持多种机型的,打开该Image的Contents.json文件,复制下面的代码覆盖该文件:
把"filename"对应的value替换为本地对应的图片名称即可(_dark结尾的图片对应的是暗黑模式)。
{
  "images" : [
    {
      "idiom" : "iphone",
      "scale" : "1x"
    },
    {
      "idiom" : "iphone",
      "scale" : "1x",
      "appearances" : [
        {
          "appearance" : "luminosity",
          "value" : "dark"
        }
      ]
    },
    {
      "idiom" : "iphone",
      "filename" : "iPhone_4.png",
      "scale" : "2x"
    },
    {
      "idiom" : "iphone",
      "filename" : "iPhone_4_dark.png",
      "appearances" : [
        {
          "appearance" : "luminosity",
          "value" : "dark"
        }
      ],
      "scale" : "2x"
    },
    {
      "idiom" : "iphone",
      "scale" : "3x"
    },
    {
      "idiom" : "iphone",
      "scale" : "3x",
      "appearances" : [
        {
          "appearance" : "luminosity",
          "value" : "dark"
        }
      ]
    },
    {
      "idiom" : "iphone",
      "subtype" : "retina4",
      "scale" : "1x"
    },
    {
      "idiom" : "iphone",
      "appearances" : [
        {
          "appearance" : "luminosity",
          "value" : "dark"
        }
      ],
      "subtype" : "retina4",
      "scale" : "1x"
    },
    {
      "idiom" : "iphone",
      "filename" : "iPhone_5.png",
      "subtype" : "retina4",
      "scale" : "2x"
    },
    {
      "idiom" : "iphone",
      "filename" : "iPhone_5_dark.png",
      "appearances" : [
        {
          "appearance" : "luminosity",
          "value" : "dark"
        }
      ],
      "subtype" : "retina4",
      "scale" : "2x"
    },
    {
      "idiom" : "iphone",
      "subtype" : "retina4",
      "scale" : "3x"
    },
    {
      "idiom" : "iphone",
      "appearances" : [
        {
          "appearance" : "luminosity",
          "value" : "dark"
        }
      ],
      "subtype" : "retina4",
      "scale" : "3x"
    },
    {
      "idiom" : "iphone",
      "filename" : "iPhone_7P.png",
      "subtype" : "736h",
      "scale" : "3x"
    },
    {
      "idiom" : "iphone",
      "filename" : "iPhone_7P_dark.png",
      "appearances" : [
        {
          "appearance" : "luminosity",
          "value" : "dark"
        }
      ],
      "subtype" : "736h",
      "scale" : "3x"
    },
    {
      "idiom" : "iphone",
      "filename" : "iPhone_7.png",
      "subtype" : "667h",
      "scale" : "2x"
    },
    {
      "idiom" : "iphone",
      "filename" : "iPhone_7_dark.png",
      "appearances" : [
        {
          "appearance" : "luminosity",
          "value" : "dark"
        }
      ],
      "subtype" : "667h",
      "scale" : "2x"
    },
    {
      "idiom" : "iphone",
      "filename" : "iPhone_X.png",
      "subtype" : "2436h",
      "scale" : "3x"
    },
    {
      "idiom" : "iphone",
      "filename" : "iPhone_X_dark.png",
      "appearances" : [
        {
          "appearance" : "luminosity",
          "value" : "dark"
        }
      ],
      "subtype" : "2436h",
      "scale" : "3x"
    },
    {
      "idiom" : "iphone",
      "filename" : "iPhone_Xs Max.png",
      "subtype" : "2688h",
      "scale" : "3x"
    },
    {
      "idiom" : "iphone",
      "filename" : "iPhone_Xs Max_dark.png",
      "appearances" : [
        {
          "appearance" : "luminosity",
          "value" : "dark"
        }
      ],
      "subtype" : "2688h",
      "scale" : "3x"
    },
    {
      "idiom" : "iphone",
      "filename" : "iPhone_XR.png",
      "subtype" : "1792h",
      "scale" : "2x"
    },
    {
      "idiom" : "iphone",
      "filename" : "iPhone_XR_dark.png",
      "appearances" : [
        {
          "appearance" : "luminosity",
          "value" : "dark"
        }
      ],
      "subtype" : "1792h",
      "scale" : "2x"
    }
  ],
  "info" : {
    "version" : 1,
    "author" : "xcode"
  }
}
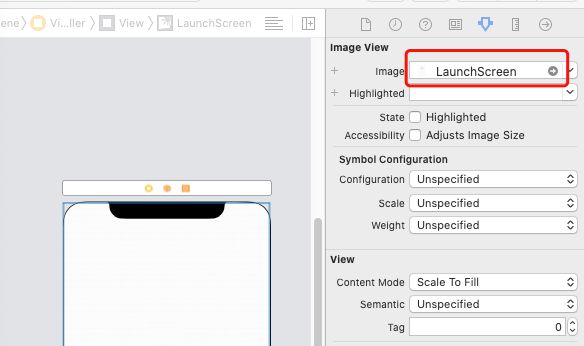
- 在 LaunchScreen.storyboard 中选择自己创建的image。
- 存在缓存问题(待解决)
方法二:
对于简单的启动图页面,直接在 LaunchScreen.storyboard 中自己画。创建icon、label等控件,设置好约束,就不用担心屏幕适配问题了。
2. UITraitCollection:
在iOS13中,我们可以通过UITraitCollection来判断当前系统所处的模式。UIScreen, UIWindow, UIViewController, UIPresentationController, UIView 都遵循了 UITraitEnvironment 协议。
/*! Trait environments expose a trait collection that describes their environment. */
@protocol UITraitEnvironment
@property (nonatomic, readonly) UITraitCollection *traitCollection API_AVAILABLE(ios(8.0));

/*! To be overridden as needed to provide custom behavior when the environment's traits change. */
- (void)traitCollectionDidChange:(nullable UITraitCollection *)previousTraitCollection API_AVAILABLE(ios(8.0));
@end
当用户更改系统外观时,系统会自动要求每个窗口和视图重绘自身。在此过程中,系统将为macOS和iOS调用下表中列出的几种众所周知的方法来更新您的内容。系统在调用这些方法之前会更新特征环境,所以只有在下列方法中获取 traitCollection 属性才是准确的。

如果您在这些方法之外进行外观敏感的更改,则您的应用可能无法针对当前环境正确绘制其内容。
在 iOS 13中,UIView、UIViewController 、UIWindow 有了一个 overrideUserInterfaceStyle 的新属性,可以覆盖系统的模式。
单个页面或视图关闭暗黑模式,设置 overrideUserInterfaceStyle 为对应的模式,强制限制该视图与其子视图以设置的模式进行展示,不跟随系统模式改变进行改变。
self.overrideUserInterfaceStyle = UIUserInterfaceStyleLight;
设置此属性会影响当前view/viewController/window 以及它下面的任何内容。
如果你希望一个子视图监听系统的模式,请将 overrideUserInterfaceStyle 属性设置为.unspecified。
3. 颜色:
-
系统的语义化颜色

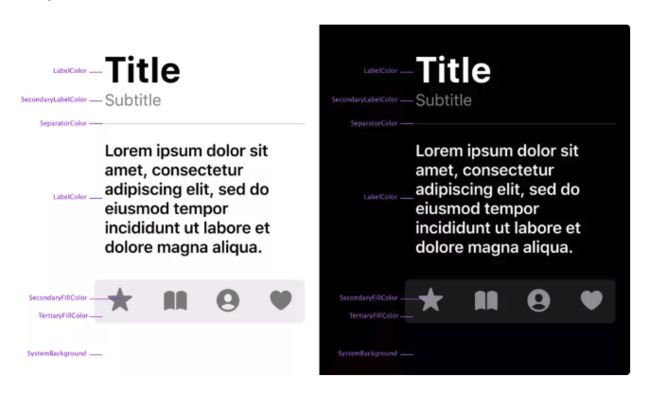
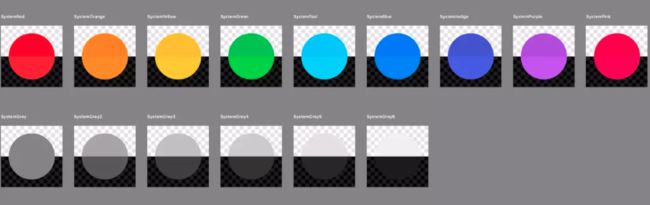
iOS默认提供了9个彩色色板(TintColor),在iOS 13中为了保证深色模式下的对比度效果,每个TintColor都新增了深浅模式两种版本,在调用时也应使用语义化的颜色名称,比如SystemBlue,在浅色模式下指的是#007AFF,在深色模式下则是#0A84FF。
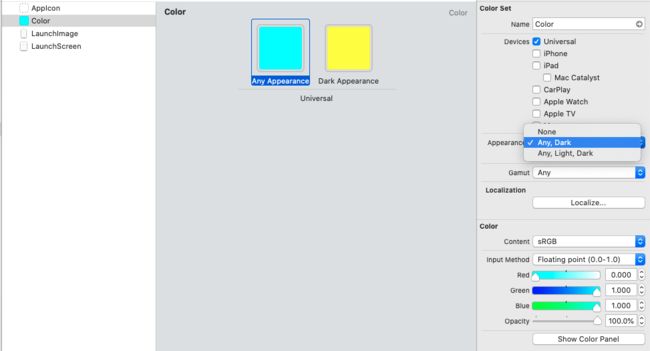
-
自定义颜色: 通过 Assets.xcassets
在Assets.xcassets中新建New Color Set。通过[UIColor colorNamed:@""]方法使用。
通过代码自定义颜色:
+ (UIColor *)colorWithDynamicProvider:(UIColor * (^)(UITraitCollection *))dynamicProvider;
- (UIColor *)initWithDynamicProvider:(UIColor * (^)(UITraitCollection *))dynamicProvider;
4. 图片:
-
SF Symbols
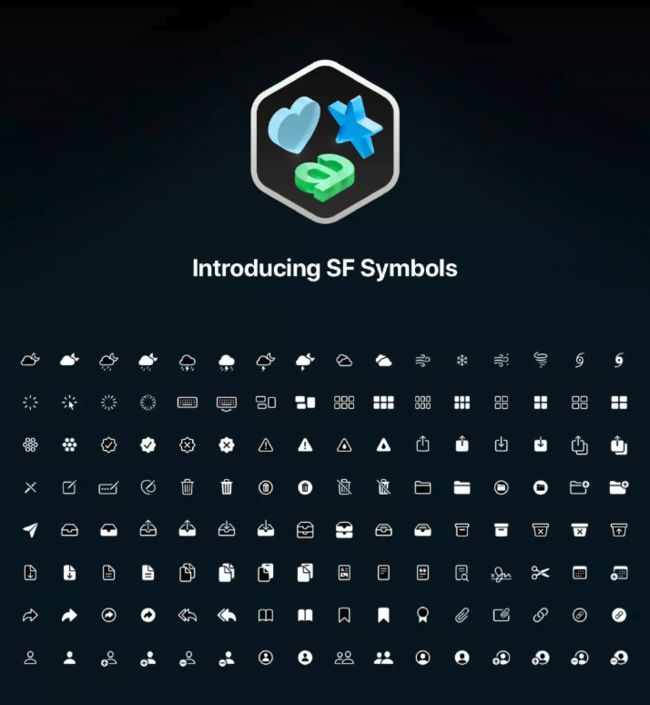
SF Symbols 是iOS 13中引入的一项非常重要的新特性,由于Dark Mode下所有图标都会需要两套颜色,使用静态的图片切图会让图片素材数量激增,因此苹果干脆做了这一整套1500多个图标的矢量图标库,配合iOS中的基底层与架高层、语义化颜色、Vibrancy(鲜亮化)等动态的颜色处理,使用SF Symbols可以在深浅模式中都能自动获得完美的展示效果。

SF Symbols的原理和Iconfont很类似,都是将SVG矢量图形以Unicode字符的形式打包在字体文件中。SF Symbols是内置集成在苹果目前的系统默认字体San Francisco字体系列里的,开发者只需引用Symbol的名称就可以迅速调用出SF Symbols提供的图标。同时设计师也可以利用SF Symbols官方提供的SVG模板制作自定义的图标共App调用。
为您的应用创建自定义符号图像
+ (nullable UIImage *)imageNamed:(NSString *)name inBundle:(nullable NSBundle *)bundle withConfiguration:(nullable UIImageConfiguration *)configuration
- 自定义图片: 通过
Assets.xcassets
在Assets.xcassets中新建New Image Set。通过[UIImage imageNamed:@""]方法使用。

5. 模糊效果:
在 iOS 13 中,我们需要让这些模糊效果随着系统模式的切换而切换。UIKit 提供了新的模糊样式且是动态的,会随着系统模式的改版而自动匹配。
利用 UIVisualEffectView 来创建一些类似模糊的效果时,不要设置类似 UIBlurEffectStyleExtraLight 这样带有明确颜色的效果,而是设置 UIKit 中新提供的动态样式的效果,比如 UIBlurEffectStyleSystemThinMaterialLight 或 UIBlurEffectStyleSystemThinMaterialDark。
UIBlurEffect *effect = [UIBlurEffect effectWithStyle:UIBlurEffectStyleSystemMaterial];
UIVisualEffectView *effectView = [[UIVisualEffectView alloc] initWithEffect:effect];
6. webView页面:
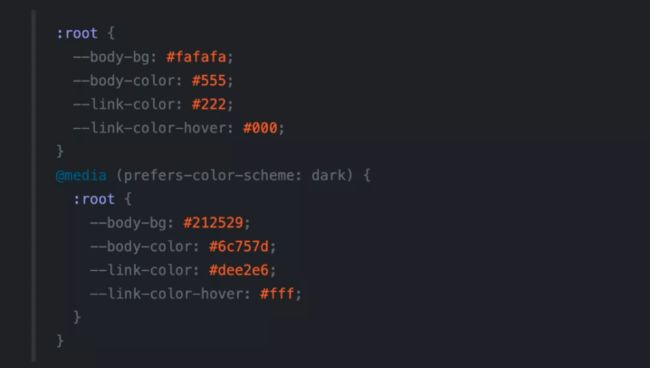
多数流行的浏览器新版本都已经支持了“prefers-color-scheme”参数来检测系统当前的外观是浅色还是深色模式。配合利用类似Semantic Color的方法来定义网页样式表中同一个颜色在深浅两种模式下的色值,Web内容也可以获得同原生App一样的自动适配深浅模式效果。
Dark Mode Support in WebKit
7. 封装适配工具:
针对iOS13暗黑模式的适配工作,写了几个分类,方便项目统一管理适配工作,可以通过 pod 'QYTheme' 导入到项目中。
功能如下:
-
-
UIWindow+QYTheme.h
当 UIUserInterfaceStyle 发生变化时的通知,可用于无法准确获取TraitCollection的地方
-
if (@available(iOS 13.0, *)) {
    [[NSNotificationCenter defaultCenter] addObserver:self
                                             selector:@selector(qy_doSomething:)
                                                 name:QYUserInterfaceStyleWillChangeNotification
                                               object:nil];
}
-
-
UIColor+QYTheme.h
统一处理颜色的分类,iOS13以前取anyColor。
-
/// 获取动态颜色
/// @param anyColor 默认颜色
/// @param darkColor 暗黑颜色
+ (UIColor *)qy_setColorWithAny:(UIColor *)anyColor dark:(UIColor *)darkColor;
// 使用方法:
self.view.backgroundColor = [UIColor qy_setColorWithAny:[UIColor whiteColor] dark:[UIColor blackColor]];
-
-
UIImageView+QYTheme.h
统一处理图片的分类,可处理本地和网络图片,网络图片依赖SDWebImage框架。
-
/// 设置图片 [处理本地图片]
/// @param anyImage 默认图片
/// @param darkImage 暗黑图片
- (void)qy_setImageWithAny:(UIImage *)anyImage darkIamge:(UIImage *)darkImage;

/// 设置图片 [处理网络图片]
/// @param anyUrl 默认url
/// @param darkUrl 暗黑图片url
/// @param placeholder 通用占位图
- (void)qy_setImageWithURL:(NSURL *)anyUrl darkImageWithURL:(NSURL *)darkUrl placeholderImage:(UIImage *)placeholder;

/// 设置图片 [处理网络图片]
/// @param anyUrl 默认url
/// @param placeholder 默认占位图
/// @param darkUrl 暗黑图片url
/// @param darkPlaceholder 暗黑占位图
- (void)qy_setImageWithURL:(NSURL *)anyUrl placeholderImage:(UIImage *)placeholder darkImageWithURL:(NSURL *)darkUrl darkPlaceholderImage:(UIImage *)darkPlaceholder;
// 使用方法:
// 本地图片
[self.imgView qy_setImageWithAny:[UIImage imageNamed:@"anyImage"] darkIamge:[UIImage imageNamed:@"darkImage"]];
// 网络图片
[self.imgView qy_setImageWithURL:[NSURL URLWithString:@"https://xxx"]
                darkImageWithURL:[NSURL URLWithString:@"https://xxx"]
                placeholderImage:[UIImage imageNamed:@"image"]];
目前工具正在完善,如有不足,欢迎指正~
源码放在GitHub上了,想查看的小伙伴可以->戳这里。
千里之行,始于足下。
参考文档:
写给设计师的指南:iOS 13 Dark Mode 深度解析
Apple Design Resources
Submit Your iPhone Apps to the App Store
Supporting Dark Mode in Your Interface
How To Adopt Dark Mode In Your iOS App
使用 QMUITheme 实现换肤并适配 iOS 13 Dark Mode