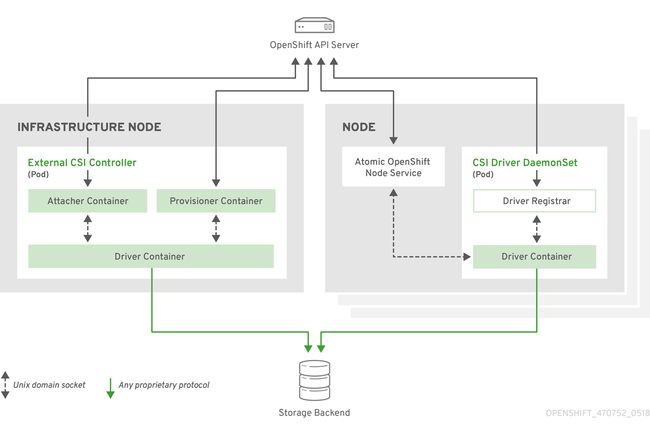
在 OpenShift 4.x 版本里,如果想要使用 Ceph 作为持久化存储,那应该使用 CSI(Container Storage Interface)。但 OpenShift 自身不会提供 CSI drivers,CSI drivers 需要存储厂商或者存储项目的社区提供。
CephFS CSI drivers 就是来自社区
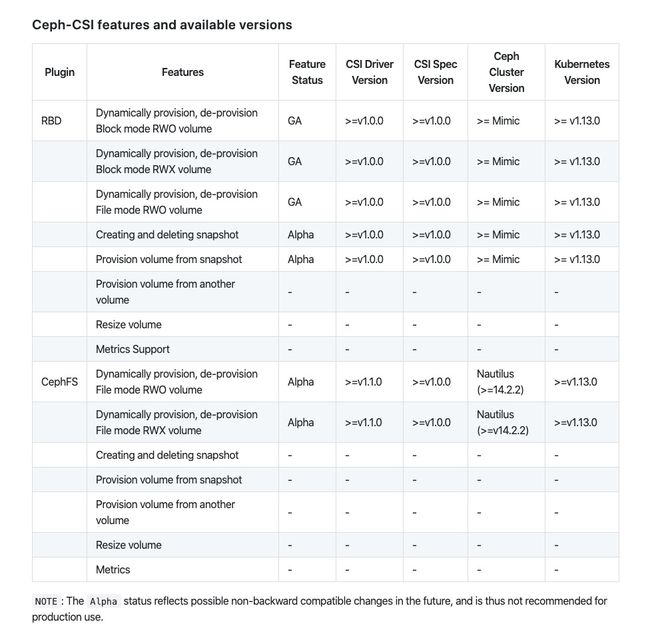
值得一提的是,目前 Ceph-CSI 在 CephFS 这一块还没有 GA。但我看了一下 Kubernetes v1.14+ 版本的 csi-cephfsplugin-provisioner 部署方式已经是用了 Deployment 并且副本数是 3,而在 Kubernetes v1.13 的版本还是使用 StatefulSet;从这里可以乐观的估计一下应该离 GA 不远了。
接下来是实践在 OpenShift 4.2 上使用 CSI 消费 CephFS 作为持久化存储。
版本信息
- OpenShift 版本
# oc version
Client Version: openshift-clients-4.2.0-201910041700
Server Version: 4.2.7
Kubernetes Version: v1.14.6+76aeb0c
- Ceph 版本
# ceph version
ceph version 14.2.4 (75f4de193b3ea58512f204623e6c5a16e6c1e1ba) nautilus (stable)
- ceph-csi 项目地址
在 OpenShift 集群部署 CSI CephFS plugin
- 将 ceph-csi 项目 clone 到可以执行 oc 命令的机器
# git clone https://github.com/ceph/ceph-csi.git
# cd ceph-csi/deploy/cephfs/kubernetes/v1.14+
- 若希望将 CSI CephFS plugin 部署到独立指定的 namespace(project) 可以创建,比如这里我会创建一个 ceph-csi 的 namespace。这里需要留意一下,项目默认的 namespace 是 default,如果自定义 project 则需要改动yaml文件进行匹配,否则会出现权限问题,这里需要理解 RBACs 的原理。
# oc create namespace ceph-csi
# oc project ceph-csi
- 部署sidecar containers and node plugins 的 RBACs
- 注意修改 yaml 文件里的 namespace 为前面创建的值
# sed -i "s/namespace:.*/namespace: ceph-csi/g" csi-nodeplugin-rbac.yaml
# sed -i "s/namespace:.*/namespace: ceph-csi/g" csi-provisioner-rbac.yaml
# oc create -f csi-provisioner-rbac.yaml
# oc create -f csi-nodeplugin-rbac.yaml
- 部署 CSI plugins 需要用到的 ConfigMap
- 需要修改 ConfigMap 里面的信息为对应 Ceph 集群的值
# cat < csi-config-map.yaml
apiVersion: v1
kind: ConfigMap
data:
  config.json: |-
    [
      {
        # clusterID,可以使用 fsid 命令查到
        "clusterID": "51f27799-737f-xxxx-xxxx-b6ecfbf0a072",
        "monitors": [
          "10.72.44.xx1:6789",
          "10.72.44.xx2:6789",
          "10.72.44.xx3:6789"
        ]
      }
    ]
metadata:
  name: ceph-csi-config
EOF
# oc create -f csi-config-map.yaml
- 部署 CSI sidecar containers & CSI CephFS driver
# oc create -f csi-cephfsplugin-provisioner.yaml
# oc create -f csi-cephfsplugin.yaml
- 这里会有一个报错,因为在 OpenShift 里有一个 SCCs 对 Pod 的权限进行管控的。集群里部署 Pod 默认都是使用 restricted 这个 SCC,restricted 只有少量的一些权限,并不满足这个场景的权限请求。
Warning FailedCreate 17m (x16 over 18m) replicaset-controller Error creating: pods "csi-cephfsplugin-provisioner-9d7f8d86-" is forbidden: unable to validate against any security context constraint: [spec.volumes[0]: Invalid value: "hostPath": hostPath volumes are not allowed to be used spec.volumes[1]: Invalid value: "hostPath": hostPath volumes are not allowed to be used spec.volumes[2]: Invalid value: "hostPath": hostPath volumes are not allowed to be used spec.volumes[3]: Invalid value: "hostPath": hostPath volumes are not allowed to be used spec.containers[3].securityContext.privileged: Invalid value: true: Privileged containers are not allowed capabilities.add: Invalid value: "SYS_ADMIN": capability may not be added]
- 要解决这个问题,我们可以自定义满足权限的 SCC,或者直接使用现有的 privileged 这个 SCC。
# oc adm policy add-scc-to-user privileged -z cephfs-csi-provisioner
# oc adm policy add-scc-to-user privileged -z cephfs-csi-nodeplugin
到这里 ceph csi 部署部分的工作就已经做完了,接下来创建对应 ceph 集群的 secret 以及 storageclass 就可以测试应用使用持久化存储了。
创建对应 ceph 集群的 secret 以及 storageclass
- 创建 secret
# cd $dir/ceph-csi/examples/cephfs/
# cat < secret.yaml
---
apiVersion: v1
kind: Secret
metadata:
  name: csi-cephfs-secret
  # namespace 需要与后面的 storageclass 里请求 secret 所在的 namespace 一致
  namespace: ceph-csi
stringData:
  adminID: admin
  adminKey: XXX+jOddBQxhOBAAI9pD90FlDYwqIytm3ECDkw==
EOF
# oc create -f secret.yaml
- 创建 storageclass
# cat < storageclass.yaml
---
apiVersion: storage.k8s.io/v1
kind: StorageClass
metadata:
  name: csi-cephfs-sc
provisioner: cephfs.csi.ceph.com
parameters:
  clusterID: 51f27799-737f-4052-be82-b6ecfbf0a072
  fsName: cephfs
  pool: cephfs_data
  csi.storage.k8s.io/provisioner-secret-name: csi-cephfs-secret
  # secret 的 namespace 需要与前面创建的 secret 所在的 namespace 一致
  csi.storage.k8s.io/provisioner-secret-namespace: ceph-csi
  csi.storage.k8s.io/controller-expand-secret-name: csi-cephfs-secret
  csi.storage.k8s.io/controller-expand-secret-namespace: ceph-csi
  csi.storage.k8s.io/node-stage-secret-name: csi-cephfs-secret
  csi.storage.k8s.io/node-stage-secret-namespace: ceph-csi
reclaimPolicy: Delete
allowVolumeExpansion: true
mountOptions:
  - debug
EOF
# oc create -f storageclass.yaml
创建应用消费存储测试
- create pvc
# oc create -f pvc.yaml
# oc get pvc
NAME             STATUS   VOLUME                                     CAPACITY   ACCESS MODES   STORAGECLASS    AGE
csi-cephfs-pvc   Bound    pvc-f198a693-183f-11ea-bcdc-001a4a160531   5Gi        RWX            csi-cephfs-sc   3s
# oc describe pvc csi-cephfs-pvc
Name:          csi-cephfs-pvc
Namespace:     ceph-csi
StorageClass:  csi-cephfs-sc
Status:        Bound
Volume:        pvc-f198a693-183f-11ea-bcdc-001a4a160531
Labels:
Annotations:   pv.kubernetes.io/bind-completed: yes
               pv.kubernetes.io/bound-by-controller: yes
               volume.beta.kubernetes.io/storage-provisioner: cephfs.csi.ceph.com
Finalizers:    [kubernetes.io/pvc-protection]
Capacity:      5Gi
Access Modes:  RWX
VolumeMode:    Filesystem
Events:
  Type       Reason                Age   From                                                                                                  Message
  ----       ------                ----  ----                                                                                                  -------
  Normal     ExternalProvisioning  21s   persistentvolume-controller                                                                           waiting for a volume to be created, either by external provisioner "cephfs.csi.ceph.com" or manually created by system administrator
  Normal     Provisioning          21s   cephfs.csi.ceph.com_csi-cephfsplugin-provisioner-9d7f8d86-8pl8h_a1694d56-1760-11ea-8a5e-0a580a830057  External provisioner is provisioning volume for claim "ceph-csi/csi-cephfs-pvc"
Mounted By:
# oc get pv
NAME                                       CAPACITY   ACCESS MODES   RECLAIM POLICY   STATUS   CLAIM                                   STORAGECLASS    REASON   AGE
pvc-f198a693-183f-11ea-bcdc-001a4a160531   5Gi        RWX            Delete           Bound    ceph-csi/csi-cephfs-pvc                 csi-cephfs-sc            25s
registry-pv                                20Gi       RWX            Retain           Bound    openshift-image-registry/registry-pvc                            14d
- 创建应用使用这个pvc
# oc create -f pod.yaml
# oc get pod
NAME                                          READY   STATUS    RESTARTS   AGE
csi-cephfs-demo-pod                           1/1     Running   0          34s
···
# oc describe pod csi-cephfs-demo-pod
···
Containers:
  ···
    Mounts:
      /var/lib/www from mypvc (rw)
···
Events:
  Type    Reason                  Age   From                                        Message
  ----    ------                  ----  ----                                        -------
  Normal  Scheduled               66s   default-scheduler                           Successfully assigned ceph-csi/csi-cephfs-demo-pod to worker-1.ocp4-cluster1.guachen.io
  Normal  SuccessfulAttachVolume  66s   attachdetach-controller                     AttachVolume.Attach succeeded for volume "pvc-f198a693-183f-11ea-bcdc-001a4a160531"
  Normal  Pulling                 41s   kubelet, worker-1.ocp4-cluster1.guachen.io  Pulling image "nginx"
  Normal  Pulled                  34s   kubelet, worker-1.ocp4-cluster1.guachen.io  Successfully pulled image "nginx"
  Normal  Created                 34s   kubelet, worker-1.ocp4-cluster1.guachen.io  Created container web-server
  Normal  Started                 34s   kubelet, worker-1.ocp4-cluster1.guachen.io  Started container web-server
- 进入 Pod 里面测试读写数据
# oc rsh csi-cephfs-demo-pod
# bash
root@csi-cephfs-demo-pod:/# cd /var/lib/www/
root@csi-cephfs-demo-pod:/var/lib/www# ls
root@csi-cephfs-demo-pod:/var/lib/www# echo "ceph-csi" > ocp4.txt
root@csi-cephfs-demo-pod:/var/lib/www# cat ocp4.txt
ceph-csi
root@csi-cephfs-demo-pod:/var/lib/www#
一切正常


