Tomcat学习笔记(9)- 管道(Pipeline)、tomcat启动
文章目录
- 1. 管道模式
- 2. Valve接口
- 3. Pipeline
- 4. 流程
-
- 4.1 StandardEngineValve
- 4.2 StandardHostValve
- 4.3 StandardContextValve
- 4.4 StandardWrapperValve
- 4.5 debug一次请求
- 4.6 自定义Valve
- 5. 初始化
-
- 5.1 init()
- 5.2 start()
- 5.3 Digester
- 7. 结合SpringMVC启动
1. 管道模式
管道模式把多个对象连接起来,整体看起来就像若干个阀门嵌套在管道中,而处理逻辑就放在阀门上。
在tomcat中,Valve接口定义了阀门的调用方法,由于阀门与阀门使用单链表结构连接,因此需提供对下一个阀门的操作;Pipeline接口定义了管道操作阀门的方法,包括获取第一个阀门、获取基础阀门、添加阀门等方法,管道需要对其扩展。
Tomcat中按照包含关系一共有4个级别的容器,它们的标准实现分别为StandardEngine、StandardHost、StandardContext和StandardWrapper,请求对象及响应对象将分别被这4个容器处理,请求响应对象在4个容器之间通过管道机制进行传递。
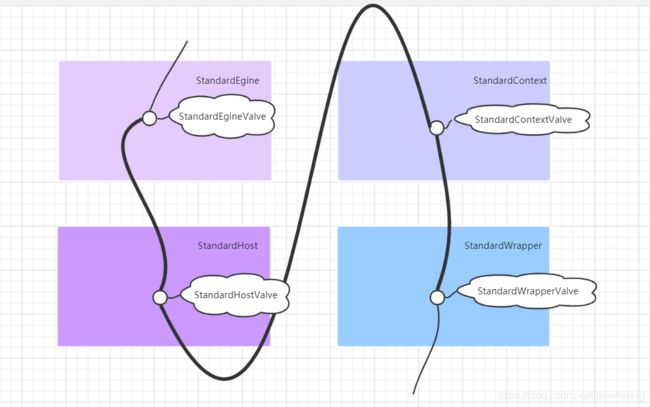
请求响应对象先通过StandardEngine的管道,期间经过若干个阀门处理,基础阀门是StandardEngineValve;往下流转到StandardHost的管道,基础阀门为StandardHostValve;类似地,通过StandardContext;最后到StandardWrapper完成整个处理流程。
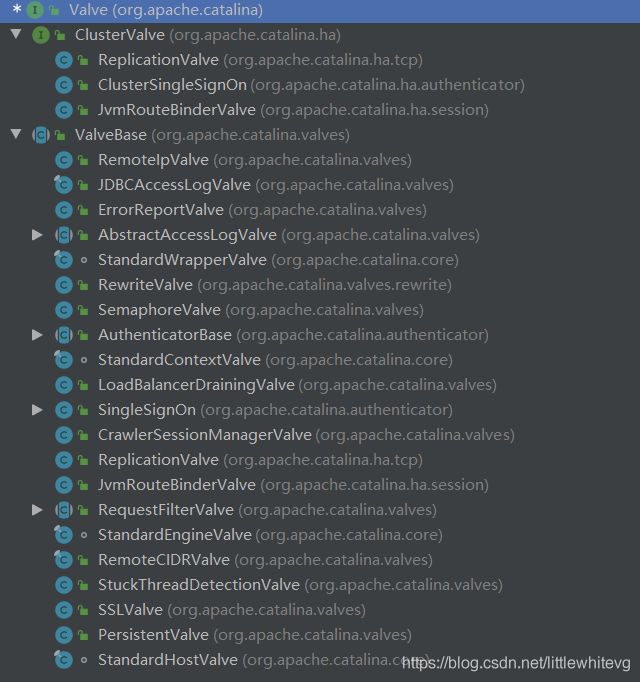
2. Valve接口
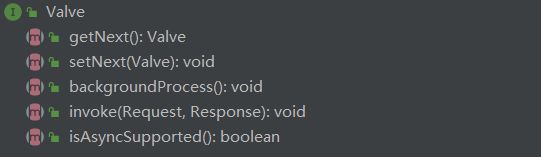
Valve的实现:
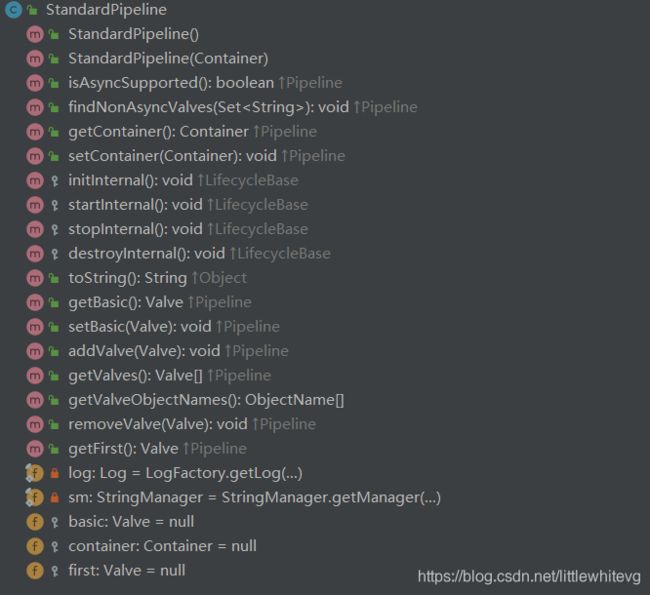
3. Pipeline

其标准实现只有StandardPipeline:
4. 流程
4.1 StandardEngineValve
org.apache.catalina.core.ContainerBase内:

StandardEngine初始化:
    public StandardEngine() {


        super();
        //设置默认的StandardEngineValve
        pipeline.setBasic(new StandardEngineValve());

        try {

            setJvmRoute(System.getProperty("jvmRoute"));
        } catch(Exception ex) {

            log.warn(sm.getString("standardEngine.jvmRouteFail"));
        }
        backgroundProcessorDelay = 10;

    }
 /**
   *选择适当的子主机来处理此请求,
*基于请求的服务器名。如果没有匹配的主机可以
*被发现,返回一个适当的HTTP错误。
*
     * @param 要处理的请求
     * @param 要产生的响应
     *
     * @exception 如果发生输入/输出错误,IOException
     * @exception ServletException,如果servlet错误发生
     */
    @Override
    public final void invoke(Request request, Response response)
        throws IOException, ServletException {


        //选择用于此请求的主机
        Host host = request.getHost();
        if (host == null) {

            response.sendError
                (HttpServletResponse.SC_BAD_REQUEST,
                 sm.getString("standardEngine.noHost",
                              request.getServerName()));
            return;
        }
        if (request.isAsyncSupported()) {

            request.setAsyncSupported(host.getPipeline().isAsyncSupported());
        }

        // 请求此主机处理此请求
        host.getPipeline().getFirst().invoke(request, response);

    }
可见调用了host.getPipeline().getFirst().invoke(request, response);
host的Pipeline的Valve。
4.2 StandardHostValve
    public StandardHost() {


        super();
        pipeline.setBasic(new StandardHostValve());

    }
StandardHostValve.invoke:
   @Override
    public final void invoke(Request request, Response response)
        throws IOException, ServletException {


        // Select the Context to be used for this Request
        Context context = request.getContext();
        if (context == null) {

            return;
        }

        if (request.isAsyncSupported()) {

            request.setAsyncSupported(context.getPipeline().isAsyncSupported());
        }

        boolean asyncAtStart = request.isAsync();

        try {

            context.bind(Globals.IS_SECURITY_ENABLED, MY_CLASSLOADER);

            if (!asyncAtStart && !context.fireRequestInitEvent(request.getRequest())) {

                // Don't fire listeners during async processing (the listener
                // fired for the request that called startAsync()).
                // If a request init listener throws an exception, the request
                // is aborted.
                return;
            }

            // Ask this Context to process this request. Requests that are
            // already in error must have been routed here to check for
            // application defined error pages so DO NOT forward them to the the
            // application for processing.
            try {

                if (!response.isErrorReportRequired()) {

                    context.getPipeline().getFirst().invoke(request, response);
                }
            } catch (Throwable t) {

                ExceptionUtils.handleThrowable(t);
                container.getLogger().error("Exception Processing " + request.getRequestURI(), t);
                // If a new error occurred while trying to report a previous
                // error allow the original error to be reported.
                if (!response.isErrorReportRequired()) {

                    request.setAttribute(RequestDispatcher.ERROR_EXCEPTION, t);
                    throwable(request, response, t);
                }
            }

            // Now that the request/response pair is back under container
            // control lift the suspension so that the error handling can
            // complete and/or the container can flush any remaining data
            response.setSuspended(false);

            Throwable t = (Throwable) request.getAttribute(RequestDispatcher.ERROR_EXCEPTION);

            // Protect against NPEs if the context was destroyed during a
            // long running request.
            if (!context.getState().isAvailable()) {

                return;
            }

            // Look for (and render if found) an application level error page
            if (response.isErrorReportRequired()) {

                // If an error has occurred that prevents further I/O, don't waste time
                // producing an error report that will never be read
                AtomicBoolean result = new AtomicBoolean(false);
                response.getCoyoteResponse().action(ActionCode.IS_IO_ALLOWED, result);
                if (result.get()) {

                    if (t != null) {

                        throwable(request, response, t);
                    } else {

                        status(request, response);
                    }
                }
            }

            if (!request.isAsync() && !asyncAtStart) {

                context.fireRequestDestroyEvent(request.getRequest());
            }
        } finally {

            // Access a session (if present) to update last accessed time, based
            // on a strict interpretation of the specification
            if (ACCESS_SESSION) {

                request.getSession(false);
            }

            context.unbind(Globals.IS_SECURITY_ENABLED, MY_CLASSLOADER);
        }
    }
其实也同理:


4.3 StandardContextValve
StandardContext:
   public StandardContext() {


        super();
        pipeline.setBasic(new StandardContextValve());
        broadcaster = new NotificationBroadcasterSupport();
     / /设置默认值
        if (!Globals.STRICT_SERVLET_COMPLIANCE) {

           //严格的servlet遵从性要求所有的扩展映射servlet
			//将根据欢迎文件进行检查
            resourceOnlyServlets.add("jsp");
        }
    }
StandardContextValve阀门首先会判断是否访问了禁止目录WEB-INF或META-INF,接着获取请求对应的Wrapper对象,再向客户端发送通知报文“HTTP/1.1 100 Continue”,最后调用Wrapper对象中管道的第一个阀门。
StandardContextValve.invoke:
 @Override
    public final void invoke(Request request, Response response)
        throws IOException, ServletException {


        // Disallow any direct access to resources under WEB-INF or META-INF
        MessageBytes requestPathMB = request.getRequestPathMB();
        if ((requestPathMB.startsWithIgnoreCase("/META-INF/", 0))
                || (requestPathMB.equalsIgnoreCase("/META-INF"))
                || (requestPathMB.startsWithIgnoreCase("/WEB-INF/", 0))
                || (requestPathMB.equalsIgnoreCase("/WEB-INF"))) {

            response.sendError(HttpServletResponse.SC_NOT_FOUND);
            return;
        }

        // Select the Wrapper to be used for this Request
        Wrapper wrapper = request.getWrapper();
        if (wrapper == null || wrapper.isUnavailable()) {

            response.sendError(HttpServletResponse.SC_NOT_FOUND);
            return;
        }

        // Acknowledge the request
        try {

            response.sendAcknowledgement();
        } catch (IOException ioe) {

            container.getLogger().error(sm.getString(
                    "standardContextValve.acknowledgeException"), ioe);
            request.setAttribute(RequestDispatcher.ERROR_EXCEPTION, ioe);
            response.sendError(HttpServletResponse.SC_INTERNAL_SERVER_ERROR);
            return;
        }

        if (request.isAsyncSupported()) {

            request.setAsyncSupported(wrapper.getPipeline().isAsyncSupported());
        }
        wrapper.getPipeline().getFirst().invoke(request, response);
    }
接着找wrapper:

![]()
4.4 StandardWrapperValve
StandardWrapper:
 /**
     * Create a new StandardWrapper component with the default basic Valve.
     */
    public StandardWrapper() {


        super();
        swValve=new StandardWrapperValve();
        pipeline.setBasic(swValve);
        broadcaster = new NotificationBroadcasterSupport();

    }
StandardWrapperValve,阀门负责统计请求次数、统计处理时间、分配Servlet 内存、执行Servlet过滤器、调用Servlet的service方法、释放Servlet内存。
StandardWrapperValve.invoke就不贴了,太长了。


看到这里就有个疑惑,从哪里调用第一个StandardEngineValve的invoke?
看到后面debug其实就会很明白了。
其次,我在StandardWrapperValve.invoke内找了很久并没有显式的找到servlet.service方法被调用。
4.5 debug一次请求
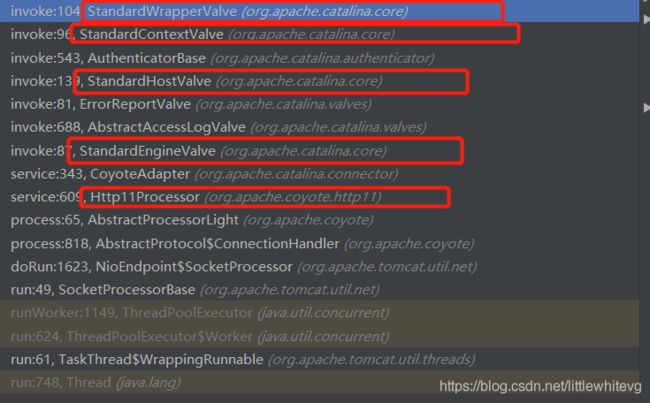
调用栈如上。
接着打断点放行就可以看见:
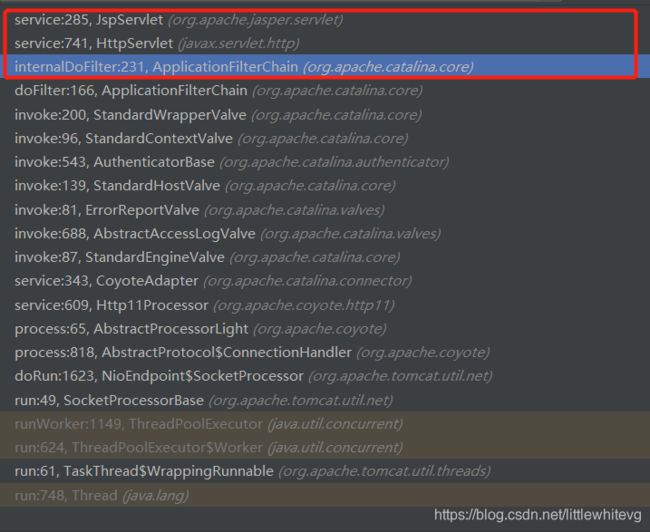
其实是在org.apache.catalina.core.ApplicationFilterChain#doFilter调用的:

再回过头:

StandardEngineValve.invoke被调用是在org.apache.catalina.connector.CoyoteAdapter#service的方法中。
如果前面的组件看懂了,那么所有的应该就连接起来了。
那么为何不从一开始就直接从Debug开始学习呢?
如果有心其实可以看见,每次debug所使用的特定的类都是被固定好了的。
比如这次debug的使用的是JSPServlet。那么下次换了请求时不请求jsp了。
该如何从debug看出原理来呢?其实这是初始化的以及Wrapper的内容。
看到这里其实Tomcat的请求就基本学完了,在不知不觉中,其实Tomcat的初始化也学完了。
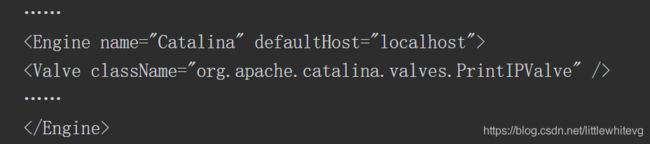
4.6 自定义Valve
public abstract class ValveBase extends LifecycleMBeanBase implements Contained, Valve {
重写invoke方法。
配置Tomcat服务器配置server.xml,这里把阀门配置到某容器下。
5. 初始化
既然已经到了这个时候,那么就得来说说Tomcat的启动做了些什么事情。
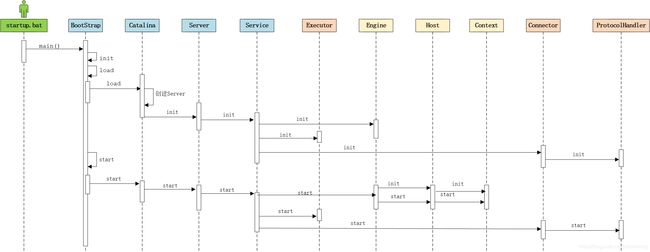
先挂一张流程图,再来看关键的启动类BootStrap。

直接来看org.apache.catalina.startup.Bootstrap#main
  /**
     * 通过提供的方法启动Tomcat时的主方法和入口点脚本。
     *
     * @param args Command line arguments to be processed
     */
    public static void main(String args[]) {


        synchronized (daemonLock) {

            if (daemon == null) {

                //在init()完成之前,不要设置守护进程
                Bootstrap bootstrap = new Bootstrap();
                try {

                    bootstrap.init();
                } catch (Throwable t) {

                    handleThrowable(t);
                    t.printStackTrace();
                    return;
                }
                daemon = bootstrap;
            } else {

                //当作为服务运行时,停止调用将在一个新的
				//所以要确保使用了正确的类装入器
				//防止一系列类未发现异常。
                Thread.currentThread().setContextClassLoader(daemon.catalinaLoader);
            }
        }

        try {

            String command = "start";
            if (args.length > 0) {

                command = args[args.length - 1];
            }

            if (command.equals("startd")) {

                args[args.length - 1] = "start";
                daemon.load(args);

                daemon.start();
            } else if (command.equals("stopd")) {

                args[args.length - 1] = "stop";
                daemon.stop();
            } else if (command.equals("start")) {

                daemon.setAwait(true);
                daemon.load(args);
                daemon.start();
                if (null == daemon.getServer()) {

                    System.exit(1);
                }
            } else if (command.equals("stop")) {

                daemon.stopServer(args);
            } else if (command.equals("configtest")) {

                daemon.load(args);
                if (null == daemon.getServer()) {

                    System.exit(1);
                }
                System.exit(0);
            } else {

                log.warn("Bootstrap: command \"" + command + "\" does not exist.");
            }
        } catch (Throwable t) {

            // Unwrap the Exception for clearer error reporting
            if (t instanceof InvocationTargetException &&
                    t.getCause() != null) {

                t = t.getCause();
            }
            handleThrowable(t);
            t.printStackTrace();
            System.exit(1);
        }
    }
先保证调用一下init方法,在来获取接受命令,看获取到start时,执行

5.1 init()
先来看init方法:
   /**
     * 初始化守护进程。
     * @throws 致命初始化错误
     */
    public void init() throws Exception {


        initClassLoaders();

        Thread.currentThread().setContextClassLoader(catalinaLoader);

        SecurityClassLoad.securityClassLoad(catalinaLoader);

        // 加载我们的启动类并调用它的process()方法
        if (log.isDebugEnabled())
            log.debug("Loading startup class");
        Class<?> startupClass = catalinaLoader.loadClass("org.apache.catalina.startup.Catalina");
        Object startupInstance = startupClass.getConstructor().newInstance();

        //设置共享扩展类加载器
        if (log.isDebugEnabled())
            log.debug("Setting startup class properties");
        String methodName = "setParentClassLoader";
        Class<?> paramTypes[] = new Class[1];
        paramTypes[0] = Class.forName("java.lang.ClassLoader");
        Object paramValues[] = new Object[1];
        paramValues[0] = sharedLoader;
        Method method =
            startupInstance.getClass().getMethod(methodName, paramTypes);
        method.invoke(startupInstance, paramValues);

        catalinaDaemon = startupInstance;
    }
执行Catalina的setParentClassLoader:
 public void setParentClassLoader(ClassLoader parentClassLoader) {

        this.parentClassLoader = parentClassLoader;
    }
接着再来看org.apache.catalina.startup.Bootstrap#load:
  /**
     * 加载守护进程。
     */
    private void load(String[] arguments) throws Exception {


        //调用load()方法
        String methodName = "load";
        Object param[];
        Class<?> paramTypes[];
        if (arguments==null || arguments.length==0) {

            paramTypes = null;
            param = null;
        } else {

            paramTypes = new Class[1];
            paramTypes[0] = arguments.getClass();
            param = new Object[1];
            param[0] = arguments;
        }
        Method method =
            catalinaDaemon.getClass().getMethod(methodName, paramTypes);
        if (log.isDebugEnabled()) {

            log.debug("Calling startup class " + method);
        }
        method.invoke(catalinaDaemon, param);
    }
这段代码就是调用org.apache.catalina.startup.Catalina#load(java.lang.String[])方法:
其又委托给该类下无参的load方法,代码很长,其主要做的事情就是创建Server。
其中Server是在哪里创建的我们后面会有介绍。
所以我们现在处于这个位置:

然后就是调用Server的生命周期方法,该方法是一个模板方法先调用的org.apache.catalina.util.LifecycleBase#init:

接着便是org.apache.catalina.core.StandardServer#initInternal
    /**
    *调用启动前的初始化。这用于允许连接器
	*在Unix操作环境下绑定到受限制的端口。
     */
    @Override
    protected void initInternal() throws LifecycleException {


        super.initInternal();

        //注册全局字符串缓存
		//注意:如果有多个服务器,缓存是全局的
		//在JVM中呈现(可能在嵌入时发生)然后缓存相同
		//将以多个名字登记
        onameStringCache = register(new StringCache(), "type=StringCache");

        // 注册MBeanFactory
        MBeanFactory factory = new MBeanFactory();
        factory.setContainer(this);
        onameMBeanFactory = register(factory, "type=MBeanFactory");

        // 注册命名资源
        globalNamingResources.init();

        // 使用来自common和shared的jar填充扩展验证器
		//类装入器
        if (getCatalina() != null) {

            ClassLoader cl = getCatalina().getParentClassLoader();
           //遍历类装入器层次结构。停在系统类装入器处。
		   //这将添加共享(如果存在)和公共类装入器
            while (cl != null && cl != ClassLoader.getSystemClassLoader()) {

                if (cl instanceof URLClassLoader) {

                    URL[] urls = ((URLClassLoader) cl).getURLs();
                    for (URL url : urls) {

                        if (url.getProtocol().equals("file")) {

                            try {

                                File f = new File (url.toURI());
                                if (f.isFile() &&
                                        f.getName().endsWith(".jar")) {

                                    ExtensionValidator.addSystemResource(f);
                                }
                            } catch (URISyntaxException e) {

                                // Ignore
                            } catch (IOException e) {

                                // Ignore
                            }
                        }
                    }
                }
                cl = cl.getParent();
            }
        }
        // 初始化我们定义的服务
        for (int i = 0; i < services.length; i++) {

            services[i].init();
        }
    }
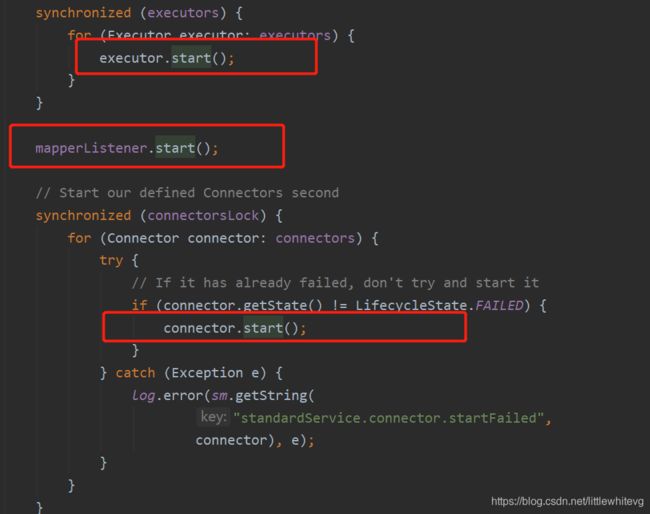
同理Service的创建后面说。直接来看org.apache.catalina.core.StandardService#initInternal:
/**
*调用启动前的初始化。这用于允许连接器
*在Unix操作环境下绑定到受限制的端口。
*/
@Override
protected void initInternal() throws LifecycleException {
super.initInternal();
if (engine != null) {
engine.init();
}
// 初始化任何Executors
for (Executor executor : findExecutors()) {
if (executor instanceof JmxEnabled) {
((JmxEnabled) executor).setDomain(getDomain());
}
executor.init();
}
// 初始化映射器侦听器
mapperListener.init();
// 初始化我们定义的连接器
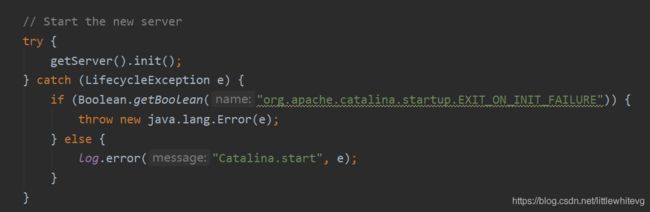
synchronized (connectorsLock) {
for (Connector connector : connectors) {
try {
connector.init();
} catch (Exception e) {
String message = sm.getString(
"standardService.connector.initFailed", connector);
log.error(message, e);
if (Boolean.getBoolean("org.apache.catalina.startup.EXIT_ON_INIT_FAILURE"))
throw new LifecycleException(message);
}
}
}
}

现在我们先看StandardEngine至此进入了容器部分,和之前的有些稍微不一样。因为只启动了一个主容器,基本的启动都是交给ContainerBase来执行。
-> org.apache.catalina.util.LifecycleBase#init
-> org.apache.catalina.core.StandardEngine#initInternal
-> org.apache.catalina.core.ContainerBase#initInternal
  @Override
    protected void initInternal() throws LifecycleException {

        BlockingQueue<Runnable> startStopQueue = new LinkedBlockingQueue<>();
        startStopExecutor = new ThreadPoolExecutor(
                getStartStopThreadsInternal(),
                getStartStopThreadsInternal(), 10, TimeUnit.SECONDS,
                startStopQueue,
                new StartStopThreadFactory(getName() + "-startStop-"));
        startStopExecutor.allowCoreThreadTimeOut(true);
        super.initInternal();
    }
如上启动一个容纳子容器的线程池。下面start线会介绍这个容器的作用,主要用来启动子容器。那么容器init暂时断到这里。
接着回到这个位置:

也就是调用一次
org.apache.catalina.core.StandardThreadExecutor#initInternal
因为我是个空项目,所以断点进不去。
那就接下往下看:
org.apache.catalina.connector.Connector#initInternal

org.apache.coyote.http11.AbstractHttp11Protocol#init
org.apache.tomcat.util.net.AbstractEndpoint#init
这里就init方法线差不多退出了。
5.2 start()
再来看start那条线:
org.apache.catalina.startup.Catalina#start

org.apache.catalina.core.StandardServer#startInternal
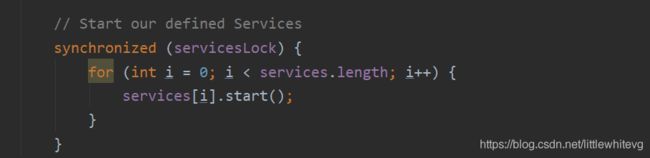
org.apache.catalina.core.StandardService#startInternal

启动顶级容器。
org.apache.catalina.core.StandardEngine#startInternal
org.apache.catalina.core.ContainerBase#startInternal
/**
启动此组件并实现需求
*的{@link org.apache.catalina.util.LifecycleBase#startInternal()}。
*
* @exception如果该组件检测到致命错误,则使用LifecycleException
*防止该组件被使用
*/
@Override
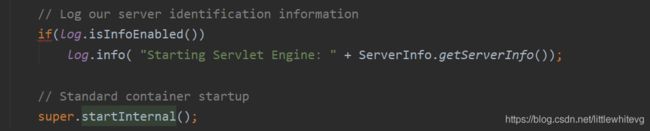
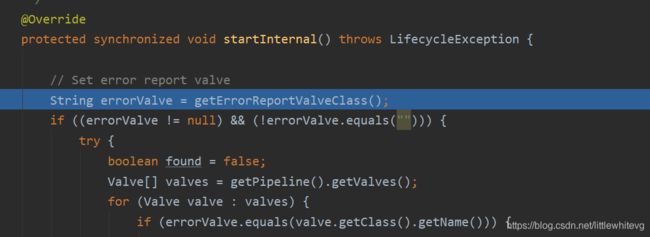
protected synchronized void startInternal() throws LifecycleException {
// 启动我们的下属组件(如果有的话)
logger = null;
getLogger();
Cluster cluster = getClusterInternal();
if (cluster instanceof Lifecycle) {
((Lifecycle) cluster).start();
}
Realm realm = getRealmInternal();
if (realm instanceof Lifecycle) {
((Lifecycle) realm).start();
}
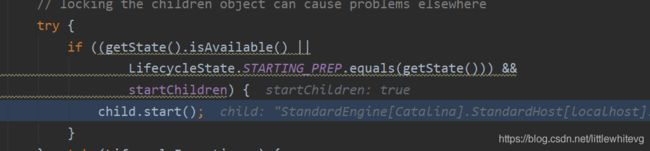
// 启动子容器(如果有的话)
Container children[] = findChildren();
List<Future<Void>> results = new ArrayList<>();
for (int i = 0; i < children.length; i++) {
results.add(startStopExecutor.submit(new StartChild(children[i])));
}
MultiThrowable multiThrowable = null;
for (Future<Void> result : results) {
try {
result.get();
} catch (Throwable e) {
log.error(sm.getString("containerBase.threadedStartFailed"), e);
if (multiThrowable == null) {
multiThrowable = new MultiThrowable();
}
multiThrowable.add(e);
}
}
if (multiThrowable != null) {
throw new LifecycleException(sm.getString("containerBase.threadedStartFailed"),
multiThrowable.getThrowable());
}
// 如果有的话,启动管道中的阀门(包括基础阀门)
if (pipeline instanceof Lifecycle) {
((Lifecycle) pipeline).start();
}
setState(LifecycleState.STARTING);
// 开始我们的线程
threadStart();
}
startStopExecutor上面看到过:

交给startStopExecutor来执行的方法就是这个call方法:
既然如此,我们来打断点看看这个child是个何方神圣。

很容易,我们看见了,这是一个Host。
接着往下debug,可见Host的LifeCycle是第一次调用:

所以调用了一次init。接下来又交给了ContainerBase#initInternal方法来执行Host的初始化,其实初始化只是初始化一个线程池,留着给子容器来初始化启动用的。
接着org.apache.catalina.util.LifecycleBase#start方法内,Host初始化完后

org.apache.catalina.core.StandardHost#startInternal
执行StandardHost的启动。

注意哦,StandardHost是没有子容器的这个时候,不知道是不是我没有配置项目进去的缘故。

再来看调用栈,原来接下来会调用Host的监听器的内容,执行HostConifg的初始化。

org.apache.catalina.core.StandardHost#addChild

org.apache.catalina.core.ContainerBase#addChild
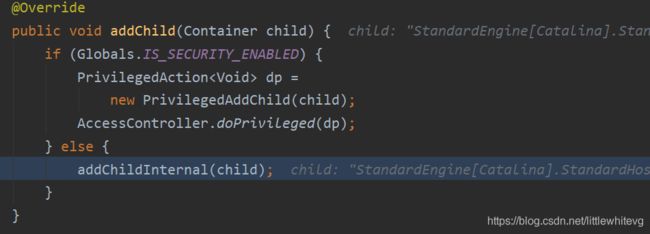
org.apache.catalina.core.ContainerBase#addChildInternal
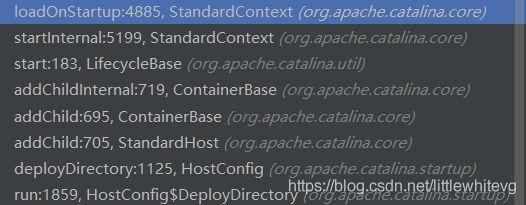
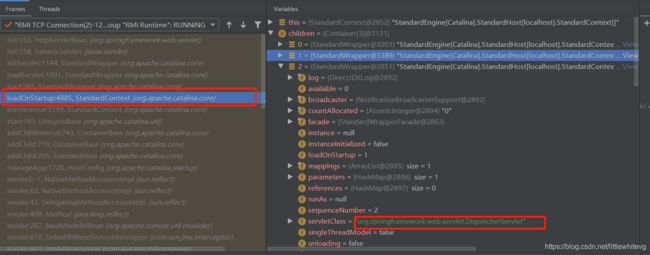
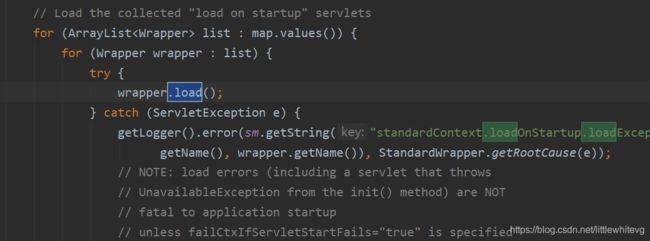
org.apache.catalina.core.StandardContext#startInternal

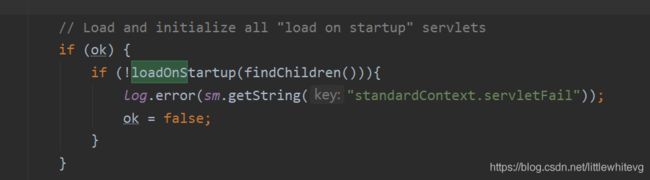
org.apache.catalina.core.StandardContext#loadOnStartup
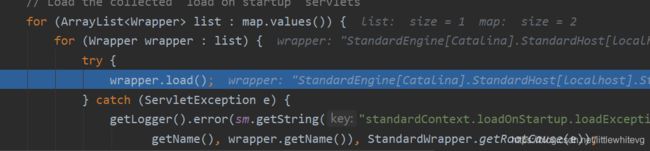
org.apache.catalina.core.StandardWrapper#load
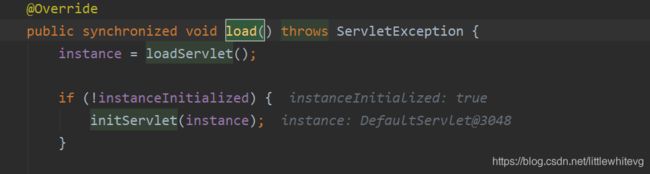
org.apache.catalina.core.StandardWrapper#initServlet

执行servlet的初始化方法。

这里调用Servlet的init方法,这里给SpringMVC启动埋下一个伏笔。
再回到这里:

调用各种生命周期函数。
org.apache.catalina.connector.Connector#startInternal

那么到这里就start结束了。
需要注意的是,进入容器那一部分,ContainerBase是很重要的一个点。结合Pipeline,就知道这部分为什么要这么设计了。
那么应该是这样的。
5.3 Digester
org.apache.commons.digester.Digester 类是 Digester 库的主类。该类可用于解析 xml 文件,对与 xml 文档中的每个元素,Digester 对象都会检查是否要做事先预定义的事件。在进行 xml 解析之前,开发人员需要设计
匹配模式。
若想要 digester 根据找到的模式创建相应的对象,则可以调用 addObjectCreate 方法。该方法有四个重载版本,比较有用的是下面两个:
public void addObjectCreate(java.lang.String pattern, java.lang.Class clazz)
public void addObjectCreate(java.lang.String pattern, java.lang.String className)
之前是不是很疑惑,Server就没有看到设置过,Server是怎么到容器中去的?
org.apache.catalina.startup.Catalina#load()

org.apache.catalina.startup.Catalina#createStartDigester

通过解析XML文件自然就可以通过反射设置了。
7. 结合SpringMVC启动
由上面我们得知,Context初始化后其子容器即Wrapper假如存在也会被调用其生命周期函数。
org.apache.catalina.core.StandardContext#startInternal
org.apache.catalina.core.StandardContext#loadOnStartup
org.apache.catalina.core.StandardWrapper#load
org.apache.catalina.core.StandardWrapper#loadServlet
org.apache.catalina.core.StandardWrapper#initServlet

该方法下调用所有已存Servlet的init方法。接下来就是交给DisPatchServlet的事情了。