本篇主要内容:
1.Frame与Bounds的区别
2.中心点(position)与锚点(anchorPoint)
3.视图与图层的坐标系
一、Frame与Bounds的区别
我们已经知道UIView的很多布局属性其实都来自于图层;UIView的布局属性包括:frame、bouns、center,分别对应了CALayer中frame、bounds、position。为了能清楚区分,图层用了position,视图用了center,但它们都代表了同样的值。
| UIView属性 | CALayer属性 | 属性说明 |
|---|---|---|
| frame | frame | 表示相对于其父视图的坐标位置 |
| bounds | bounds | 表示相对于其自身的坐标位置,{0,0}通常是其左上角 |
| center | position | 相对于父图层锚点AnchorPoint所在位置 |
上图对原有视图做了旋转变换,之后的frame实际上代表了覆盖在图层旋转之后的整个轴对齐的矩形区域,此时frame的宽和高和bounds不再一致了。
其实,对于视图和图层来说,frame是根据bounds、position、和transform计算而来的;所以当其中的任何一个值发生变化时,frame就会发生变化,相反改变frame也同样影响他们当中的值。
六、中心点(position)与锚点(anchorPoint)
1.锚点的概念
position与anchorPoint是两个容易混淆的概念,我们首先从Xcode中找到关于它们的注释说明如下:
/* The position in the superlayer that the anchor point of the layer's
 * bounds rect is aligned to. Defaults to the zero point. Animatable. */
@property CGPoint position;

/* Defines the anchor point of the layer's bounds rect, as a point in
 * normalized layer coordinates - '(0, 0)' is the bottom left corner of
 * the bounds rect, '(1, 1)' is the top right corner. Defaults to
 * '(0.5, 0.5)', i.e. the center of the bounds rect. Animatable. */
@property CGPoint anchorPoint;
我们可以看出,position被用于描述当前layer在superlayer中的位置,而且是通过当前layer的anchorPoint来确定的。换句话来讲就是:position是当前layer的anchorPoint在superLayer中的位置。
我们也可以更确切理解为:position是相对于superLayer来讲,而anchorPoint是相对于当前layer来讲;只不过在默认情况下,anchorPoint与position是重合的;锚点是用单位坐标来描述的(即图层的相对坐标),图层的左上角是{0,0},右下角是{1,1},因此图层的默认锚点是{0.5, 0.5},表示图层的中间位置代表了其位置position。
下面的图示是将锚点从{0.5,0.5}改为了{0,0},我们在这里更容易看到position与anchorPoint之间的关系:
如图,修改图层锚点会改变layer的frame,但是其position不会改变,这看起来似乎有点奇怪,但是我们依然可以通过一些计算方式看出端倪:
position.x = frame.origin.x + 0.5 * bounds.size.width;
position.y = frame.origin.y + 0.5 * bounds.size.height;
这里的0.5参数,其实就是由于锚点默认值得到的,所以改进公式如下:
position.x = frame.origin.x + anchorPoint.x * bounds.size.width;
position.y = frame.origin.y + anchorPoint.y * bounds.size.height;
此时,我们如果通过修改anchorPoint的值来进行测试,就会发现改变的只有frame的origin,这就说明修改position与anchorPoint中任何一个属性都不能影响另一个属性,由此我们也可以再次改进公式:
frame.origin.x = position.x - anchorPoint.x * bounds.size.width;
frame.origin.y = position.y - anchorPoint.y * bounds.size.height;
最后得出结论:frame的origin坐标由position与anchorPoint来共同决定;
2.锚点的作用
锚点就相当于一个支点,可以形象的理解为一颗固定了图层的图钉,尤其是我们在做旋转动画时,可能会需要设置此属性来决定图层是围绕哪一个点旋转的;但这时候我们又不得不考虑一个问题:修改锚点可以让我们的动画围绕非中心点旋转,但是这也改变了原有视图的位置frame,这是我们不想要的结果,该如何解决呢?这里提供一种方法如下:
- (void)setAnchorPoint:(CGPoint)anchorPoint forView:(UIView *)view{
    CGPoint oldOrigin = view.frame.origin;
    view.layer.anchorPoint = anchorPoint;
    CGPoint newOrigin = view.frame.origin;

    CGPoint transition;
    transition.x = newOrigin.x - oldOrigin.x;
    transition.y = newOrigin.y - oldOrigin.y;

    view.center = CGPointMake (view.center.x - transition.x, view.center.y - transition.y);
}
下面再来具体演示一下修改锚点改变动画状态的用法,我们分别创建橙色视图默认围绕中心旋转,而紫色视图围绕左顶点旋转,关键代码如下:
#import "TestLayerFiveVC.h"
@interface TestLayerFiveVC ()

@property (nonatomic,strong) UIView *viewA;
@property (nonatomic,strong) UIView *viewB;

@end

@implementation TestLayerFiveVC

- (void)viewDidLoad {
    [super viewDidLoad];
    [self.view addSubview:self.orangeView];
    [self.view addSubview:self.purpleView];

    [self.orangeView mas_makeConstraints:^(MASConstraintMaker *make) {
        make.top.equalTo(self.view).offset(100);
        make.centerX.equalTo(self.view);
        make.width.height.mas_equalTo(100);
    }];

    [self.purpleView mas_makeConstraints:^(MASConstraintMaker *make) {
        make.top.equalTo(self.orangeView.mas_bottom).offset(150);
        make.centerX.equalTo(self.view);
        make.width.height.mas_equalTo(100);
    }];
    [self.view layoutIfNeeded];

    //orangeView的旋转动画
    [self addRotationAnimation:self.orangeView withDuration:3];

    //修改purpleView的锚点,并恢复其原先的Frame,使其可以绕着左上角顶点旋转
    [self resetAnchorPoint:CGPointMake(0, 0) forView:self.purpleView];
    [self addRotationAnimation:self.purpleView withDuration:3];
}


- (void)resetAnchorPoint:(CGPoint)anchorPoint forView:(UIView *)view{
    CGPoint oldOrigin = view.frame.origin;
    view.layer.anchorPoint = anchorPoint;
    CGPoint newOrigin = view.frame.origin;

    CGPoint transition;
    transition.x = newOrigin.x - oldOrigin.x;
    transition.y = newOrigin.y - oldOrigin.y;

    //重新设置原来视图位置
    view.center = CGPointMake (view.center.x - transition.x, view.center.y - transition.y);
    [view mas_remakeConstraints:^(MASConstraintMaker *make) {
        make.top.equalTo(view.superview).offset(view.center.y - transition.y);
        make.leading.equalTo(view.superview).offset(view.center.x - transition.x);
        make.width.mas_equalTo(view.width);
        make.height.mas_equalTo(view.height);
    }];
}

- (void)addRotationAnimation:(__kindof UIView *)view withDuration:(CFTimeInterval)dutation {
    CABasicAnimation *rotationAnimation = [CABasicAnimation animationWithKeyPath:@"transform.rotation.z"];
    rotationAnimation.toValue = [NSNumber numberWithFloat: -M_PI * 2.0];
    rotationAnimation.duration = dutation;
    rotationAnimation.cumulative = YES;
    rotationAnimation.repeatCount = MAXFLOAT;
    rotationAnimation.removedOnCompletion = NO;
    [view.layer addAnimation:rotationAnimation forKey:@"rotationAnimation"];
}
效果图如下:
三、视图与图层的坐标系
CALayer给不同坐标系之间的图层转换提供了一些工具类方法:
- (CGPoint)convertPoint:(CGPoint)p fromLayer:(nullable CALayer *)l;
- (CGPoint)convertPoint:(CGPoint)p toLayer:(nullable CALayer *)l;
- (CGRect)convertRect:(CGRect)r fromLayer:(nullable CALayer *)l;
- (CGRect)convertRect:(CGRect)r toLayer:(nullable CALayer *)l;
与此对应的UIView也具有相似的方法如下:
- (CGPoint)convertPoint:(CGPoint)point toView:(nullable UIView *)view;
- (CGPoint)convertPoint:(CGPoint)point fromView:(nullable UIView *)view;
- (CGRect)convertRect:(CGRect)rect toView:(nullable UIView *)view;
- (CGRect)convertRect:(CGRect)rect fromView:(nullable UIView *)view;
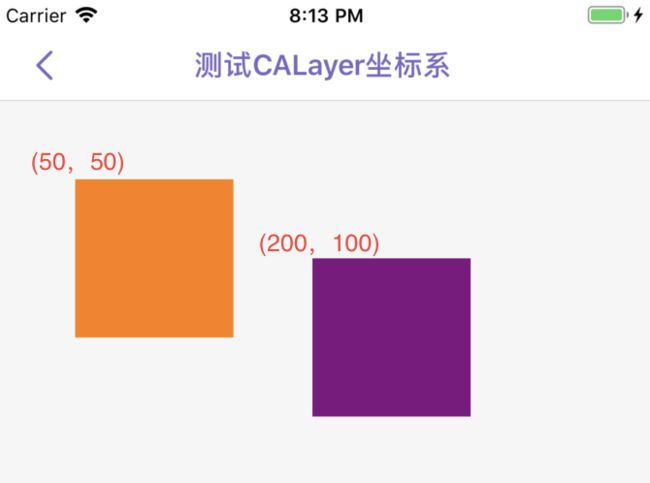
通过这些方法,我们可以把定义在一个图层(或视图)坐标系下的点或者矩形转换为另一个图层(或视图)坐标系下的点或者矩形;开发过程中我们通常操作的对象都是视图,所以下面以视图为例简单演示其用法:首先创建添加两个宽高都是100*100的橙色、紫色视图在控制器的View上,
使用下面的代码进行测试,结果如下:
CGPoint targetPoint = CGPointMake(10, 10);

CGPoint point1 = [purpleView convertPoint:targetPoint toView:orangeView]; //代码1
CGPoint point2 = [orangeView convertPoint:targetPoint fromView:purpleView];
NSLog(@"\npoint1:%@\npoint2:%@",NSStringFromCGPoint(point1),NSStringFromCGPoint(point2));

/*测试结果:
 point1:{160, 60}
 point2:{160, 60}
 */
代码分析:
这里分别测试了convertPoint的两种用法(convertRect与其相似),我们可以将代码1理解为:参考organView为坐标系时,purpleView上坐标为target的点的坐标值;
---End---
相关文章:
iOS动画-CALayer寄宿图与绘制原理
iOS动画-CALayer布局属性详解
iOS动画-CALayer隐式动画原理与特性
iOS动画-CAAnimation使用详解


