Qt学习(一)界面布局QLayout、QGridLayout、QHBoxLayout、QVBoxLayout简述及实列
@## Qt学习(一)界面布局QLayout、QGridLayout、QHBoxLayout、QVBoxLayout简述TOC
Qt提供了QGridLayout类、QHBoxLayout类、QVBoxLayout类等基本的布局管理。

一、QGridLayout类:网格排列布局
The QGridLayout class lays out widgets in a grid.(引自Qt编辑器)
代码:
头文件定义对象:
    QString input1="",input3="",input5="",
    input2="",input4="",input6="",input7="";
    QLabel *label1,*label2,*label3,*label4,*label5,*label6,*label7;
    QPushButton *button1,*button2,*button3,*button4,
    *button5,*button6,*button7,*button8,*button9,*button0,
    *button_1,*button_2,*button_3,*button_4,*button_5,
    *button_6,*button_7,*button_8;~
//源文件创建界面排列对象:
    QGridLayout *main=new QGridLayout(this);
    label1=new QLabel;
    label1->setText(input1);
    label2=new QLabel;
    label2->setText(input2);
    label3=new QLabel;
    label3->setText(input3);
    label4=new QLabel;
    label4->setText(input4);
    label5=new QLabel;
    label5->setText(input5);
    label6=new QLabel;
    label6->setText(tr("欢迎使用本计算机"));
    label7=new QLabel;
    label7->setText("");
    button1=new QPushButton("1");
    button2=new QPushButton("2");
    button3=new QPushButton("3");
    button4=new QPushButton("4");
    button5=new QPushButton("5");
    button6=new QPushButton("6");
    button7=new QPushButton("7");
    button8=new QPushButton("8");
    button9=new QPushButton("9");
    button0=new QPushButton("0");
    button_1=new QPushButton("+");
    button_2=new QPushButton("-");
    button_3=new QPushButton("*");
    button_4=new QPushButton("/");
    button_5=new QPushButton("=");
    button_6=new QPushButton("EC");
    button_7=new QPushButton("%");
    button_8=new QPushButton("连算");
    main->addWidget(label1,0,0);
    main->addWidget(label2,0,1);
    main->addWidget(label3,0,2);
    main->addWidget(label4,0,3);
    main->addWidget(label5,0,4);
    main->addWidget(button1,1,0);
    main->addWidget(button2,1,1);
    main->addWidget(button3,1,2);
    main->addWidget(button4,2,0);
    main->addWidget(button5,2,1);
    main->addWidget(button6,2,2);
    main->addWidget(button7,3,0);
    main->addWidget(button8,3,1);
    main->addWidget(button9,3,2);
    main->addWidget(button0,4,0);
    main->addWidget(button_1,1,3);
    main->addWidget(button_2,2,3);
    main->addWidget(button_3,3,3);
    main->addWidget(button_4,4,3);
    main->addWidget(button_5,4,2);
    main->addWidget(button_6,4,1);
    main->addWidget(button_7,6,3);
    main->addWidget(button_8,5,3);
    main->addWidget(label6,5,0,1,3);
    main->addWidget(label7,6,0,1,3);~
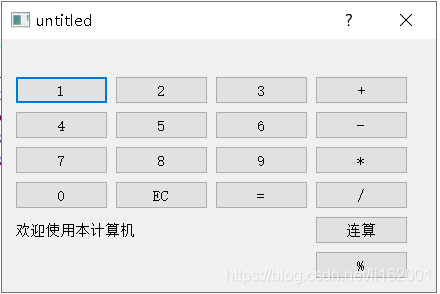
效果图:
在QGridLayout中,使用的布局常用方法有addWidget()和addLayout()。
addWidget()方法用于加入需要布局的控件,方法原型:
//addWidget()方法原型:
void addWidget
(QWidget *widget,			//需要插入的控件对象
  int fromRow,				//插入的行
  int fromColumn,			//插入的列
  int rowSpan,				//表示占用的行数
  int columnSpan,			//表示占用的列数
  Qt::Alignment alignment=0,		//描述控件的对齐方式
)
addLayout()方法用于加入需要布局的控件
//addLayout()方法原型
void addLayout
(
	QLayout *layout,		//需要插入的子布局对象
	int row,			//插入的行
	int column,			//插入的列
	int rowSpan,			//占用的行
	int columnSpan,			//占用的列
	Qt::Alignment alignment		//指定对齐方向
)
二、QHBoxLayout类:水平排列布局
The QHBoxLayout class lines up widgets horizontally.
代码
      QWidget *window = new QWidget;
      QPushButton *button1 = new QPushButton("One");
      QPushButton *button2 = new QPushButton("Two");
      QPushButton *button3 = new QPushButton("Three");
      QPushButton *button4 = new QPushButton("Four");
      QPushButton *button5 = new QPushButton("Five");


      QHBoxLayout *layout = new QHBoxLayout;
      layout->addWidget(button1);
      layout->addWidget(button2);
      layout->addWidget(button3);
      layout->addWidget(button4);
      layout->addWidget(button5);


      window->setLayout(layout);
      window->show();
页面效果
![]()
三、QVBoxLayout类:垂直排列布局
The QVBoxLayout class lines up widgets vertically.
代码:
      QWidget *window = new QWidget;
      QPushButton *button1 = new QPushButton("One");
      QPushButton *button2 = new QPushButton("Two");
      QPushButton *button3 = new QPushButton("Three");
      QPushButton *button4 = new QPushButton("Four");
      QPushButton *button5 = new QPushButton("Five");


      QVBoxLayout *layout = new QVBoxLayout;
      layout->addWidget(button1);
      layout->addWidget(button2);
      layout->addWidget(button3);
      layout->addWidget(button4);
      layout->addWidget(button5);


      window->setLayout(layout);
      window->show();
效果图:

四、配合使用制作界面
多使用addWidget()和addLayout()。
代码:
头文件定义对象
private:
        //左侧
        QLabel *UserNameLabel;
        QLabel *NameLabel;
        QLabel *SexLabel;
        QLabel *DepartmentLabel;
        QLabel *AgeLabel;
        QLabel *OtherLabel;
        QLineEdit *UserNameLineEdit;
        QLineEdit *NameLineEdit;
        QComboBox *SexComboBox;
        QTextEdit *DepartmentTextEdit;
        QLineEdit *AgeLineEdit;
        QGridLayout *LeftLayout;
        //右侧
        QLabel *HeadLabel;          //右上角部分
        QLabel *HeadIconLabel;
        QPushButton *UpdateHeadBtn;
        QHBoxLayout *TopRightLayout;


        QLabel *IntroductionLabel;
        QTextEdit *IntroductionTextEdit;
        QVBoxLayout *RightLayout;
        //底部
        QPushButton *OkBtn;
        QPushButton *CancelBtn;
        QHBoxLayout *ButtomLayout;
源文件排列对象
    setWindowTitle(tr("UserInfo"));
    /************** 左侧 ******************************/
    UserNameLabel =new QLabel(tr("用户名:"));
    UserNameLineEdit =new QLineEdit;
    NameLabel =new QLabel(tr("姓名:"));
    NameLineEdit =new QLineEdit;
    SexLabel =new QLabel(tr("性别:"));
    SexComboBox =new QComboBox;
    SexComboBox->addItem(tr("女"));
    SexComboBox->addItem(tr("男"));
    DepartmentLabel =new QLabel(tr("部门:"));
    DepartmentTextEdit =new QTextEdit;
    AgeLabel =new QLabel(tr("年龄:"));
    AgeLineEdit =new QLineEdit;
    OtherLabel =new QLabel(tr("备注:"));
    OtherLabel->setFrameStyle(QFrame::Panel|QFrame::Sunken);


    LeftLayout =new QGridLayout();
    LeftLayout->addWidget(UserNameLabel,0,0);     			//用户名
    LeftLayout->addWidget(UserNameLineEdit,0,1);


    LeftLayout->addWidget(NameLabel,1,0);                	//姓名
    LeftLayout->addWidget(NameLineEdit,1,1);


    LeftLayout->addWidget(SexLabel,2,0);                   	//性别
    LeftLayout->addWidget(SexComboBox,2,1);


    LeftLayout->addWidget(DepartmentLabel,3,0);           	//部门
    LeftLayout->addWidget(DepartmentTextEdit,3,1);


    LeftLayout->addWidget(AgeLabel,4,0);                    //年龄
    LeftLayout->addWidget(AgeLineEdit,4,1);


    LeftLayout->addWidget(OtherLabel,5,0,1,2);             	//其他


    LeftLayout->setColumnStretch(0,1);
    LeftLayout->setColumnStretch(1,3);
    /*********右侧*********/
    HeadLabel =new QLabel(tr("头像: "));                    //右上角部分
    HeadIconLabel =new QLabel;
    QPixmap icon("312.png");
    HeadIconLabel->setPixmap(icon);
    HeadIconLabel->resize(icon.width(),icon.height());
    UpdateHeadBtn =new QPushButton(tr("更新"));


    TopRightLayout =new QHBoxLayout();
    TopRightLayout->setSpacing(20);
    TopRightLayout->addWidget(HeadLabel);
    TopRightLayout->addWidget(HeadIconLabel);
    TopRightLayout->addWidget(UpdateHeadBtn);
    IntroductionLabel =new QLabel(tr("个人说明:"));         //右下角部分
    IntroductionTextEdit =new QTextEdit;


    RightLayout =new QVBoxLayout();
    RightLayout->setMargin(10);
    RightLayout->addLayout(TopRightLayout);
    RightLayout->addWidget(IntroductionLabel);
    RightLayout->addWidget(IntroductionTextEdit);
    /*--------------------- 底部 --------------------*/
    OkBtn =new QPushButton(tr("确定"));
    CancelBtn =new QPushButton(tr("取消"));


    ButtomLayout =new QHBoxLayout();
    ButtomLayout->addStretch();
    ButtomLayout->addWidget(OkBtn);
    ButtomLayout->addWidget(CancelBtn);
    /*---------------------------------------------*/
    QGridLayout *mainLayout =new QGridLayout(this);
    mainLayout->setMargin(15);
    mainLayout->setSpacing(10);
    mainLayout->addLayout(LeftLayout,0,0);
    mainLayout->addLayout(RightLayout,0,1);
    mainLayout->addLayout(ButtomLayout,1,0,1,2);
    mainLayout->setSizeConstraint(QLayout::SetFixedSize);
效果图:

萌新,刚刚学习没多久,如有错误,敬请指正,感谢