- 路由(URL/Target-Acton/BeeHive)
- pod 的使用
- 依赖注入
pod会帮我们生成Framework,Framework只是一个文件,可能是静态库,也可能是动态库,Framework的作用即是将Header(头文件),binary(二进制),bundle(资源文件)一起打包,具体是动态库还是静态库取决于Mach-O
组件一般都是通过库的方式,静态库(.a .h)在编译时就已经链接到APP中,如果有多个地方使用静态库就会被每链接多次,浪费内存()
动态库(.tbd .dylb)是在运行时期按需加载的,多个地方公用一个动态库。动态库是不参与编译过程的,所以也不会产生符号冲突。(在编译第三方的时候经常出现)
在使用组件化的过程中除了使用pod的方式,还可以通过静态库的方式来选择性的分层。
在使用pod的时候需要不断的打tag发版测试,这个时候操作步骤是繁琐的,如果没有更多的要求,可以先在工程中用静态库分层。
例如我们的APP在运行的时候,UI层,业务层,网络请求层解耦
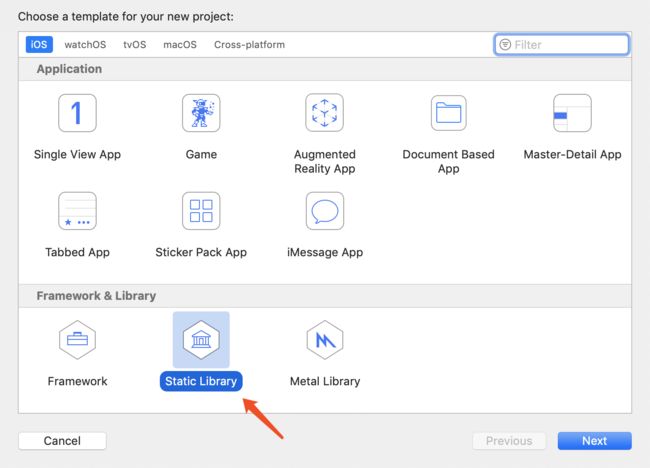
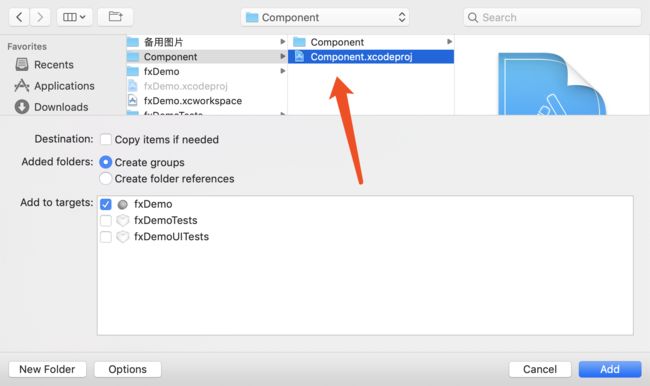
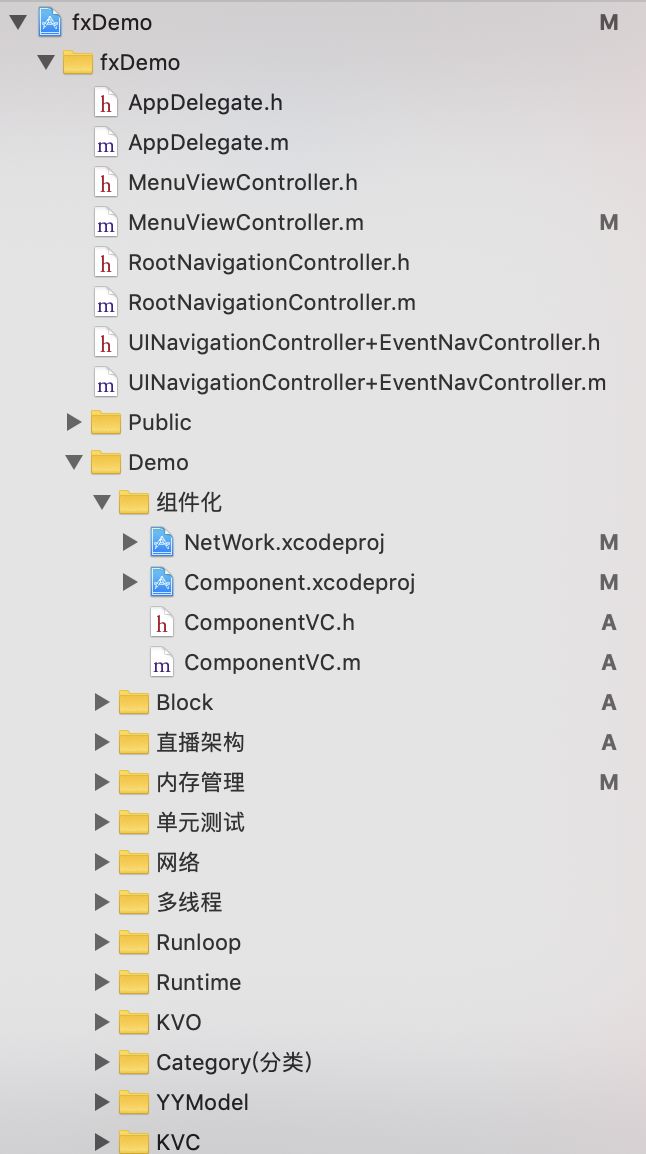
添加静态库流程如下:
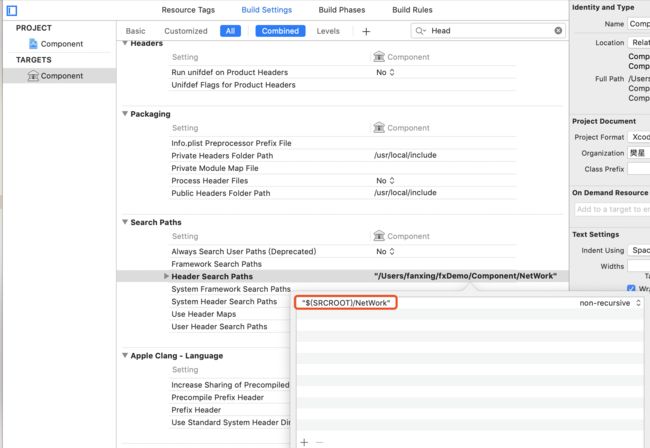
假如说我们的业务层需要依赖网络请求,需要在对应的HEADER_SEARCH_PATHS知道当前业务层在哪里找到网络层
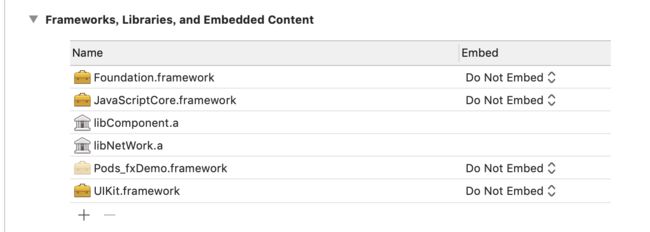
添加对应的.a文件,就可以了
文件结构图
代码:
#import "ComponentVC.h"
#import

@interface ComponentVC ()

@end

@implementation ComponentVC

- (void)viewDidLoad {
    [super viewDidLoad];
    // Do any additional setup after loading the view.
    [Component getData];
}
#import "Component.h"
#import

@implementation Component
+(id)getData{
    [NetWork getDataWithUrl:@"www.baidu.com"];
    return nil;
}
@end
#import "NetWork.h"

@implementation NetWork
+ (id)getDataWithUrl:(NSString *)url{
    NSLog(@"Url is %@", url);
    return nil;
}
@end
这就是通过静态库的方式来做组件化 。
接下来看下使用pod的方式来实现组件化:
当我们使用pod install的时候发生了什么事情
- 查看本地spec 是否有担起podSpec
- 如果存在旧取出对应Spec的git地址,直接去git拉取代码
- 不存在,就需要去更新Cocoapod master repo
- 使用git命令,去github拉取对应的源码
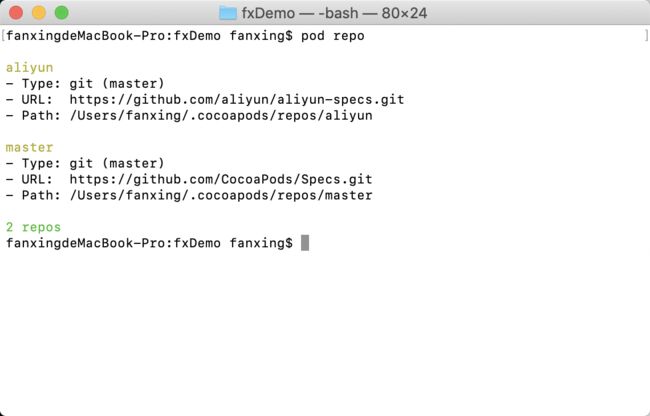
分析:master里面就是cocoapod的spec文件,我们可以命名自己spec文件来存放自己的私有库的pod spec。如果有自己的spec,那么就会存放自己私有库的spec。
下面来具体实施以下具体的工程:
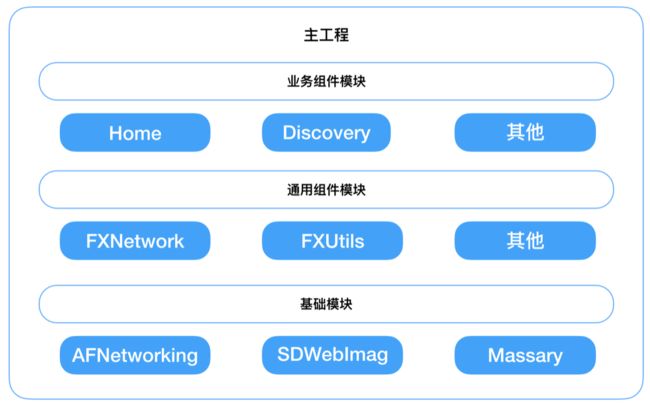
项目拆分的原则:
当我们第一次做组件化的时候,首先拆分的颗粒度不要太大,可能你会觉得看起来都想拆成一个组件,这样是不可取的,加剧了你的任务,而且update和install的时候是比较慢的,所以初期要颗粒度大一点的去拆分。
- 基础模块,其实就是一些第三方库,以及系统的Framework
- 基础模块是可以直接被通用模块直接依赖的(就是直接可以通过#import方式依赖,它们直接不需要通过路由来通讯)。
- 通用组件尽量不要有横向的import,如果有就说明需要下沉到下一层(拆分的颗粒度有问题,共有的部分可以下沉到下一个模块,这种需要在实际使用过程中,慢慢去拆分的)。
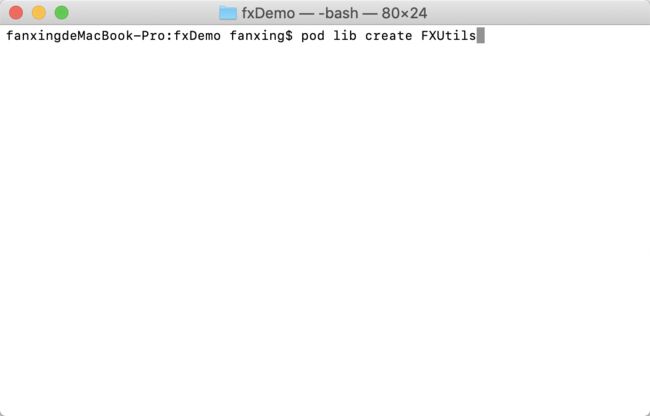
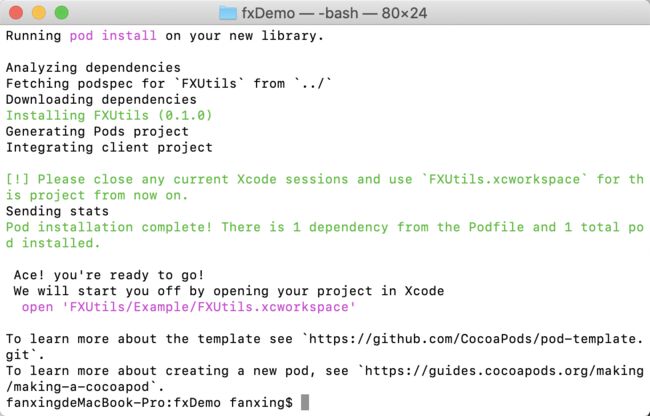
首先在当前工程中新建一个pod,相当于去github拉取当前的模板文件
需要配置一些参数
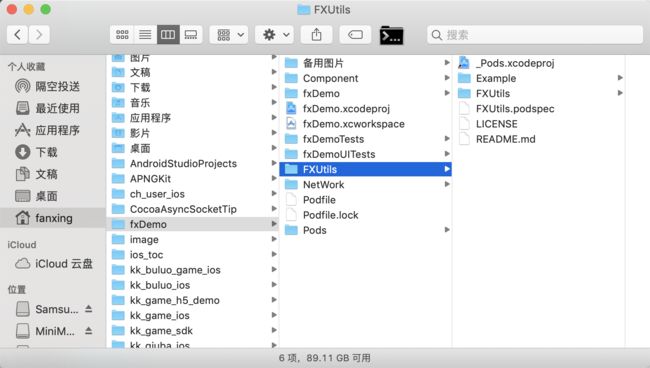
创建成功,这时在本地工程目录里面会有这个库的文件夹:
接下来需要把一部分代码抽取到FXUtils中
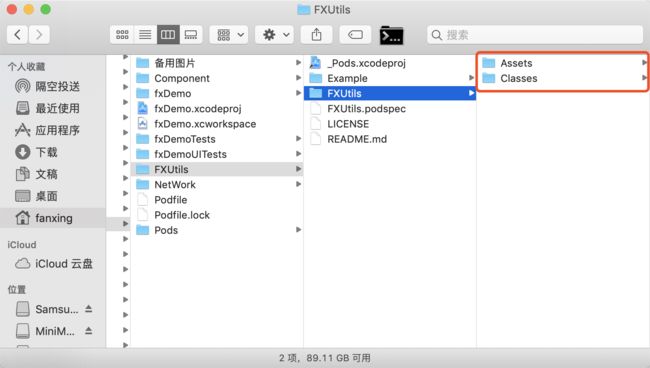
下面是FXUtils工程文件夹:
分析:FXUtils里面有两个文件夹,一个是Assets里面存的是项目资源(图片,xib等),另一个是Classes存放的就是我们当前的类文件
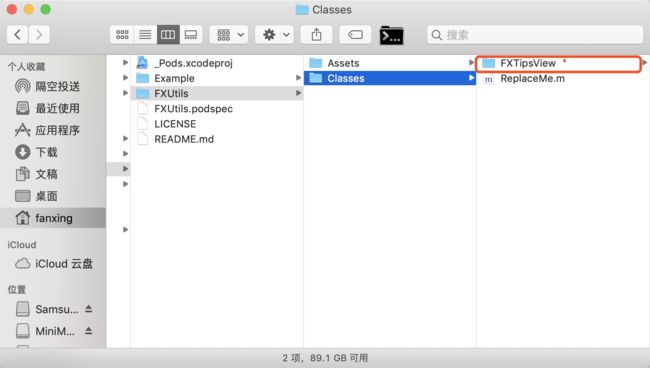
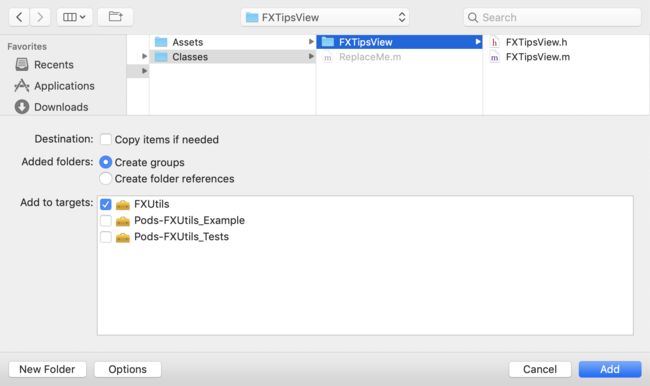
接下来吧Base里面的FXTipsView复制到Utils里面Classes文件夹:
接下来在Utils工程的Development Pod把刚才的文件添加进来
然后command+b解决报错:
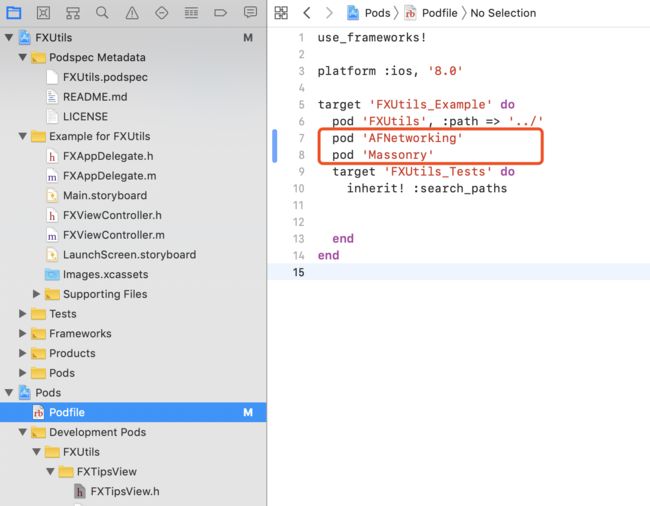
- 如果报错原因是因为使用了第三方库,就在Podfile文件里面引入对应的第三方库
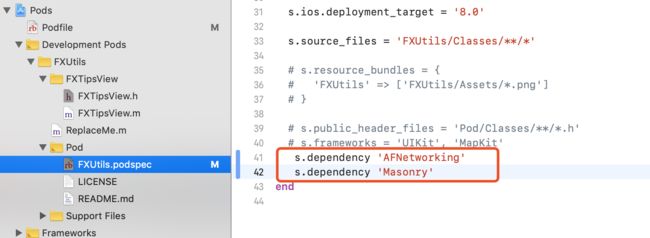
这里有一个问题就是,虽然已经添加了对应的pod,但是FXUtils还不知道去哪里去找新添加的依赖库,所以需要在FXUtils的pod依赖库里面去添加:
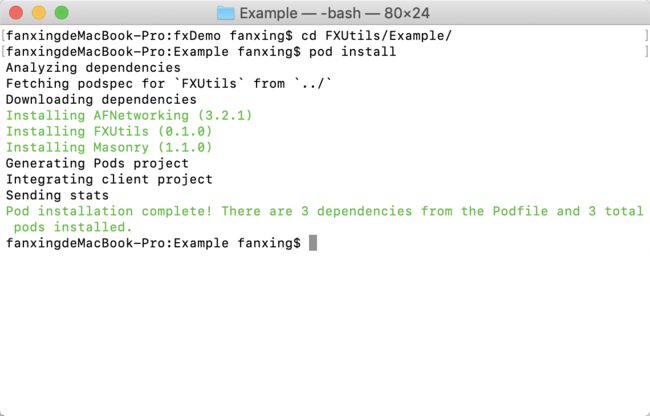
进入example工程,在终端中 pod install:
现在依赖的pod库已经下载到工程里面了
这样就解决了组件引入第三方库报错的问题。
除了一些使用第三方库的错误,还有一些依赖于主工程的公共文件的宏定义常量的设置也会报错,那么对于这种常量该如何拆分呢?
例如组件里面的宏定义依赖主工程的一些类(例如颜色定义,屏幕尺寸,字体代销等),这种改如何处理。
###########################这里没有解决如果组件里面有xib该如何处理:
需要在podspec文件中引入,指定资源路劲。
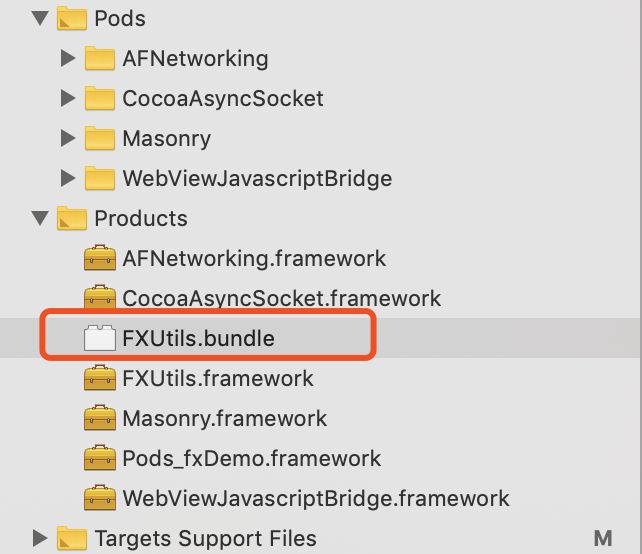
添加了resource_bundles之后,在终端pod install之后,会在pod Product里面生成一个bundle文件包含xib的nib打包文件。(官方推荐使用bundle,因为比较安全)
加载bundle里面xib的代码:
NSString *bundlePath = [[NSBundle bundleForClass:[self class]].resourcePath stringByAppendingPathComponent:@"/FXUtils.bundle"];
NSBundle *resource_bundle = [NSBundle bundleWithPath:bundlePath];
UIView *backView = [[resource_bundle loadNibNamed:NSStringFromClass([self class]) owner:nil options:nil] lastObject];
这里有一个问题,就是如果不使用resource_bundles,只使用resource,只是把我们的当前存在的资源copy到目标工程中,并没有bundle产生,它会在app包里面Frameworks->FXUtils.framework->Assets.car里面,我们在编译的时候系统会把我们的Assets生成一个这样的文件。
注意:如果我们使用resource指定的资源会和我们主工程的资源文件一起编译在Assets.car文件中,这样就会有一个问题,文件名称有可能会冲突,同名文件会被覆盖,所以推荐使用resource_bundle。
下面这段代码其实是指定当前类文件的路径,这里需要注意必须是.h和.m文件,如果不指定类型,会出现加载重复报错。
s.source_files = 'FXUtils/Classes/**/*.{h.m}'
推送远程私有库具体步骤就不再这里详细说了参考另一编转载的博客CocoaPods远程私有库从0到1转载
- 需要注意验证Spec是否合法步骤(pod lib lint),坑比较多。
- 实际上需要生成两个库,一个是spec存放库,一个是代码git存放库。
- 提交的时候,如果你修改了spec文件也需要单独提交spec文件。
组件之间通讯方式—路由:
主要讲解三个主流的框架:
- MGJRouter
其实每个业务模块都会暴露一个文件PublicHeader(用来暴露当前组件所具有的服务),用来供其他业务组件调用的,MGRouter会调用一个url,然后去各个PublicHeader里面去找。
CTMediator: Target(文件),Category(暴露服务)。
Beehive():暴露的是需要提前加载的服务,先加载内存中。
MGJRouter使用方式:
- (void)demoBasicUsage
{
    [MGJRouter registerURLPattern:@"mgj://foo/bar/:id.html" toHandler:^(NSDictionary *routerParameters) {
        [self appendLog:@"匹配到了 url,以下是相关信息"];
        [self appendLog:[NSString stringWithFormat:@"routerParameters:%@", routerParameters]];
    }];

    [MGJRouter openURL:@"mgj://foo/bar"];
}
源码:
+ (void)registerURLPattern:(NSString *)URLPattern toHandler:(MGJRouterHandler)handler
{
    [[self sharedInstance] addURLPattern:URLPattern andHandler:handler];
}

- (void)addURLPattern:(NSString *)URLPattern andHandler:(MGJRouterHandler)handler
{
    //解析当前 URL
    //
    NSMutableDictionary *subRoutes = [self addURLPattern:URLPattern];
    if (handler && subRoutes) {
        subRoutes[@"_"] = [handler copy];
    }
}

- (NSMutableDictionary *)addURLPattern:(NSString *)URLPattern
{
    NSArray *pathComponents = [self pathComponentsFromURL:URLPattern];

    NSMutableDictionary* subRoutes = self.routes;

    for (NSString* pathComponent in pathComponents) {
        if (![subRoutes objectForKey:pathComponent]) {
            subRoutes[pathComponent] = [[NSMutableDictionary alloc] init];
        }
        subRoutes = subRoutes[pathComponent];
    }
    return subRoutes;
}

- (NSArray*)pathComponentsFromURL:(NSString*)URL
{

    NSMutableArray *pathComponents = [NSMutableArray array];
    if ([URL rangeOfString:@"://"].location != NSNotFound) {
        NSArray *pathSegments = [URL componentsSeparatedByString:@"://"];
        // 如果 URL 包含协议,那么把协议作为第一个元素放进去
        [pathComponents addObject:pathSegments[0]];

        // 如果只有协议,那么放一个占位符
        URL = pathSegments.lastObject;
        if (!URL.length) {
            [pathComponents addObject:MGJ_ROUTER_WILDCARD_CHARACTER];
        }
    }

    for (NSString *pathComponent in [[NSURL URLWithString:URL] pathComponents]) {
        if ([pathComponent isEqualToString:@"/"]) continue;
        if ([[pathComponent substringToIndex:1] isEqualToString:@"?"]) break;
        [pathComponents addObject:pathComponent];
    }
    return [pathComponents copy];
}
分析: pathComponentsFromURL方法吧url分割成了array,分为协议头,模块,参数。
全局subRoutes存放当前回调block,其实在调用的时候也根据当前的规则然后找到block,最终完成代码的调用。
断点调试:
CTMediator
这框架核心就是CTMediator类,不管是发现服务还是调用服务都是通过这个类来调用的。
接下来看下源码:
//targetName 类名
//action - SEL 方法编号
- (id)performTarget:(NSString *)targetName action:(NSString *)actionName params:(NSDictionary *)params shouldCacheTarget:(BOOL)shouldCacheTarget
{
    NSString *swiftModuleName = params[kCTMediatorParamsKeySwiftTargetModuleName];

    // generate target
    NSString *targetClassString = nil;
    if (swiftModuleName.length > 0) {
        targetClassString = [NSString stringWithFormat:@"%@.Target_%@", swiftModuleName, targetName];
    } else {
        targetClassString = [NSString stringWithFormat:@"Target_%@", targetName];
    }
    NSObject *target = self.cachedTarget[targetClassString];
    if (target == nil) {
        //获得class
        Class targetClass = NSClassFromString(targetClassString);
        //
        target = [[targetClass alloc] init];
    }

    // generate action
    NSString *actionString = [NSString stringWithFormat:@"Action_%@:", actionName];
    SEL action = NSSelectorFromString(actionString);

    if (target == nil) {
        // 这里是处理无响应请求的地方之一,这个demo做得比较简单,如果没有可以响应的target,就直接return了。实际开发过程中是可以事先给一个固定的target专门用于在这个时候顶上,然后处理这种请求的
        [self NoTargetActionResponseWithTargetString:targetClassString selectorString:actionString originParams:params];
        return nil;
    }

    if (shouldCacheTarget) {
        self.cachedTarget[targetClassString] = target;
    }

    if ([target respondsToSelector:action]) {
        return [self safePerformAction:action target:target params:params];
    } else {
        // 这里是处理无响应请求的地方,如果无响应,则尝试调用对应target的notFound方法统一处理
        SEL action = NSSelectorFromString(@"notFound:");
        if ([target respondsToSelector:action]) {
            return [self safePerformAction:action target:target params:params];
        } else {
            // 这里也是处理无响应请求的地方,在notFound都没有的时候,这个demo是直接return了。实际开发过程中,可以用前面提到的固定的target顶上的。
            [self NoTargetActionResponseWithTargetString:targetClassString selectorString:actionString originParams:params];
            [self.cachedTarget removeObjectForKey:targetClassString];
            return nil;
        }
    }
}
分析:它的机制最主要的是通过运行时,最终都会调用到safePerformAction方法:
//最终调用这个方法 - NSInvocation()
- (id)safePerformAction:(SEL)action target:(NSObject *)target params:(NSDictionary *)params
{
    NSMethodSignature* methodSig = [target methodSignatureForSelector:action];
    if(methodSig == nil) {
        return nil;
    }
    const char* retType = [methodSig methodReturnType];

    if (strcmp(retType, @encode(void)) == 0) {
        //NSInvocation 进行方法调用
        NSInvocation *invocation = [NSInvocation invocationWithMethodSignature:methodSig];
        [invocation setArgument:¶ms atIndex:2];
        [invocation setSelector:action];
        [invocation setTarget:target];
        //对应的方法就执行了
        [invocation invoke];
        return nil;
    }

    if (strcmp(retType, @encode(NSInteger)) == 0) {
        NSInvocation *invocation = [NSInvocation invocationWithMethodSignature:methodSig];
        [invocation setArgument:¶ms atIndex:2];
        [invocation setSelector:action];
        [invocation setTarget:target];
        [invocation invoke];
        NSInteger result = 0;
        [invocation getReturnValue:&result];
        return @(result);
    }

    if (strcmp(retType, @encode(BOOL)) == 0) {
        NSInvocation *invocation = [NSInvocation invocationWithMethodSignature:methodSig];
        [invocation setArgument:¶ms atIndex:2];
        [invocation setSelector:action];
        [invocation setTarget:target];
        [invocation invoke];
        BOOL result = 0;
        [invocation getReturnValue:&result];
        return @(result);
    }

    if (strcmp(retType, @encode(CGFloat)) == 0) {
        NSInvocation *invocation = [NSInvocation invocationWithMethodSignature:methodSig];
        [invocation setArgument:¶ms atIndex:2];
        [invocation setSelector:action];
        [invocation setTarget:target];
        [invocation invoke];
        CGFloat result = 0;
        [invocation getReturnValue:&result];
        return @(result);
    }

    if (strcmp(retType, @encode(NSUInteger)) == 0) {
        NSInvocation *invocation = [NSInvocation invocationWithMethodSignature:methodSig];
        [invocation setArgument:¶ms atIndex:2];
        [invocation setSelector:action];
        [invocation setTarget:target];
        [invocation invoke];
        NSUInteger result = 0;
        [invocation getReturnValue:&result];
        return @(result);
    }

#pragma clang diagnostic push
#pragma clang diagnostic ignored "-Warc-performSelector-leaks"
    return [target performSelector:action withObject:params];
#pragma clang diagnostic pop
}
分析:主要就是NSInvocation来执行,这个来执行方法有个好处,不需要知道当前具体的类,也不用知道具体的方法编号,只需要根据当前的字符串设置下,然后调用invoke,对应的方法就执行了。
这样还会有依然问题,就是还是需要些Target_B这样的硬编码,框架的做法就是使用CTMediator的分类。
分析:
- 首先A模块不会知道B模块里面的内容,B提供具体的服务,这时候需要新建一个Target_B,用来把B暴露的服务封装一层,目的是为了在调用B的服务时候不需要知道B的具体的名称。
- A在调用的时候只需要提供Target_B模块名称+方法名称,然后交给CTMediator,CTMediator就会找到Target_B执行方法。
- 需要单独的维护一个CTMediator的分类Pod库,总的调用逻辑就是先调用CTMediator分类然后CTMediator调用Target_B,Target_B再调用B模块。
- 每一个模块都暴露一个Target文件,里面包含了模块能提供的服务,还需要有一个CTMediator的分类,这个分类是用来解决硬编码的问题。
- 回传参数是通过把Block添加到参数字典里面,然后把字典当做参数传过去,回调的时候需要从字典中取出Block回调,回调代码如下:
- (void)CTMediator_showAlertWithMessage:(NSString *)message cancelAction:(void(^)(NSDictionary *info))cancelAction confirmAction:(void(^)(NSDictionary *info))confirmAction
{
    NSMutableDictionary *paramsToSend = [[NSMutableDictionary alloc] init];
    if (message) {
        paramsToSend[@"message"] = message;
    }
    if (cancelAction) {
        paramsToSend[@"cancelAction"] = cancelAction;
    }
    if (confirmAction) {
        paramsToSend[@"confirmAction"] = confirmAction;
    }
    [self performTarget:kCTMediatorTargetA
                 action:kCTMediatorActionShowAlert
                 params:paramsToSend
      shouldCacheTarget:NO];
}
总结:
- 使用这个框架,肯定是需要写很多的分类,但是有一个好处就是如果需要使用模块B,只需要对应模块的分类文件就可以了,不需要知道模块B里面具体的内容。
- 总体感觉使用起来是比较规范的,解耦比较彻底,减少沟通过程中出现的问题。
项目拆分(一般是三层):
基础层:网络请求,数据缓存
通用业务层:拿到数据,清洗数据,交付数据
具体业务层:首页模板,发现模块(假如首页和发现模块有耦合,例如视频播放,这时候放到具体业务模块就不合适了,因为会产生横向依赖,需要下沉到通用业务层),这里有一个小技巧,就是上层只能依赖下沉,下沉不应该知道上层的具体内容,如果有一些需要依赖上层,就应该考虑是否需要把这部分下沉(依赖下沉)。
BeeHive
阿里开源的框架库
- 应用的代理解耦,接管APPDelegate,分发给不同的模块
- 模块间解耦
配置代码:
- (BOOL)application:(UIApplication *)application didFinishLaunchingWithOptions:(NSDictionary *)launchOptions
{

    //获取配置
    [BHContext shareInstance].application = application;
    [BHContext shareInstance].launchOptions = launchOptions;
    //赋值,创建自己的 Plist 文件来进行管理,Plist 文件

    [BHContext shareInstance].moduleConfigName = @"BeeHive.bundle/BeeHive";//可选,默认为BeeHive.bundle/BeeHive.plist
    [BHContext shareInstance].serviceConfigName = @"BeeHive.bundle/BHService";

    [BeeHive shareInstance].enableException = YES;
    [[BeeHive shareInstance] setContext:[BHContext shareInstance]];
    [[BHTimeProfiler sharedTimeProfiler] recordEventTime:@"BeeHive::super start launch"];

    [super application:application didFinishLaunchingWithOptions:launchOptions];


    //创建了一个服务,统一调度(模块),UIViewController
    //@protocol(HomeServiceProtocol)-- HomeViewController
    id homeVc = [[BeeHive shareInstance] createService:@protocol(HomeServiceProtocol)];


    if ([homeVc isKindOfClass:[UIViewController class]]) {
        UINavigationController *navCtrl = [[UINavigationController alloc] initWithRootViewController:(UIViewController*)homeVc];

        self.window = [[UIWindow alloc] initWithFrame:[UIScreen mainScreen].bounds];
        self.window.rootViewController = navCtrl;
        [self.window makeKeyAndVisible];
    }

    return YES;
}
分析:
- 获取配置都保存到一个单例类BHContext里面,这个单例类用来给其他模块分发环境,下面是BHContext类:
/**
 * Created by BeeHive.
 * Copyright (c) 2016, Alibaba, Inc. All rights reserved.
 *
 * This source code is licensed under the GNU GENERAL PUBLIC LICENSE.
 * For the full copyright and license information,please view the LICENSE file in the root directory of this source tree.
 */

#import
#import "BHServiceProtocol.h"
#import "BHConfig.h"
#import "BHAppDelegate.h"

typedef enum
{
    BHEnvironmentDev = 0,
    BHEnvironmentTest,
    BHEnvironmentStage,
    BHEnvironmentProd
}BHEnvironmentType;


@interface BHContext : NSObject

//global env
@property(nonatomic, assign) BHEnvironmentType env;

//global config
@property(nonatomic, strong) BHConfig *config;

//application appkey
@property(nonatomic, strong) NSString *appkey;
//customEvent>=1000
@property(nonatomic, assign) NSInteger customEvent;

@property(nonatomic, strong) UIApplication *application;

@property(nonatomic, strong) NSDictionary *launchOptions;

@property(nonatomic, strong) NSString *moduleConfigName;

@property(nonatomic, strong) NSString *serviceConfigName;

//3D-Touch model
#if __IPHONE_OS_VERSION_MAX_ALLOWED > 80400
@property (nonatomic, strong) BHShortcutItem *touchShortcutItem;
#endif

//OpenURL model
@property (nonatomic, strong) BHOpenURLItem *openURLItem;

//Notifications Remote or Local
@property (nonatomic, strong) BHNotificationsItem *notificationsItem;

//user Activity Model
@property (nonatomic, strong) BHUserActivityItem *userActivityItem;

//watch Model
@property (nonatomic, strong) BHWatchItem *watchItem;

//custom param
@property (nonatomic, copy) NSDictionary *customParam;

+ (instancetype)shareInstance;

- (void)addServiceWithImplInstance:(id)implInstance serviceName:(NSString *)serviceName;

- (void)removeServiceWithServiceName:(NSString *)serviceName;

- (id)getServiceInstanceFromServiceName:(NSString *)serviceName;

@end
这里保存了很多APP的信息,launchOptions,openURLItem等
- 回到前面的[BeeHive shareInstance],这是一个统一的调度单例类,调度的是模块的注册,以及服务的注册,通过 id
homeVc = [[BeeHive shareInstance] createService:@protocol(HomeServiceProtocol)];这句代码可以调起当前的UIViewController,下面来查看是怎么调起的:(注意这里的HomeServiceProtocol,代表HomeViewController可以提供的服务)
下面是HomeServiceProtocol代码:
#import
#import "BHServiceProtocol.h"

//服务--- 协议
//URL -- PublicHeader
//CTMediator -- Target_A
@protocol HomeServiceProtocol

-(void)registerViewController:(UIViewController *)vc title:(NSString *)title iconName:(NSString *)iconName;

@end
分析:在BeeHive里面服务就是协议,其实不管用哪一种方式进行解耦都会提供一种服务,只是提供的方式不一样,对于URL路由来说,它提供的是PublicHeder,对于CTMediator提供Target_A,而对于BeeHive就是提供的协议来暴露服务。
BHViewController实现了HomeServiceProtocol协议代码如下:
//注册到数据段(Main 函数执行之前执行了)
@BeeHiveService(HomeServiceProtocol,BHViewController)

@interface BHViewController ()

@property(nonatomic,strong) NSMutableArray *registerViewControllers;

@end

@interface demoTableViewController : UIViewController


@end
分析:其实吧Protocol和Moudle建立了依赖关系(key-value方式)
下面查看下下面代码:
 //创建了一个服务,统一调度(mokuai),UIViewController
    //@protocol(HomeServiceProtocol)-- HomeViewController
    id homeVc = [[BeeHive shareInstance] createService:@protocol(HomeServiceProtocol)];
进入createService方法:
- (id)createService:(Protocol *)proto;
{
    //BHServiceManager统一调度类,来调度模块和协议
    return [[BHServiceManager sharedManager] createService:proto];
}
分析:其实内部有两个管理类,BHModuleManager与BHServiceManager用来操作不同的业务逻辑,
进入BHServiceManager的createService方法:
- (id)createService:(Protocol *)service
{
    return [self createService:service withServiceName:nil];
}
- (id)createService:(Protocol *)service withServiceName:(NSString *)serviceName {
    return [self createService:service withServiceName:serviceName shouldCache:YES];
}

- (id)createService:(Protocol *)service withServiceName:(NSString *)serviceName shouldCache:(BOOL)shouldCache {
    if (!serviceName.length) {
        serviceName = NSStringFromProtocol(service);
    }
    id implInstance = nil;

    if (![self checkValidService:service]) {
        if (self.enableException) {
            @throw [NSException exceptionWithName:NSInternalInconsistencyException reason:[NSString stringWithFormat:@"%@ protocol does not been registed", NSStringFromProtocol(service)] userInfo:nil];
        }

    }

    NSString *serviceStr = serviceName;
    if (shouldCache) {
        //获得 IMP
        id protocolImpl = [[BHContext shareInstance] getServiceInstanceFromServiceName:serviceStr];
        if (protocolImpl) {
            return protocolImpl;
        }
    }

    Class implClass = [self serviceImplClass:service];
    if ([[implClass class] respondsToSelector:@selector(singleton)]) {
        if ([[implClass class] singleton]) {
            if ([[implClass class] respondsToSelector:@selector(shareInstance)])
                implInstance = [[implClass class] shareInstance];
            else
                implInstance = [[implClass alloc] init];
            if (shouldCache) {
                [[BHContext shareInstance] addServiceWithImplInstance:implInstance serviceName:serviceStr];
                return implInstance;
            } else {
                return implInstance;
            }
        }
    }
    return [[implClass alloc] init];
}
分析:
- 先获取serviceName,其实就是协议名称,然后在获得协议的实现imp,在[[BHContext shareInstance].servicesByName objectForKey:serviceName];里面有一个字典(key是Protocol
, value是具体的协议imp),字典里面保存了imp。 - 对于服务注册有三种方式,第一种是注解的方式:
对于BHViewController来说,它调用了一个注解,传入了协议和VC
//注册到数据段(Main 函数执行之前执行了)
@BeeHiveService(HomeServiceProtocol,BHViewController)
我们来具体看下它是如何注解的:
#define BeehiveServiceSectName "BeehiveServices"

//used 需要保留的告诉编译器
//函数:保存在TEXT段
//数据:保存在DATA段(每个段分为不同的section)
//Macho 文件格式
//这段代码的作用是在我们的text段插入了一个section,section名称为BeehiveServices。
#define BeeHiveDATA(sectname) __attribute((used, section("__DATA,"#sectname" ")))

//HomeProtocol
#define BeeHiveService(servicename,impl) \
class BeeHive; char * k##servicename##_service BeeHiveDATA(BeehiveServices) = "{ \""#servicename"\" : \""#impl"\"}";
分析:首先这是一个宏定义
- 假设我们当前传进来的参数servicename为HomeProtocol
-
是连接的意思
- BeeHiveDATA 传入字段为BeehiveServices就是一个单纯的字符串,传入之后拼接取出来的值是BeehiveServiceSectName宏定义值BeehiveServices
- used为保留字段,是告诉编译器需要保留
我们来全部替换展开看下:
char *kHomeProtocol_service __attribute((used, section("__DATA,"#sectname" "))) = {"""HomeProtocol""","""BHViewController"""}
这句代码的意思是把我们当前的字段注册到__Data数据段标识为BeehiveServices,这里存放的是以key-value方式的HomeProtocol-BHViewController,这个是在Mach-O加载的时候把它加载进去的。
具体是如何加载下面来讨论下:
//load 在 Main 执行之前执行,load比constructor方法早执行一点
//这个方法 constructor :Main执行之前执行
__attribute__((constructor))
void initProphet() {
    //注册一个回调函数,这里先去load_images之后调用dyld_callback
    _dyld_register_func_for_add_image(dyld_callback);
}
分析:attribute是GNU编译器的语法,initProphet方法在main函数之前调用。
进入dyld_callback方法:
//读取 Mach-o 文件
NSArray* BHReadConfiguration(char *sectionName,const struct mach_header *mhp);
static void dyld_callback(const struct mach_header *mhp, intptr_t vmaddr_slide)
{
    NSArray *mods = BHReadConfiguration(BeehiveModSectName, mhp);//读取mach-o的section,取出BeehiveModSectName里面存放的服务
    for (NSString *modName in mods) {
        Class cls;
        if (modName) {
            cls = NSClassFromString(modName);//取出模块名称对应的类名称

            if (cls) {
                [[BHModuleManager sharedManager] registerDynamicModule:cls];//添加到一个统一的字典里面去
            }
        }
    }

    //register services
    NSArray *services = BHReadConfiguration(BeehiveServiceSectName,mhp);
    for (NSString *map in services) {
        NSData *jsonData =  [map dataUsingEncoding:NSUTF8StringEncoding];
        NSError *error = nil;
        id json = [NSJSONSerialization JSONObjectWithData:jsonData options:0 error:&error];
        if (!error) {
            if ([json isKindOfClass:[NSDictionary class]] && [json allKeys].count) {

                NSString *protocol = [json allKeys][0];
                NSString *clsName  = [json allValues][0];

                if (protocol && clsName) {
                    [[BHServiceManager sharedManager] registerService:NSProtocolFromString(protocol) implClass:NSClassFromString(clsName)];
                }

            }
        }
    }

}
分析:其实就是从Mach-O文件中读取出服务名称与controller直接注册服务,这样的就协议名称和类名称都有了,然后添加到allServicesDict
里面去。
总结:只需要使用@BeeHiveService(HomeServiceProtocol,BHViewController)这样声明下,就可以注册到数据段中,main函数之前完成,仿造java注解,这就是通过注解的方式加载当前的模块。
第二种方式是plist方式,我们来看下BeeHive通过静态plist的方式来加载模块:
代码:
    [BHContext shareInstance].moduleConfigName = @"BeeHive.bundle/BeeHive";//可选,默认为BeeHive.bundle/BeeHive.plist
    [BHContext shareInstance].serviceConfigName = @"BeeHive.bundle/BHService";
分析:有两个,分别是module(模块)和service(服务/协议)
module:
service:
- (void)registerLocalServices
{
    NSString *serviceConfigName = [BHContext shareInstance].serviceConfigName;

    NSString *plistPath = [[NSBundle mainBundle] pathForResource:serviceConfigName ofType:@"plist"];
    if (!plistPath) {
        return;
    }

    NSArray *serviceList = [[NSArray alloc] initWithContentsOfFile:plistPath];

    [self.lock lock];
    for (NSDictionary *dict in serviceList) {
        NSString *protocolKey = [dict objectForKey:@"service"];
        NSString *protocolImplClass = [dict objectForKey:@"impl"];
        if (protocolKey.length > 0 && protocolImplClass.length > 0) {
            [self.allServicesDict addEntriesFromDictionary:@{protocolKey:protocolImplClass}];
        }
    }
    [self.lock unlock];
}
分析:这种解耦的方式就是把当前模块名称和对应暴露出来的服务名称全部放到静态plist文件中就可以去加载,使用的时候还是去servicesByName中根据服务名称取出对应的模块名称,而且可以自己指定plist文件。
第三种方式就是通过load方法来注册:
#define BH_EXPORT_MODULE(isAsync) \
+ (void)load { [BeeHive registerDynamicModule:[self class]]; } \
-(BOOL)async { return [[NSString stringWithUTF8String:#isAsync] boolValue];}
用法:
#import "UserTrackModule.h"

#import "BeeHive.h"
#import "BHService.h"

#import "BHUserTrackViewController.h"

@interface UserTrackModule()

@end

@implementation UserTrackModule


BH_EXPORT_MODULE(NO)

- (void)modSetUp:(BHContext *)context
{
    NSLog(@"UserTrackModule setup");
}


-(void)modInit:(BHContext *)context
{

//    [[BeeHive shareInstance] registerService:@protocol(UserTrackServiceProtocol) service:[BHUserTrackViewController class]];
}

@end
进入源码
+ (void)registerDynamicModule:(Class)moduleClass
{
    [[BHModuleManager sharedManager] registerDynamicModule:moduleClass];
}
- (void)registerDynamicModule:(Class)moduleClass
{
    [self registerDynamicModule:moduleClass shouldTriggerInitEvent:NO];
}

- (void)registerDynamicModule:(Class)moduleClass
       shouldTriggerInitEvent:(BOOL)shouldTriggerInitEvent
{
    [self addModuleFromObject:moduleClass shouldTriggerInitEvent:shouldTriggerInitEvent];
}
- (void)addModuleFromObject:(id)object
     shouldTriggerInitEvent:(BOOL)shouldTriggerInitEvent
{
    Class class;
    NSString *moduleName = nil;

    if (object) {
        class = object;
        moduleName = NSStringFromClass(class);
    } else {
        return ;
    }

    __block BOOL flag = YES;
    [self.BHModules enumerateObjectsUsingBlock:^(id  _Nonnull obj, NSUInteger idx, BOOL * _Nonnull stop) {
        if ([obj isKindOfClass:class]) {
            flag = NO;
            *stop = YES;
        }
    }];
    if (!flag) {
        return;
    }

    if ([class conformsToProtocol:@protocol(BHModuleProtocol)]) {
        NSMutableDictionary *moduleInfo = [NSMutableDictionary dictionary];

        BOOL responseBasicLevel = [class instancesRespondToSelector:@selector(basicModuleLevel)];

        int levelInt = 1;

        if (responseBasicLevel) {
            levelInt = 0;
        }

        [moduleInfo setObject:@(levelInt) forKey:kModuleInfoLevelKey];
        if (moduleName) {
            [moduleInfo setObject:moduleName forKey:kModuleInfoNameKey];
        }

        [self.BHModuleInfos addObject:moduleInfo];

        id moduleInstance = [[class alloc] init];
        [self.BHModules addObject:moduleInstance];
        [moduleInfo setObject:@(YES) forKey:kModuleInfoHasInstantiatedKey];
        [self.BHModules sortUsingComparator:^NSComparisonResult(id moduleInstance1, id moduleInstance2) {
            NSNumber *module1Level = @(BHModuleNormal);
            NSNumber *module2Level = @(BHModuleNormal);
            if ([moduleInstance1 respondsToSelector:@selector(basicModuleLevel)]) {
                module1Level = @(BHModuleBasic);
            }
            if ([moduleInstance2 respondsToSelector:@selector(basicModuleLevel)]) {
                module2Level = @(BHModuleBasic);
            }
            if (module1Level.integerValue != module2Level.integerValue) {
                return module1Level.integerValue > module2Level.integerValue;
            } else {
                NSInteger module1Priority = 0;
                NSInteger module2Priority = 0;
                if ([moduleInstance1 respondsToSelector:@selector(modulePriority)]) {
                    module1Priority = [moduleInstance1 modulePriority];
                }
                if ([moduleInstance2 respondsToSelector:@selector(modulePriority)]) {
                    module2Priority = [moduleInstance2 modulePriority];
                }
                return module1Priority < module2Priority;
            }
        }];
        [self registerEventsByModuleInstance:moduleInstance];

        if (shouldTriggerInitEvent) {
            [self handleModuleEvent:BHMSetupEvent forTarget:moduleInstance withSeletorStr:nil andCustomParam:nil];
            [self handleModulesInitEventForTarget:moduleInstance withCustomParam:nil];
            dispatch_async(dispatch_get_main_queue(), ^{
                [self handleModuleEvent:BHMSplashEvent forTarget:moduleInstance withSeletorStr:nil andCustomParam:nil];
            });
        }
    }
}
分析:其实就是拿到当前class的名称,和当前协议建立一个关系,最终以key-value形式再存manager字典中。
具体是如何拿到ViewController的呢?
源码:
//key-value(类的名称)
//模块与模块之间解耦(协议)
id v4 = [[BeeHive shareInstance] createService:@protocol(UserTrackServiceProtocol)];
  if ([v4 isKindOfClass:[UIViewController class]]) {
    [self registerViewController:(UIViewController *)v4 title:@"埋点3"     iconName:nil];
}
总结:createService其实就是通过key-value的方式来拿到当前的ViewController类的名称,这样模块与模块直接就解耦了,而且是通过协议找到ViewController来解耦的。
接下来聊一下依赖注入:MVC里面的ViewController只需要知道View,如果我们的下层组件需要依赖上层的东西,但是在模块化过程中这种方式的不可取的,这是后就需要控制反转(需要使用一些框架进行依赖注入,不是直接使用#import文件)
下面的代码是给Person类添加一个sayHello方法
LGInjectionProtocol.h源码:
#import
#import "extobjc.h"

@protocol LGTestProtocol

//标记一下
@concrete
+ (void)sayHello;

@end
LGInjectionProtocol.m源码:
#import "LGInjectionProtocol.h"

//这又是什么操作
//类, @concreteprotocol(创建了一个容器)
@concreteprotocol(LGTestProtocol)

//这个容器类具体实现
+(void)sayHello{
    NSLog(@"hello");
}

@end
person调用sayHello方法:
Person *p = [Person new];
[p.class sayHello];
打印如下:
分析:这样就可以调用成功了,方法必须要有一个载体类,@concreteprotocol就是帮我们创建了一个容器,这个容器就是用来承载我们的方法的,下面来查看下源码:
#define concreteprotocol(NAME) \
    /*
     * create a class used to contain all the methods used in this protocol
    //这里声明了一个类
     */ \
    interface NAME ## _ProtocolMethodContainer : NSObject < NAME > {} \
    @end \
    \
    @implementation NAME ## _ProtocolMethodContainer \
    /*
     * when this class is loaded into the runtime, add the concrete protocol
     * into the list we have of them
     */ \
    + (void)load { \
        /*
         * passes the actual protocol as the first parameter, then this class as
         * the second
         */ \
        if (!ext_addConcreteProtocol(objc_getProtocol(metamacro_stringify(NAME)), self)) \
            fprintf(stderr, "ERROR: Could not load concrete protocol %s\n", metamacro_stringify(NAME)); \
    } \
    \
    /*
     * using the "constructor" function attribute, we can ensure that this
     * function is executed only AFTER all the Objective-C runtime setup (i.e.,
     * after all +load methods have been executed)
     */ \
    __attribute__((constructor)) \
    static void ext_ ## NAME ## _inject (void) { \
        /*
         * use this injection point to mark this concrete protocol as ready for
         * loading
         */ \
        ext_loadConcreteProtocol(objc_getProtocol(metamacro_stringify(NAME))); \
    }
分析:当我们使用concreteprotocol来声明的时候,声明了一个类
LGTestProtocol_ProtocolMethodContainer
BOOL ext_addConcreteProtocol (Protocol *protocol, Class containerClass) {
    return ext_loadSpecialProtocol(protocol, ^(Class destinationClass){
        ext_injectConcreteProtocol(protocol, containerClass, destinationClass);
    });
}
进入ext_addConcreteProtocol方法
BOOL ext_loadSpecialProtocol (Protocol *protocol, void (^injectionBehavior)(Class destinationClass)) {
    @autoreleasepool {
        NSCParameterAssert(protocol != nil);
        NSCParameterAssert(injectionBehavior != nil);

        // lock the mutex to prevent accesses from other threads while we perform
        // this work
        if (pthread_mutex_lock(&specialProtocolsLock) != 0) {
            fprintf(stderr, "ERROR: Could not synchronize on special protocol data\n");
            return NO;
        }

        // if we've hit the hard maximum for number of special protocols, we can't
        // continue
        //这里是最大容量
        if (specialProtocolCount == SIZE_MAX) {
            pthread_mutex_unlock(&specialProtocolsLock);
            return NO;
        }

        // if the array has no more space, we will need to allocate additional
        // entries
        //这里是动态扩容
        if (specialProtocolCount >= specialProtocolCapacity) {
            size_t newCapacity;
            if (specialProtocolCapacity == 0)
                // if there are no entries, make space for just one
                newCapacity = 1;
            else {
                // otherwise, double the current capacity
                newCapacity = specialProtocolCapacity << 1;

                // if the new capacity is less than the current capacity, that's
                // unsigned integer overflow
                if (newCapacity < specialProtocolCapacity) {
                    // set it to the maximum possible instead
                    newCapacity = SIZE_MAX;

                    // if the new capacity is still not greater than the current
                    // (for instance, if it was already SIZE_MAX), we can't continue
                    if (newCapacity <= specialProtocolCapacity) {
                        pthread_mutex_unlock(&specialProtocolsLock);
                        return NO;
                    }
                }
            }

            // we have a new capacity, so resize the list of all special protocols
            // to add the new entries
            //初始化了内存空间b
            void * restrict ptr = realloc(specialProtocols, sizeof(*specialProtocols) * newCapacity);
            if (!ptr) {
                // the allocation failed, abort
                pthread_mutex_unlock(&specialProtocolsLock);
                return NO;
            }

            specialProtocols = ptr;
            specialProtocolCapacity = newCapacity;
        }

        // at this point, there absolutely must be at least one empty entry in the
        // array
        assert(specialProtocolCount < specialProtocolCapacity);

        // disable warning about "leaking" this block, which is released in
        // ext_injectSpecialProtocols()
        #ifndef __clang_analyzer__
        ext_specialProtocolInjectionBlock copiedBlock = [injectionBehavior copy];

        // construct a new EXTSpecialProtocol structure and add it to the first
        // empty space in the array
        //把当前的协议存放在结构体
        specialProtocols[specialProtocolCount] = (EXTSpecialProtocol){
            .protocol = protocol,
            .injectionBlock = (__bridge_retained void *)copiedBlock,
            .ready = NO
        };
        #endif

        ++specialProtocolCount;
        pthread_mutex_unlock(&specialProtocolsLock);
    }

    // success!
    return YES;
}
分析:首先是判断是否超过协议的最大注册量,然后是进行动态扩容,然后会初始化一片内存空间用来存放specialProtocols,specialProtocols其实是一个结构体指针,结构体源码:
// contains the information needed to reference a full special protocol
typedef struct {
    // the actual protocol declaration (@protocol block)
    __unsafe_unretained Protocol *protocol; //用户自定义的协议

    // the injection block associated with this protocol
    //
    // this block is RETAINED and must eventually be released by transferring it
    // back to ARC
    void *injectionBlock; //注册的Block

    // whether this protocol is ready to be injected to its conforming classes
    //
    // this does NOT refer to a special protocol having been injected already
    BOOL ready;
} EXTSpecialProtocol;
总结
- ext_addConcreteProtocol其实就是初始化了内存空间(数组里面存放了结构体)
- 然后保存当前注册协议到结构体。
回到前面ext_injectConcreteProtocol方法这里:
源码:
static void ext_injectConcreteProtocol (Protocol *protocol, Class containerClass, Class class) {
    // get the full list of instance methods implemented by the concrete
    // protocol
    unsigned imethodCount = 0;
    Method *imethodList = class_copyMethodList(containerClass, &imethodCount);

    // get the full list of class methods implemented by the concrete
    // protocol
    unsigned cmethodCount = 0;
    //容器类的方法列表
    Method *cmethodList = class_copyMethodList(object_getClass(containerClass), &cmethodCount);

    // get the metaclass of this class (the object on which class
    // methods are implemented)
    Class metaclass = object_getClass(class);

    // inject all instance methods in the concrete protocol
    for (unsigned methodIndex = 0;methodIndex < imethodCount;++methodIndex) {
        Method method = imethodList[methodIndex];
        SEL selector = method_getName(method);

        // first, check to see if such an instance method already exists
        // (on this class or on a superclass)
        if (class_getInstanceMethod(class, selector)) {
            // it does exist, so don't overwrite it
            continue;
        }

        // add this instance method to the class in question
        IMP imp = method_getImplementation(method);
        const char *types = method_getTypeEncoding(method);
        if (!class_addMethod(class, selector, imp, types)) {
            fprintf(stderr, "ERROR: Could not implement instance method -%s from concrete protocol %s on class %s\n",
                sel_getName(selector), protocol_getName(protocol), class_getName(class));
        }
    }

    // inject all class methods in the concrete protocol
    for (unsigned methodIndex = 0;methodIndex < cmethodCount;++methodIndex) {
        Method method = cmethodList[methodIndex];
        SEL selector = method_getName(method);

        // +initialize is a special case that should never be copied
        // into a class, as it performs initialization for the concrete
        // protocol
        if (selector == @selector(initialize)) {
            // so just continue looking through the rest of the methods
            continue;
        }

        // first, check to see if a class method already exists (on this
        // class or on a superclass)
        //
        // since 'class' is considered to be an instance of 'metaclass',
        // this is actually checking for class methods (despite the
        // function name)
        if (class_getInstanceMethod(metaclass, selector)) {
            // it does exist, so don't overwrite it
            continue;
        }

        // add this class method to the metaclass in question
        IMP imp = method_getImplementation(method);
        const char *types = method_getTypeEncoding(method);
        //class_addMethod (Perons , sel - IMP),就是给person添加sel-imp,就是说调用person里面的sayHello其实就是把找到这个sel-imp然后添加给person
        if (!class_addMethod(metaclass, selector, imp, types)) {
            fprintf(stderr, "ERROR: Could not implement class method +%s from concrete protocol %s on class %s\n",
                sel_getName(selector), protocol_getName(protocol), class_getName(class));
        }
    }

    // free the instance method list
    free(imethodList); imethodList = NULL;

    // free the class method list
    free(cmethodList); cmethodList = NULL;

    // use [containerClass class] and discard the result to call +initialize
    // on containerClass if it hasn't been called yet
    //
    // this is to allow the concrete protocol to perform custom initialization
    (void)[containerClass class];
}
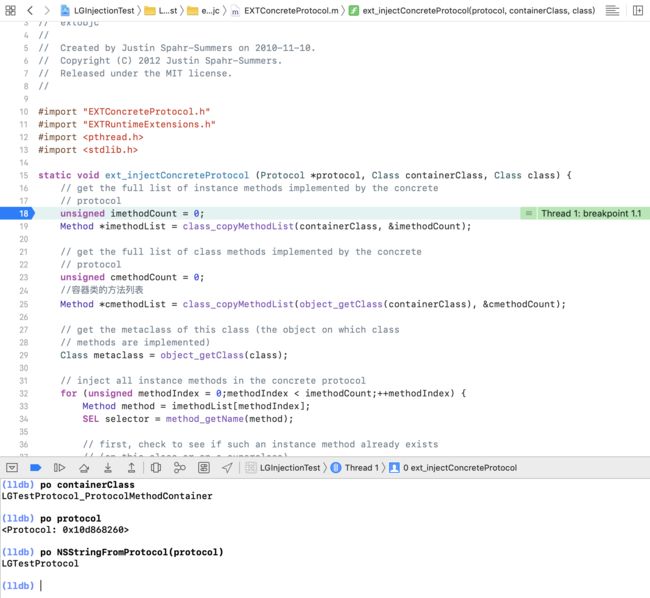
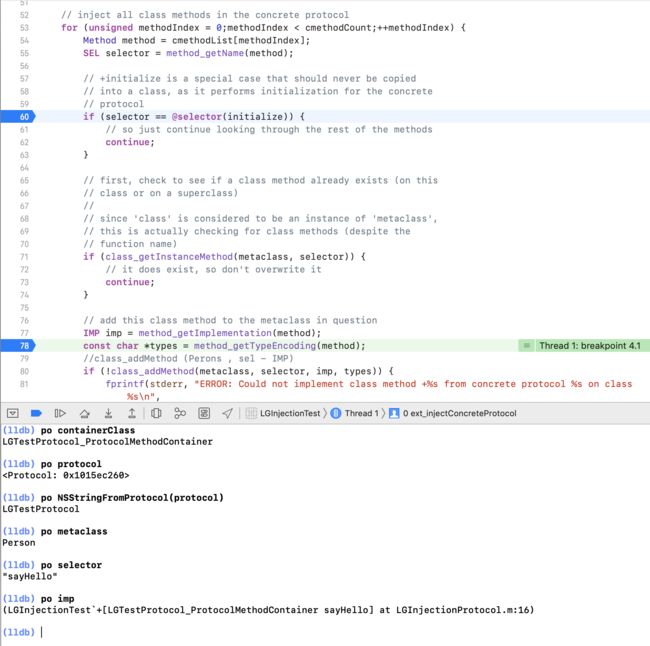
断点调试打印如下:
分析:通过Runtime找到方法,LGTestProtocol是刚才声明的协议。
分析:metaclass是Person,从参数传进来的class而来,然后取出sayHello,接下来去获得imp,就是我们的LGTestProtocol_ProtocolMethodContainer容器类去调用sayHello,所以最开始的[p.class sayHello]就相当于调用LGInjectionProtocol里面的sayHello的imp(也就是容器类里面的具体实现),这种通过中间协议中间者去调用方法来解决控制反转,依赖注入的问题,从而达到调用的目的,对于下层来说不需要知道上层具体干了哪些事情。
继续前面attribute里面的ext_loadConcreteProtocol方法(这段代码是在main方法调用之前执行):
源码:
void ext_specialProtocolReadyForInjection (Protocol *protocol) {
    @autoreleasepool {
        NSCParameterAssert(protocol != nil);

        // lock the mutex to prevent accesses from other threads while we perform
        // this work
        if (pthread_mutex_lock(&specialProtocolsLock) != 0) {
            fprintf(stderr, "ERROR: Could not synchronize on special protocol data\n");
            return;
        }

        // loop through all the special protocols in our list, trying to find the
        // one associated with 'protocol'
        for (size_t i = 0;i < specialProtocolCount;++i) { //遍历容器
            if (specialProtocols[i].protocol == protocol) {
                // found the matching special protocol, check to see if it's
                // already ready
                if (!specialProtocols[i].ready) {
                    // if it's not, mark it as being ready now
                    specialProtocols[i].ready = YES; //read标识置为yes

                    // since this special protocol was in our array, and it was not
                    // loaded, the total number of protocols loaded must be less
                    // than the total count at this point in time
                    assert(specialProtocolsReady < specialProtocolCount);

                    // ... and then increment the total number of special protocols
                    // loaded – if it now matches the total count of special
                    // protocols, begin the injection process
                    if (++specialProtocolsReady == specialProtocolCount)
                        ext_injectSpecialProtocols();
                }

                break;
            }
        }

        pthread_mutex_unlock(&specialProtocolsLock);
    }
}
分析:遍历容器把ready标识置为yes
接下来进入ext_injectSpecialProtocols方法:
/**
 * This function actually performs the hard work of special protocol injection.
 * It obtains a full list of all classes registered with the Objective-C
 * runtime, finds those conforming to special protocols, and then runs the
 * injection blocks as appropriate.
 */
static void ext_injectSpecialProtocols (void) {
    /*
     * don't lock specialProtocolsLock in this function, as it is called only
     * from public functions which already perform the synchronization
     */

    /*
     * This will sort special protocols in the order they should be loaded. If
     * a special protocol conforms to another special protocol, the former
     * will be prioritized above the latter.
     */
    qsort_b(specialProtocols, specialProtocolCount, sizeof(EXTSpecialProtocol), ^(const void *a, const void *b){
        // if the pointers are equal, it must be the same protocol
        if (a == b)
            return 0;

        const EXTSpecialProtocol *protoA = a;
        const EXTSpecialProtocol *protoB = b;

        // A higher return value here means a higher priority
        int (^protocolInjectionPriority)(const EXTSpecialProtocol *) = ^(const EXTSpecialProtocol *specialProtocol){
            int runningTotal = 0;

            for (size_t i = 0;i < specialProtocolCount;++i) {
                // the pointer passed into this block is guaranteed to point
                // into the 'specialProtocols' array, so we can compare the
                // pointers directly for identity
                if (specialProtocol == specialProtocols + i)
                    continue;

                if (protocol_conformsToProtocol(specialProtocol->protocol, specialProtocols[i].protocol))
                    runningTotal++;
            }

            return runningTotal;
        };

        /*
         * This will return:
         * 0 if the protocols are equal in priority (such that load order does not matter)
         * < 0 if A is more important than B
         * > 0 if B is more important than A
         */
        return protocolInjectionPriority(protoB) - protocolInjectionPriority(protoA);
    });

    unsigned classCount = objc_getClassList(NULL, 0);
    if (!classCount) {
        fprintf(stderr, "ERROR: No classes registered with the runtime\n");
        return;
    }

    Class *allClasses = (Class *)malloc(sizeof(Class) * (classCount + 1));
    if (!allClasses) {
        fprintf(stderr, "ERROR: Could not allocate space for %u classes\n", classCount);
        return;
    }

    // use this instead of ext_copyClassList() to avoid sending +initialize to
    // classes that we don't plan to inject into (this avoids some SenTestingKit
    // timing issues)
    classCount = objc_getClassList(allClasses, classCount);

    /*
     * set up an autorelease pool in case any Cocoa classes get used during
     * the injection process or +initialize
     */
    @autoreleasepool {
        // loop through the special protocols, and apply each one to all the
        // classes in turn
        //
        // ORDER IS IMPORTANT HERE: protocols have to be injected to all classes in
        // the order in which they appear in specialProtocols. Consider classes
        // X and Y that implement protocols A and B, respectively. B needs to get
        // its implementation into Y before A gets into X.
        for (size_t i = 0;i < specialProtocolCount;++i) {
            Protocol *protocol = specialProtocols[i].protocol;

            // transfer ownership of the injection block to ARC and remove it
            // from the structure
            ext_specialProtocolInjectionBlock injectionBlock = (__bridge_transfer id)specialProtocols[i].injectionBlock;
            specialProtocols[i].injectionBlock = NULL;

            // loop through all classes
            for (unsigned classIndex = 0;classIndex < classCount;++classIndex) {
                Class class = allClasses[classIndex];

                // if this class doesn't conform to the protocol, continue to the
                // next class immediately
                if (!class_conformsToProtocol(class, protocol))
                    continue;

                injectionBlock(class);
            }
        }
    }

    // free the allocated class list
    free(allClasses);

    // now that everything's injected, the special protocol list can also be
    // destroyed
    free(specialProtocols); specialProtocols = NULL;
    specialProtocolCount = 0;
    specialProtocolCapacity = 0;
    specialProtocolsReady = 0;
}
分析:这个方式其实也是在加载当前类和协议名称。
总结:首先是有个容器,容器里面存放不同的结构体,每一个结构体里面存放了我们的协议和对应要执行的Block,然后就是执行,通过runtime的方式来找到它并执行当前的imp,这就是我们刚才说的冠以依赖注入框架的核心内容。
组件化:
- pod
- 分层
- 路由(URL,CTMediator,BeeHive)
- 依赖注入
