
iOS 的锁有以下 10 种:
OSSpinLock、os_unfair_lock、dispatch_semaphore、pthread_mutex,
NSLock、NSCondition、NSConditionLock、NSRecursiveLock,
pthread_mutex(recursive)、@synchronized。
其中,OSSpinLock 已经不安全了,os_unfair_lock 在 iOS 10 后才能用,
递归才用的递归锁 NSRecursiveLock、pthread_mutex(recursive),
有特殊条件才用的条件锁 NSCondition、NSConditionLock,
因此,常用的也就 4 种: dispatch_semaphore、pthread_mutex、NSLock、@synchronized。
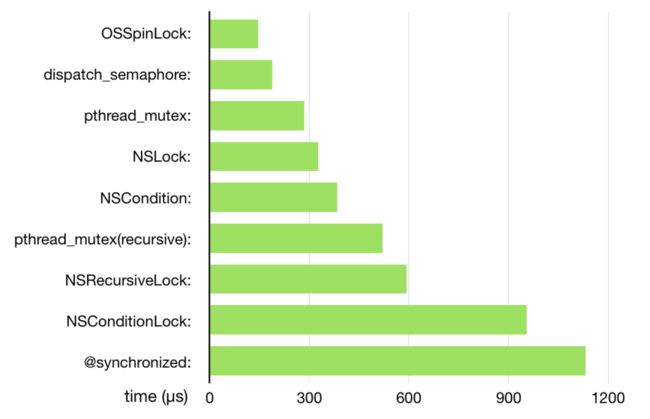
NSLock 封装的 pthread_mutex 的 PTHREAD_MUTEX_ERRORCHECK 模式。NSConditionLock 封装的 NSCondition,NSCondition 封装的 pthread_mutex。NSRecursiveLock 封装的 pthread_mutex 的 PTHREAD_MUTEX_RECURSIVE 模式。
放一张性能测试图,来自文章《 不再安全的 OSSpinLock》。
一、NSLocking 协议
// 加锁。会阻塞当前线程,直到加锁成功。
- (void)lock;
// 解锁。
- (void)unlock;
二、NSLock
警告!
NSLock 加锁和解锁,要在同一个线程,否则会有不可预估的结果。
原因:
The NSLock class uses POSIX threads to implement its locking behavior. When sending an unlock message to an NSLock object, you must be sure that message is sent from the same thread that sent the initial lock message. Unlocking a lock from a different thread can result in undefined behavior.
连续调用多次 lock 会死锁。unlock 未加锁的锁,会在控制台输出错误信息。
// 在超时之前,尝试加锁。
// 阻塞当前线程,直到加锁成功或超时。
// 加锁成功返回 YES,超时返回 NO。
- (BOOL)lockBeforeDate:(NSDate *)limit;
// 尝试加锁,不阻塞,加锁成功返回 YES。
- (BOOL)tryLock;
// 锁的名字,可用于调试和输出日志。
@property(copy) NSString *name;
三、NSRecursiveLock
递归锁,同一个线程多次加锁,不会死锁。
加锁和解锁次数对应,才能解锁。
API 和 NSLock 一样。
举个栗子:
- (void)testNSRecursiveLock {
    NSRecursiveLock *lock = [NSRecursiveLock new];
    dispatch_queue_t global = dispatch_get_global_queue(QOS_CLASS_DEFAULT, 0);
    static void (^recursiveBlock)(int count);

    recursiveBlock = ^(int count) {
        [lock lock];
        if (count > 0) {
            NSLog(@"%d", count);
            recursiveBlock(count -1);
        }
        [lock unlock];
    };

    dispatch_async(global, ^{
        recursiveBlock(5);
    });

//    控制台输出
//    2019-06-19 09:50:26 5
//    2019-06-19 09:50:26 4
//    2019-06-19 09:50:26 3
//    2019-06-19 09:50:26 2
//    2019-06-19 09:50:26 1
}
四、NSConditionLock
条件锁,可以设置加锁条件,只有条件满足的时候,才加锁成功。并且可以在解锁的时候,设置新的加锁条件。
// 创建。condition 是加锁成功的条件。
// 返回 An initialized condition lock object;
// 返回 may be different than the original receiver.(什么意思?)
- (instancetype)initWithCondition:(NSInteger)condition;
// 加锁条件。默认值是 0。
@property(readonly) NSInteger condition;
// 不考虑加锁条件,和 NSLock 一样。
- (BOOL)lockBeforeDate:(NSDate *)limit;
// 条件相等时,才能加锁成功。
// 会阻塞当前线程,直到加锁成功。
// 锁空闲,条件不相等,会一直阻塞。
- (void)lockWhenCondition:(NSInteger)condition;
// 在超时之前,条件相等时,才能加锁成功。
// 会阻塞当前线程,直到加锁成功或超时。
// 加锁成功返回 YES,超时返回 NO。
- (BOOL)lockWhenCondition:(NSInteger)condition beforeDate:(NSDate *)limit;
// 不考虑加锁条件,和 NSLock 一样。
- (BOOL)tryLock;
// 尝试加锁,不会阻塞,立即返回。
// 加锁成功返回 YES,否则返回 NO。
// 内部调用 lockWhenCondition:beforeDate:。
- (BOOL)tryLockWhenCondition:(NSInteger)condition;
// 解锁,并设置新的加锁条件。
- (void)unlockWithCondition:(NSInteger)condition;
// 名字。
@property(copy) NSString *name;
举个栗子:
- (void)testNSConditionLock {
    NSConditionLock *lock = [[NSConditionLock alloc] initWithCondition:0];
    self.conditionLock = lock;
    dispatch_queue_t global = dispatch_get_global_queue(QOS_CLASS_DEFAULT, 0);

    dispatch_async(global, ^{
        NSLog(@"A: 开始睡眠");
        [NSThread sleepForTimeInterval:2];
        NSLog(@"A: 结束睡眠");

        [lock lockWhenCondition:0];
        NSLog(@"A: condition = %li", lock.condition);
        // 释放锁,修改条件 = 1
        [lock unlockWithCondition:1];
    });

    dispatch_async(global, ^{
        NSLog(@"B: condition != 1,等待");
        [lock lockWhenCondition:1];
        NSLog(@"B: condition = %li", lock.condition);
        [lock unlockWithCondition:2];
    });

    dispatch_async(global, ^{
        NSLog(@"C: condition != 2,等待");
        [lock lockWhenCondition:2];
        NSLog(@"C: condition = %li", lock.condition);
        [lock unlockWithCondition:0];
    });

//    控制台输出
//    2019-06-18 14:00:29  A: 开始睡眠
//    2019-06-18 14:00:29  B: condition != 1,等待
//    2019-06-18 14:00:29  C: condition != 2,等待
//    2019-06-18 14:00:31  A: 结束睡眠
//    2019-06-18 14:00:31  A: condition = 0
//    2019-06-18 14:00:31  B: condition = 1
//    2019-06-18 14:00:31  C: condition = 2
}
上面的代码,任务 A 会睡眠 2 秒,任务 B、C 因为条件不满足,所以等待。任务 A 唤醒后,条件满足,获取锁,完成任务,然后释放锁并修改条件 = 1,此时任务 B 的条件满足,获得锁,最后释放锁并修改条件 = 2,。。。
五、NSCondition
使用 NSCondition 的步骤
- 调用 lock。
- 判断是否满足条件(比如 count 是否 <= 0)。
- 如果条件不满足,就调用 wait 或 waitUntilDate:,等待该函数返回后,走步骤 2。
- 如果条件满足(比如 count = 3),执行任务。
- 可选是否更新条件(比如修改 count = 0),或者调用 signal。
- 调用 unlock。
上述步骤的伪代码:
lock the condition

// 这里循环是因为下面的 wait 会被 signal 或 broadcast 唤醒。
// 唤醒后重新判断条件,不满足就等待。
while (!(boolean_predicate)) {
    wait on condition
}

do protected work

(optionally, signal or broadcast the condition again or change a predicate value)

unlock the condition
举个栗子:
- (void)testNSCondition {
    NSCondition *condition = [NSCondition new];
    self.condition = condition;

    static int count = 0;
    dispatch_queue_t global = dispatch_get_global_queue(QOS_CLASS_DEFAULT, 0);

    dispatch_async(global, ^{
        [self.condition lock];
        NSLog(@"A:获得 lock");

        // 这里循环是因为下面的 wait 会被 signal 或 broadcast 唤醒。
        while (count <= 0) {
            NSLog(@"A:开始等待");
            [self.condition wait]; // 等待会释放锁,被唤醒会重新获得锁。
            NSLog(@"A:结束等待");
        }

        // 完成任务后,可以调用 signal 或修改 count,这里没必要。
        NSLog(@"A:我代表月亮收拾你");

        [self.condition unlock];
        NSLog(@"A:unlock");
    });

    dispatch_async(global, ^{
        // 睡眠 1 秒,等上面的代码进入 wait 状态。
        [NSThread sleepForTimeInterval:1];

        // A unlock 或 wait,B 才能获得锁,否则会一直等待。
        [self.condition lock];
        NSLog(@"B:获得 lock");

        count = 1;
        NSLog(@"B:修改 count = 1");

        [self.condition signal];
        NSLog(@"B:signal");

        [self.condition unlock];
        NSLog(@"B:unlock");
    });
}

//    控制台输出
//    2019-06-18 10:51:35  A:获得 lock
//    2019-06-18 10:51:35  A:开始等待
//    2019-06-18 10:51:36  B:获得 lock
//    2019-06-18 10:51:36  B:修改 count = 1
//    2019-06-18 10:51:36  B:signal
//    2019-06-18 10:51:36  B:unlock
//    2019-06-18 10:51:36  A:结束等待
//    2019-06-18 10:51:36  A:我代表月亮收拾你
//    2019-06-18 10:51:36  A:unlock
上面的代码,A 获得锁后,条件不满足,开始等待。B 在 A 等待释放锁后获得锁,修改条件然后 signal 和 unlock。A 收到 signal 被唤醒,在 wait 返回前重新获得锁,判断条件是满足的,往下执行任务。任务执行后,没有修改条件,也没有 signal 其他线程,直接释放锁。
下面是 API 的定义。
// 阻塞当前线程,直到收到 signal。
// 注意,必须在调用 lock 后才能调用 wait。
// 注意,wait 后会释放锁,唤醒后在 wait 返回前会重新获得锁。
- (void)wait;
// 阻塞当前线程,直到收到 signal 或超时。
// 收到 signal 就返回 YES,超时返回 NO。
// 注意,必须在调用 lock 后才能调用 wait。
// 注意,wait 后会释放锁,唤醒后在 wait 返回前会重新获得锁。
- (BOOL)waitUntilDate:(NSDate *)limit;
// 发送信号,唤醒一个等待信号的线程。
// 可以调用多次,唤醒多个线程。如果没有正在等待的线程,signal 会什么都不做。
- (void)signal;
// 广播信号,唤醒所有等待信号的线程。
// 如果没有正在等待的线程,broadcast 会什么都不做。
- (void)broadcast;
// 名字。
@property(copy) NSString *name;
六、pthread_mutex
6.1 pthread_mutex_t
互斥锁。
static pthread_once_t once = PTHREAD_ONCE_INIT;
static pthread_mutex_t mutex;

void init_pthread_mutex() {
    pthread_mutex_init(&mutex, NULL);  // 初始化
}

- (void)test_pthread_mutex {
    pthread_once(&once, init_pthread_mutex);  // 执行一次

    pthread_mutex_lock(&mutex);  // 加锁
    // ...
    pthread_mutex_unlock(&mutex);  // 解锁

    // 其他函数
    // 成功返回 0,不阻塞
    pthread_mutex_trylock(&mutex);
    // 销毁锁
    pthread_mutex_destroy(&mutex);
}
6.2 pthread_mutex_t(recursive)
递归锁。
static pthread_once_t once = PTHREAD_ONCE_INIT;
static pthread_mutex_t mutex;

void init_pthread_mutex_recursive() {
    pthread_mutexattr_t attr;   // 锁的属性
    pthread_mutexattr_init(&attr); // 初始化attr并且给它赋予默认
    pthread_mutexattr_settype(&attr, PTHREAD_MUTEX_RECURSIVE); // 设置锁类型,这边是设置为递归锁

    pthread_mutex_init(&mutex, &attr);  // 初始化
    pthread_mutexattr_destroy(&attr); // 销毁一个属性对象,在重新进行初始化之前该结构不能重新使用
}

- (void)test_pthread_mutex_recursive {
    pthread_once(&once, init_pthread_mutex_recursive);

    dispatch_queue_t global = dispatch_get_global_queue(QOS_CLASS_DEFAULT, 0);
    static void (^recursiveBlock)(int count);

    recursiveBlock = ^(int count) {
        pthread_mutex_lock(&mutex);
        if (count > 0) {
            NSLog(@"%d", count);
            recursiveBlock(count -1);
        }
        pthread_mutex_unlock(&mutex);
    };

    dispatch_async(global, ^{
        recursiveBlock(5);
    });
}

//    控制台输出
//    2019-06-19 09:50:26 5
//    2019-06-19 09:50:26 4
//    2019-06-19 09:50:26 3
//    2019-06-19 09:50:26 2
//    2019-06-19 09:50:26 1
七、dispatch_semaphore_t
关于 GCD,可以看我的另一篇文章:《GCD》。
举个玉米:
- (void)testDispatch_semaphore {
    dispatch_semaphore_t sema = dispatch_semaphore_create(1);
    dispatch_queue_t global = dispatch_get_global_queue(QOS_CLASS_DEFAULT, 0);

    // 信号量先 - 1,如果 < 0,就阻塞当前线程
    dispatch_semaphore_wait(sema, DISPATCH_TIME_FOREVER);
    NSLog(@"任务 A 得到锁");

    // 模拟竞争
    dispatch_async(global, ^{
        dispatch_time_t time = dispatch_time(DISPATCH_TIME_NOW, 10 * NSEC_PER_SEC);

        NSLog(@"任务 B 开始等待");
        dispatch_semaphore_wait(sema, time); // 等待 10 秒

        NSLog(@"任务 B 得到锁");
        NSLog(@"任务 B 完成");

        // 注意,如果超时了也要调用 signal
        dispatch_semaphore_signal(sema);
        NSLog(@"任务 B 释放锁");
    });

    [NSThread sleepForTimeInterval:1];
    NSLog(@"任务 A 完成");

    dispatch_semaphore_signal(sema);
    NSLog(@"任务 A 释放锁");

//    控制台输出
//    2019-06-19 10:59:32 任务 A 得到锁
//    2019-06-19 10:59:32 任务 B 开始等待
//    2019-06-19 10:59:33 任务 A 完成
//    2019-06-19 10:59:33 任务 A 释放锁
//    2019-06-19 10:59:33 任务 B 得到锁
//    2019-06-19 10:59:33 任务 B 完成
//    2019-06-19 10:59:33 任务 B 释放锁
}
八、OSSpinLock
OSSpinLock 是自旋锁。自旋的意思是不会睡眠,而是 while 循环不断尝试获取锁。自旋锁的性能很高,适用于加锁时间极短、竞争不激烈的情况,因为自旋会占用 CPU,如果有大量的线程自旋,会浪费大量的 CPU 时间,严重影响性能。
OSSpinLock 是不安全的,因为优先级反转的问题而导致死锁。优先级反转,是指低优先级线程得到锁,高优先级线程自旋,导致低优先级线程无法获得 CPU 时间,不能完成任务就会导致死锁。如果你能保证访问锁的线程的优先级是相同的,否则就不要使用了,具体看这篇文章 《不再安全的 OSSpinLock》。
苹果在 iOS 10 推出 os_unfair_lock 代替 OSSpinLock。
OSSpinLock lock = OS_SPINLOCK_INIT;
OSSpinLockLock(&lock);
...
OSSpinLockUnlock(&lock);
九、os_unfair_lock
互斥锁,不是自旋锁。iOS 10 推出的,用来代替废弃的自旋锁 OSSpinLock(优先级反转会导致死锁)。property 的 原子性 atomic 就是用这个锁实现的。
该锁并不公平,也不按排队顺序加锁,比如,解锁的线程又立即获得锁,排队等待的线程就没有机会获得锁。这有利于性能,也会导致饥饿(长时间拿不到锁)。
性能优秀,不过文档好像不推荐我们使用。
底层的同步机制。
Access low-level synchronization mechanisms to control access to state across different threads.
应首选更高级别的同步原语,例如 pthread 或 dispatch 子系统提供的原语。
Higher level synchronization primitives, such as those provided by the pthread or dispatch subsystems, should be preferred.
lock 方法里面还有一段话:
A lock must not be accessed from multiple processes or threads via shared or multiply-mapped memory, because the lock implementation relies on the address of the lock value and owning process.
不要在 multiply-mapped memory 中使用,看不懂什么意思。
总之,这是个底层的同步机制,不要乱用,还是使用 pthread 或 GCD 的信号量吧,性能都差不多的。
9.1 定义
typedef struct os_unfair_lock_s os_unfair_lock;

// 初始化,要导入头文件
#import
os_unfair_lock unfair_lock = OS_UNFAIR_LOCK_INIT;
9.2 os_unfair_lock_trylock
// 成功返回 ture,失败返回 false。不阻塞。
bool os_unfair_lock_trylock(os_unfair_lock_t lock);
Do not attempt to call this function within a retry loop。
If this function returnsfalse, you must either proceed without having acquired the lock or call os_unfair_lock_lock directly.
9.3 os_unfair_lock_lock
// A low-level lock that allows waiters to block efficiently on contention.
void os_unfair_lock_lock(os_unfair_lock_t lock);
锁包含线程所有权信息,用于解决优先级反转的问题。
A lock should be considered opaque and implementation-defined. Locks contain thread ownership information that the system may use to attempt to resolve priority inversions.
注意,加锁和解锁要在同一个线程。
A lock must be unlocked only from the same thread in which it was locked. Attempting to unlock from a different thread causes a runtime error.
A lock must not be accessed from multiple processes or threads via shared or multiply-mapped memory, because the lock implementation relies on the address of the lock value and owning process.
Note
该方法不会自旋,而是等待。该锁并不公平,也不按排队顺序加锁,比如,解锁的线程又立即获得锁,排队等待的线程就没有机会获得锁。这有利于性能,也会导致饥饿(长时间拿不到锁)。
This is a replacement for the deprecated OSSpinLock. This function doesn't spin on contention, but instead waits in the kernel to be awoken by an unlock. Like OSSpinLock, this function does not enforce fairness or lock ordering—for example, an unlocker could potentially reacquire the lock immediately, before an awoken waiter gets an opportunity to attempt to acquire the lock. This may be advantageous for performance reasons, but also makes starvation of waiters a possibility.
9.4 os_unfair_lock_unlock
// 释放锁。解锁和加锁要在同一个线程。
void os_unfair_lock_unlock(os_unfair_lock_t lock);
举个栗子:
- (void)test_os_unfair_lock {
//    iOS 10 引入,需要导入头文件
//    #import

    // 初始化
    os_unfair_lock unfair_lock = OS_UNFAIR_LOCK_INIT;
    // 加锁
    os_unfair_lock_lock(&unfair_lock);
    // 。。。
    // 解锁
    os_unfair_lock_unlock(&unfair_lock);

    // 尝试加锁,成功返回 ture,失败返回 false
//    os_unfair_lock_trylock(&unfair_lock);
}
十、@synchronized
@synchronized 的性能是最差的,但是很方便,不用自己创建锁,不用加锁。
它会添加一个异常捕获操作来保护代码的执行,处理异常时,会释放锁。因此使用它需要 enable Objective-C exception handling,如果你不想启用异常处理,就改用其他锁吧。
它通过递归锁来保护一个代码段,可以嵌套调用。递归锁和传入的 OC 对象是对应的。传入的 OC 对象的地址作为 key,通过 hash Map 得到系统维护的一个递归锁。传入 nil 会什么都不做,起不到锁的作用。(参考文章 正确使用@synchronized())
需要注意的是,要区分粒度。不同的代码块,应该用不同的对象加锁。比如两个不同功能的函数,由两个独立的线程执行,如果用同一个对象加锁(比如 self),就会影响性能了。
举个栗子:
- (void)myMethod:(id)anObj
{
    @synchronized(anObj)
    {
        // Everything between the braces is protected by the @synchronized directive.
    }
}
如果两个线程同时调用该函数,传入的 anObj 不是同一个,那么这两个线程都能拿到一个不同的锁,不会阻塞对方。如果传入的 anObj 是同一个,那么先到的线程会阻塞后到的线程,因为根据 anObj 的地址,拿到的递归锁是同一个,先到的线程得到锁,后到的线程只能等待了。
The object passed to the @synchronized directive is a unique identifier used to distinguish the protected block. If you execute the preceding method in two different threads, passing a different object for the anObj parameter on each thread, each would take its lock and continue processing without being blocked by the other. If you pass the same object in both cases, however, one of the threads would acquire the lock first and the other would block until the first thread completed the critical section.
再举个:
- (void)testSynchronized {
    ViewController *vc = [ViewController new];
    dispatch_async(dispatch_get_global_queue(0, 0), ^{
        // 会被强引用
        @synchronized (vc) {
            NSLog(@"@synchronized 开始");
            [NSThread sleepForTimeInterval:3];
            NSLog(@"@synchronized 结束");
        }
    });

//    控制台输出
//    2019-06-20 09:29:34 @synchronized 开始
//    2019-06-20 09:29:37 @synchronized 结束
//    2019-06-20 09:29:37 ViewController dealloc
}
上面代码说明,传入的对象会被强引用,执行结束后才会释放。
十一、原子性 atomic
atomic 并不是一种锁,而是用锁实现的一种局部线程安全(In a sense, an atomic property is localized thread safety)。
property 默认是 atomic,如果不声明为 nonatomic 的话。
它的作用是,当一个线程访问 property 的 getter 或 setter 时,其他想访问 getter 或 setter 的线程,都要等待。
比如线程 A 通过 getter 获取 property 的值到一半时,其他想访问 getter 或 setter 的线程都要等待。
实现的原理是在 getter 和 setter 加锁,而且是同一个锁,这样就能保证任一时刻只有一个线程可以访问 getter 和 setter。
atomic 以前是用自旋锁 OSSpinLock 实现的,但由于优先级反转的问题,iOS 10 后改用互斥锁 os_unfair_lock 实现了。
Properties are atomic by default so that synthesized accessors provide robust access to properties in a multithreaded environment—that is, the value returned from the getter or set via the setter is always fully retrieved or set regardless of what other threads are executing concurrently
假设一个对象声明为 strong, copy, 或 retain ,而且如果用 nonatomic 修饰,getter 就直接返回它的值,不会加锁。如果没有用 nonatomic 修饰,它的 getter 代码类似下面:
[_internal lock]; // lock using an object-level lock
id result = [[value retain] autorelease];
[_internal unlock];
return result;
注意,atomic 并不是线程安全的。
假设有 3 个线程,一个 atomic 的 property,线程 A 调用 getter,线程 B、C 调用 setter。atomic 并不能保证线程 A、B、C 的执行顺序,因此 A 获取的值有 3 种情况:原值、B 值、C 值。
不对的地方,还请指正。