1 APNS原理
iOS消息推送的工作机制可以简单的用下图来概括:

Provider是指某个iPhone软件的Push服务器,APNS是Apple Push Notification Service的缩写,是苹果的服务器。
上图可以分为三个阶段:
第一阶段:应用程序把要发送的消息、目的iPhone的标识打包,发给APNS。
第二阶段:APNS在自身的已注册Push服务的iPhone列表中,查找有相应标识的iPhone,并把消息发送到iPhone。
第三阶段:iPhone把发来的消息传递给相应的应用程序,并且按照设定弹出Push通知。
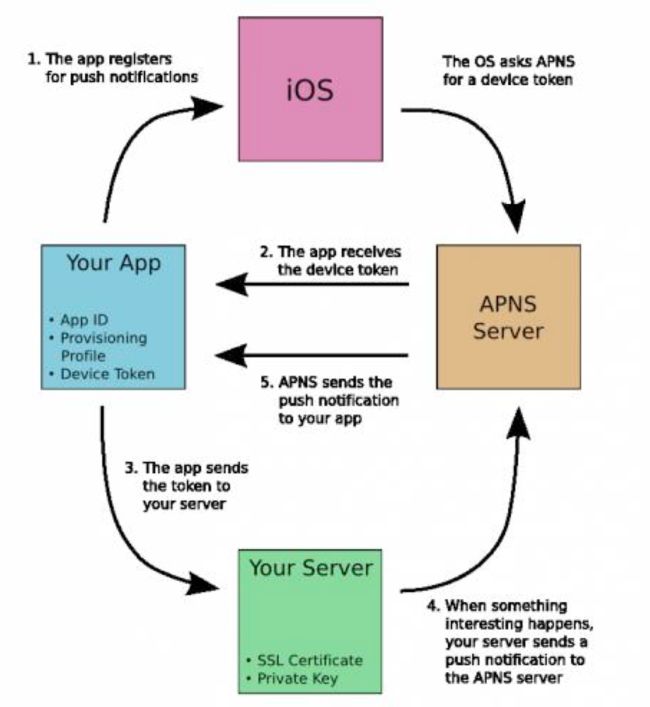
从上图我们可以看到:
1、应用程序注册消息推送。
2、iOS从APNS Server获取device token,应用程序接收device token。
3、应用程序将device token发送给PUSH服务端程序。
4、服务端程序向APNS服务发送消息。
5、APNS服务将消息发送给iPhone应用程序。
2 具体使用
2.1 证书生成
无论是iPhone客户端和APNS,还是Provider和APNS,都需要通过证书进行连接。下面我介绍一下几种用到的证书。
2.1.1 一、CSR文件
1、生成Certificate Signing Request(CSR)
2、填写你的邮箱和常用名称,并选择保存到硬盘。
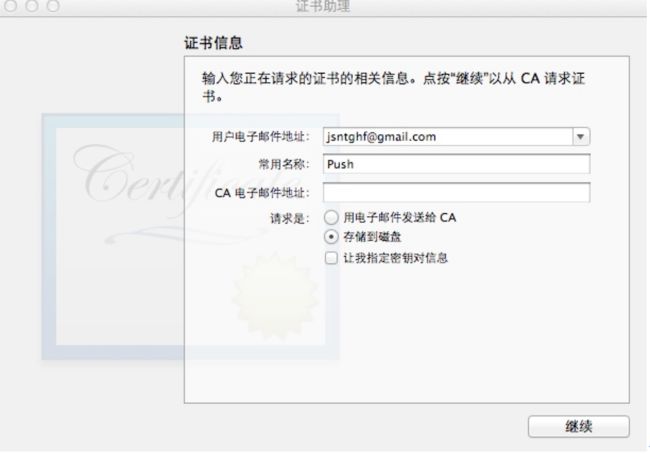
点击继续:

这样就在本地生成了一个Push.certSigningRequest文件。
2.1.2 二、p12文件
1、导出密钥。
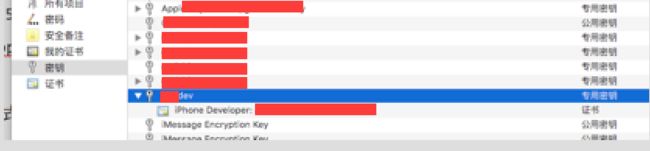
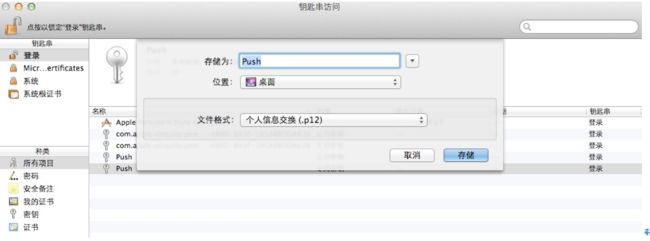
2、输入你的密码。
这样就生成了一个Push.p12文件。
2.1.3 三、SSL certificate文件
1、用你付过费的帐号登录到iOS Provisioning Portal,并新建一个App ID,这个过程可以参考:iOS应用的真机调试,这样就会生成下面这条记录:

2、点击右侧的Configure:
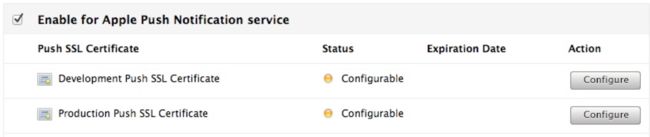
3、点击Development Push SSL Certificate一行后的Configure:
4、点击Continue:
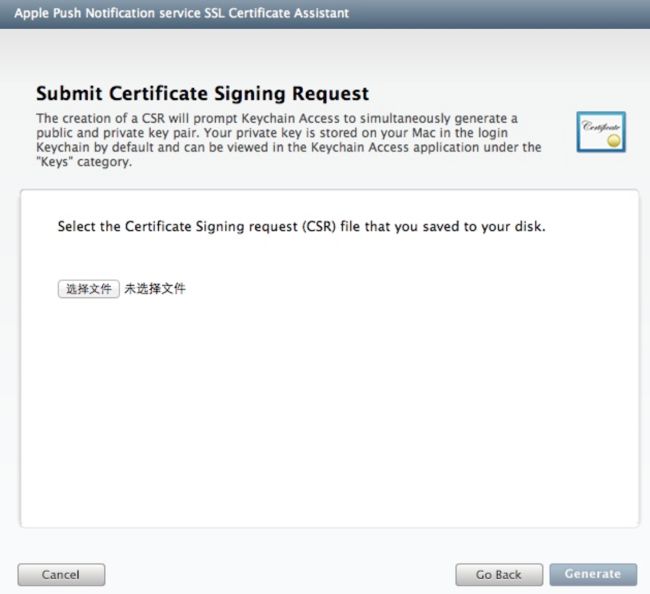
5、选择前面生成好的Push.certSigningRequest文件,点击Generate,出现如下所示的页面:

6、点击Continue:
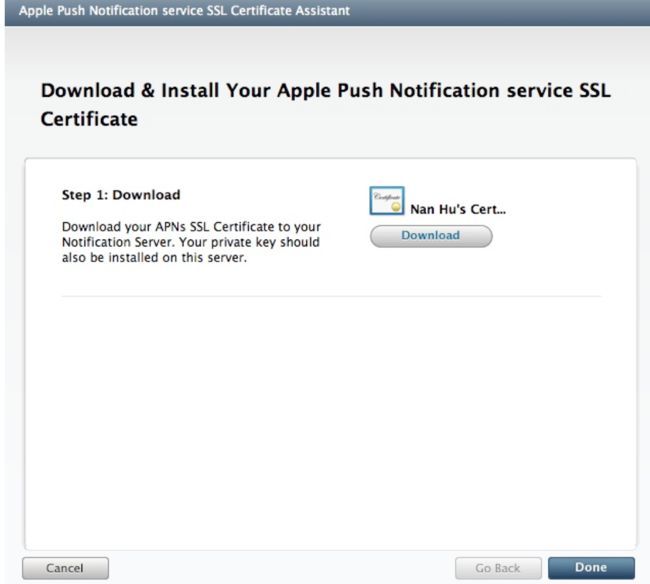
7、点击Download,并将文件命名为aps_developer_identity.cer。
8、点击Done,你会发现状态变成了Enabled:
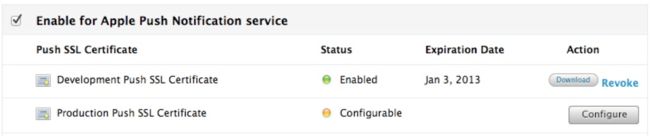
注意:有的App ID的Apple Push Notification service列是灰色的,并且不允许使用Configure按钮,这是因为APNS不支持带通配符的App ID。
到现在为止,我们已经生成了三个文件:
1、Push.certSigningRequest
2、Push.p12
3、aps_developer_identity.cer
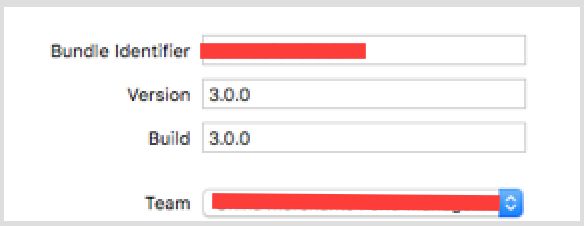
2.2 工程配置
2.2.1 Xcode工程指定支持推送的bundleID
2.2.2 指定支持推送的证书
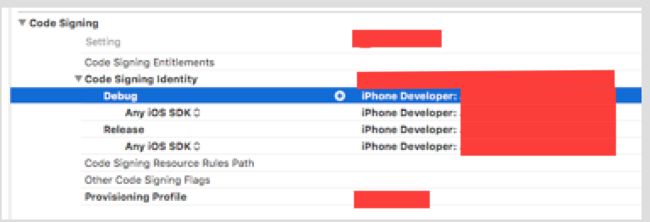
2.2.3 Xcode工程增加推送证书

2.3 代码添加
2.3.1 app端代码添加
在项目的AppDelegate中的didFinishLaunchingWithOptions方法中加入下面的代码:
[[UIApplication sharedApplication] registerForRemoteNotificationTypes:(UIRemoteNotificationTypeAlert|UIRemoteNotificationTypeSound|UIRemoteNotificationTypeBadge)];
通过registerForRemoteNotificationTypes方法,告诉应用程序,能接受push来的通知。
在项目的AppDelegate中添加下面的方法来获取deviceToken:
- (void)application:(UIApplication *)app didRegisterForRemoteNotificationsWithDeviceToken:(NSData *)deviceToken {
NSString *token = [NSString stringWithFormat:@"%@", deviceToken];
NSLog(@"My token is:%@", token);
}
- (void)application:(UIApplication *)app didFailToRegisterForRemoteNotificationsWithError:(NSError *)error {
NSString *error_str = [NSString stringWithFormat: @"%@", error];
NSLog(@"Failed to get token, error:%@", error_str);
}
获取到的deviceToken,我们可以提交给后台应用程序,发送通知的后台应用程序除了需要知道deviceToken之外,还需要一个与APNS连接的证书。
2.3.2 后台配置
2.3.2.1 后台证书生成方法一
这个证书可以通过我们前面生成的两个文件中得到。
1、将aps_developer_identity.cer转换成aps_developer_identity.pem格式
openssl x509 -in aps_developer_identity.cer -inform DER -out aps_developer_identity.pem -outform PEM
2、将p12格式的私钥转换成pem
openssl pkcs12 -nocerts -out Push_Noenc.pem -in Push.p12
3、创建p12文件
openssl pkcs12 -export -in aps_developer_identity.pem -inkey Push_Noenc.pem -certfile Push.certSigningRequest -name "aps_developer_identity"-out aps_developer_identity.p12
这样我们就得到了在.net或java等后台应用程序中使用的证书文件:aps_developer_identity.p12
如果后台应用是php的话,那么可以按照 iOS消息推送机制中pem文件的生成这篇文章中的方法来生成php后台应用程序中使用的证书文件:ck.pem
2.3.2.2 后台证书生成方法二
假设密码统一123456
opensslpkcs12 -clcerts -nokeys -out hj_aps_cert.pem -in hj_dis_push_cer.p12
opensslpkcs12 -nocerts -out hj_aps_key.pem -in hj_dis_push_key.p12
openssl pkcs12 -export -in
hj_aps_cert.pem -inkey hj_aps_key.pem -certfile
hj_Dis_Push.certSigningRequest -name "hj_aps" -out
hj_dis_push_server.p12
openssl
pkcs12 -clcerts -nokeys -out hj_dis_push_cert.pem -in hj_dis_push_cert.p12
openssl
pkcs12 -nocerts -out hj_dis_push_key.pem -in hj_dis_push_key.p12
openssl pkcs12 -export -in hj_dis_push_cert.pem -inkey hj_dis_push_key.pem -certfile hj_dis.certSigningRequest -name "hj_dis_aps" -out hj_dis_push_server.p12
2.3.3 apns4j后台推送环境变量设置
后台推送配置时,要注意的是环境设置函数:
config.setDevEnv(true)
生产环境必须设置为false,否则会报invalid TOKEN错误;
JAVA APNS苹果推送
http://blog.csdn.net/linyu19872008/article/details/19421045
推送通知iOS客户端编写实现及推送服务器端编写
http://www.open-open.com/lib/view/open1369278303201.html
3 开发技巧
3.1 常用技巧
3.1.1 应用图标上红点消除
application.applicationIconBadgeNumber=0
写在didFinishLaunchingWithOptions每次启动应用程序,使应用图标上数字标记都会变为0。注意要写在注册远程消息推送注册动作之前。
3.1.2 apns4j中设置推送声音
apns4j是Apple Push Notification Service的Java实现!
Maven:
com.github.teaey
apns4j
1.0.1
示例代码:
KeyStoreWraper keyStore = KeyStoreHelper.getKeyStoreWraper("XXXXXXXX.p12", keyStorePasswd);
AppleNotificationServer appleNotificationServer = new AppleNotificationServer(AppleGateway.ENV_DEVELOPMENT, keyStore);
SecurityConnectionFactory connectionFactory = new SecurityConnectionFactory(appleNotificationServer);
SecurityConnection connection = connectionFactory.getSecurityConnection();
NotifyPayload notifyPayload = new NotifyPayload();
//notifyPayload.setAlert("TEST1");
notifyPayload.setBadge(2);
//不能传null,不然会导致接收消息时没有声音
notifyPayload.setSound("default");
notifyPayload.setAlertBody("Pushed By apns4j");
notifyPayload.setAlertActionLocKey("Button Text");
connection.writeAndFlush(deviceTokenString, notifyPayload);
connection.close();
项目主页:http://www.open-open.com/lib/view/home/1429931797088
3.1.3 iOS8自定义推送显示按钮及推送优化
参考链接:iOS8自定义推送显示按钮及推送优化
http://www.jianshu.com/p/803bfaae989e
3.1.3.1 注册推送
在iOS8中,我们使用新的函数来注册通知,如下:
- (void)registerForRemoteNotifications NS_AVAILABLE_IOS(8_0);
该函数的作用是向苹果服务器注册该设备,注册成功过后会回调
- (void)application:(UIApplication *)application didRegisterForRemoteNotificationsWithDeviceToken:(NSData *)deviceToken NS_AVAILABLE_IOS(3_0);
注册失败则回调
- (void)application:(UIApplication *)application didFailToRegisterForRemoteNotificationsWithError:(NSError *)error NS_AVAILABLE_IOS(3_0);
执行registerForRemoteNotifications只是完成了与APNS的注册交互,接下来还要设置推送的类型和策略。如果没有设置则接收到的消息都是以静默的方式接收。
3.1.3.2 设置推送类型
- (void)registerUserNotificationSettings:(UIUserNotificationSettings *)notificationSettings NS_AVAILABLE_IOS(8_0);
在这里我们用到了UIUserNotificationSettings这个新类,苹果对其解释是这样的。
A UIUserNotificationSettings object encapsulates the types of notifications that can be displayed to the user by your app. Apps that use visible or audible alerts in conjunction with a local or push notification must register the types of alerts they employ. UIKit correlates the information you provide with the user’s preferences to determine what types of alerts your app is allowed to employ.
简单来说就是我们可以自行注册推送的提醒类型。再来看看UIUserNotificationSettings为我们提供了那些函数。查看API,我们只找到了
+ (instancetype)settingsForTypes:(UIUserNotificationType)types categories:(NSSet *)categories;
UIUserNotificationType就是以往我们设定的推送声音、推送数量Badge和是否Alter的参数组合。因为它们是NS_OPTIONS类型,所以是可以多选的。
我们重点放在categories上。可以看到,categories的类型是一个集合(NSSet *),也就是说我们可以设置多个推送策略。继续查找API,我们找到了UIUserNotificationCategory。苹果的说明是这样的
A UIUserNotificationCategory object encapsulates information about custom actions that your app can perform in response to a local or push notification. Each instance of this class represents a group of actions to display in conjunction with a single notification. The title of each action is uses as the title of a button in the alert displayed to the user. When the user taps a button, the system reports the selected action to your app delegate.
就是说我们对每一条推送信息可以设置一组行为,行为以按钮方式显示。当我们点击按钮时会调用app delegate的代理方法。查看UIUserNotificationCategory相关属性
@property (nonatomic, copy, readonly) NSString *identifier;
identifier:策略标识,在推送时用来决定客户端显示哪种推送策略,稍后会介绍。
看到该属性是只读的,我们在自定义策略时使用的是UIMutableUserNotificationCategory来设置,设置方法如下:
- (void)setActions:(NSArray *)actions forContext:(UIUserNotificationActionContext)context;
对一个策略我们可以设置多个行为,使用的是UIUserNotificationAction。
查看UIUserNotificationAction相关属性
// The unique identifier for this action. @property (nonatomic, copy, readonly) NSString *identifier; // The localized title to display for this action. @property (nonatomic, copy, readonly) NSString *title; // How the application should be activated in response to the action. @property (nonatomic, assign, readonly) UIUserNotificationActivationMode activationMode; // Whether this action is secure and should require unlocking before being performed. If the activation mode is UIUserNotificationActivationModeForeground, then the action is considered secure and this property is ignored. @property (nonatomic, assign, readonly, getter=isAuthenticationRequired) BOOL authenticationRequired; // Whether this action should be indicated as destructive when displayed. @property (nonatomic, assign, readonly, getter=isDestructive) BOOL destructive;
identifier:行为标识符,用于调用代理方法时识别是哪种行为。
title:行为名称。
UIUserNotificationActivationMode:即行为是否打开APP。
authenticationRequired:是否需要解锁。
destructive:这个决定按钮显示颜色,YES的话按钮会是红色。
同样由于这些属性都是只读的,我们使用UIMutableUserNotificationAction来生成自定义行为。
3.1.3.3 编码
我们设置两种推送策略,每种策略分别设置两种行为。代码如下:
if(8.0 <= [UIDevice currentDevice].systemVersion.doubleValue) {
[[UIApplication sharedApplication] registerForRemoteNotifications];
UIMutableUserNotificationAction * action1 = [[UIMutableUserNotificationAction alloc] init];
action1.identifier = @"action1";
action1.title=@"策略1行为1";
action1.activationMode = UIUserNotificationActivationModeForeground;
action1.destructive = YES;
UIMutableUserNotificationAction * action2 = [[UIMutableUserNotificationAction alloc] init];
action2.identifier = @"action2";
action2.title=@"策略1行为2";
action2.activationMode = UIUserNotificationActivationModeBackground;
action2.authenticationRequired = NO;
action2.destructive = NO;
UIMutableUserNotificationCategory * category1 = [[UIMutableUserNotificationCategory alloc] init];
category1.identifier = @"Category1";
[category1 setActions:@[action2, action1] forContext:(UIUserNotificationActionContextDefault)];
UIMutableUserNotificationAction * action3 = [[UIMutableUserNotificationAction alloc] init];
action3.identifier = @"action3";
action3.title=@"策略2行为1";
action3.activationMode = UIUserNotificationActivationModeForeground;
action3.destructive = YES;
UIMutableUserNotificationAction * action4 = [[UIMutableUserNotificationAction alloc] init];
action4.identifier = @"action4";
action4.title=@"策略2行为2";
action4.activationMode = UIUserNotificationActivationModeBackground;
action4.authenticationRequired = NO;
action4.destructive = NO;
UIMutableUserNotificationCategory * category2 = [[UIMutableUserNotificationCategory alloc] init];
category2.identifier = @"Category2";
[category2 setActions:@[action4, action3] forContext:(UIUserNotificationActionContextDefault)];
UIUserNotificationSettings *uns = [UIUserNotificationSettings settingsForTypes:(UIUserNotificationTypeAlert|UIUserNotificationTypeBadge|UIUserNotificationTypeSound) categories:[NSSet setWithObjects: category1, category2, nil]];
[[UIApplication sharedApplication] registerUserNotificationSettings: uns];
}
关于推送证书制作请百度,这里推荐一个推送测试工具。
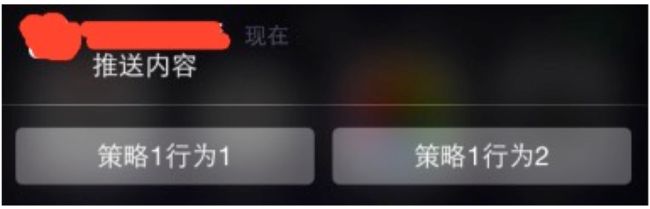
推送策略一
{"aps":{"alert":"推送内容","sound":"default","badge":0, "category":"Category1"}}
显示结果:
推送策略二
{"aps":{"alert":"推送内容","sound":"default","badge":0, "category":"Category2"}}
显示结果:
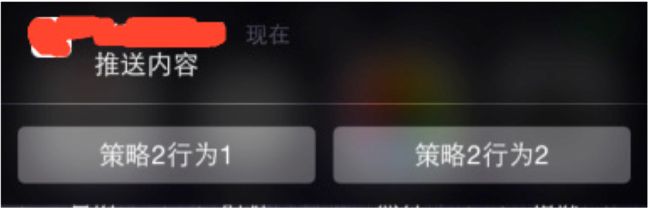
策略二
点击相应按钮会激活代理方法
- (void)application:(UIApplication *)application handleActionWithIdentifier:(NSString *)identifier forRemoteNotification:(NSDictionary *)userInfo completionHandler:(void(^)())completionHandler NS_AVAILABLE_IOS(8_0);
这里我们根据传过来的identifier确定点击了哪个按钮,并执行相应操作。
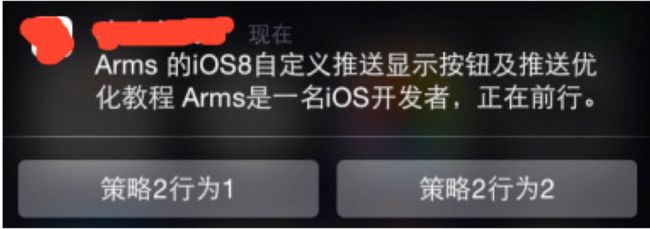
3.1.3.4 推送优化
苹果APNS对推送内容大小限制不能超过256个字节(现在这个限制好像放宽了)。如果推送消息内容过多,不仅会造成推送延迟,还会消耗流量。对于推送信息中重复的文本内容,我们可以在本地字符串strings中自定义键值动态设定参数来完成推送。
Localizable.strings中添加:
"pushkey" = "%@ 的iOS8自定义推送显示按钮及推送优化教程 %@是一名iOS开发者,正在前行。";
设置推送信息
{"aps":{"alert":{"loc-args":["Arms","Arms"],"loc-key":"pushkey"}, "sound":"default","badge":0, "category":"Category2"}}
显示结果:
4 参考链接
iOS消息推送机制的实现
http://www.cnblogs.com/qq78292959/archive/2012/07/16/2593651.html
iOS消息推送原理及实现Demo
http://www.cnblogs.com/cdts_change/p/3240893.html
(Good)推送通知iOS客户端编写实现及推送服务器端编写
http://www.open-open.com/lib/view/open1369278303201.html
(Good)iOS推送小结(证书的生成、客户端的开发、服务端的开发)
http://www.2cto.com/kf/201401/275788.html
iOS消息推送(Message)证书设置指南
http://www.cnblogs.com/huangzizhu/p/4137571.html
JAVA APNS苹果推送
http://blog.csdn.net/linyu19872008/article/details/19421045
p12 pem互转
http://blog.csdn.net/xyxjn/article/details/40863095
主题:如何使用applicationIconBadgeNumber?
http://www.cocoachina.com/bbs/read.php?tid-269873.html
Apple Push Notification Service的Java实现:apns4j
http://www.open-open.com/lib/view/open1429931797088.html
IOS新消息通知提示-声音、震动
http://www.2cto.com/kf/201308/235849.html
IOS成长之路-使用系统默认声音、震动
http://blog.csdn.net/like7xiaoben/article/details/9001806
关于IOS推送声音的设置
http://www.cocoachina.com/bbs/read.php?tid-191292-page-2.html
IOS推送声音设置
http://blog.csdn.net/u011043997/article/details/51180503
iOS8推送消息的快速回复处理
http://blog.csdn.net/yujianxiang666/article/details/35260135
iOS8自定义推送显示按钮及推送优化
http://www.jianshu.com/p/803bfaae989e