基于Python的车牌识别(切割及识别)
基于Python的车牌识别(切割及识别)
上一篇博文简单的分享车牌定位,这次,将定位出来的车牌进行分割并识别出该字符。
1、车牌定位及提取
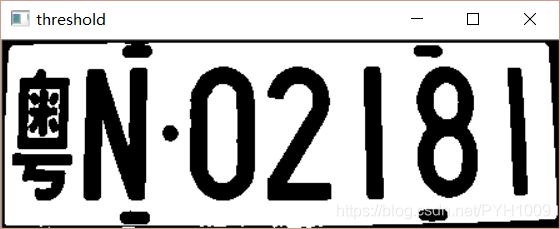
2、车牌二值化
def split_char(image):
    # 改变车牌号大小
    image = cv2.resize(image, (445, 150))
    # 高斯模糊
    blurerd = cv2.GaussianBlur(image, (3, 3), 0, 0, cv2.BORDER_DEFAULT)
    # 图像转灰度
    gray = cv2.cvtColor(blurerd, cv2.COLOR_BGR2GRAY)

    kernel = np.ones((3, 3), np.uint8)
    # kernel = cv2.getStructuringElement(cv2.MORPH_RECT, (5, 5))
    # img_opening = cv2.morphologyEx(gray,cv2.MORPH_CLOSE,kernel)
    # img_opening = cv2.addWeighted(gray,1,img_opening,-1,0)  #将两张图片相融合

    # 将灰度图像转换为二值化,设定阈值是100  (黑白照片)
    w=12 #分割图片的最小值
    A = 80
    P = 0.98
    while A<101:
        ret, img_thre = cv2.threshold(gray, A, 255, cv2.THRESH_BINARY_INV)
        # img_thre = cv2.erode(img_thre, kernel)

        cv2.imshow("threshold", img_thre)
        # cv2.imwrite(output_dir + '/' + 'img_thre' + '.jpg', img_thre)
        # cv2.waitKey(0)
3、分割
(1)分割主要采用的方法是投影,通过设置阈值将图片先水平分割(去掉上下水平线)
        # 分割图像
        white = []  # 记录每一列的白色像素总和
        black = []  # 记录每一列的黑色像素的总和
        height = img_thre.shape[0]
        width = img_thre.shape[1]
        white_max = 0
        black_max = 0
        # 计算每一行的黑白像素的总和
        for i in range(height):
            s = 0  # 这一行白色总数
            t = 0  # 这一行黑色总数
            for j in range(width):
                if img_thre[i][j] == 255:
                    s = s + 1
                if img_thre[i][j] == 0:
                    t = t + 1
            white_max = max(white_max, s)
            black_max = max(black_max, t)
            white.append(s)
            black.append(t)
            # print("第%d行:white[%d]=%d,black[%d]=%d" % (i, i, s, i, t))

        arg = True  # False表示白底黑字,True表示黑底白字
        if black_max > white_max:
            arg = False

        # print("width:%d,height:%d" % (width, height), arg)
        # print("whitemax:%d   blackmax:%d" %(white_max,black_max))

        f = 0.8
        # 去除上下水平线
        def find_end(start_):
            end_ = start_ + 1
            for m in range(start_ + 1, height - 1):
                # 0.95参数可多调整,对应下面的0.05
                if (black[m] if arg else white[m]) > (0.95 * black_max if arg else f * white_max):
                    # print(white[m],0.94 * white_max)
                    end_ = m
                    break
            return end_

        n = 1
        start = 1
        img_thre2 = None
        J=0
        for i in range(200):
            if n < height - 2:
                n = n + 1
                while n < height - 2 and black[n] == width:
                    n = n + 1
                if (white[n] if arg else black[n]) > (0.05 * white_max if arg else 0.22 * black_max):
                    # 以上是判断白底黑字还是黑字白底
                    # 0.05可调整,对应上面的0.95
                    start = n
                    end = find_end(start)
                    n = end
                    img_thr2 = False
                    #print(start, "-", end)
                    if end - start >= 90:
                        #print(start, "-(有效)", end)
                        img_thre = img_thre[start:end, 1:width]
                        cv2.imshow("cai", img_thre)
                        img_thr2 = True
                    elif((img_thr2==False) and (f!=1.0)):
                        f = f+ 0.01
                        #print(f)
                        n = n-1
                    else:
                        break

            else:
                break
(2)进行垂直分割后的图片分割成七个字符图片
 # 垂直分割
        white = []  # 记录每一列的白色像素总和
        black = []  # 记录每一列的黑色像素的总和
        height = img_thre.shape[0]
        width = img_thre.shape[1]
        white_max = 0
        black_max = 0
        # 计算每一列的黑白像素的总和
        for i in range(width):
            s = 0  # 这一列白色总数
            t = 0  # 这一列黑色总数
            for j in range(height):
                if img_thre[j][i] == 255:
                    s = s + 1
                if img_thre[j][i] == 0:
                    t = t + 1
            white_max = max(white_max, s)
            black_max = max(black_max, t)
            white.append(s)
            black.append(t)
            # print("第%d列:white[%d]=%d,black[%d]=%d" % (i, i, s, i, t))

        '''
        plt.subplot(211)
        plt.plot(white)
        plt.title("white")
        plt.show()
        plt.subplot(212)
        plt.plot(black)
        plt.title("black")
        plt.show()
        '''

        def find_end(start_):
            end_ = start_ + 1
            for m in range(start_ + 1, width - 1):
                # 0.95参数可多调整,对应下面的0.05
                if (black[m] if arg else white[m]) > (0.85 * black_max if arg else P * white_max):
                    end_ = m
                    break
            return end_

        n = 1
        start = 1
        #j = 0
        cj = []
        #f = False


        for i in range(800):
            if (n < width - 2):
                # print(width)
                n = n + 1
                if (white[n] if arg else black[n]) > (0.08 * white_max if arg else 0.15 * black_max):
                    # 以上是判断白底黑字还是黑字白底
                    # 0.05可调整,对应上面的0.95
                    #print(P)
                    start = n
                    end = find_end(start)
                    n = end
                    if end - start > 63:  #强制分割
                        end = start + 60
                    #print(end,start,"无效")
                    #print(J)

                    if (end - start > w):
                        cj.append(img_thre[1:height, start:end])  # cj存放已经分割好的图片
                        #print(end,start)
                        #cv2.imshow("cai" + str(j), cj[j])
                        J=J + 1
                    else:
                        # print(start, "无效-", end)
                        pass
                #print(i,n)
            else:
                break
        #print(J)
        #print("J=", J)
        if ((J > 0) and (J < 7)):
            P = P - 0.01
            A = 80
            J = 0
            #print(False)
            # print(J)
        if J > 7:  # 分割出多余的部分
            #print("分割太细,数值加1")
            A = 80
            w = w + 1

        if J==7:
            for k in range(J):
                cj[k] = cv2.resize(cj[k], (64, 64))
                cv2.imwrite(output_dir + '/split' + '/' + str(k) + '.jpg', cj[k])
                cv2.imshow("cai" + str(k), cj[k])
                #print(A)
                #cv2.waitKey()
            f = True
            A = 101
            break
        A = A+5
3、字符识别
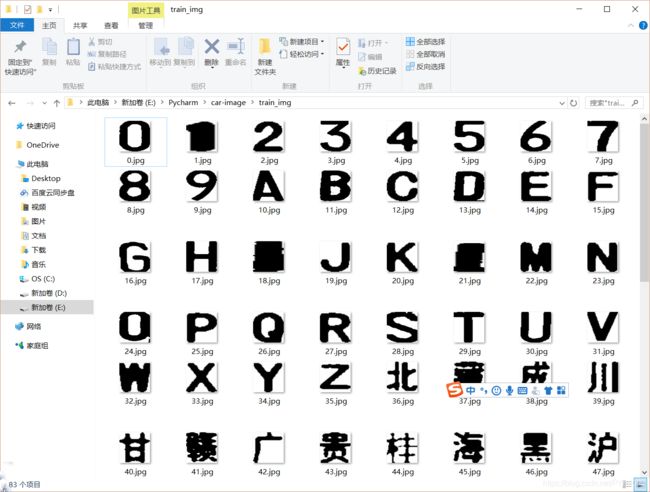
这里采用的是模板匹配的方法,主要是基于均值哈希算法、差值感知算法、哈希值对比来进行模板匹配,效果还不错。
#模板匹配
# !/usr/bin/python
# -*- coding: UTF-8 -*-

# 均值哈希算法
def aHash(img):
    # 缩放为8*8
    img = cv2.resize(img, (8, 8), interpolation=cv2.INTER_CUBIC)
    # 转换为灰度图
    gray = cv2.cvtColor(img, cv2.COLOR_BGR2GRAY)
    # s为像素和初值为0,hash_str为hash值初值为''
    s = 0
    hash_str = ''
    # 遍历累加求像素和
    for i in range(8):
        for j in range(8):
            s = s + gray[i, j]
    # 求平均灰度
    avg = s / 64
    # 灰度大于平均值为1相反为0生成图片的hash值
    for i in range(8):
        for j in range(8):
            if gray[i, j] > avg:
                hash_str = hash_str + '1'
            else:
                hash_str = hash_str + '0'
    return hash_str


# 差值感知算法
def dHash(img):
    # 缩放8*8
    img = cv2.resize(img, (9, 8), interpolation=cv2.INTER_CUBIC)
    # 转换灰度图
    gray = cv2.cvtColor(img, cv2.COLOR_BGR2GRAY)
    hash_str = ''
    # 每行前一个像素大于后一个像素为1,相反为0,生成哈希
    for i in range(8):
        for j in range(8):
            if gray[i, j] > gray[i, j + 1]:
                hash_str = hash_str + '1'
            else:
                hash_str = hash_str + '0'
    return hash_str


# Hash值对比
def cmpHash(hash1, hash2):
    n = 0
    # hash长度不同则返回-1代表传参出错
    if len(hash1) != len(hash2):
        return -1
    # 遍历判断
    for i in range(len(hash1)):
        # 不相等则n计数+1,n最终为相似度
        if hash1[i] != hash2[i]:
            n = n + 1
    return n
源代码:https://download.csdn.net/download/PYH1009/19479024?spm=1001.2014.3001.5501


