事故起因
业务上新集群,本来以为"洒洒水",11 点切,12 点就能在家睡觉了。流量切过来后,在验证过程中,发现网页能够正常打开,在登录时返回了 502,当场懵逼。在相关的容器日志发现一个高频的报错条目“7000 端口无法连接”,向业务组了解到这是 redis 集群中的一个端口,前后端是通过 redis 交互的,该集群同时还有 7001-7003 其它三个端口。
用 nc 命令对 redis 集群进行连接测试:向服务端发送 keys * 命令时,7000 端口返回的是 HTTP/1.1 400 Bad Request,其他三个端口是 redis 返回的 -NOAUTH Authentication required。
$ nc 10.0.0.6 7000
keys *
HTTP/1.1 400 Bad Request
content-length: 0
connection: close

$ nc 10.0.0.6 7003
keys *
-NOAUTH Authentication required
判断 7000 端口连接到了其他应用上,至少不是 redis。在宿主机上抓包发现没有抓到访问 7000 端口的流量,然后查看容器的 nf_conntrackb 表,发现 7000 端口的数据只有到本地的会话信息;7003 的有两条会话信息,一条到本机的,一条到目标服务器的。
$ grep 7000 /proc/net/nf_conntrack
ipv4     2 tcp      6 110 TIME_WAIT src=10.64.192.14 dst=10.0.0.6 sport=50498 dport=7000 src=127.0.0.1 dst=10.64.192.14 sport=15001 dport=50498 [ASSURED] mark=0 zone=0 use=2

$ grep 7003 /proc/net/nf_conntrack
ipv4     2 tcp      6 104 TIME_WAIT src=10.64.192.14 dst=10.0.0.6 sport=38952 dport=7003 src=127.0.0.1 dst=10.64.192.14 sport=15001 dport=38952 [ASSURED] mark=0 zone=0 use=2
ipv4     2 tcp      6 104 TIME_WAIT src=10.64.192.14 dst=10.0.0.6 sport=38954 dport=7003 src=10.0.0.6 dst=10.64.192.14 sport=7003 dport=38954 [ASSURED] mark=0 zone=0 use=2
由此判断出 istio 没有代理转发出 7000 的流量,这突然就触及到了我的知识盲区,一大堆人看着,办公室 26 度的空调,一直在冒汗。没办法了,在与业务商量后,只能先关闭 istio 注入,优先恢复了业务。回去后恶补 istio 的相关资料。终于将问题解决。记录下相关信息,以供日后参考。
背景知识补充
istio Sidecar 的模式
istio 的 Sidecar 有两种模式:
- ALLOW_ANY:istio 代理允许调用未知的服务,黑名单模式。
- REGISTRY_ONLY:istio 代理会阻止任何没有在网格中定义的 HTTP 服务或 service entry 的主机,白名单模式。
istio-proxy(Envoy)的配置结构
istio-proxy(Envoy)的代理信息大体由以下几个部分组成:
- Cluster:在 Envoy 中,Cluster 是一个服务集群,Cluster 中包含一个到多个 endpoint,每个 endpoint 都可以提供服务,Envoy 根据负载均衡算法将请求发送到这些 endpoint 中。cluster 分为 inbound 和 outbound 两种,前者对应 Envoy 所在节点上的服务;后者占了绝大多数,对应 Envoy 所在节点的外部服务。可以使用如下方式分别查看 inbound 和 outbound 的 cluster。
- Listeners:Envoy 采用 listener 来接收并处理 downstream 发过来的请求,可以直接与 Cluster 关联,也可以通过 rds 配置路由规则(Routes),然后在路由规则中再根据不同的请求目的地对请求进行精细化的处理。
- Routes:配置 Envoy 的路由规则。istio 下发的缺省路由规则中对每个端口(服务)设置了一个路由规则,根据 host 来对请求进行路由分发,routes 的目的为其他服务的 cluster。
- Endpoint:cludter 对应的后端服务,可以通过 istio pc endpoint 查看 inbound 和 outbound 对应的 endpoint 信息。
服务发现类型
cluster 的服务发现类型主要有:
- ORIGINAL_DST:类型的 Cluster,Envoy 在转发请求时会直接采用 downstream 请求中的原始目的地 IP 地址
- EDS:EDS 获取到该 Cluster 中所有可用的 Endpoint,并根据负载均衡算法(缺省为 Round Robin)将 Downstream 发来的请求发送到不同的 Endpoint。istio 会自动为集群中的 service 创建代理信息,listener 的信息从 service 获取,对应的 cluster 被标记为 EDS 类型
- STATIC:缺省值,在集群中列出所有可代理的主机 Endpoints。当没有内容为空时,不进行转发。
- LOGICAL_DNS:Envoy 使用 DNS 添加主机,但如果 DNS 不再返回时,也不会丢弃。
- STRICT_DNS:Envoy 将监控 DNS,而每个匹配的 A 记录都将被认为是有效的。
两个特殊集群
BlackHoleCluster:黑洞集群,匹配此集群的流量将被不会被转发。
{
    "name": "BlackHoleCluster",
    "type": "STATIC",
    "connectTimeout": "10s"
}
类型为 static,但是没有指定可代理的 Endpoint,所以流量不会被转发。
PassthroughCluster:透传集群,匹配此集群的流量数据包的目的 IP 不会改变。
{
    "name": "PassthroughCluster",
    "type": "ORIGINAL_DST",
    "connectTimeout": "10s",
    "lbPolicy": "CLUSTER_PROVIDED",
    "circuitBreakers": {
       "thresholds": [
          {
              "maxConnections": 4294967295,
               "maxPendingRequests": 4294967295,
               "maxRequests": 4294967295,
               "maxRetries": 4294967295
            }
        ]
 }
类型为 original_dst,流量将原样转发。
一个特殊的 Listener
istio 中有一个特殊的 Listener 叫 virtualOutbound,定义如下:
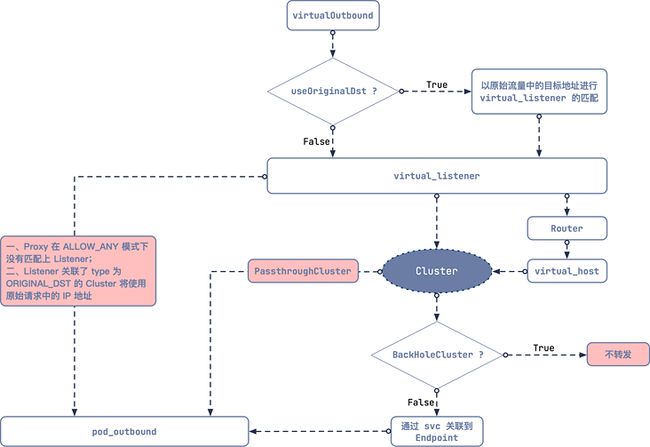
- virtualOutbound:每个 Sidecar 都有一个绑定到 0.0.0.0:15001 的 listener,该 listener 下关联了许多 virtual listener。iptables 会先将所有出站流量导入该 listener,该 listener 有一个字段 useOriginalDst 设置为 true,表示会使用最佳匹配原始目的地的方式将请求分发到 virtual listener,如果没有找到任何 virtual listener,将会直接发送到数据包原目的地的 PassthroughCluster。
useOriginalDst 字段的具体意义是,如果使用 iptables 重定向连接,则代理接收流量的目标地址可能与原始目标地址不同。当此标志设置为 true 时,侦听器会将重定向流量转交给与原始目标地址关联的侦听器。如果没有与原始目标地址关联的侦听器,则流量由接收它的侦听器处理。默认为 false。
virtualOutbound 的流量处理流程如图所示:
这是 virtualOutbound 的部分配置:
{
   "name": "envoy.tcp_proxy",
   "typedConfig": {
      "@type": "type.googleapis.com/envoy.config.filter.network.tcp_proxy.v2.TcpProxy",
      "statPrefix": "PassthroughCluster",
      "cluster": "PassthroughCluster"
     }
}
……………
"useOriginalDst": true
istio 的 outbond 流量处理
开启流量治理后,pod 访问外部资源的流量转发路径如图所示:
istio 注入后 istio-proxy 有一个监听在 15001 的端口,所有非 istio-proxy 用户进程产生的 outbond 流量,通过 iptables 规则被重定向到 15001。
# Sidecar 注入的 pod 监听的端口
$ ss -tulnp
State       Recv-Q Send-Q                                 Local Address:Port                                                Peer Address:Port
LISTEN      0      128                                                *:80                                                             *:*
LISTEN      0      128                                                *:15090                                                          *:*
LISTEN      0      128                                        127.0.0.1:15000                                                          *:*
LISTEN      0      128                                                *:15001                                                          *:*
LISTEN      0      128                                                *:15006                                                          *:*
LISTEN      0      128                                             [::]:15020                                                       [::]:*

# Pod 内部的 iptables 表项
$ iptables-save
# Generated by iptables-save v1.4.21 on Fri Sep 17 13:47:09 2021
*nat
:PREROUTING ACCEPT [129886:7793160]
:INPUT ACCEPT [181806:10908360]
:OUTPUT ACCEPT [53409:3257359]
:POSTROUTING ACCEPT [53472:3261139]
:istio_INBOUND - [0:0]
:istio_IN_REDIRECT - [0:0]
:istio_OUTPUT - [0:0]
:istio_REDIRECT - [0:0]
-A PREROUTING -p tcp -j istio_INBOUND
-A OUTPUT -p tcp -j istio_OUTPUT
-A istio_INBOUND -p tcp -m tcp --dport 22 -j RETURN
-A istio_INBOUND -p tcp -m tcp --dport 15020 -j RETURN
-A istio_INBOUND -p tcp -j istio_IN_REDIRECT
-A istio_IN_REDIRECT -p tcp -j REDIRECT --to-ports 15006
-A istio_OUTPUT -s 127.0.0.6/32 -o lo -j RETURN
-A istio_OUTPUT ! -d 127.0.0.1/32 -o lo -j istio_IN_REDIRECT
-A istio_OUTPUT -m owner --uid-owner 1337 -j RETURN
-A istio_OUTPUT -m owner --gid-owner 1337 -j RETURN
-A istio_OUTPUT -d 127.0.0.1/32 -j RETURN
-A istio_OUTPUT -j istio_REDIRECT
-A istio_REDIRECT -p tcp -j REDIRECT --to-ports 15001
COMMIT
# Completed on Fri Sep 17 13:47:09 2021
istio-proxy 收到流量后,大致的处理步骤如下:
- Proxy 在 ALLOW_ANY 模式下没有匹配上 listener 将被直接转发
- listener 关联了 type 为 ORIGINAL_DST 的 cluster 将使用原始请求种的 IP 地址
- 匹配上了 BlackHoleCluster,将不会被转发
被代理流量的匹配步骤大致如下:
疑问:isito 为 svc 创建的 listener 地址是全零的,集群内部的端口是会存在复用的,那 istio 到底是怎么区分流量的呢?
关键就在于 route,route 由 virtual_host 条目组成,这些 virtual_host 条目就是根据 svc 的信息生成的,访问集群内部的 svc 时,在 route 里可以根据域名或者 svc 对应的 virtual_ip 进行精确匹配,所以完全不需要担心啦。
$ kubectl get svc -A | grep 8001
NodePort    10.233.34.158           8001:30333/TCP                                                                                                                               8d
NodePort    10.233.9.105            8001:31717/TCP                                                                                                                               8d
NodePort    10.233.60.59            8001:31135/TCP                                                                                                                               2d16h
NodePort    10.233.18.212           8001:32407/TCP                                                                                                                               8d
NodePort    10.233.15.5             8001:30079/TCP                                                                                                                               8d
NodePort    10.233.59.21            8001:31103/TCP                                                                                                                               8d
NodePort    10.233.17.123           8001:31786/TCP                                                                                                                               8d
NodePort    10.233.9.196            8001:32662/TCP                                                                                                                               8d
NodePort    10.233.62.85            8001:32104/TCP                                                                                                                               8d
ClusterIP     10.233.49.245           8000/TCP,8001/TCP,8443/TCP,8444/TCP
这是 route 下的 virtual_host 条目:
    {
        "name": "8001",
        "virtualHosts": [
            {
                "name": "merchant-center.open.svc.cluster.local:8001",
                "domains": [
                    "merchant-center.open.svc.cluster.local",
                    "merchant-center.open.svc.cluster.local:8001",
                    "merchant-center.open",
                    "merchant-center.open:8001",
                    "merchant-center.open.svc.cluster",
                    "merchant-center.open.svc.cluster:8001",
                    "merchant-center.open.svc",
                    "merchant-center.open.svc:8001",
                    "10.233.60.59",
                    "10.233.60.59:8001"
                ],
                "routes": [
                    {
                        "name": "default",
                        "match": {
                            "prefix": "/"
                        },
                        "route": {
                            "cluster": "outbound|8001||merchant-center.open.svc.cluster.local",
                            "timeout": "0s",
                            "retryPolicy": {
                                "retryOn": "connect-failure,refused-stream,unavailable,cancelled,resource-exhausted,retriable-status-codes",
                                "numRetries": 2,
                                "retryHostPredicate": [
                                    {
                                        "name": "envoy.retry_host_predicates.previous_hosts"
                                    }
                                ],
                                "hostSelectionRetryMaxAttempts": "5",
                                "retriableStatusCodes": [
                                    503
                                ]
                            },
                            "maxGrpcTimeout": "0s"
                        },
…………………
{
                "name": "cashier-busi-svc.pay.svc.cluster.local:8001",
                "domains": [
                    "cashier-busi-svc.pay.svc.cluster.local",
                    "cashier-busi-svc.pay.svc.cluster.local:8001",
                    "cashier-busi-svc.pay",
                    "cashier-busi-svc.pay:8001",
                    "cashier-busi-svc.pay.svc.cluster",
                    "cashier-busi-svc.pay.svc.cluster:8001",
                    "cashier-busi-svc.pay.svc",
                    "cashier-busi-svc.pay.svc:8001",
                    "10.233.17.123",
                    "10.233.17.123:8001"
                ],
…………………
            {
                "name": "center-job.manager.svc.cluster.local:8001",
                "domains": [
                    "center-job.manager.svc.cluster.local",
                    "center-job.manager.svc.cluster.local:8001",
                    "center-job.manager",
                    "center-job.manager:8001",
                    "center-job.manager.svc.cluster",
                    "center-job.manager.svc.cluster:8001",
                    "center-job.manager.svc",
                    "center-job.manager.svc:8001",
                    "10.233.34.158",
                    "10.233.34.158:8001"
                ],
……………
问题分析
基于以上信息,对集群内的 svc 进行端口过滤,终于发现了集群中存在使用了 7000 端口的 service:
istio 会为 10.233.0.115:7000 自动生成一个 0.0.0.0:7000 的 listener:
ADDRESS      PORT     TYPE
0.0.0.0         7000      TCP
查看详细配置信息,在该 listener 中对于 tcp 流量是不转发(BlackHoleCluster),所以目标地址为 10.0.x.x:7000 的流量被 listener_0.0.0.0:7000 匹配到时,因为是 tcp 的流量(nc 命令默认 tcp 协议),所以代理没有对该流量进行转发。这与开头提到的 pod 没有流量发出来现象一致。
{
     "name": "0.0.0.0_7000",
     "address": {
        "socketAddress": {
        "address": "0.0.0.0",
        "portValue": 7000
        }
     },
     "filterChains": [
       {
          "filterChainMatch": {
          "prefixRanges": [
             {
                "addressPrefix": "10.64.x.x",
                "prefixLen": 32
              }
           ]
        },
     "filters": [
       {
          "name": "envoy.tcp_proxy",
          "typedConfig": {
            "@type": "type.googleapis.com/envoy.config.filter.network.tcp_proxy.v2.TcpProxy",
            "statPrefix": "BlackHoleCluster",
            "cluster": "BlackHoleCluster"
            }
          }
        ]
}
至于 7001-7003 为什么能通,是因为 istio-proxy 默认使用的是 ALLOW_ANY 模式,对于没有匹配上 listener 的流量是直接放行。可以通过 istio_configmap 配置信息来验证一下:
$ kubectl get cm istio -n istio-system -o yaml | grep -i -w -a3 "mode"
    # REGISTRY_ONLY - restrict outbound traffic to services defined in the service registry as well
    #   as those defined through ServiceEntries
    outboundTrafficPolicy:
      mode: ALLOW_ANY
    localityLbSetting:
      enabled: true
    # The namespace to treat as the administrative root namespace for istio
--
      drainDuration: 45s
      parentShutdownDuration: 1m0s
      #
      # The mode used to redirect inbound connections to Envoy. This setting
      # has no effect on outbound traffic: iptables REDIRECT is always used for
      # outbound connections.
      # If "REDIRECT", use iptables REDIRECT to NAT and redirect to Envoy.
      # The "REDIRECT" mode loses source addresses during redirection.
      # If "TPROXY", use iptables TPROXY to redirect to Envoy.
      # The "TPROXY" mode preserves both the source and destination IP
      # addresses and ports, so that they can be used for advanced filtering
      # and manipulation.
      # The "TPROXY" mode also configures the Sidecar to run with the
      # CAP_NET_ADMIN capability, which is required to use TPROXY.
      #interceptionMode: REDIRECT
      #
解决方案
最后我们来解决开头提到的问题,总共有三种解决方案。
方法 1:Service Entry
服务条目(Service Entry)是 istio 重要的资源对象之一,作用是将外部的资源注册到 istio 内部的网格服务中来,以提供网格内对外部资源的更加精细化的控制。我们可以简单理解为白名单,istios 根据 Service Entry 的内容生成 listeners。
我们在命名空间 dev-self-pc-ct 中添加如下配置:
$ kubectl apply -f - <查看 listener:
$ ./istioctl proxy-config listeners test-8c4c9dcb9-kpm8n.dev-self --address 10.0.x.x -o json

[
    {
        "name": "10.0.x.x_7000",
        "address": {
            "socketAddress": {
                "address": "10.0.x.x",
                "portValue": 7000
            }
        },
        "filterChains": [
            {
                "filters": [
                    {
                        "name": "mixer",
                        "typedConfig": {
                            "@type": "type.googleapis.com/istio.mixer.v1.config.client.TcpClientConfig",
                            "transport": {
                                "networkFailPolicy": {
                                    "policy": "FAIL_CLOSE",
                                    "baseRetryWait": "0.080s",
                                    "maxRetryWait": "1s"
                                },
                                "checkCluster": "outbound|9091||istio-policy.istio-system.svc.cluster.local",
                                "reportCluster": "outbound|9091||istio-telemetry.istio-system.svc. cluster.local",
                                "reportBatchMaxEntries": 100,
                                "reportBatchMaxTime": "1s"
                            },
                            "mixerAttributes": {
                                "attributes": {
                                    "context.proxy_version": {
                                        "stringValue": "1.4.8"
                                    },
                                    "context.reporter.kind": {
                                        "stringValue": "outbound"
                                    },
                                    "context.reporter.uid": {
                                        "stringValue": "kubernetes://test-8c4c9dcb9-kpm8n.dev-self"
                                    },
                                    "destination.service.host": {
                                        "stringValue": "redis"
                                    },
                                    "destination.service.name": {
                                        "stringValue": "redis"
                                    },
                                    "destination.service.namespace": {
                                        "stringValue": "dev-self "
                                    },
                                    "source.namespace": {
                                        "stringValue": "dev-self "
                                    },
                                    "source.uid": {
                                        "stringValue": "kubernetes://test-8c4c9dcb9-kpm8n.dev-self"
                                    }
                                }
                            },
                            "disableCheckCalls": true
                        }
                    },
                    {
                        "name": "envoy.tcp_proxy",
                        "typedConfig": {
                            "@type": "type.googleapis.com/envoy.config.filter.network.tcp_proxy.v2.TcpProxy",
                            "statPrefix": "outbound|7000||redis",
                            "cluster": "outbound|7000||redis"
                        }
                    }
                ]
            }
        ],
        "deprecatedV1": {
            "bindToPort": false
        },
        "listenerFiltersTimeout": "0.100s",
        "continueOnListenerFiltersTimeout": true,
        "trafficDirection": "OUTBOUND"
    },
    ......
]
我们可以看到 listener "10.0.1.6_7000" 中 tcp 流量关联了 outbound|7000||redis 集群,该集群的类型是 ORIGINAL_DST,即保持源报文的目的地址,并且没有关联任何 service。
所以此时访问 10.0.x.x:7000 的目标地址不会改变。
{
    "name": "outbound|7000||redis",
    "type": "ORIGINAL_DST",
    "connectTimeout": "10s",
    "lbPolicy": "CLUSTER_PROVIDED",
    "circuitBreakers": {
    "thresholds": [
       {
          "maxConnections": 4294967295,
          "maxPendingRequests": 4294967295,
          "maxRequests": 4294967295,
          "maxRetries": 4294967295
       }
     ]
  }
}
再次访问测试:
$ nc 10.0.0.6 7000
keys *
-NOAUTH Authentication required.

$ nc 10.0.0.7 7000
keys *
-NOAUTH Authentication required.

$ nc 10.0.0.8 7000
keys *
-NOAUTH Authentication required.
已经可以正常转发。
方法 2:更改 global.proxy.includeIPRanges 或 global.proxy.excludeIPRanges 配置选项
- global.proxy.includeIPRanges:需要进行代理 ip 地址范围
- global.proxy.excludeIPRanges:不需要进行代理的 ip 地址范围。
最终效果为在 pod 的 iptables 规则上匹配或排除对应的地址,访问这些地址流量不会被重定向到 istio-proxy,而是直接发送。
我们可以使用 kubectl apply 命令更新 istio-Sidecar-injector 配置,也可以修改 spec. template.metadata. annotations 中的 traffic.Sidecar.istio.io/includeOutboundIPRanges 来达到相同的效果。
  template:
    metadata:
      annotations:
        kubectl.kubernetes.io/restartedAt: '2021-06-09T21:59:10+08:00'
        kubesphere.io/restartedAt: '2021-09-13T17:07:03.082Z'
        logging.kubesphere.io/logSidecar-config: '{}'
        Sidecar.istio.io/componentLogLevel: 'ext_authz:trace,filter:debug'
        Sidecar.istio.io/inject: 'true'
        traffic.Sidecar.istio.io/excludeOutboundIPRanges: 10.0.1.0/24
Pod 里的 iptables 规则会将目标地址为 10.0.x.x/24 的流量正常转发:
# Generated by iptables-save v1.4.21 on Fri Sep 17 14:26:10 2021
*nat
:PREROUTING ACCEPT [131058:7863480]
:INPUT ACCEPT [183446:11006760]
:OUTPUT ACCEPT [53889:3286544]
:POSTROUTING ACCEPT [53953:3290384]
:istio_INBOUND - [0:0]
:istio_IN_REDIRECT - [0:0]
:istio_OUTPUT - [0:0]
:istio_REDIRECT - [0:0]
-A PREROUTING -p tcp -j istio_INBOUND
-A OUTPUT -p tcp -j istio_OUTPUT
-A istio_INBOUND -p tcp -m tcp --dport 22 -j RETURN
-A istio_INBOUND -p tcp -m tcp --dport 15020 -j RETURN
-A istio_INBOUND -p tcp -j istio_IN_REDIRECT
-A istio_IN_REDIRECT -p tcp -j REDIRECT --to-ports 15006
-A istio_OUTPUT -s 127.0.0.6/32 -o lo -j RETURN
-A istio_OUTPUT ! -d 127.0.0.1/32 -o lo -j istio_IN_REDIRECT
-A istio_OUTPUT -m owner --uid-owner 1337 -j RETURN
-A istio_OUTPUT -m owner --gid-owner 1337 -j RETURN
-A istio_OUTPUT -d 127.0.0.1/32 -j RETURN
-A istio_OUTPUT -d  10.0.0.0/24  -j RETURN
-A istio_OUTPUT -j istio_REDIRECT
-A istio_REDIRECT -p tcp -j REDIRECT --to-ports 15001
COMMIT
# Completed on Fri Sep 17 14:26:10 2021
方法 3:用 Service 打败 Service
这个方法基于 istio 会为集群中的 svc 自动生成 listener 的工作方式,手动在集群中为外部服务创建 service 和 endpoints:
apiVersion: v1
kind: Endpoints
metadata:
  name: rediscluster
  labels:
    name: rediscluster
    app: redis-jf
    user: jf
  namespace: dev-self
subsets:
  - addresses:
      - ip: 10.0.x.x
      - ip: 10.0.x.x
      - ip: 10.0.x.x
    ports:
      - name: tcp-7000
        port: 7000
      - name: tcp-7001
        port: 7001
      - name: tcp-7002
        port: 7002
      - name: tcp-7003
        port: 7003
---
apiVersion: v1
kind: Service
metadata:
  name: rediscluster
  namespace: dev-self
spec:
  ports:
  - name: tcp-7000
    protocol: TCP
    port: 7000
    targetPort: 7000
  - name: tcp-7001
    protocol: TCP
    port: 7001
    targetPort: 7001
  - name: tcp-7002
    protocol: TCP
    port: 7002
    targetPort: 7002
  - name: tcp-7003
    protocol: TCP
    port: 7003
    targetPort: 7003
  selector:
    name: rediscluster
    app: redis-jf
    user: jf
应用以上配置后 istio 会自动生成一个 service_ip+port 的 listener。Service 信息如下:
Selector:          app=redis-jf,name=rediscluster,user=jf
Type:              ClusterIP
IP:                10.233.40.115
Port:              tcp-7000  7000/TCP
TargetPort:        7000/TCP
Endpoints:
Port:              tcp-7001  7001/TCP
TargetPort:        7001/TCP
Endpoints:
Port:              tcp-7002  7002/TCP
TargetPort:        7002/TCP
Endpoints:
Port:              tcp-7003  7003/TCP
TargetPort:        7003/TCP
Endpoints:
Session Affinity:  None
Events:
Listener 部分信息如下:
{
   "name": "10.233.59.159_7000",
   "address": {
      "socketAddress": {
         "address": "10.233.59.159",
         "portValue": 7000
         }
     },
      "filterChains": [
          {
             "filters": [
                 {
                   "name": "mixer",
                   "typedConfig": {
                     "@type": "type.googleapis.com/istio.mixer.v1.config.client.TcpClientConfig",
                     "transport": {
                       "networkFailPolicy": {
                          "policy": "FAIL_CLOSE",
                          "baseRetryWait": "0.080s",
                          "maxRetryWait": "1s"
                        },
                     "checkCluster": "outbound|9091||istio-policy.istio-system.svc.cluster.local",
                     "reportCluster": "outbound|9091||istio-telemetry.istio-system.svc.cluster.local",
                     "reportBatchMaxEntries": 100,
                     "reportBatchMaxTime": "1s"
                   },
                   "mixerAttributes": {
                      "attributes": {
                         "context.proxy_version": {
                         "stringValue": "1.4.8"
                     },
......
该 listener 指向了一个 cluster:
{
  "name": "envoy.tcp_proxy",
  "typedConfig": {
      "@type": "type.googleapis.com/envoy.config.filter.network.tcp_proxy.v2.TcpProxy",
      "statPrefix": "outbound|7000||redis",
      "cluster": "outbound|7000||redis"
    }
}
对应的 service 信息如下:
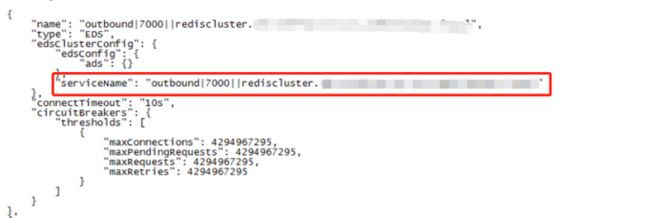
可以看到 endpoint 就是刚才我们指定的外部服务器地址:
进行访问测试:
已经可以正常访问了。
总结
最后我们来比较一下这三种方法。
- 方法 1:通过添加 ServiceEntry,以允许访问外部服务。可以让你使用 istio 服务网格所有的功能去调用集群内或集群外的服务,这是官方推荐的方法。
- 方法 2:直接绕过了 istio Sidecar 代理,使你的服务可以直接访问任意的外部服务。 但是,以这种方式配置代理需要了解集群提供商相关知识和配置。将失去对外部服务访问的监控,并且无法将 istio 功能应用于外部服务的流量。
- 方法 3:这个方法相对于其他两种,配置有点复杂,同时还要通过 service 的方式来访问外部服务,这意味着对于已经存在的应用需要进行改造。具体能否实施看实际情况。
方法 1 的做法类似于“白名单”,不但能达到访问外部服务的目的,并且可以像集群内部服务一样对待(可使用 istio 的流量控制功能)。另外,即使服务受到入侵,由于“白名单”的设置入侵者也无法(或较难)将流量回传到入侵机器,进一步保证了服务的安全性;
方法 2 直接绕过了 istio Sidecar 代理,使你的服务可以直接访问任意的外部服务。 但是,以这种方式配置代理需要了解集群提供商相关知识和配置。 你将失去对外部服务访问的监控,并且无法将 istio 功能应用于外部服务的流量;
方法 3 虽然也可以使用 istio 的流量控制功能来管理外部流量,但是在实际操作中会存在配置复杂、改造应用等问题
因此,强烈推荐大家使用方法一。最后,特别提醒一下大家。将 includeOutboundIPRanges 设置为空是有问题的,这相当于将所有的服务都配置代理绕行,那 Sidecar 就没起作用了,没了 Sidecar 的 istio 就没有灵魂了。。
本文由博客一文多发平台 OpenWrite 发布!


