R语言基础操作(一): str_split,mutate,gather,dplyr,ggplot2
数据下载地址: votes and seats-2.csv
运行环境Rstudio
首先导入数据, 并且查看一些简单的信息:
votes.seats <- read.csv('votes and seats-2.csv', na.strings = '–', head = TRUE, sep=',')
dim(votes.seats)
head(votes.seats, 10) #查看前几行row, 默认6
tail(votes.seats, 8) #查看后几行
names(votes.seats) #显示列名称
会发现产生了两张表和一些数据:
纬度和列名称:

前10个

后8个

大致如上,na.strings=’-’ 的作用是把原表中’-’ 的部分已NA显示, head=TRUE的话,表头不会被当成数据,基本和python差不多的读取方式。
接下来我们向单独查看某一列的话就用$操作符, 比如votes.seats$election 就会只显示election那一列的数据。
接下来我们把election那一列的年月日给拆分,这里用到了str_split:
str_split(votes.seats$election, ' ', simplify = T)

会生成一个列数为4的矩阵,分别对应日月年以及选举这个词,这里就只显示前面几行了。simplify=T的作用是生成矩阵,不然会生成一个list。
接下来会用到mutate操作,其目的是可以在原表的尾部添加新的列。当然他也可以在原有的列上进行修改,只需要关键字是表中存在的即可,不存在的关键字则单独新增一列。
install.packages('tidyverse')
library(dplyr)
library(stringr)
library(tidyr)

votes.seats %>% #用了mutate函数之后,就会在csv文件后面添加新定义的列,列名称就在mutate里定义
  mutate(year = str_split(election, ' ', simplify = T)[, 3])
先下载一个package,并且导入几个library,后续会用到。
注意这里需要用到%>%操作符,个人感觉有点像java里的. 操作,即调用一个函数。在mutate函数中规定新列的名称是year,显示内容就为我们刚才得到的矩阵的第三列,即“年”。

可以看到vote.seats最后一列已经多了一列year了。
当然你还可以根据需求添加其他的列。
这里我们将增加其他几列,以做后续使用,分别是每个派的投票比例:
votes.seats <- votes.seats %>%
  mutate(year = str_split(election, ' ', simplify = T)[, 3],
         coalition.seat.share = coalition.seats / total.seats, #转换成百分比
         labor.seat.share = labor.seats / total.seats,
         other.seat.share = other.seats / total.seats,
         total.seat.share = coalition.seat.share + labor.seat.share + other.seat.share)
votes.seats
接下来是gather函数,他的作用是把实现类似key-value 一样的配对,比如该数据中分别有每一年,不同派(Coalition, Labor, Other)之间的投票比例, 我们希望他们每一个都和年份有一个单独的配对.
votes.seats%>%
  gather(party, seat.share,
         coalition.seat.share, labor.seat.share, other.seat.share)

这里看不懂没关系,可以发现表的行数变成了129,之前是43行,正好是3倍,即每一年,和每一个party都单独生成一行,所以每一年生成了三行。
继续使用dplyr 函数, 直接在上一个代码上操作即可,并且我们使用
a <- votes.seats%>%
  gather(party, seat.share,
         coalition.seat.share, labor.seat.share, other.seat.share) %>%
  dplyr::select(year, party, seat.share) %>% #这句是只选择这几列显示
  mutate(party = dplyr::recode(party, 'coalition.seat.share' = 'Coalition',
  'labor.seat.share' = 'Labor',
  'other.seat.share' = 'Other'))

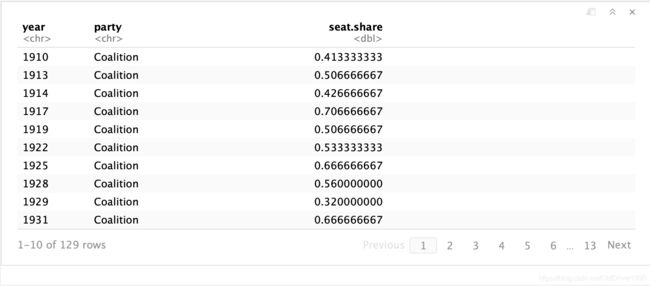
a

将该表计作a,他是关于年份,party,以及seat.share 的
使用dplyr::select 表示只选择这几列显示。
使用dplyr::recode 从新定义名称。
由于这里没有排序,他是先生成43个所有关于Coalition这一个party的,再是Labor的,最后是Other的。接下来我们将使他显示的更合理。
类似的,再生成一个关于vote.share 的表:
b <- votes.seats%>%
  gather(party, vote.share,
         coalition.pmy,
         labor.pmy,
         other.pmy) %>%
  dplyr::select(year, party, vote.share) %>% #这句是只选择这几列显示
  mutate(party = dplyr::recode(party, 'coalition.pmy' = 'Coalition',
                               'labor.pmy' = 'Labor',
                               'other.pmy' = 'Other'))
b
结果不再展示,和上一个表类似。
接下来使用merge函数,将两个表融合
pmy_vote_efficiency <- a%>%
  merge(b)
pmy_vote_efficiency

可以发现,现在这个表,将seat.share 和vote.share 融合到了一张表上了。
接下来使用绘图函数ggplot2 可视化他们之间(seat share, vote share)的关系
library(ggplot2)
library(scales)
ggplot(pmy_vote_efficiency, aes(x = vote.share, y = seat.share, colour = party))+
  geom_point()
ggplot(pmy_vote_efficiency)+
  geom_point(aes(x = vote.share, y = seat.share, colour = party))
使绘图内容更加丰富
ggplot(pmy_vote_efficiency, aes(x = vote.share, y = seat.share, colour = party))+
  geom_point()+
  geom_abline()+
  geom_smooth(method = 'glm', se=F)+
  scale_x_continuous(labels = percent)+
  scale_y_continuous(labels = percent)+
  scale_colour_manual(values = c('blue', 'red', 'purple'))+
  labs(title = 'Your plot title goes here',
       x = 'x-axis',
       y = 'y-axis')+
  theme_minimal()+
  theme(legend.title = element_blank(),
        legend.position = 'bottom')

使用geom_abline() 生成一条总体的回归线,geom_smooth 为每一类数据生成一条单独的线。
scale_x_continuous(labels = percent) 将坐标轴改成百分比显示。
