OpenCV笔记12——直方图均衡化、直方图计算以及相似度比较(附椒盐噪声添加方法)

OpenCV笔记12——直方图均衡化、直方图计算以及相似度比较(附椒盐噪声添加方法)_第1张图片

1.直方图均衡化API

OpenCV笔记12——直方图均衡化、直方图计算以及相似度比较(附椒盐噪声添加方法)_第2张图片

输入输出图像必须是单通道8位的图像!!!
可以在输入图像上直接进行操作;


2.单通道图像直方图均衡化

实验代码:

#include 
#include 

using namespace cv;
using namespace std;

int main()
{
     
	Mat img = imread("E:/image/flower2.jpg");
	if (img.empty())printf("Load Image Error");

	Mat img_gray,dst;
	cvtColor(img, img_gray, CV_BGR2GRAY);
	equalizeHist(img_gray, dst);

	imshow("src", img_gray);
	imshow("result", dst);
	waitKey(0);
}

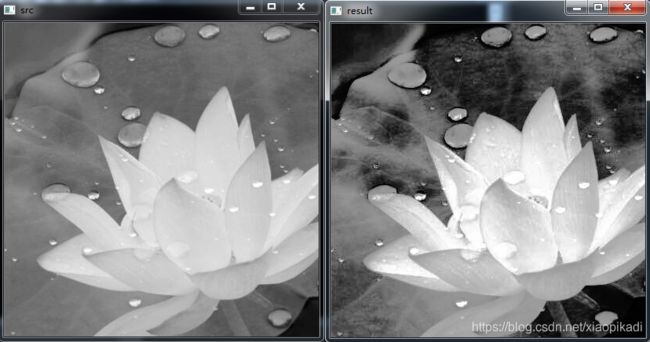
运行结果:
OpenCV笔记12——直方图均衡化、直方图计算以及相似度比较(附椒盐噪声添加方法)_第3张图片


3.彩色图像直方图均衡化

因为API只能输入输出单通道的图像,所以:
分离-均衡化-合并
1.首先将彩色图分离成3个通道(cv::split)
2.再分别对三个通道进行直方图均衡化;
3.最后再将3个均衡化之后的单通道图像合并;

实验代码:

#include 
#include 

using namespace cv;
using namespace std;

int main()
{
     
	Mat dst,img = imread("E:/image/bubble.jpg");
	if (img.empty())printf("Load Image Error");

	//直接对灰度图像进
	行均衡化
	/*
	Mat img_gray;
	cvtColor(img, img_gray, CV_BGR2GRAY);
	equalizeHist(img_gray, dst);
    */
	//分割通道
	vector<Mat>channels;
	split(img, channels);

	Mat blue, green, red;
	blue  = channels.at(0);
	green = channels.at(1);
	red   = channels.at(2);
	//分别对BGR通道做直方图均衡化
	equalizeHist(blue, blue);
	equalizeHist(green, green);
	equalizeHist(red, red);
	//合并通道
	merge(channels, dst);

	imshow("src", img);
	imshow("result", dst);
	waitKey(0);
}

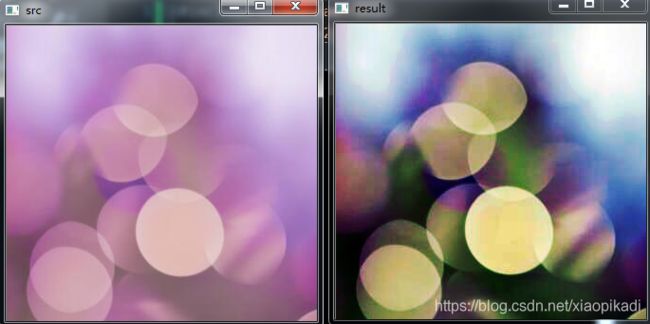
运行结果:
OpenCV笔记12——直方图均衡化、直方图计算以及相似度比较(附椒盐噪声添加方法)_第4张图片


4.绘制直方图

4.1计算直方图

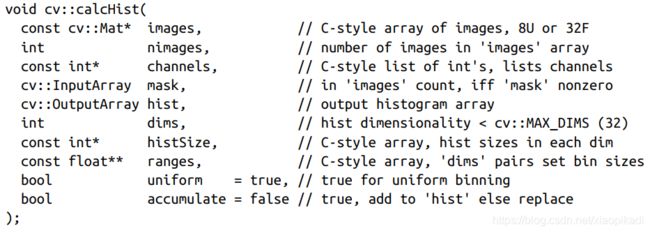
相关API
OpenCV笔记12——直方图均衡化、直方图计算以及相似度比较(附椒盐噪声添加方法)_第5张图片

4.2绘制直方图

4.2.1实验代码

#include 
#include 

using namespace cv;
using namespace std;

int main()
{
     
	Mat dst, img = imread("E:/image/girl2.jpg");
	if (img.empty())printf("Load Image Error");

	//1.分通道显示
	vector<Mat> Channel;
	split(img, Channel);

	//2.计算直方图
	int histsize = 128;
	float range[] = {
      0, 256 };
	const float *histRanges[] = {
      range };
	Mat b_hist, g_hist, r_hist;
	calcHist(&Channel[0], 1, 0, Mat(), b_hist, 1, &histsize, histRanges, true, false);
	calcHist(&Channel[1], 1, 0, Mat(), g_hist, 1, &histsize, histRanges, true, false);
	calcHist(&Channel[2], 1, 0, Mat(), r_hist, 1, &histsize, histRanges, true, false);
	int sum=0;
	for (int k = 0; k < 128; k++)
	{
     
		sum += b_hist.at<float>(k);
		cout << b_hist.at<float>(k) << endl;
	}
	cout << "----------------------------------" << endl;
	cout << img.rows*img.cols << endl;//输出原图像总像素
	cout << "----------------------------------" << endl;
	cout << sum << endl;//输出蓝色通道统计个数总和
	
	//3.归一化
	int hist_h = 400;//直方图的图像的高
	int hist_w = 512; //直方图的图像的宽
	int bin_w = hist_w / histsize;//直方图的等级
	Mat histImage(hist_h, hist_w, CV_8UC3, Scalar(0, 0, 0));//绘制直方图显示的图像
	//归一化,输入图像,输出图像,归一化的取值范围(0, hist_h)
	normalize(b_hist, b_hist, 0, hist_h, NORM_MINMAX, -1, Mat());
	normalize(g_hist, g_hist, 0, hist_h, NORM_MINMAX, -1, Mat());
	normalize(r_hist, r_hist, 0, hist_h, NORM_MINMAX, -1, Mat());


	//4.绘制直方图(render histogram chart)
	for (int i = 1; i < histsize; i++)
	{
     
		//绘制蓝色分量直方图    
		line(histImage, Point((i - 1)*bin_w, hist_h - cvRound(b_hist.at<float>(i - 1))),
			Point((i)*bin_w, hist_h - cvRound(b_hist.at<float>(i))), Scalar(255, 0, 0), 2, CV_AA);
		//绘制绿色分量直方图
		line(histImage, Point((i - 1)*bin_w, hist_h - cvRound(g_hist.at<float>(i - 1))),
			Point((i)*bin_w, hist_h - cvRound(g_hist.at<float>(i))), Scalar(0, 255, 0), 2, CV_AA);
		//绘制红色分量直方图
		line(histImage, Point((i - 1)*bin_w, hist_h - cvRound(r_hist.at<float>(i - 1))),
			Point((i)*bin_w, hist_h - cvRound(r_hist.at<float>(i))), Scalar(0, 0, 255), 2, CV_AA);
	}

	imshow("src", img);
	imshow("result", histImage);
	waitKey(0)
}

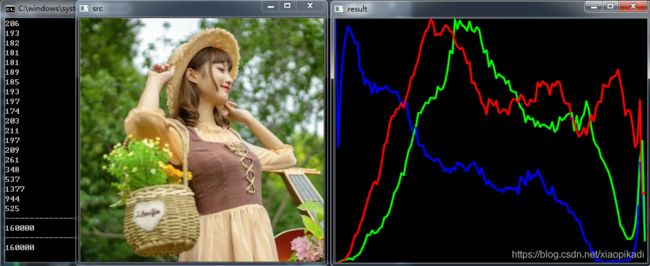
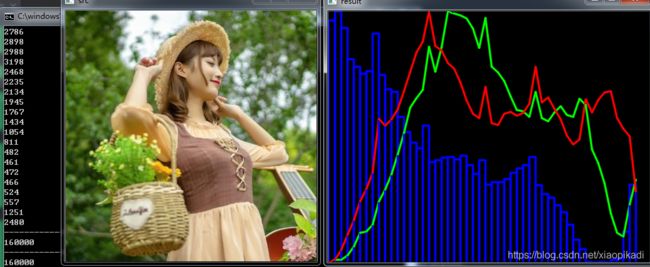
4.2.2运行结果

OpenCV笔记12——直方图均衡化、直方图计算以及相似度比较(附椒盐噪声添加方法)_第6张图片
当然想画成下面这样也是可以的:
OpenCV笔记12——直方图均衡化、直方图计算以及相似度比较(附椒盐噪声添加方法)_第7张图片

	//绘制蓝色分量直方图    
	line(histImage, Point((i-1)*bin_w, hist_h),Point((i-1)*bin_w, hist_h - cvRound(b_hist.at<float>(i))), Scalar(255, 0, 0), 2, CV_AA);
	line(histImage, Point((i - 1)*bin_w, hist_h - cvRound(b_hist.at<float>(i))),Point((i)*bin_w, hist_h - cvRound(b_hist.at<float>(i))), Scalar(255, 0, 0), 2, CV_AA);
	line(histImage, Point((i)*bin_w, hist_h - cvRound(b_hist.at<float>(i))),Point((i)*bin_w, hist_h), Scalar(255, 0, 0), 2, CV_AA);

5.根据直方图比较两幅图像的相似度

5.1相关API

OpenCV笔记12——直方图均衡化、直方图计算以及相似度比较(附椒盐噪声添加方法)_第8张图片
注意:
1.两个输入图像的大小必须相同!
2.四种method,如下:

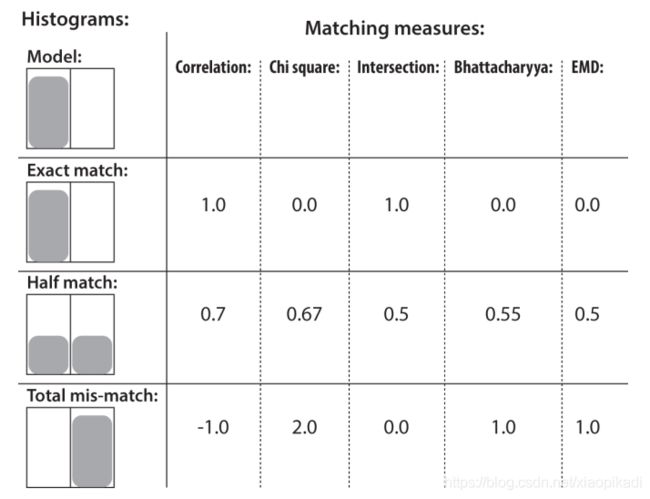
第一种:cv::COMP_CORREL(相关性比较)

值越大,匹配度越高;完美匹配值为1,完全不匹配值为-1,值为0时表示不相关;
OpenCV笔记12——直方图均衡化、直方图计算以及相似度比较(附椒盐噪声添加方法)_第9张图片
第二种:cv::COMP_CHISQR_ALT(卡方比较)

值越小,匹配度越高;完美匹配值为0,完全不匹配值为1;
(前提:图像直方图均衡化后的结果已进行归一化)
OpenCV笔记12——直方图均衡化、直方图计算以及相似度比较(附椒盐噪声添加方法)_第10张图片
第三种:cv::COMP_INTERSECT(十字交叉)

值越大,匹配度越高;完美匹配值为1,完全不匹配值为0;
(前提:图像直方图均衡化后的结果已进行归一化)
OpenCV笔记12——直方图均衡化、直方图计算以及相似度比较(附椒盐噪声添加方法)_第11张图片
第四种:cv::COMP_BHATTACHARYYA(巴氏距离)

值越小,匹配度越高;完美匹配值为0,完全不匹配值为1;
OpenCV笔记12——直方图均衡化、直方图计算以及相似度比较(附椒盐噪声添加方法)_第12张图片
直方图匹配方法示意图:
OpenCV笔记12——直方图均衡化、直方图计算以及相似度比较(附椒盐噪声添加方法)_第13张图片


5.2步骤

1.将输入图像转换为HSV色彩空间;
2.计算直方图,归一化;
3.比较直方图;

我的第一个疑问:为什么要将图像转换到HSV色彩空间呢?

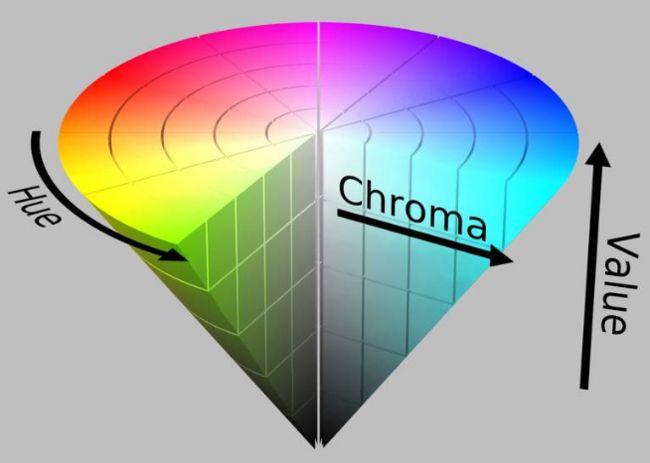
首先我弱弱的查了一下什么是HSV色彩空间…

参考链接:https://zhuanlan.zhihu.com/p/67930839
OpenCV笔记12——直方图均衡化、直方图计算以及相似度比较(附椒盐噪声添加方法)_第14张图片

然后又看了一下参考手册,大概意思就是说RGB对图像的亮度非常敏感,但是在HSV空间中能够很好的避开亮度的影响,如下图是OpenCV参考手册中的一个示意图:
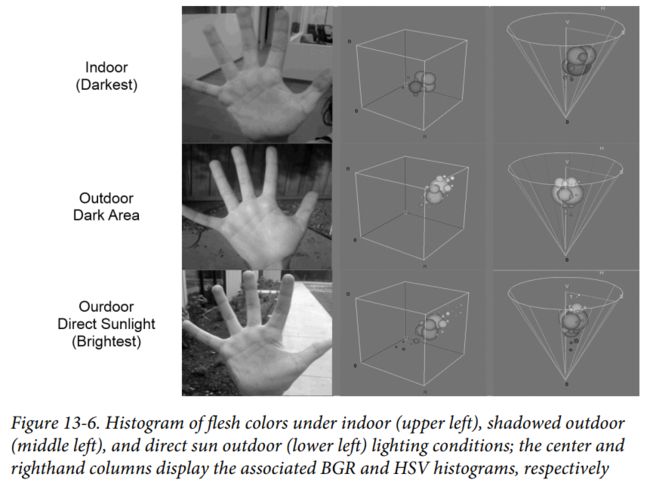
OpenCV笔记12——直方图均衡化、直方图计算以及相似度比较(附椒盐噪声添加方法)_第15张图片

The left column shows images of a hand in an indoor environment, a shaded outdoor environment, and a sunlitoutdoor environment.

In the middle column are the blue, green, and red (BGR) histograms corresponding to the observed flesh tone of the hand.

In the right column are the corresponding HSV histograms, where the vertical axis is V (value), the radius is S (saturation), and the angle is H (hue). Notice that indoors is the darkest, outdoors in shadow is a bit brighter, and outdoors in the sun is the brightest. Note also that the colors shift somewhat as a result of the changing color of the illuminating light.

——摘自Learning OpenCV3参考手册原文


5.3实验代码

#include 
#include 

using namespace cv;
using namespace std;
string convertToString(double d);

int main()
{
     
	Mat base, test1, test2;
	Mat hsvbase, hsvtest1, hsvtest2;
	base = imread("E:/image/dog.jpg");
	test1 = imread("E:/image/dog0.jpg");
	test2 = imread("E:/image/dog1.jpg");
	if (base.empty() || test1.empty() || test2.empty())
	{
     
		printf("Load Image Error"); 
		return -1;
	}

	//步骤一:从RGB空间转换到HSV空间
	cvtColor(base, hsvbase, CV_BGR2HSV);
	cvtColor(test1, hsvtest1, CV_BGR2HSV);
	cvtColor(test2, hsvtest2, CV_BGR2HSV);

	//步骤二:计算直方图与归一化
	int h_bins = 50;
	int s_bins = 60;
	int histsize[] = {
      h_bins, s_bins };
	//hue varies from 0 to 179,saturation from 0 to 255
	float h_ranges[] = {
      0, 180 };
	float s_ranges[] = {
      0, 256 };
	const float*histRanges[] = {
      h_ranges, s_ranges };
	//use the 0-th and 1-st channels
	int channels[] = {
      0, 1 };
	MatND hist_base;
	MatND hist_test1;
	MatND hist_test2;
	//计算直方图
	calcHist(&hsvbase, 1, channels, Mat(), hist_base, 2, histsize, histRanges, true, false);
	calcHist(&hsvtest1, 1, channels, Mat(), hist_test1, 2, histsize, histRanges, true, false);
	calcHist(&hsvtest2, 1, channels, Mat(), hist_test2, 2, histsize, histRanges, true, false);

	//归一化
	normalize(hist_base, hist_base, 0, 1, NORM_MINMAX, -1, Mat());//归一化
	normalize(hist_test1, hist_test1, 0, 1, NORM_MINMAX, -1, Mat());
	normalize(hist_test2, hist_test2, 0, 1, NORM_MINMAX, -1, Mat());

	//步骤三:比较直方图,并返回值
	double basebase = compareHist(hist_base, hist_base, CV_COMP_BHATTACHARYYA);//比较直方图
	double basetest1 = compareHist(hist_base, hist_test1, CV_COMP_BHATTACHARYYA);
	double basetest2 = compareHist(hist_base, hist_test2, CV_COMP_BHATTACHARYYA);
	//printf("test1 with test2 correlation value :%f", test1test2);

	//在原图中显示相关性参数
	putText(base, convertToString(basebase), Point(50, 50), CV_FONT_HERSHEY_COMPLEX, 1, Scalar(255, 0, 255), 2, CV_AA);
	putText(test1, convertToString(basetest1), Point(50, 50), CV_FONT_HERSHEY_COMPLEX, 1, Scalar(255, 0, 255), 2, CV_AA);
	putText(test2, convertToString(basetest2), Point(50, 50), CV_FONT_HERSHEY_COMPLEX, 1, Scalar(255, 0, 255), 2, CV_AA);

	namedWindow("base", CV_WINDOW_AUTOSIZE);
	namedWindow("test1", CV_WINDOW_AUTOSIZE);
	namedWindow("test2", CV_WINDOW_AUTOSIZE);

	imshow("base", base);
	imshow("test1", test1);
	imshow("test2", test2);

	waitKey(0);
	return 0;
}

//由于comparehist计算出来的相关性的值是一个double型,这个函数就是把double转变为string
string convertToString(double d)
{
     
	ostringstream os;
	if (os << d)
		return os.str();
	return "invalid conversion";
}

5.4运行结果

下图中的数字就是示例图像与原图(最左边)比较的结果;采用的的是巴氏距离的方法,所以是值越小匹配度越高;


6.给图像添加椒盐噪声

顺便学习了一下怎么在图像中椒盐噪声,方便平时的测试使用,这里的椒噪声指黑色像素点0,盐噪声指的是白色像素点255;

基本思路就是选取随机像素点然后改变其像素值为0或255即可;

6.1实验代码

Mat addSaltNoise(const Mat srcImage, int n)
{
     
	Mat dstImage = srcImage.clone();
	for (int k = 0; k < n; k++)
	{
     
		//随机取值行列
		int i = rand() % dstImage.rows;
		int j = rand() % dstImage.cols;
		//图像通道判定
		if (dstImage.channels() == 1)
		{
     
			dstImage.at<uchar>(i, j) = 255;		//盐噪声
		}
		else
		{
     
			dstImage.at<Vec3b>(i, j)[0] = 255;
			dstImage.at<Vec3b>(i, j)[1] = 255;
			dstImage.at<Vec3b>(i, j)[2] = 255;
		}
	}
	for (int k = 0; k < n; k++)
	{
     
		//随机取值行列
		int i = rand() % dstImage.rows;
		int j = rand() % dstImage.cols;
		//图像通道判定
		if (dstImage.channels() == 1)
		{
     
			dstImage.at<uchar>(i, j) = 0;		//椒噪声
		}
		else
		{
     
			dstImage.at<Vec3b>(i, j)[0] = 0;
			dstImage.at<Vec3b>(i, j)[1] = 0;
			dstImage.at<Vec3b>(i, j)[2] = 0;
		}
	}
	return dstImage;
}

6.2运行结果

参考文章链接:
1.https://blog.csdn.net/zhu_hongji/article/details/81663161
2.https://blog.csdn.net/qq_34784753/article/details/69379135

你可能感兴趣的:(机器视觉,1024程序员节)